Pololu Blog » User Profile: Patrick »
Posts by Patrick
You are currently viewing a selection of posts from the Pololu Blog. You can also view all the posts.
Popular tags: community projects new products raspberry pi arduino more…
We now offer UV printing and more metal laser cutting capabilities!
 |
I’m excited to share some exciting improvements to our Custom Laser Cutting Service: a greatly expanded range of metal cutting capabilities and UV printing!
Metal laser cutting
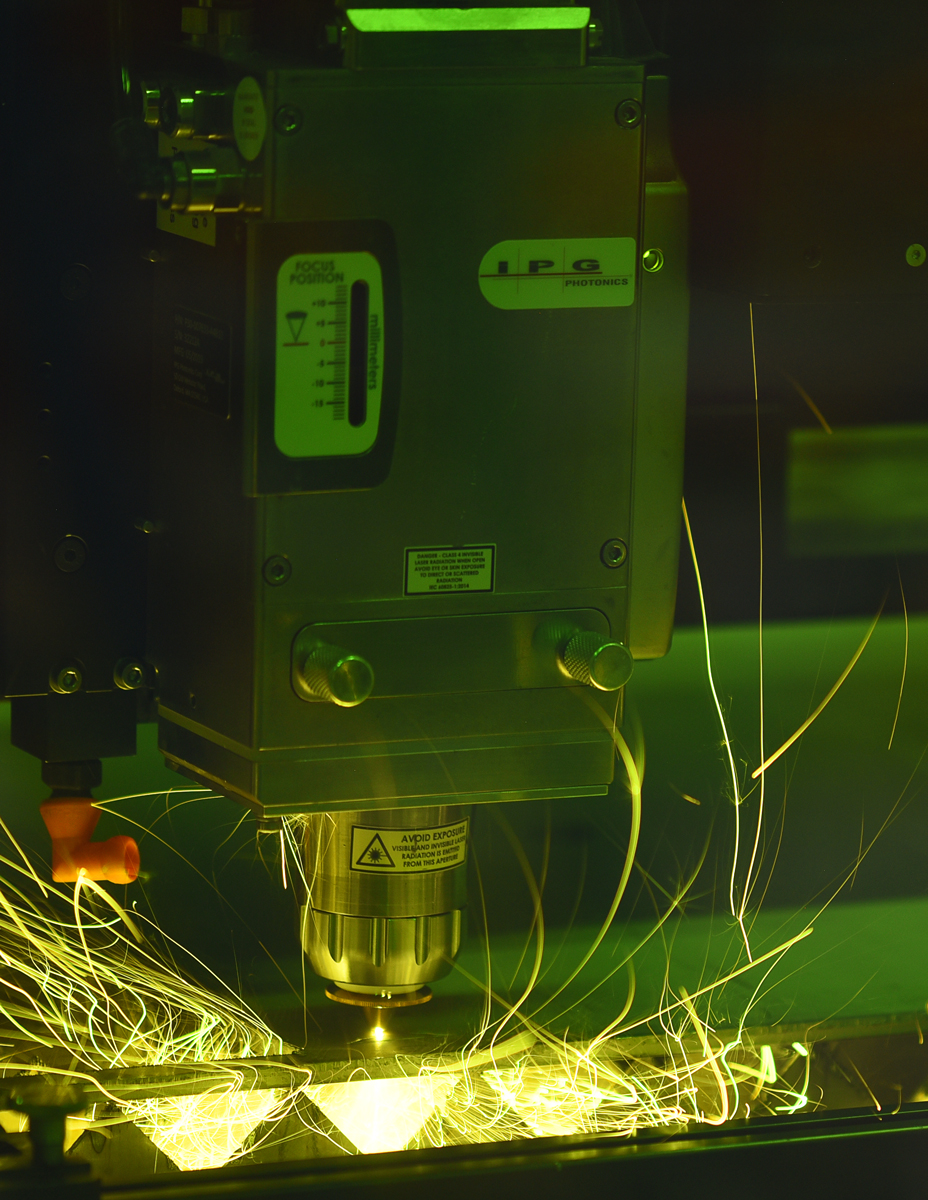
The last time we made a blog post about our laser cutting capabilities (over six years ago now), our most powerful machine was a 400 W CO2 laser cutter that could cut materials including plastics and woods up to 1″ (25.4 mm) thick, as well as steel up to 0.060″ (1.5 mm) thick. But we still weren’t satisfied with our metal cutting capabilities, so in the time since then, we have added an IPG Photonics LaserCube with a 3000 W fiber laser. The LaserCube is specifically designed to cut metals, enabling us to work with a wider variety of metals in thicknesses up to 1/4″ (6.35 mm).
|
|
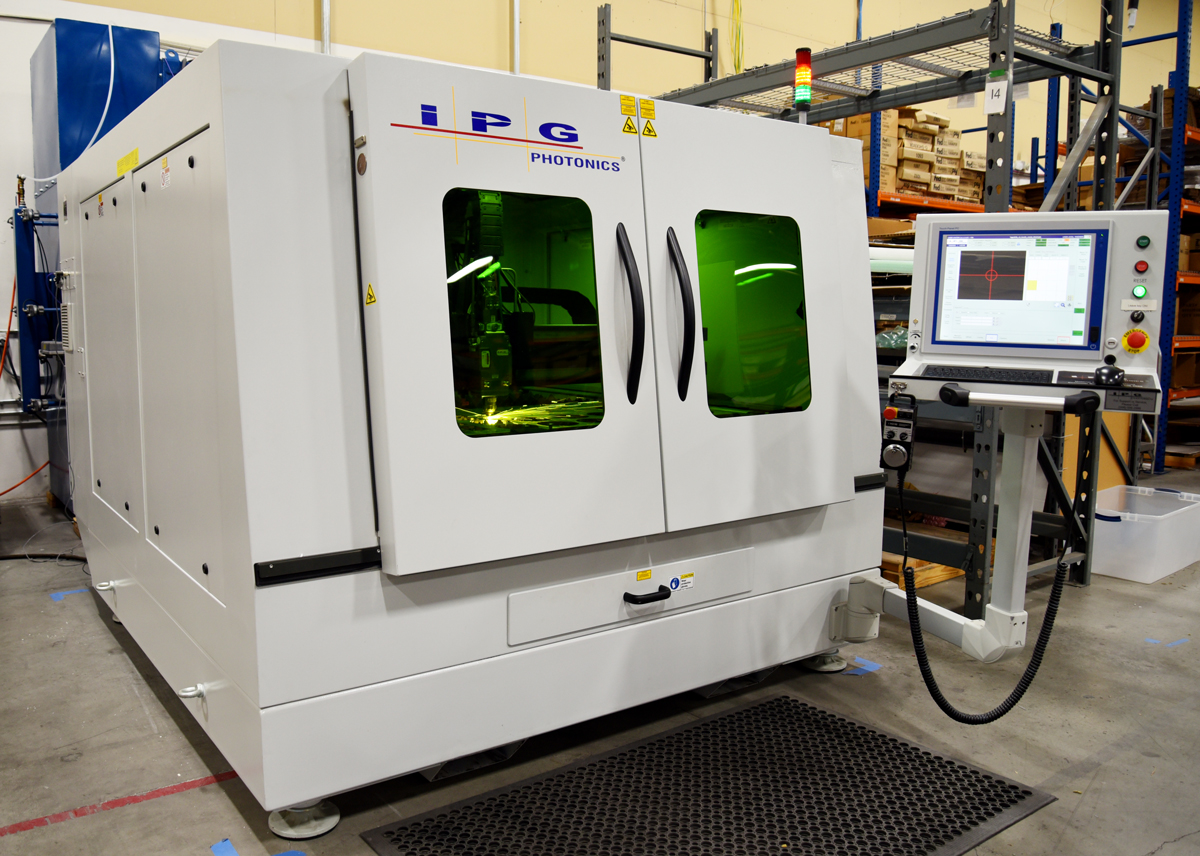
Jan briefly mentioned the LaserCube in a blog post back in March 2020 just after we finished installing it—and right as the world was locking down in response to the COVID-19 pandemic. With the disruptions first from pandemic and then from the subsequent global parts shortages, almost all of our efforts went into keeping daily operations going, and developing new processes for fundamentally new equipment like the LaserCube got put on the back burner. Fortunately, things have been gradually getting back to normal and we are now ready to officially announce the new metal cutting capabilities the LaserCube enables!
We can now cut:
- Steel up to 1/4″ (6.35 mm) thick
- Aluminum up to 1/4″ (6.35 mm) thick
- Brass up to 1/8″ (3.18 mm) thick
- Bronze up to 1/8″ (3.18 mm) thick
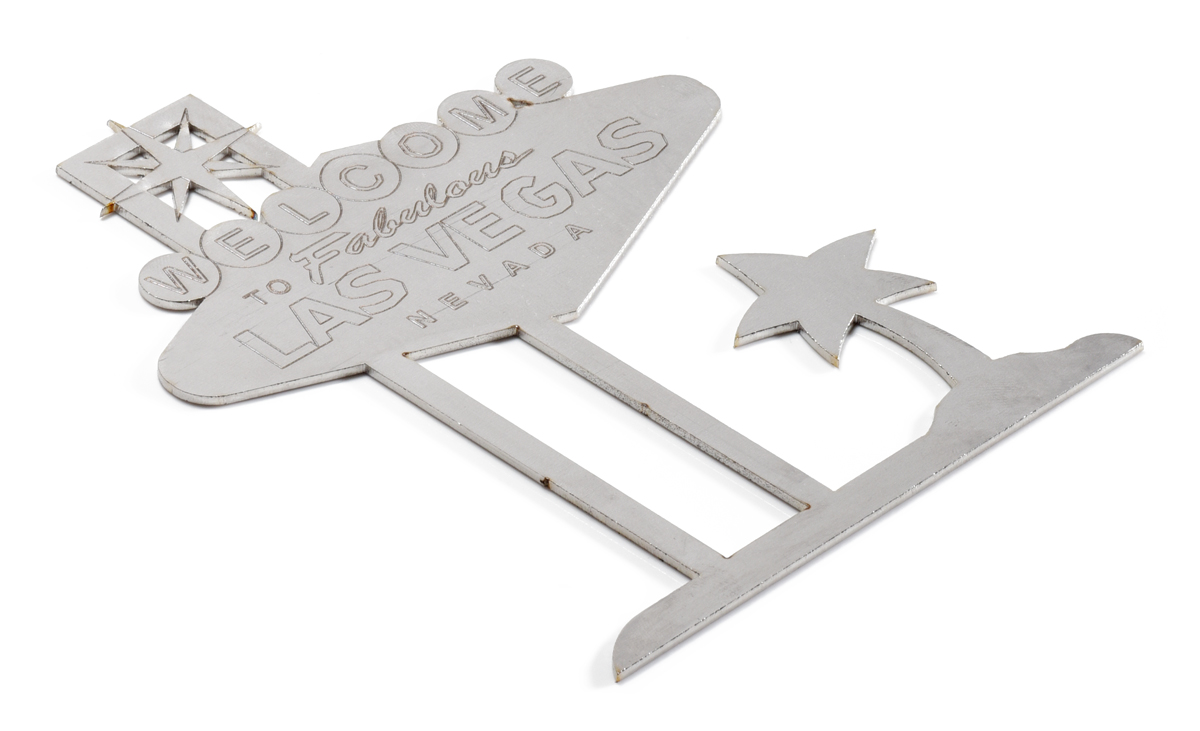
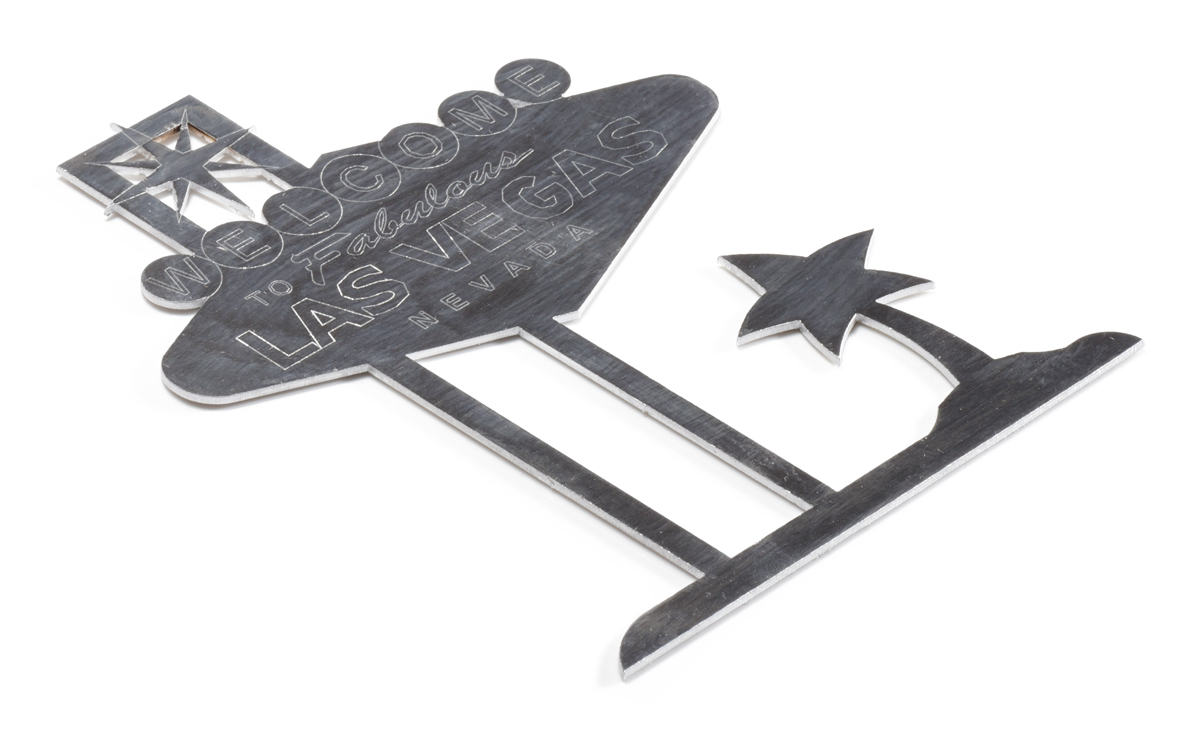
Correspondingly, we have added 5052 and 6061 aluminum to our regularly-stocked metals, joining 304 stainless steel and 1018 mild steel. We typically have sheets up to 24″ × 48″ (61 cm × 122 cm), but we can also order different metals/alloys or cut materials provided by customers up to 48″ × 48″. Additionally, since getting the LaserCube set up, we have started regularly using nitrogen (N2) as an assist gas, which helps cut parts with less discoloration and cleaner edges.
|
|
|
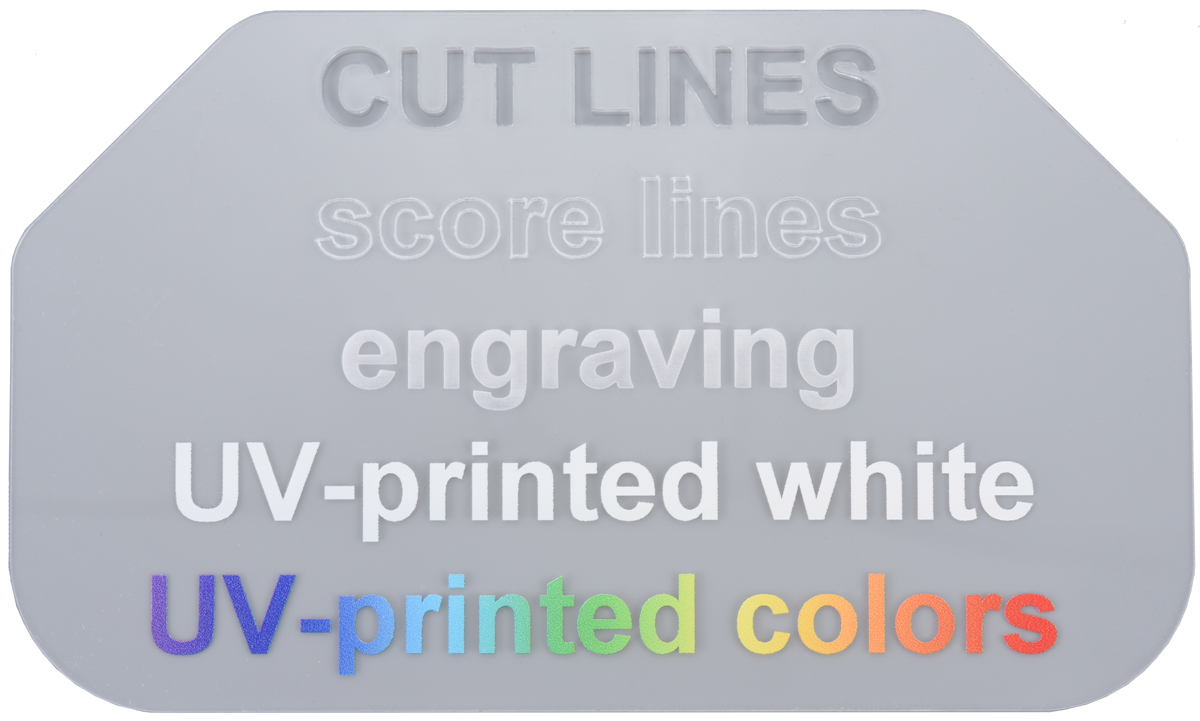
UV printing
Our newest equipment is a Mimaki UJF-6042 MkII e UV printer, which lets us add vibrant and colorful labels, logos, photos, and artwork to your laser-cut parts. It can print with 1200 DPI resolution to an area up to 24″ × 16.5″ (61 cm × 42 cm), and the UV-cured ink adheres to many of the materials we laser cut, including plastics, wood, and yes, metal!
 |
 |
Our printer has inks for CMYK colors, plus a few special inks:
- White ink for printing vibrant colors on non-white materials
- Primer ink for helping the print better adhere to the material
- Clear ink for adding a layer of protection to the print
These different types of ink can be layered in various combinations for different effects.
|
|
|
|


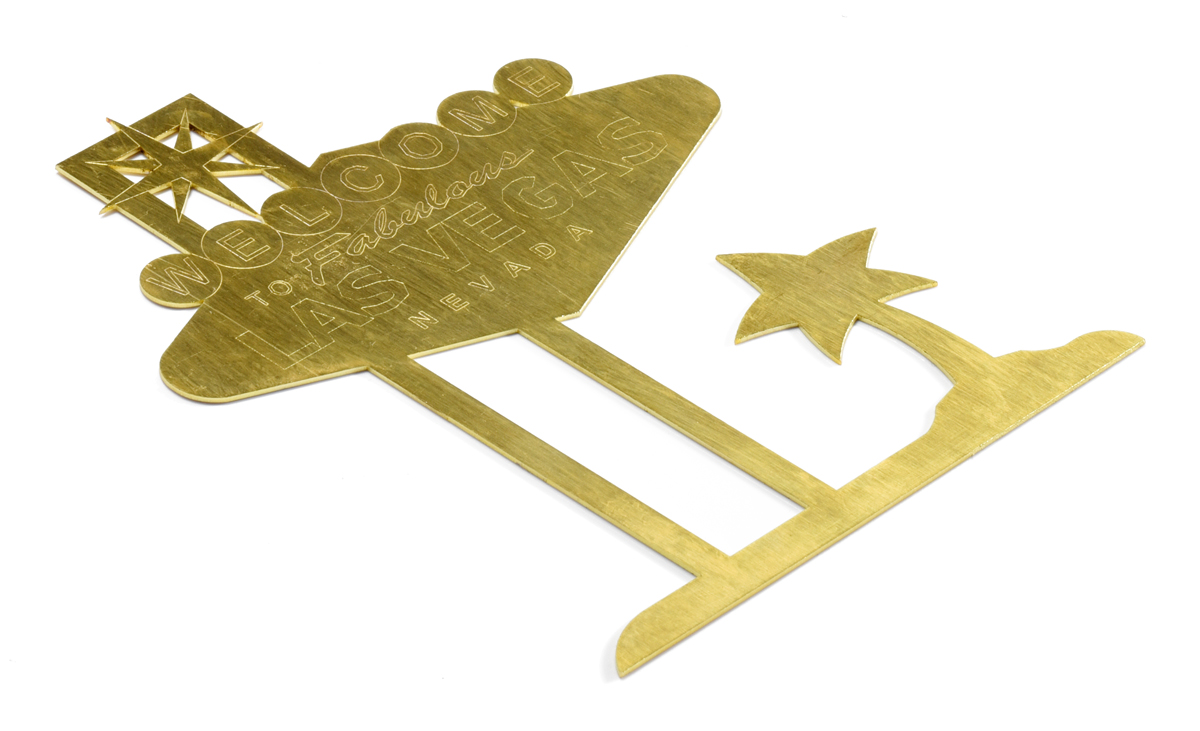
We especially like printing on transparent materials, like clear acrylic, since there are so many ways you can print different layers of ink to create unique parts. For example, we can make opaque images visible from either side of the part by printing a layer of white sandwiched by two color layers like we did for these personalized Christmas tree ornaments.
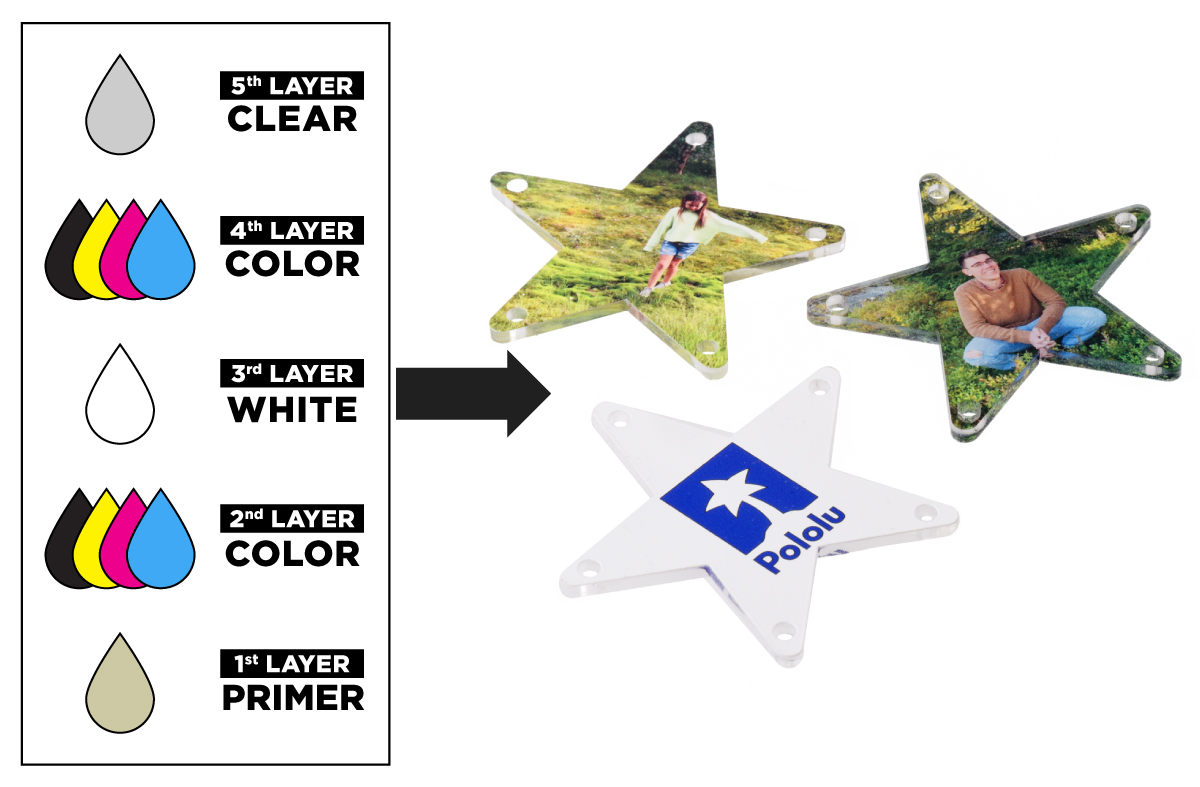 |
Laser-cut and UV-printed acrylic Christmas tree ornaments with two color layers for double-sided appearance. |
|---|
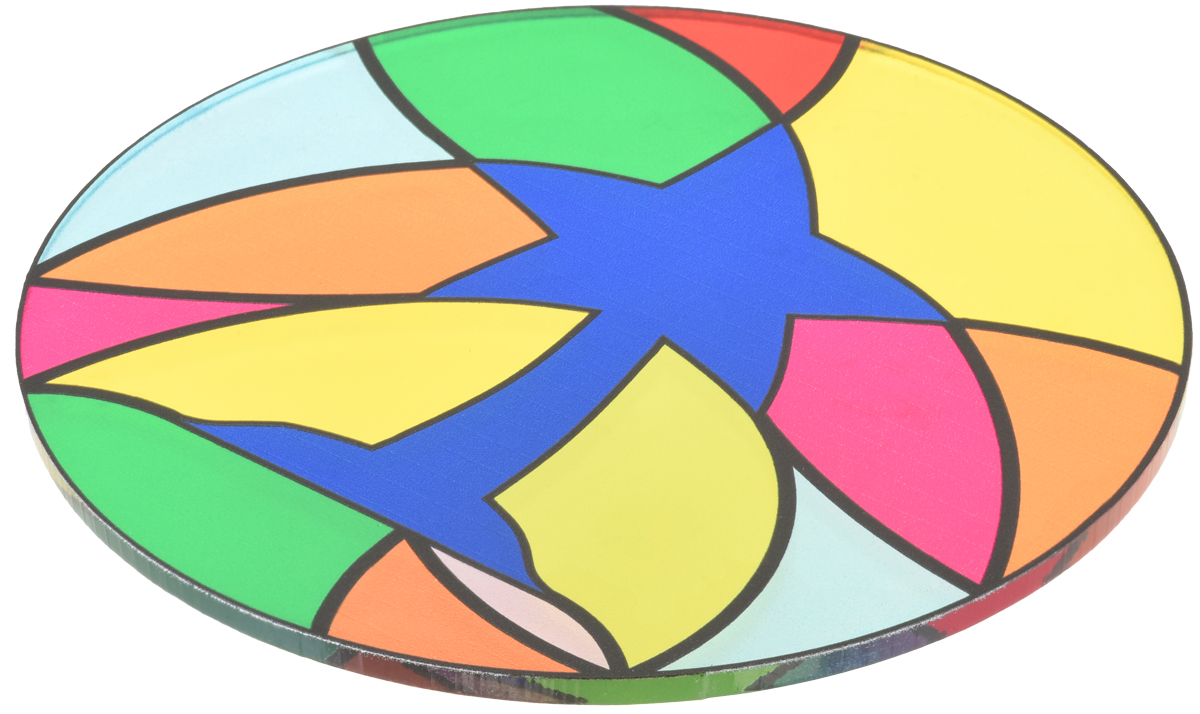
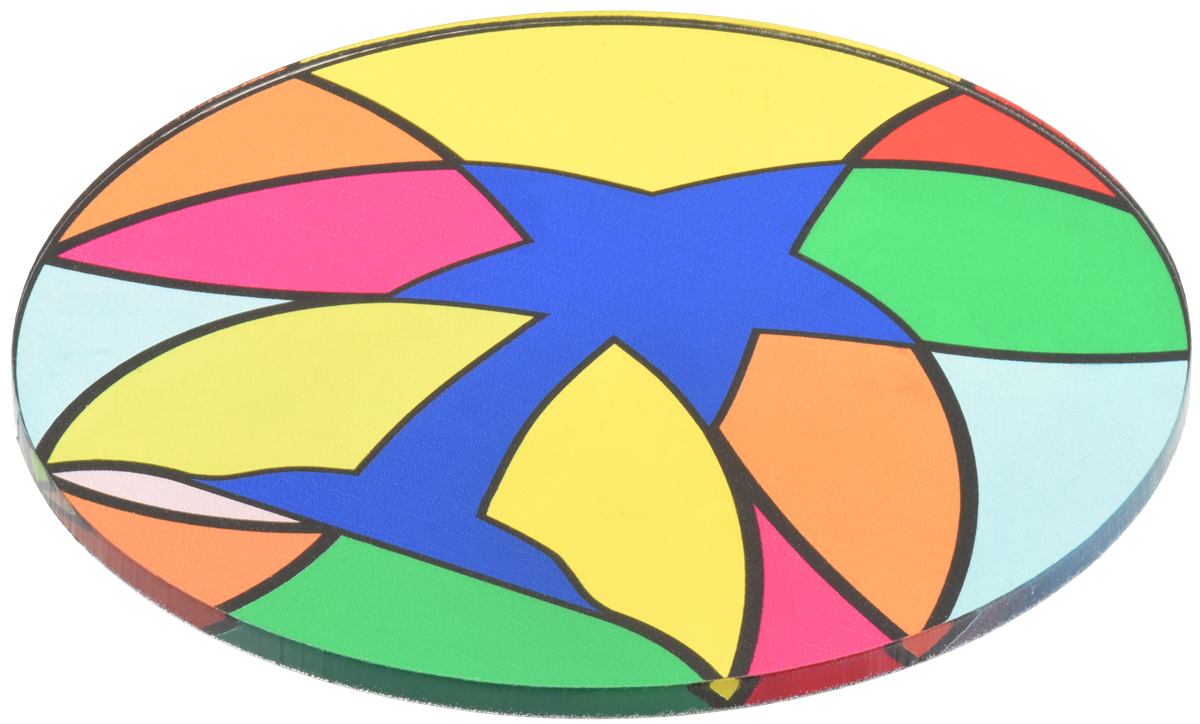
Alternatively, by strategically skipping the white layer in some areas of the print we can make transparent colorful parts that resemble stained glass.
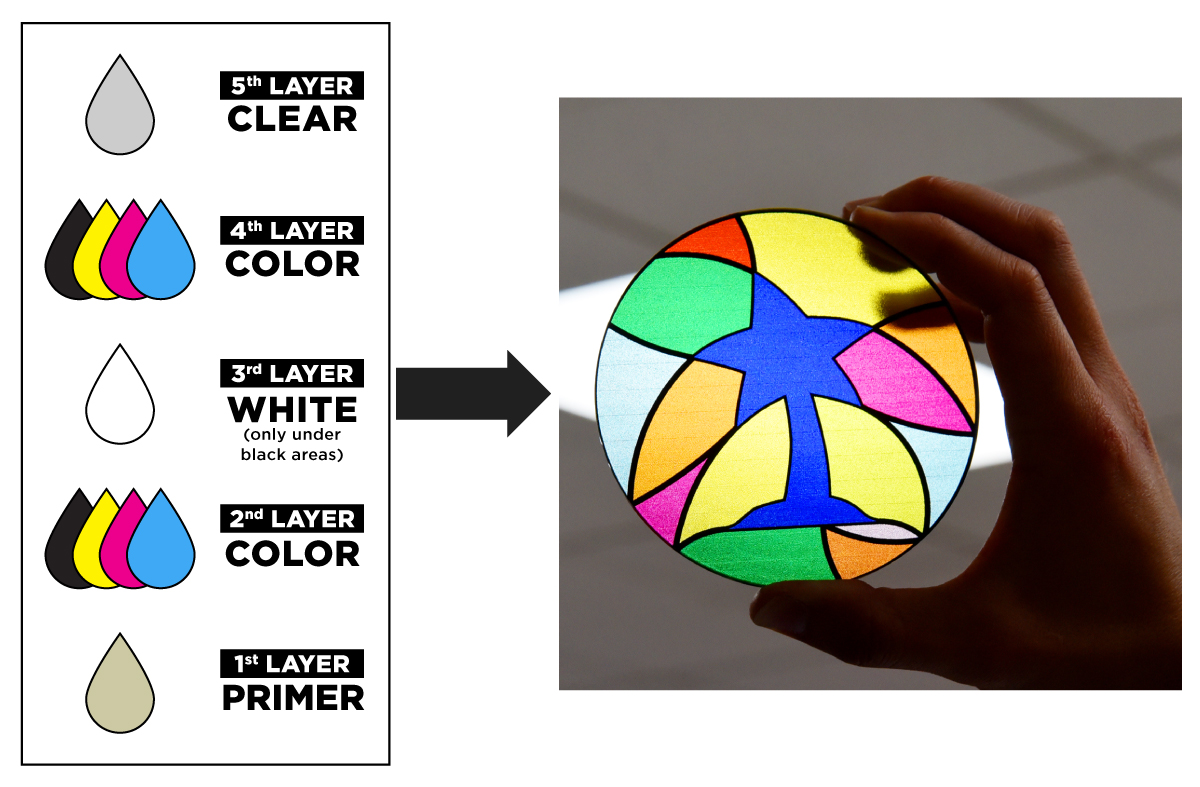 |
Laser-cut and UV-printed acrylic part with stained glass appearance. |
|---|
Getting a quote
You can submit a quote request for laser-cut metal parts, laser-cut parts with UV-printed artwork, or other types of laser-cut and engraved parts through our Custom Laser Cutting Service page. To get started, we recommend downloading one of our templates below, which already have the different layers set up.
 |
 |
 |
| CorelDRAW (340k cdr) | Adobe Illustrator (7MB ai) | Inkscape (457k svg) |
|---|
|
|
||||
|
|
Then, all you will need to do is add your artwork to the appropriate layer, save it, and submit a quote request!
For more detailed information about all of our capabilities and how to set up your files to make the process as smooth as possible, check out our Custom Laser Cutting Guide.
Share with us
We are excited to see what parts you design and how they get used in your projects! When you get your parts, consider posting some pictures in the Share Your Projects category of our forum. If you are still brainstorming ideas for your next project, our forum and blog posts tagged laser cutting
are a great places to find inspiration.
Related products

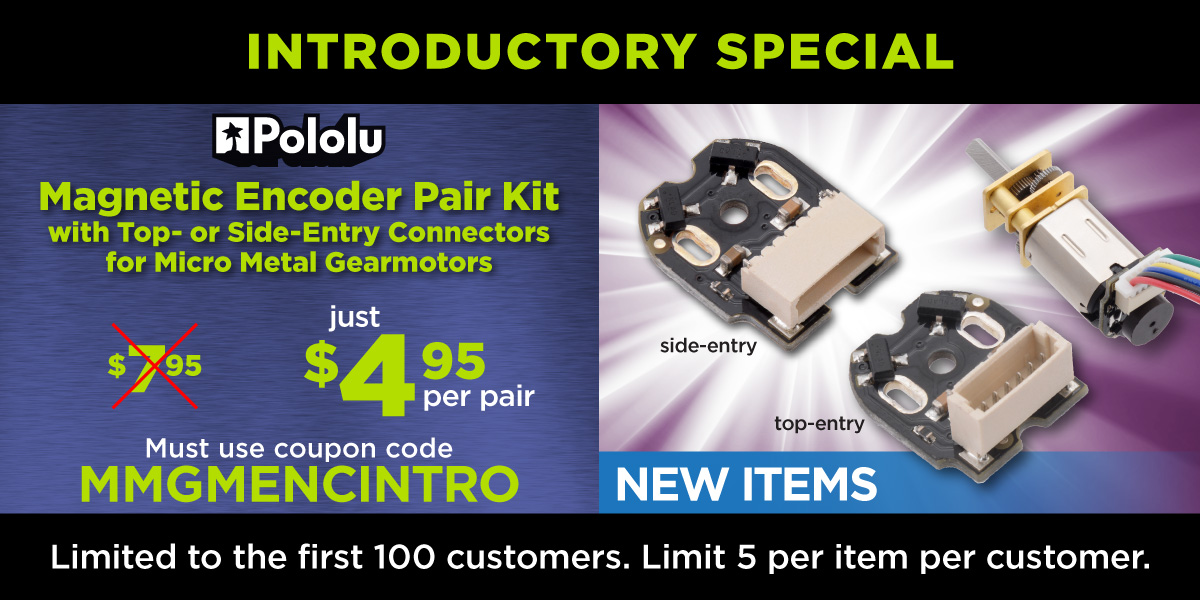
New products: Magnetic Encoder Pair Kit with JST SH-type Connectors for Micro Metal Gearmotors
 |
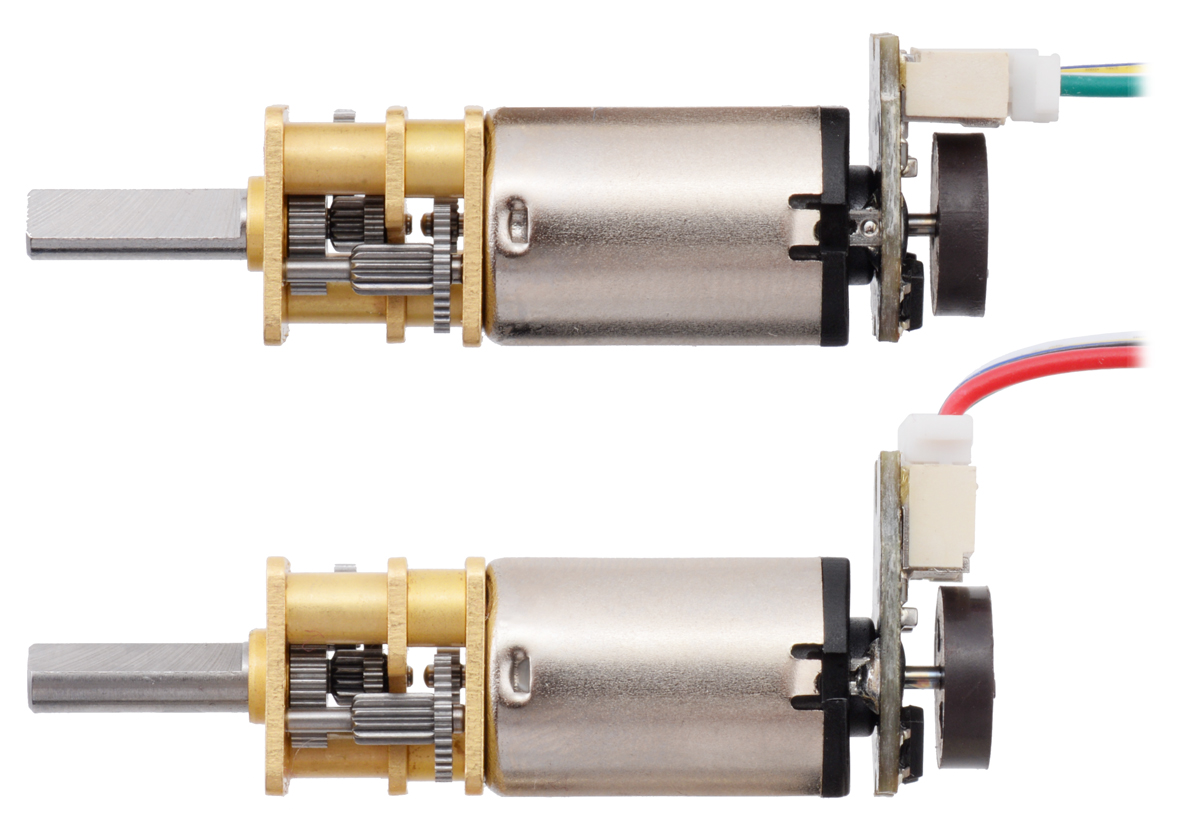
Everyone wants encoders on their motors, but not everyone wants to solder a bunch of wires to a tiny encoder board. That is why I am excited to announce that we are now offering two new versions of magnetic encoders for Micro Metal Gearmotors that feature JST SH-type connectors:
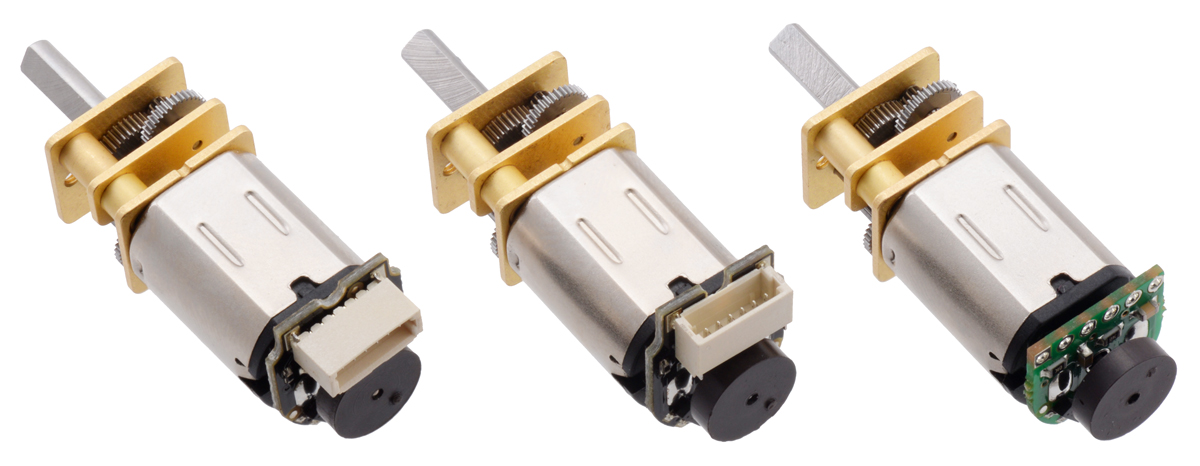
- Magnetic Encoder Pair Kit with Top-Entry Connector for Micro Metal Gearmotors, 12 CPR, 2.7-18V
- Magnetic Encoder Pair Kit with Side-Entry Connector for Micro Metal Gearmotors, 12 CPR, 2.7-18V
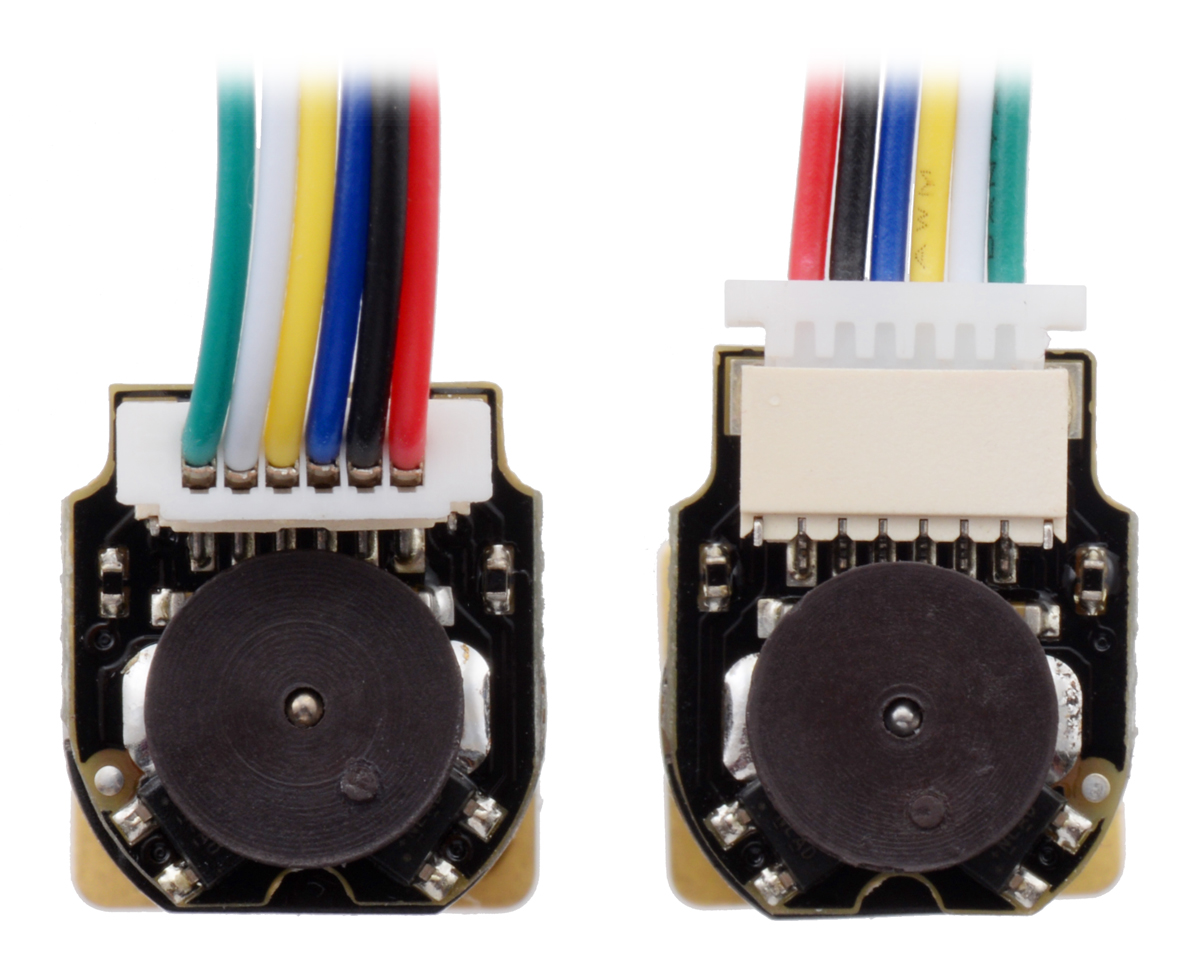
These encoders are easier to get up and running than our previous design that requires soldering to through-holes with a 2 mm pitch. With these new encoders, you just have to solder the board to the two motor tabs (sorry, that part is not going away yet), put the magnetic disc on the backshaft, and plug in your cable (available separately in a variety of lengths)!
We think that the “micro” aspect of our Micro Metal Gearmotors is one of their coolest features since their small size make them useful in a wide array of projects. We designed these encoders with this in mind, making them within the profile of the gearmotor on three sides (the side with the connector extends a few millimeters past the motor). Since everyone’s constraints are different, we decided to make two encoder versions, one with a top-entry connector that lets the cable come straight out of the back, and one with a side-entry connector for applications where there isn’t much space past the rear of the motor. We are also continuing to offer encoder boards with through-holes, which allow wires to be soldered to the board for especially compact installations.
|
|
Remember that you will also need 6-pin female JST SH-style cables to use our new encoders. We are offering those cables in three lengths: 12 cm, 30 cm, and 75 cm.
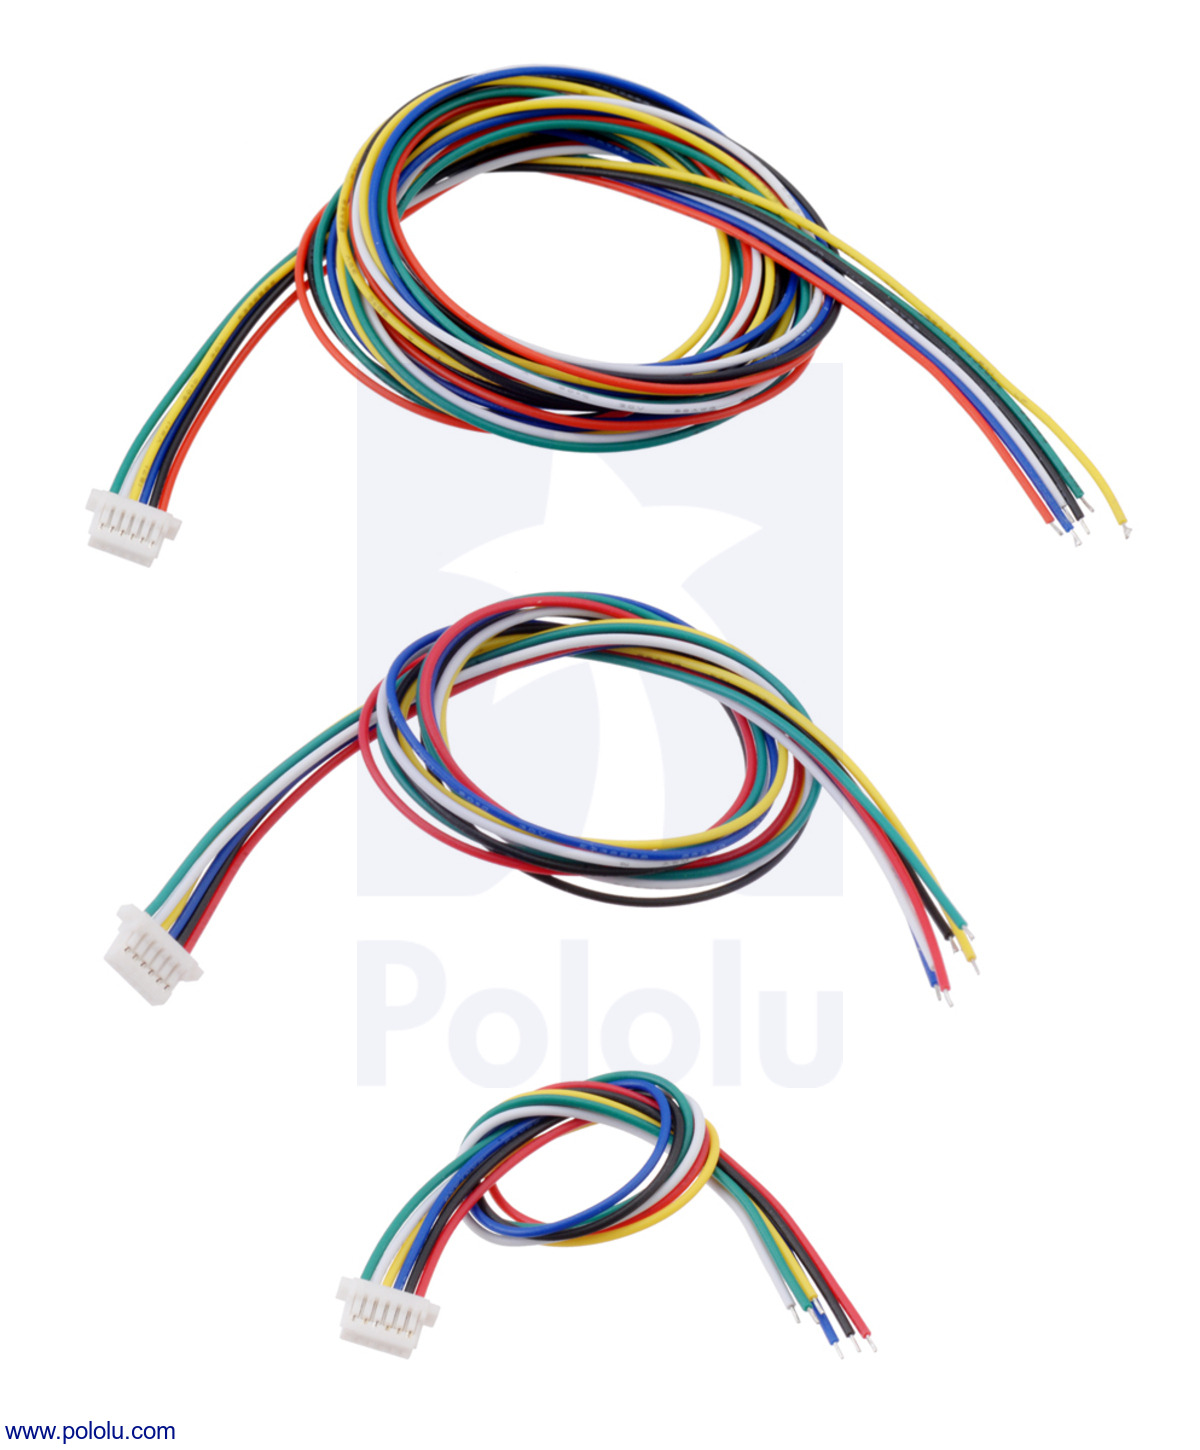 |
The ends of our cables are unterminated so you can decide how you want to connect them in your project (solder, crimp connectors, terminal blocks, etc.).
Introductory special
In case you are not as excited as I am yet, our intro special might help. Right now, you can get up to five of our new encoder pair kits for just $4.95 each using the coupon code MMGMENCINTRO! (Click to add the coupon code to your cart.) But you better hurry, this offer is limited to the first hundred customers to use the coupon code.
Related products


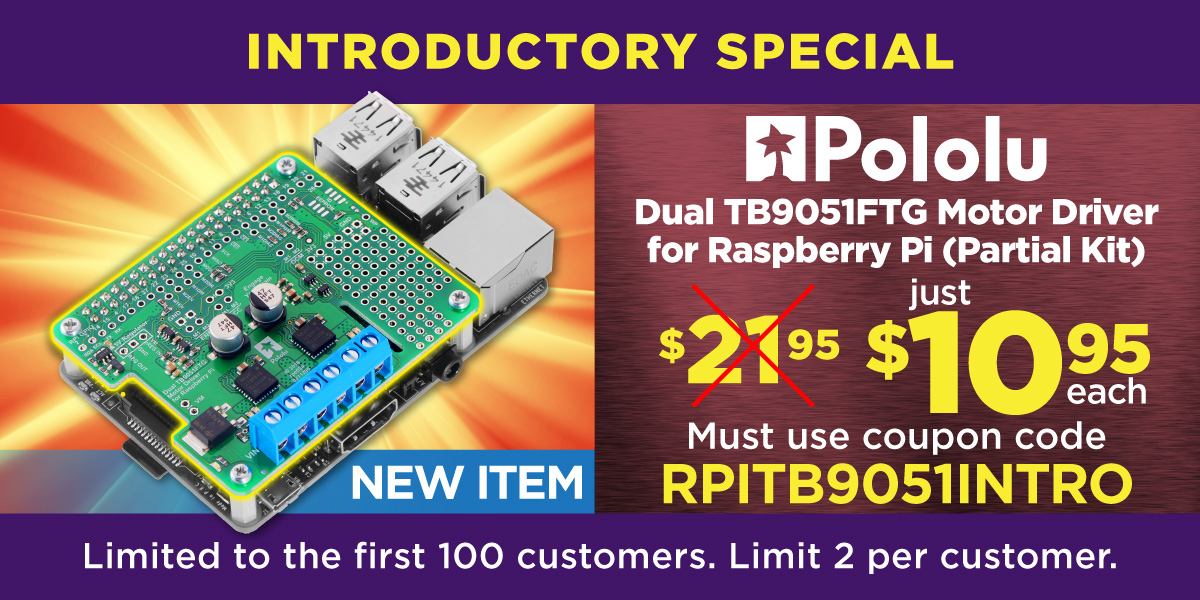
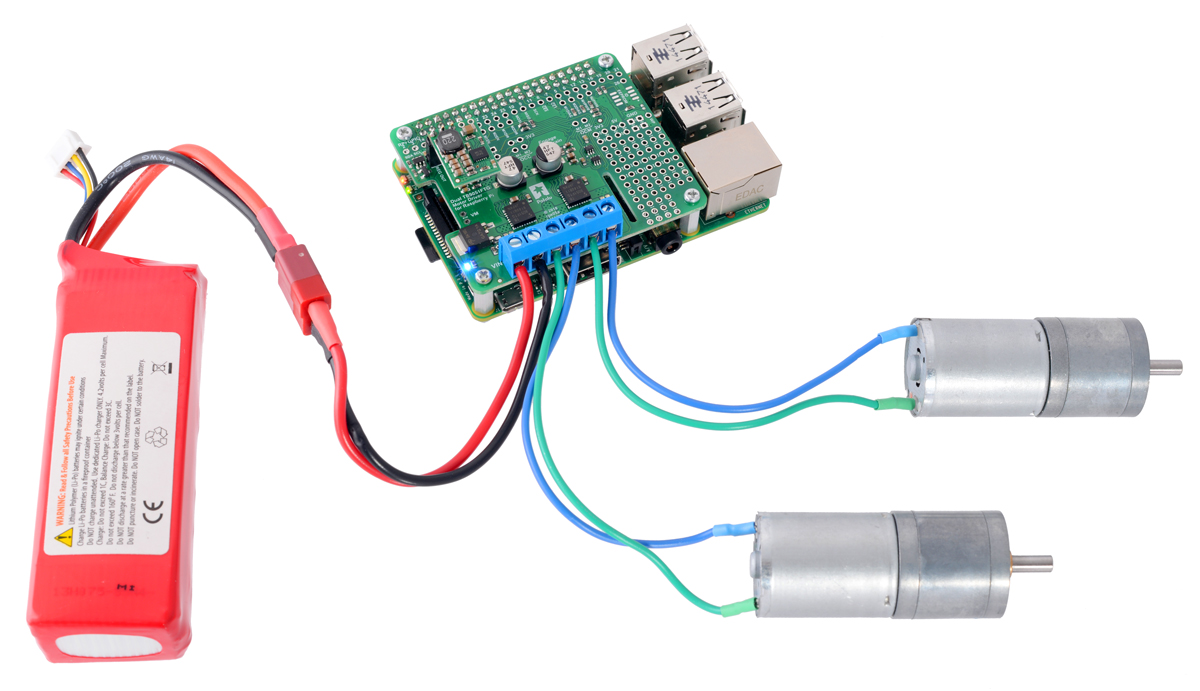
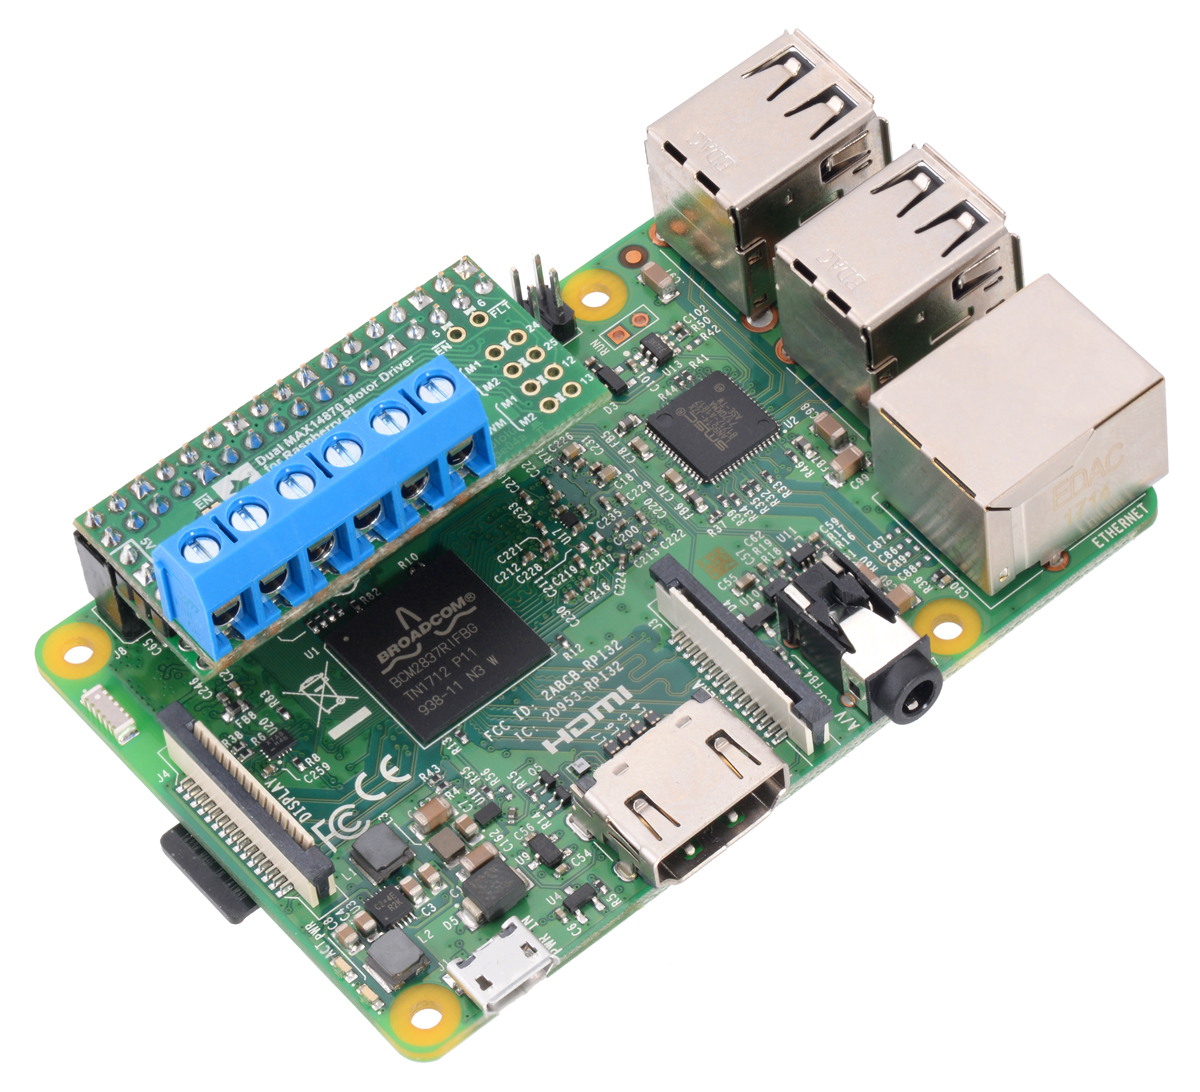
New Product: Dual TB9051FTG Motor Driver for Raspberry Pi
I am excited to share the second Pololu product for which I routed the PCB, the Dual TB9051FTG Motor Driver for Raspberry Pi. This board complements the TB9051FTG Single Brushed DC Motor Driver Carrier and the recently announced Dual TB9051FTG Motor Driver Shield for Arduino by making it easy to control two motors with a Raspberry Pi (Model B+ or newer).
The TB9051FTG can deliver a few amps across a wide operating voltage (4.5 to 28 V), which makes this expansion board ideal for controlling two small or medium size motors in your Raspberry Pi project. You can optionally connect a voltage regulator, like a D24V10F5 or D24V22F5 step down regulator, to power the Raspberry Pi with your motor power supply. The board also provides a prototyping area to help you construct clean custom circuits without the need for additional prototyping PCBs beyond the footprint of your Raspberry Pi.
 |
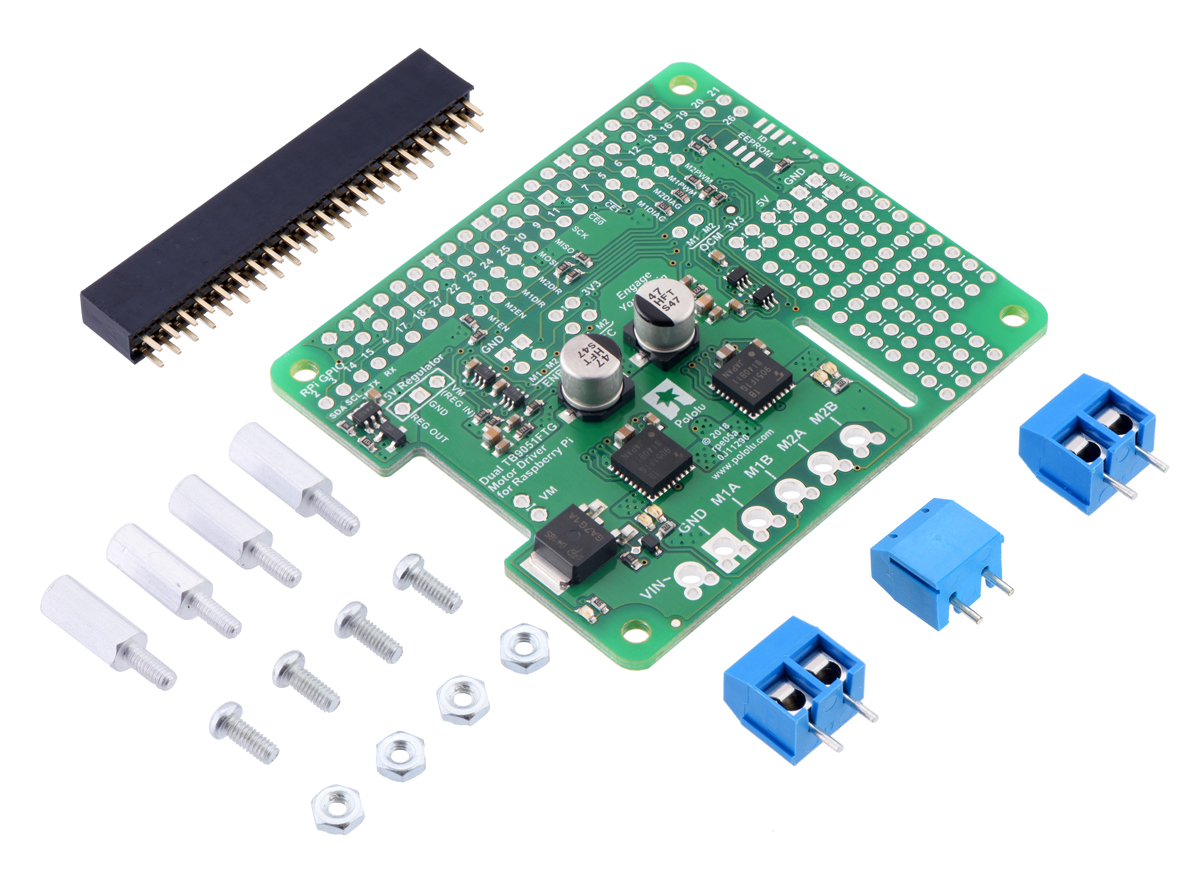
The Dual TB9051FTG Motor Driver for Raspberry Pi is available in two versions:
- a partial kit, with connectors included but not soldered in
- fully assembled, with the female header and terminal blocks soldered to the board
The board adheres to the Raspberry Pi HAT (Hardware Attached on Top) mechanical specification, although it does not conform to the full HAT specifications due to the lack of an ID EEPROM. (A footprint for adding your own EEPROM is available for applications where one would be useful.)
|
|

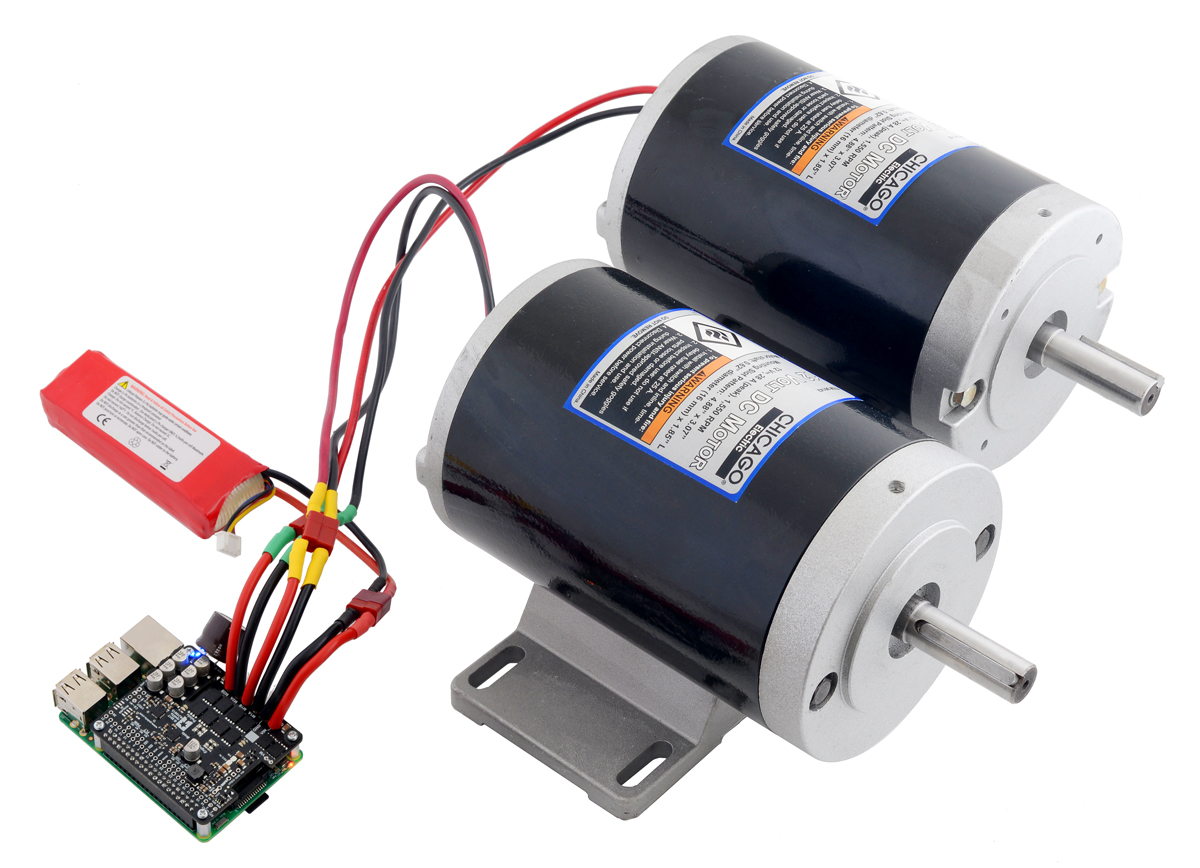
With the addition of this product, we now have eight Raspberry Pi motor driver expansion boards for you to choose from. To control more powerful motors, we offer various high-power motor drivers for Raspberry Pi. If you don’t need all the power provided by the TB9051FTG, consider our small and inexpensive DRV8835 Dual Motor Driver for Raspberry Pi or the dual MAX14870 motor driver expansion board (the first board I routed).
|
|

We have an introductory discount to go with this new product announcement. The first 100 customers to use coupon code RPITB9051INTRO can get up to two units for just $10.95 each. Note that this introductory offer applies only to the units without connectors soldered in. The introductory coupons for the single TB9051FTG carrier, the dual TB9051FTG Arduino shield, and some other products introduced this year are still available; you can see all the coupons available on our specials page.
Related products


UNLV wins 1st place in Student Design Competition at ASME E-Fest West
 |
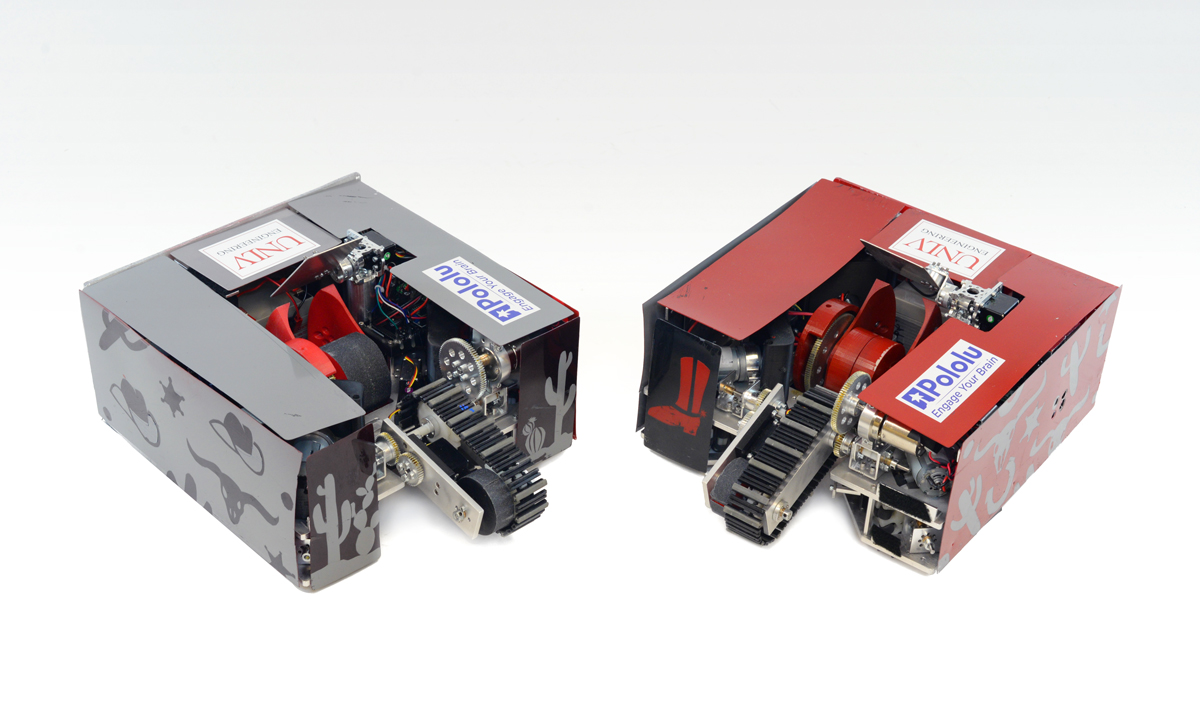
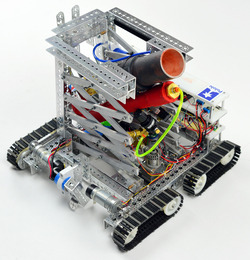
At Pololu, I have spent the recent weeks developing new products, like the motor driver I announced on Wednesday, but at school (I am a mechanical engineering student at the University of Nevada, Las Vegas, UNLV) I have been managing an American Society of Mechanical Engineers (ASME) Student Design Competition (SDC) team. SDC teams create robotic devices to fulfill a problem statement that changes every year. They compete with their devices at one of ASME’s regional student conferences called E-Fests. Last year, I managed a three-member team that built The Rebel WIP and earned third place in the Robot Pentathalon at the E-Fest West. This year, my ten-member team made a squad of robots called The Rebel Bandits for the new SDC challenge, Robot Football. We overcame many technical challenges and 14 other teams to win first place at this year’s E-Fest West that competed this past Saturday!
The SDC’s Robot Football was loosely based on soccer, but with four robot teams competing to shoot eight tennis balls into four goals on a 5 m x 5 m field. Each team was assigned a goal to defend, and eight tennis balls were set in a square pattern at the center of the field for robots to score into the other goals. For this competition, teams could build multiple remote controlled robots, but the robots and controllers had to be able to fit inside a single 50 cm cube. Some teams built soccer squads with only two or three big robots, while other teams used up to six little robots for their squad (which made the matches super chaotic), but each team could only control one ball at a time. Robots controlling a ball needed to keep the ball on the ground when they moved around, but they could stop and lift the ball to shoot on a goal.
 |
The Rebel Bandits. |
|---|
 |
The Outlaw. |
|---|
I am really proud of the robots my team designed and built for this competition, so I want to share how my team made a first place robot squad! However, since we won the competition at E-Fest West, we were invited to compete again in the SDC Finals at ASME’s International Mechanical Engineering Congress and Exposition in Pittsburgh, Pennsylvania this November. We will be competing against the first and second place winners from the other student conferences: E-Fest East, E-Fest Asia Pacific, and E-Fest South America, as well as the SDC team from California State University, Northridge, who came in second place at E-Fest West. The teams will be more competitive, and the prize money increases significantly! So that makes me a little bit nervous about showing all the technical details for our robots right now, but I would still like to give a basic rundown.
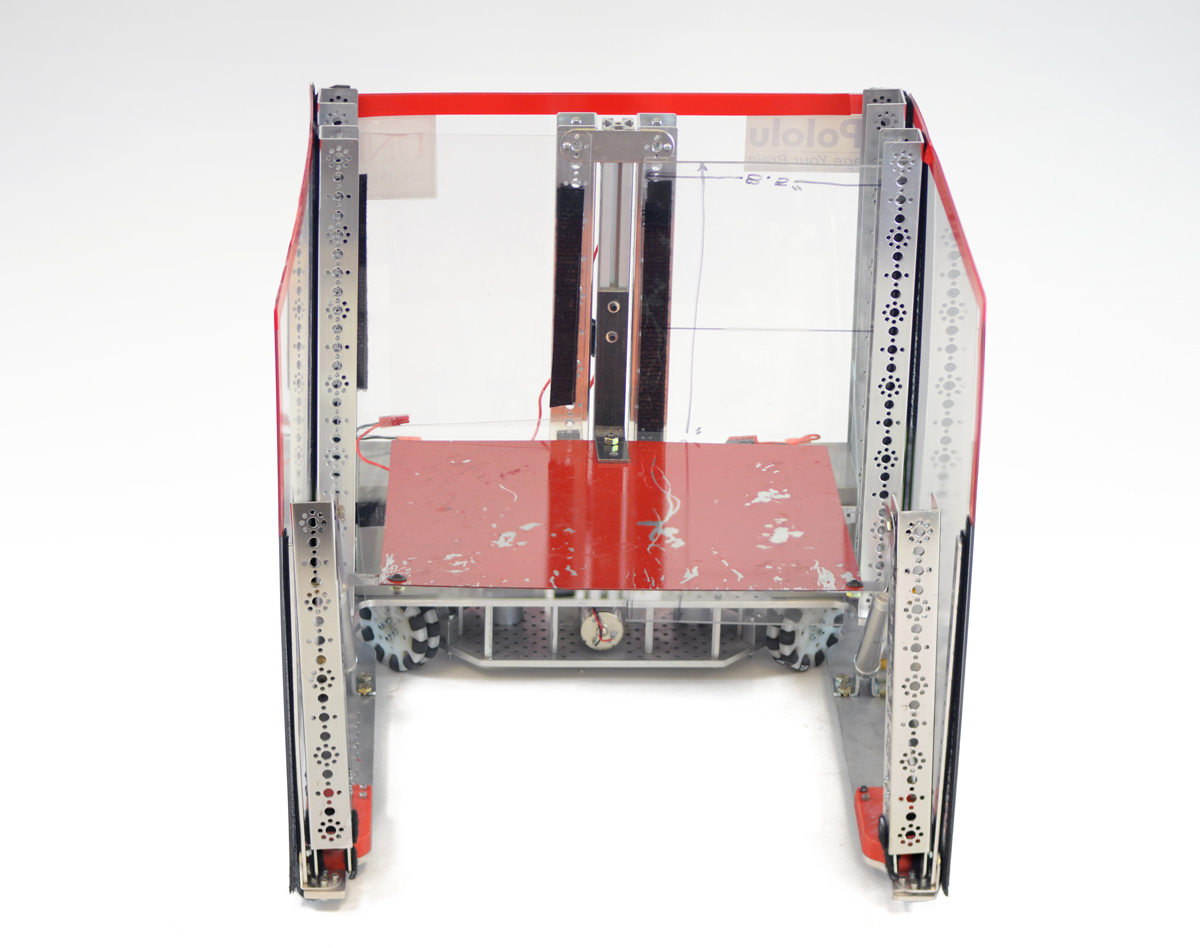
Our strategy was to build three large robots: one defender, and two offensive robots. We call the defender robot The Outlaw. It is built on a U-shaped frame with 19 in (48.3 cm) long sides and has tall walls. Even though it cannot block from inside our penalty box and is not particularly fast, it can seriously impede the efforts of other teams to score on our goal just by being big and tall. The Outlaw uses three DC motors for its drive train at the base of the U-frame, and Pololu ball casters help support the far ends of the U-frame. One DC motor is driven by a G2 High-Power Motor Driver, and since we use an A-Star 32U4 SV for the Outlaw’s microcontroller, the other two DC motors are driven by a Dual G2 High-Power Motor Driver Shield for Arduino.
 |
The Desperado and The Renegade. |
|---|
The two offensive robots are named The Renegade and The Desperado (you should notice the Wild West theme by now). Other than the color schemes, these robots are almost complete duplicates. We decided to build only two offensive robots because it gave us sufficient space to build robust robots with high quality shooting mechanisms.
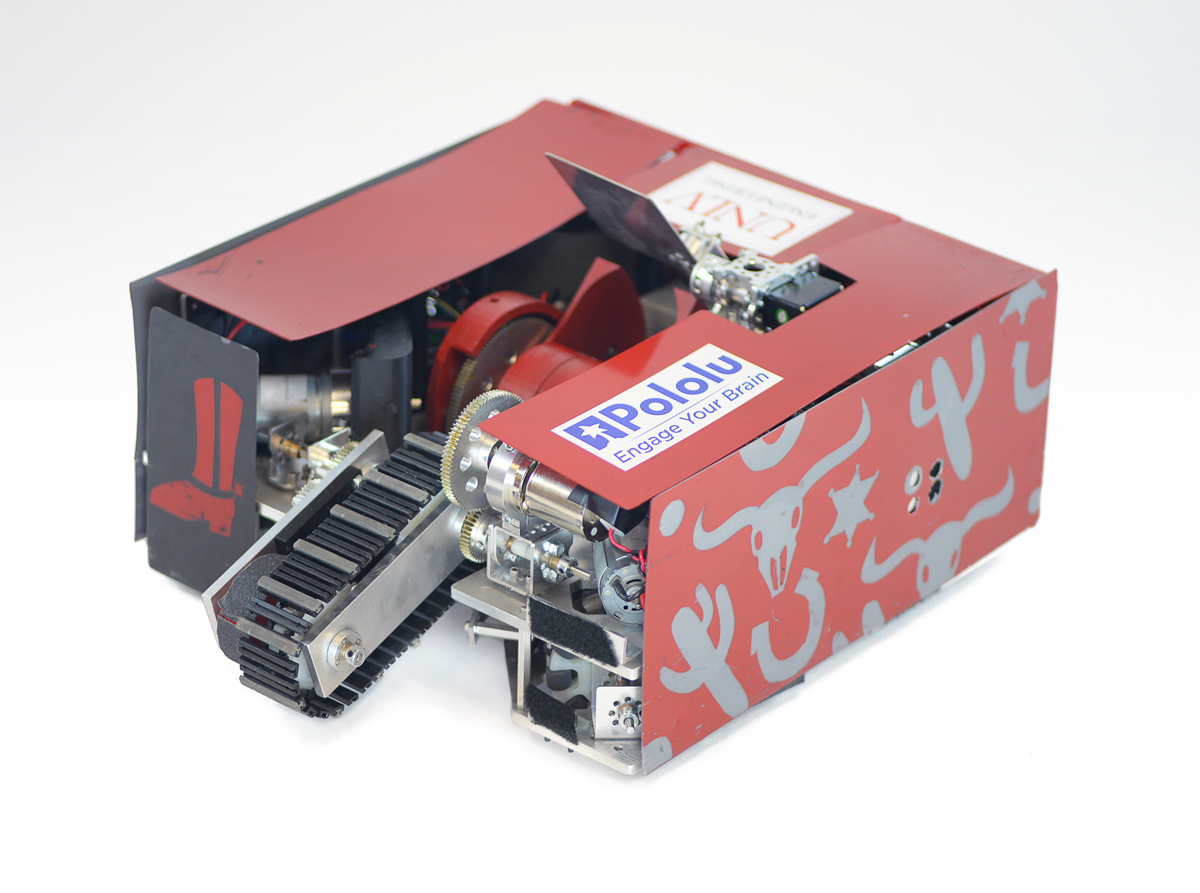 |
Each offensive robot uses four DC motors for the drive train. A standard size servo extends an arm with an intake belt, and a DC motor runs the intake belt to pull a ball into the robot’s reservoir. Another servo opens and closes a gate that keeps the ball in the reservoir or pushes the ball into the shooting mechanism. The reservoir allows the ball to roll on the ground as the robot moves without the intake belt constantly pushing down on the ball and impeding driving. The shooting device is a ramp and flywheel. When taking a shot on the goal, the operator stops the robot and the flywheel revs up to high speed. Then the gate servo pushes the ball into the ramp. The velocity of the wheel pulls the ball along the ramp structure and throws the ball at high velocity. Just beyond the outlet for the ball, a plate on a pivot controlled by a servo lets us control the ball’s trajectory. This allows us to shoot across long distances or over defender robots.
The offensive robots each use an Arduino Mega as their primary microcontroller. Most of the DC motors on The Renegade and The Desperado are controlled by either a Dual G2 High-Power Motor Driver Shield connected to the Arduino Mega or are driven by individual G2 High-Power Motor Drivers. On each robot, a Maestro servo controller is used as a slave controller that powers and controls the standard servos. Additionally we use the Maestros’ functionality as general I/O controllers to send logic signals to the individual 18v17 Motor Drivers. In our setups, we want the servos and the Maestros to be powered from 6 V, so we use a step-down voltage regulator to connect the Maestro power rails to main power supply on each robot, a 12 V lead-acid battery.
I am very fortunate to have worked with an awesome team this year for the SDC, and I am grateful for the parts and support we obtained from both Pololu and UNLV! It was also exciting to see different teams at the competition using other Pololu parts like our wheels, metal gearmotors, regulators, and brushed DC motor drivers. After our SDC Finals competition in November, I plan to write another blog post about more of the technical details of our robot. (Hopefully I will be able to brag a little about another first place trophy too!)
 |
Patrick and 6 members of UNLV’s SDC team that traveled to competition in Pomona, California. |
|---|
Until then, I want to know more about some of your projects! I hope you will share a little about your cool projects in the blog comments, or you can make a Pololu forum account and post in the Share Your Projects category!
Related products


New products: Dual MAX14870 Motor Drivers for Arduino and Raspberry Pi
For my birthday, I am excited to share two new products to help get your projects moving: dual motor driver boards for Arduino and for Raspberry Pi based on Maxim MAX14870 drivers, which on these boards (without additional cooling) can power motors with a continuous 1.7 A (2.5 A peak) from a voltage source anywhere from 4.5 V to 36 V. This makes the driver ideal for powering a wide range of motors including our high power micro metal gearmotors, and our 12 V 20D mm metal gearmotors. We like the MAX14870 so much that already we make a single driver carrier for it, and we use it on our A-Star 32U4 Robot Controller SV. These new boards make it easy to control two motors using the MAX14870 with an Arduino or Raspberry Pi.
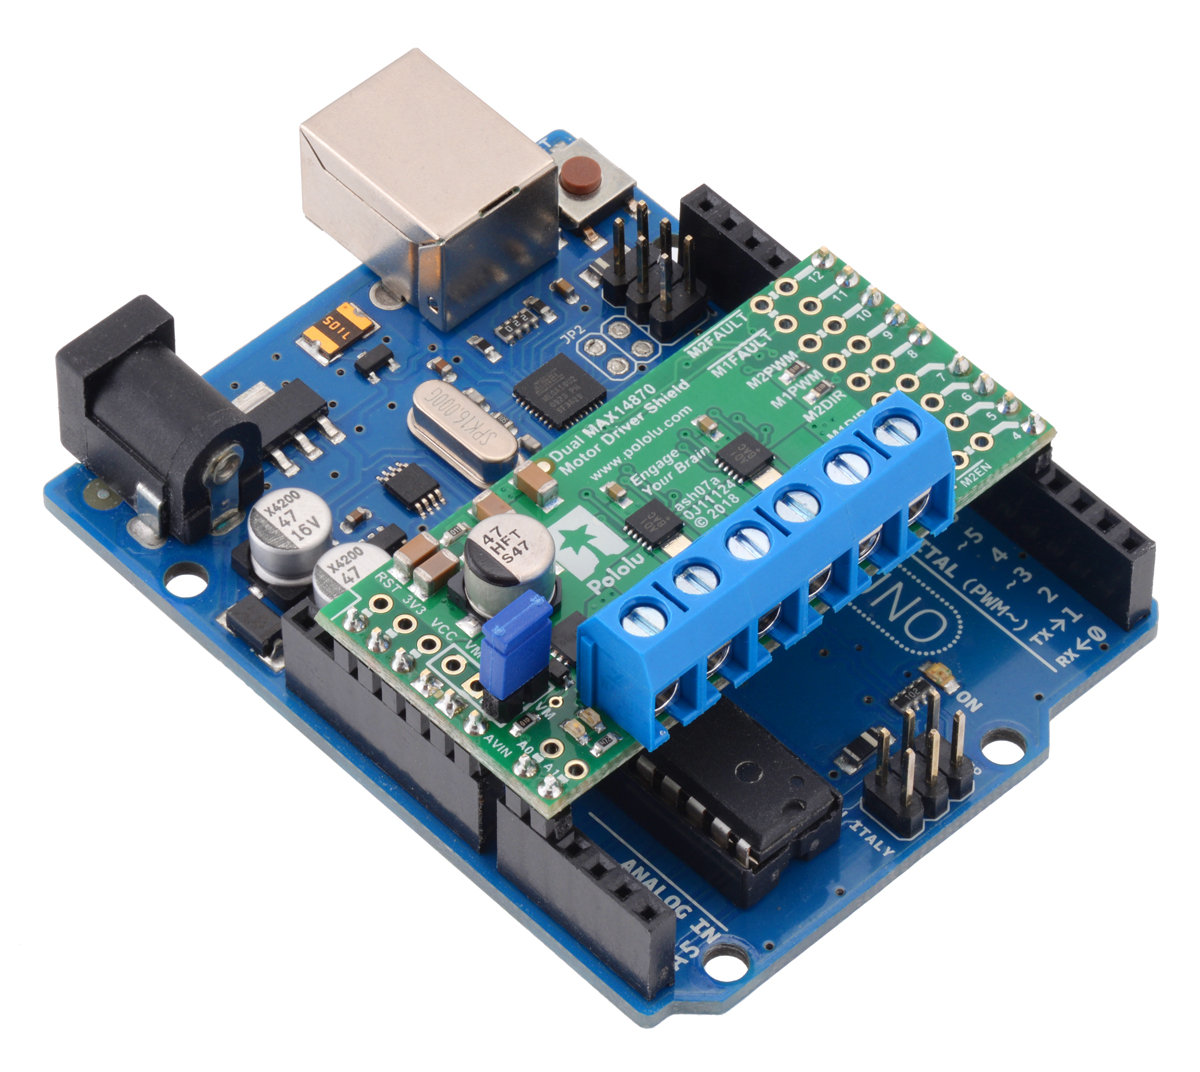 |
The Dual MAX14870 Motor Driver Shield for Arduino is designed to plug directly into an Arduino or another microcontroller board with the Arduino form factor. It connects the Arduino I/O pins to the two-pin speed/direction interfaces as well as the fault output pins, and our open-source library is available to help you get started. The shield can be set up to power your Arduino device from your motor power supply, which is especially helpful if you are using an Arduino or compatible device with an operating voltage similar to that of the MAX14870, such as our A-Star 32U4 Prime SV. Additionally, the board can be customized to use the advanced features of the MAX14870 drivers or change the pin mappings.
The Dual MAX14870 Motor Driver for Raspberry Pi has many of the same features as the Arduino version, but it is designed to plug into the GPIO header on a compatible Raspberry Pi (Model B+ or newer), including the Pi 3 Model B and Model A+. We provide an open-source Python library to make it easy to interface with the board. This board also has a location to connect a step-down 5 V regulator to power the Raspberry Pi from your motor’s power supply.
|
|

I am really excited about these boards because the Raspberry Pi expansion board is the first PCB I ever designed, and the Arduino shield was designed by my friend David S. Both of us are engineering students at the University of Nevada, Las Vegas who work at Pololu to complement our studies. It has been a great experience for us to learn how to design these products from the development engineers here at Pololu. Plus, getting to share these products for the first time with you is a fun way to celebrate my birthday!
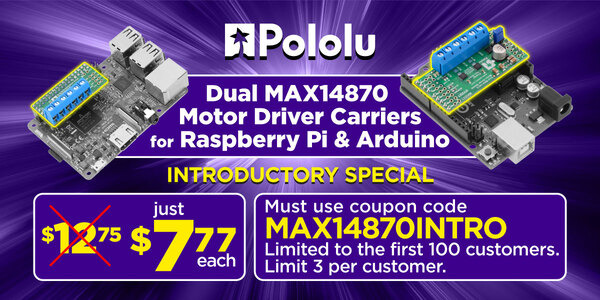
As usual for our new product releases this year, we’re offering an extra introductory discount: the first 100 customers to use coupon code MAX14870INTRO can get any mix of up to 3 of these boards for $7.77 each. (Click to add the coupon code to your cart .) Note that this introductory offer applies only to the units without connectors soldered in.
Related products


High-altitude balloon for the solar eclipse

This summer, Jon and I participated in NASA’s nationwide Eclipse Ballooning Project with the University of Nevada. Specifically, we were members of the University of Nevada, Las Vegas (UNLV) section of Nevada’s team which also had a section from the University of Nevada Reno (UNR). Our goal was to make a payload to collect interesting video footage and scientific data, then fly that payload on a high-altitude balloon that would ascend to around 100,000 ft in the totality zone during the 2017 solar eclipse on August 21. Continued…
The Rebel WIP from UNLV
It has been over a year since my last/first blog post about my mini sumo robot. Since then, I have been busy studying to earn a mechanical engineering degree at the University of Nevada, Las Vegas, working at Pololu, and, of course, building cool robots. Recently, I have been working as part of a UNLV team, Rebel Robotics, to build a robot to compete in an intercollegiate competition organized by the American Society of Mechanical Engineers (ASME) called the Student Design Competition. My team’s robot, the Rebel WIP (work in progress), competed against teams from colleges across the western half of the United Sates in the Student Design Competition at an engineering festival hosted by UNLV and ASME called E-Fest West. Continued…
Patrick's mini sumo robot: Covert Ops
Hi, my name is Patrick. I am an engineering intern at Pololu and am studying at the University of Nevada, Las Vegas to earn a mechanical engineering degree. I decided to build a custom robot to compete in the recent LVBots mini-sumo competition here at Pololu. It was my first competition at LVBots. I started out by watching a compilation video of the previous sumo competition at LVBots since I had never competed in a mini-sumo competition before. My goal was to create a robot that could out maneuver other robots and had as few vulnerabilities as possible. To achieve this goal, I decided to build a robot that would be high speed and able to push opponents from both sides of the robot with a lot of force. The result of my efforts is the robot I call Covert Ops. Continued…


Home | Forum | Blog | Support | Ordering Information | Lists | Distributors | BIG Order Form | About | Contact
© 2001–2026 Pololu Corporation


