Pololu Blog » Posts tagged “arduino” »
Posts tagged “arduino” (Page 3)
You are currently viewing a selection of posts from the Pololu Blog. You can also view all the posts.
Popular tags: community projects new products raspberry pi arduino more…
Continuous testing for Arduino libraries using PlatformIO and Travis CI
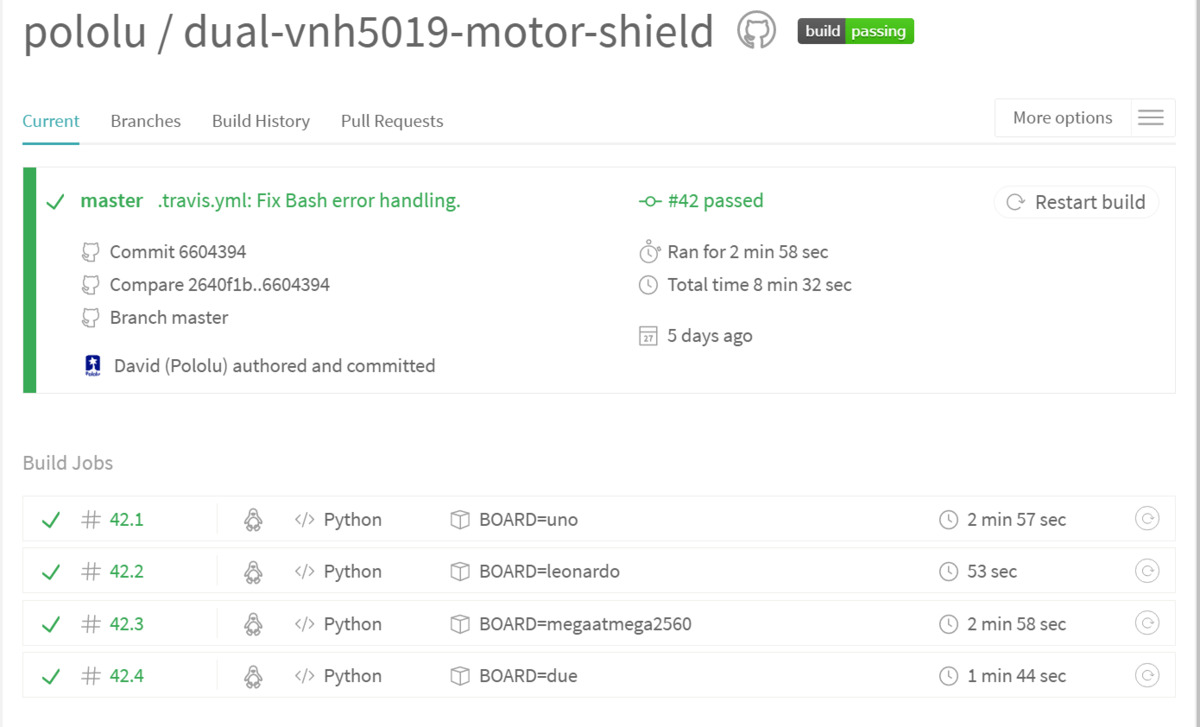 |
At Pololu we maintain around thirty open-source Arduino libraries, and we keep adding new ones whenever we make a new carrier board or Arduino shield. People typically use these libraries with Arduino-compatible boards, such as our A-Star programmable controllers or Arduinos. We also have Arduino libraries for our user-programmable robot kits like the Romi 32U4 robot, Balboa 32U4 robot and Zumo 32U4 robot.
Sometimes we need to make changes to a lot of libraries at once, like when we wanted to add all of our libraries to the Arduino Library Manager. For us, library manager compatibility requires changing the directory layout, but doesn’t require changing the library or example code. With this many libraries to change, there is a risk of potentially breaking a working library by misspelling or moving a file incorrectly. Fortunately, customer Walt Sorensen introduced us to PlatformIO and Travis CI, which let us test compiling Arduino libraries every time they are pushed to GitHub.
Setting this up is easy enough that we encourage you to do it on your Arduino libraries! First, sign up for Travis CI (a testing service, free for open-source projects) and enable it for the GitHub repository you want to test. Now, every time you push new code to your repository, Travis CI will try to see if there is a .travis.yml file in the top level with instructions for running tests.
If your project has the structure of an Arduino Library Manager project and you have at least one example sketch, our short .travis.yml file should work. This file instructs Travis CI to compile the library and its examples against all the supported Arduino boards (specified in the “env” list of the .travis.yml file). The results can be seen on Travis CI’s website (for example, here is Pololu’s Travis CI page). The Arduino compiler is provided by PlatformIO, an open source ecosystem for internet-of-things development, which supports a long list of Arduino-compatible boards.
You can share your Travis CI build status by embedding a badge into your GitHub readme page:
 |
Of course, for most library changes, we still have to test on actual hardware, but now every time we update our libraries (or a contributor submits a pull request), we can be sure they will at least compile on every supported board.
New product: Romi 32U4 Control Board
 |
What do you need to turn a Romi chassis into a functioning robot? Here are some Romi projects from the community, as well a couple of our example builds:
|
|
|
|
|

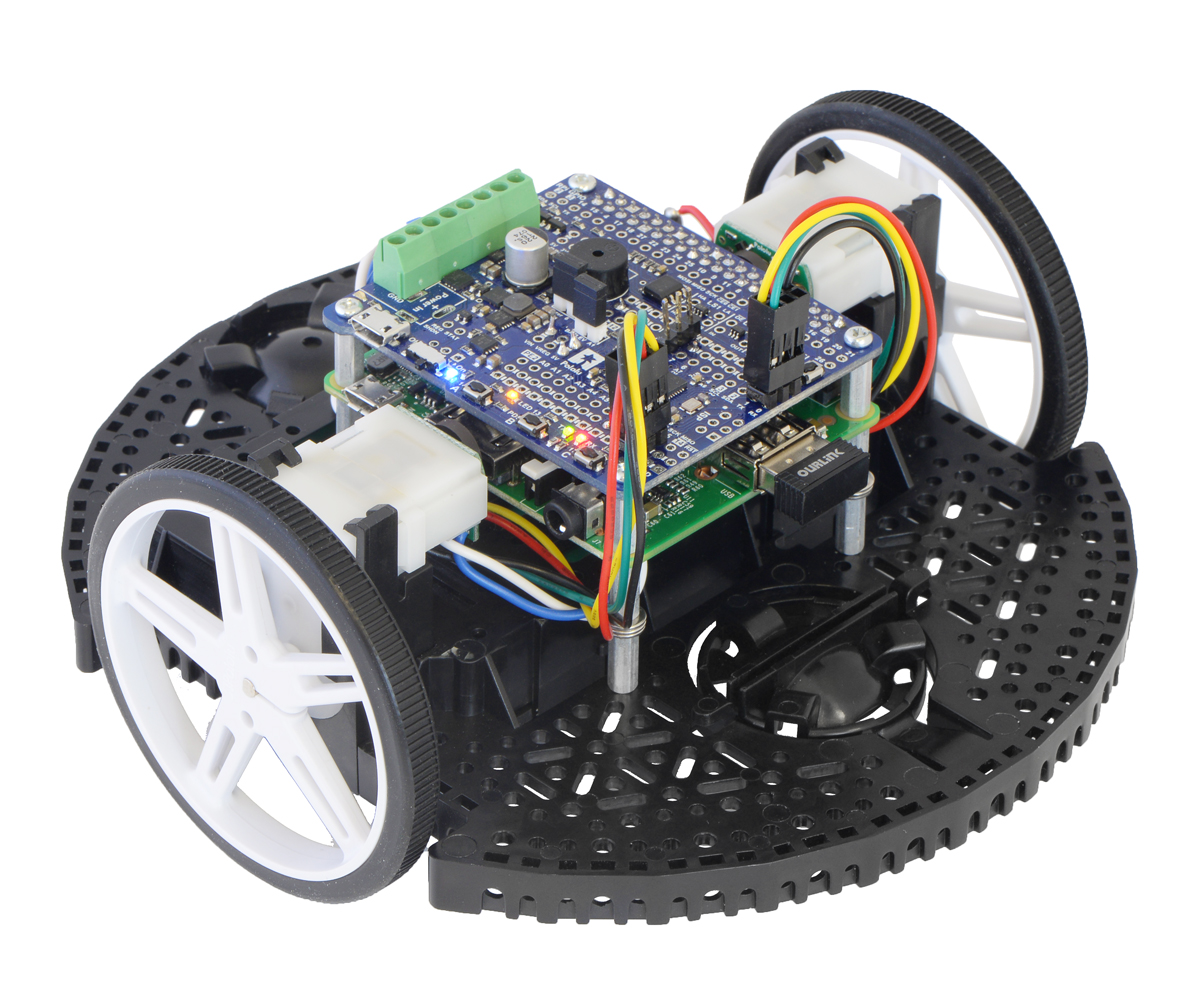

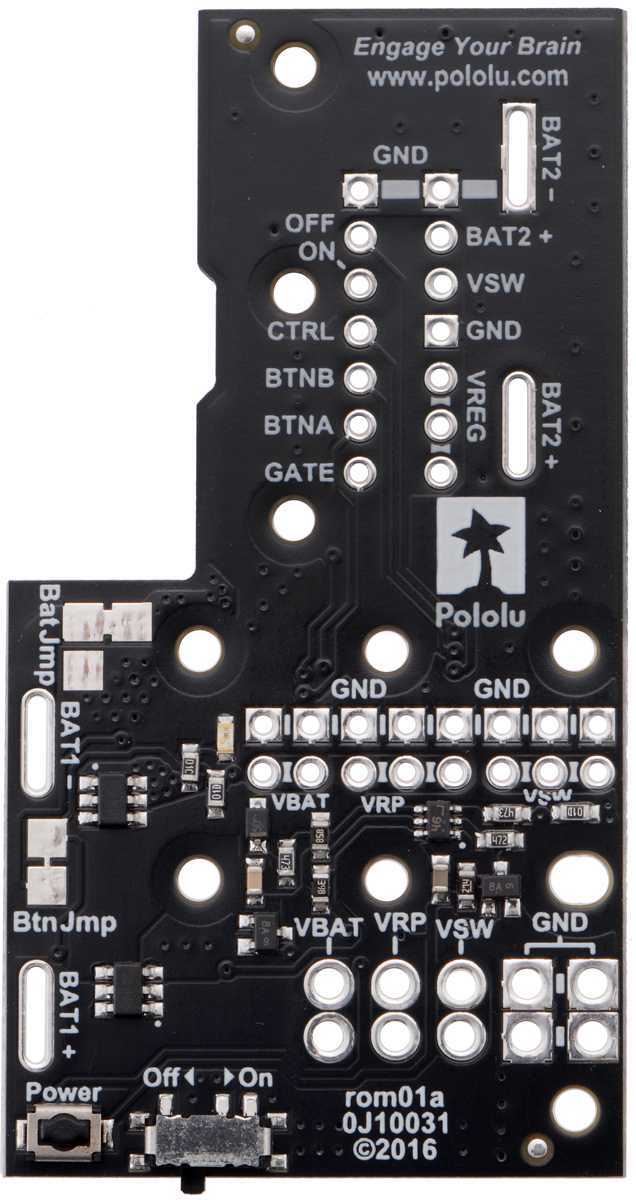
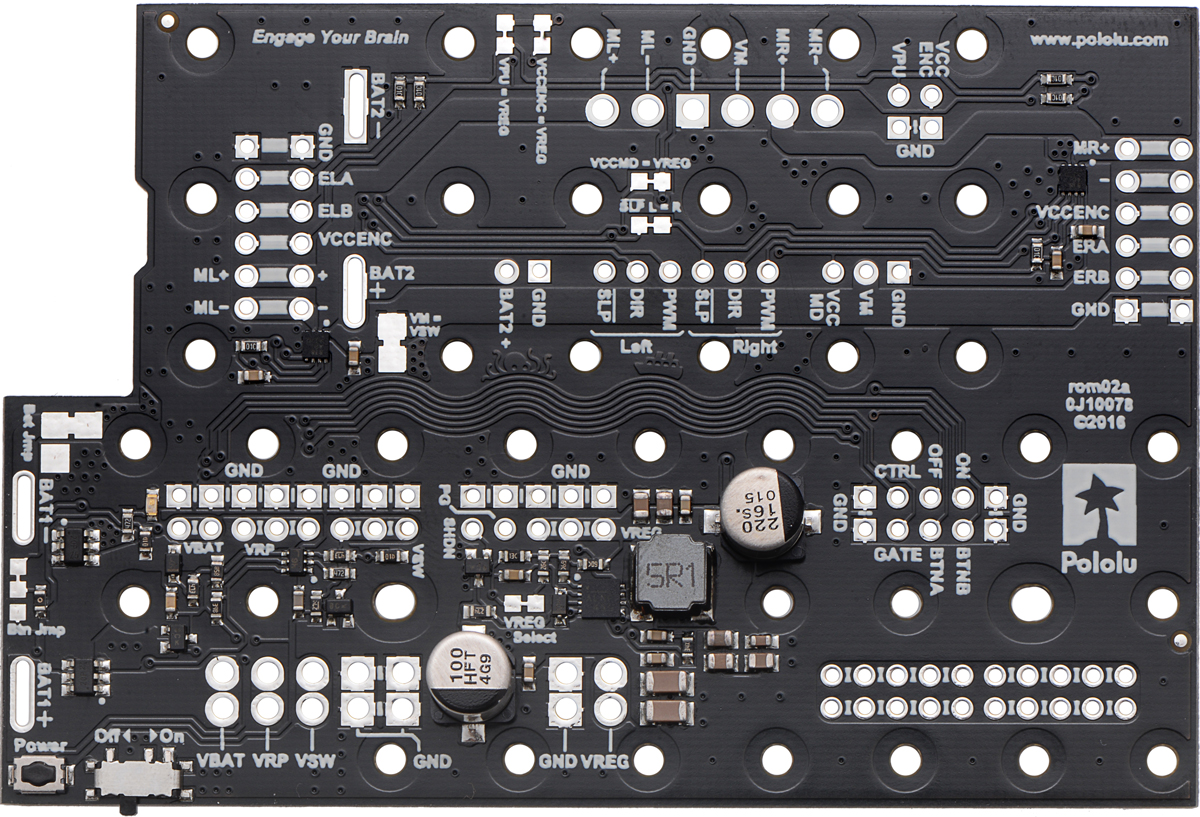
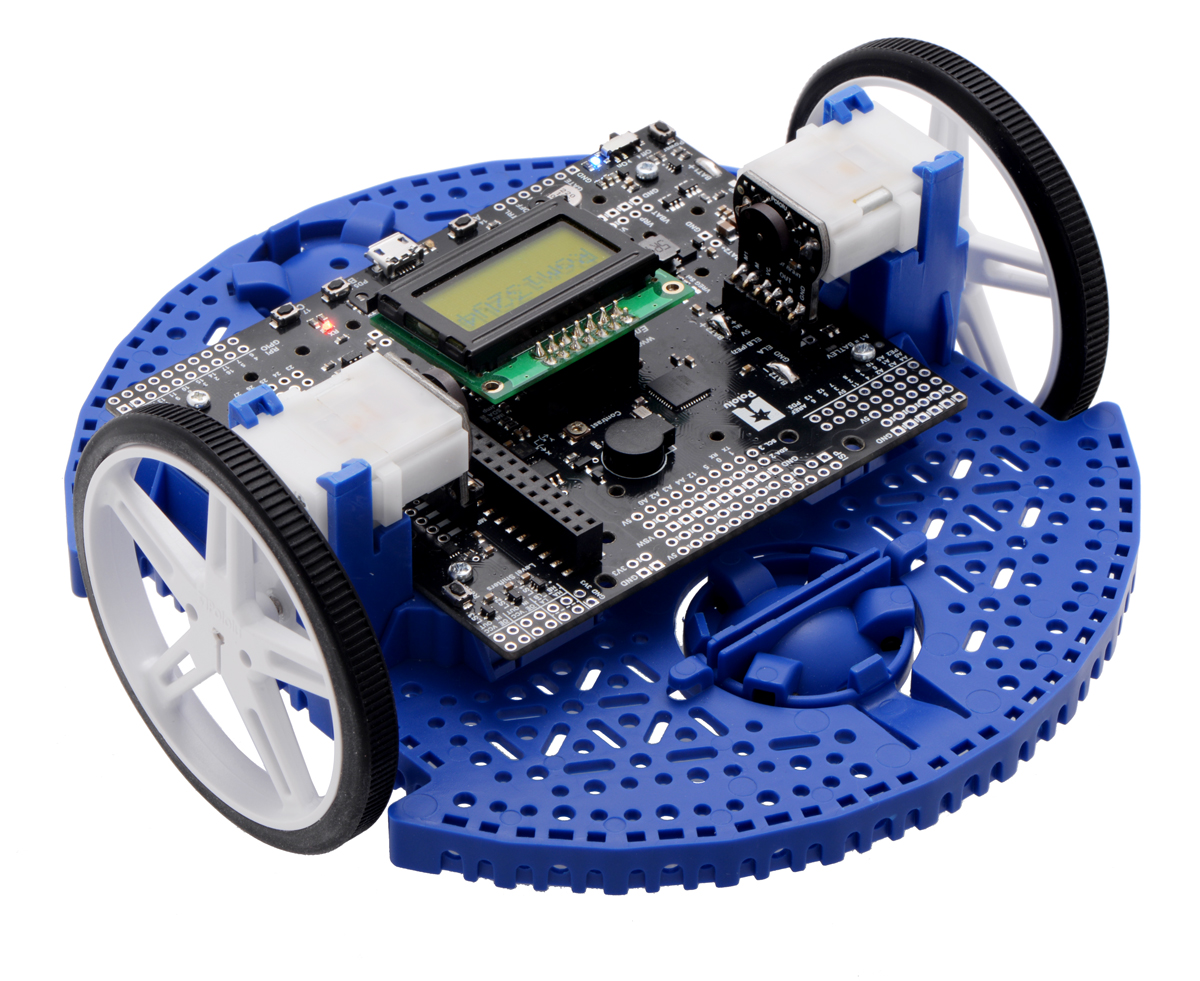
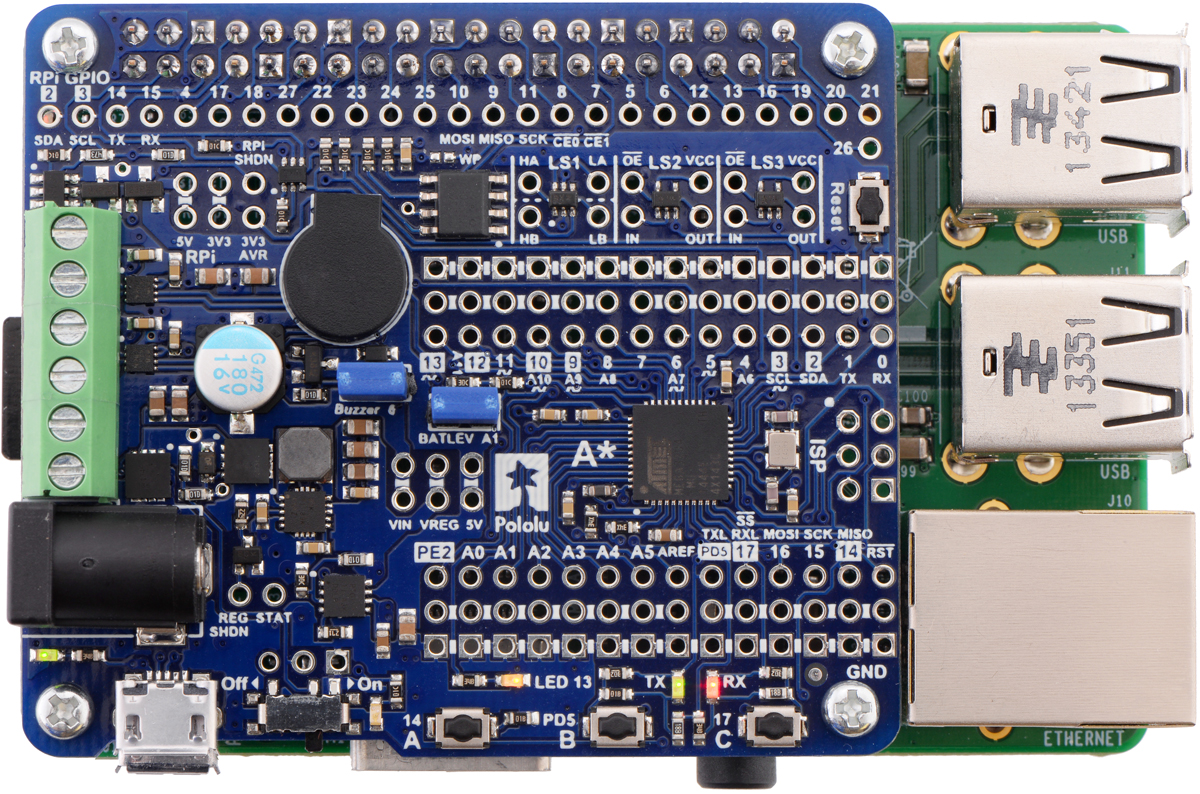
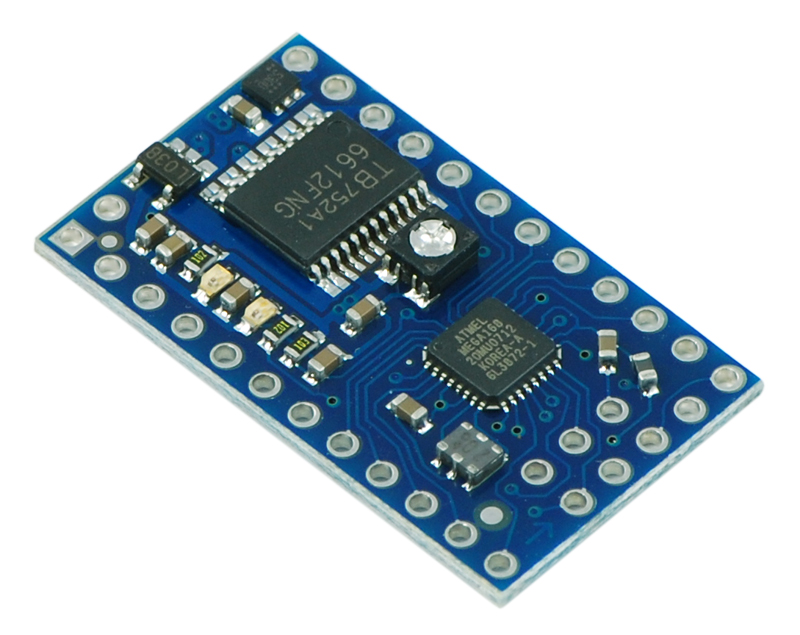
A variety of controllers can be used with the Romi, but until now you have had to figure out lots of wiring to connect everything together. You will always need some wiring to connect your own sensors or other devices, but we have been trying to make it easier to get started, beginning with the Romi power distribution board and motor driver board, which help simplify some of the more difficult parts. Our new Romi 32U4 Control Board is the culmination of this product line: a complete controller solution for the Romi that integrates power, motor control, and an Arduino-compatible microcontroller.
|
|
|
|||
Romi power distribution board, motor driver board, |
|||||
|---|---|---|---|---|---|
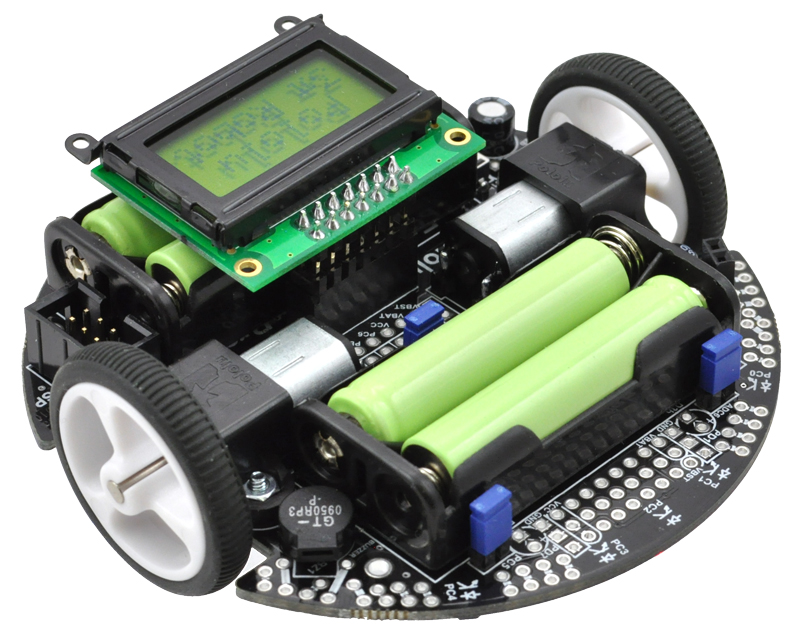
Here is how it looks when connected to a Romi Chassis with motors and encoders plugged in, as well as the optional LCD:
 |
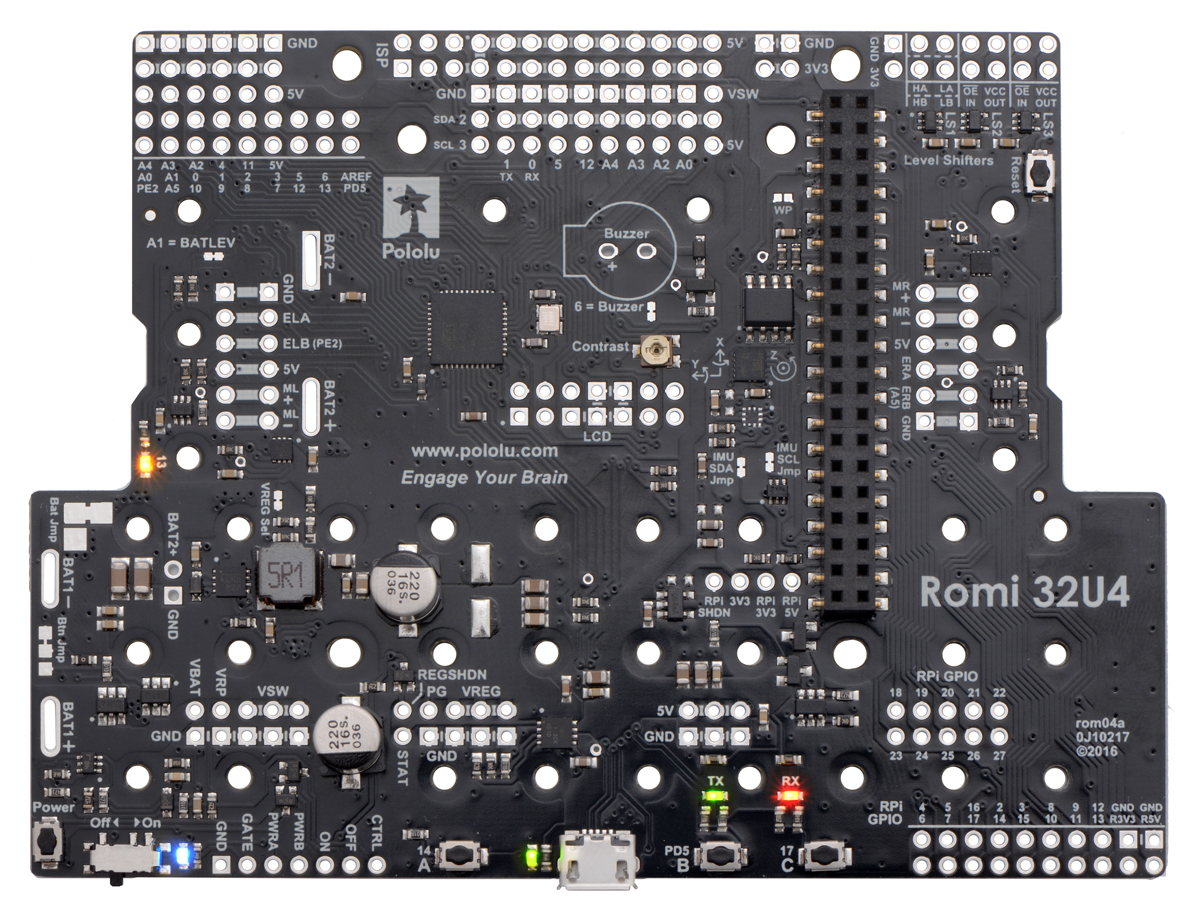
Features of the Romi 32U4 Control Board
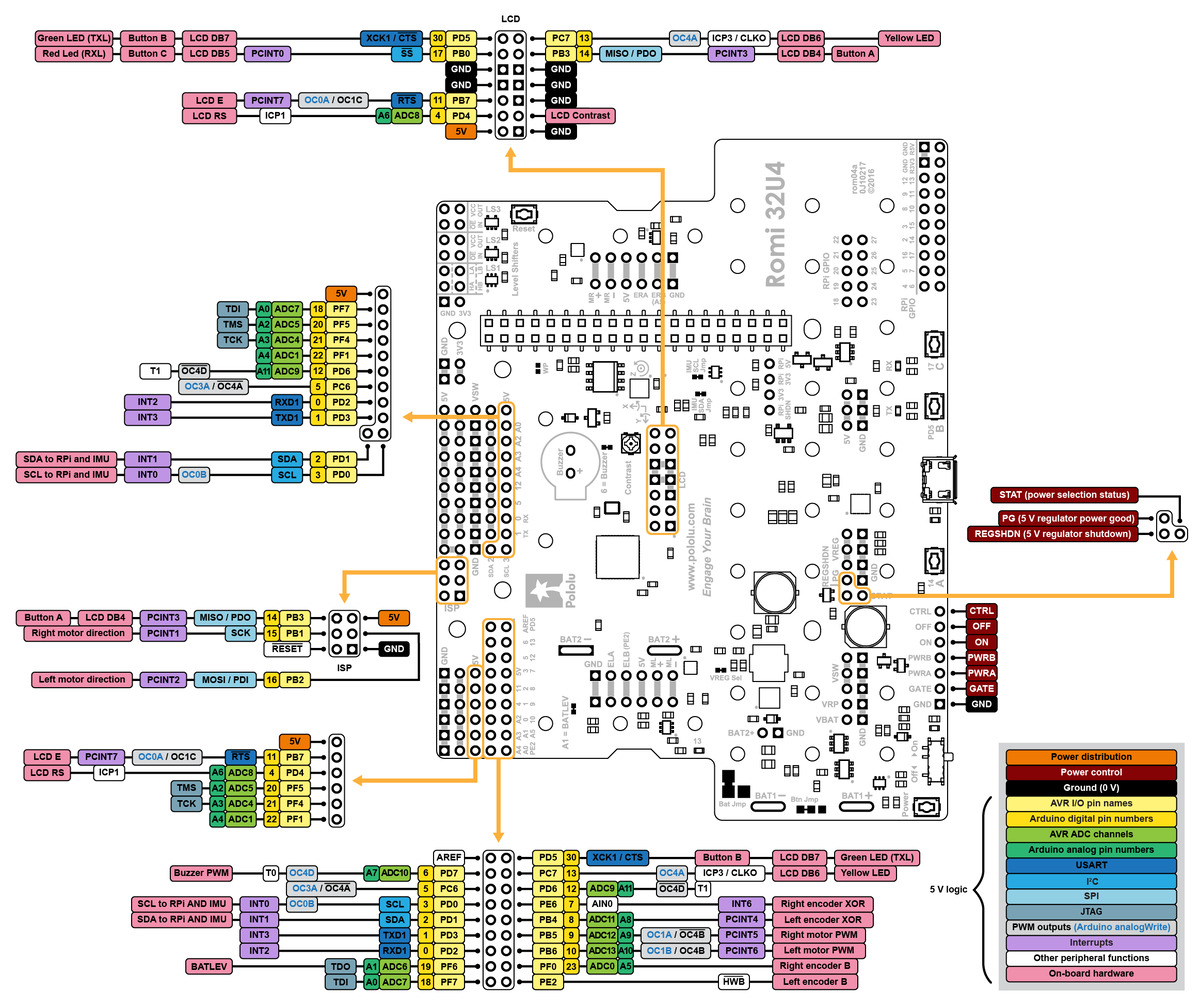 |
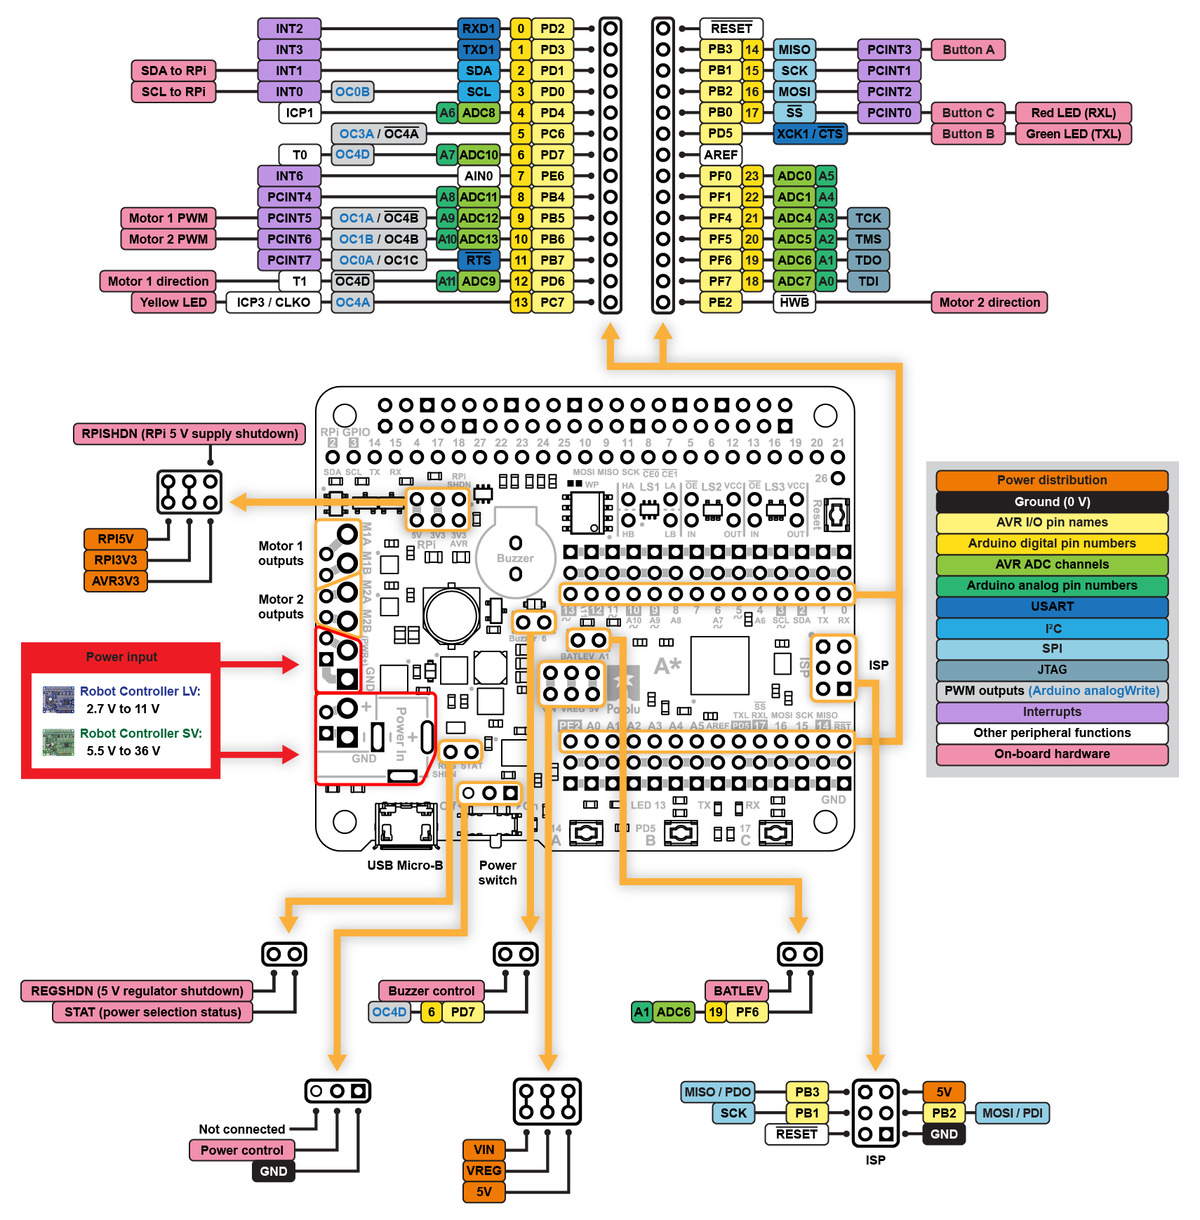
Pinout diagram of the Romi 32U4 Control Board (ATmega32U4 pinout, peripherals, and board power control). |
|---|
- Reverse-protected battery power switch circuit
- Powerful 5 V, 2 A switching regulator
- Dual 1.8 A DRV8838 motor drivers
- ATmega32U4 microcontroller with Arduino-compatible USB bootloader
- 16 free general-purpose I/O ports including 10 analog inputs
- LCD connector
- Buzzer
- Three user buttons
- Five indicator LEDs (2 for power, 3 user-controllable)
- Battery voltage monitoring
- Quadrature encoder inputs
- Four general-purpose level shifters
- 3-axis I²C accelerometer
- 3-axis I²C gyroscope
- Raspberry Pi connector with I²C interface and HAT EEPROM
Raspberry Pi interface
Microcontrollers like the ATmega32U4 are great for fast, timing-sensitive operations such as reading sensors or driving servos, but their computing power is very limited compared to devices like the Raspberry Pi. That is why we built a Raspberry Pi interface into this board: to give you the option to expand your robot beyond what is possible with a microcontroller. This could be useful for anything from advanced applications like computer vision or room mapping to simply letting your robot share status updates on Twitter. Here is a Romi assembled with a Raspberry Pi:
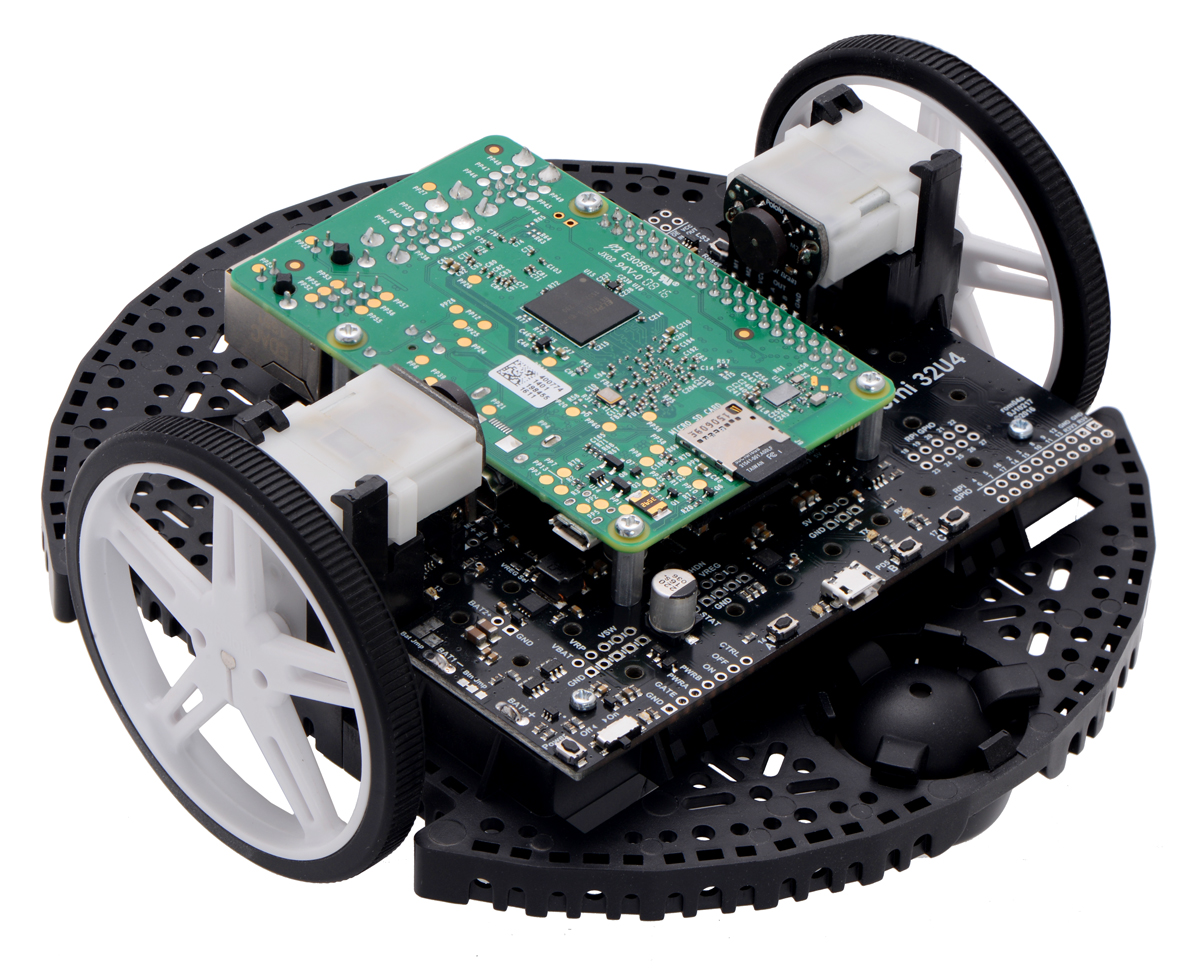 |
When connected, the control board supplies power to the Raspberry Pi and connects to it as an I²C slave device. We include the ID EEPROM required by the HAT specification, though we have not found it particularly useful, so we ship it blank and unlocked for you to experiment with.
Our Arduino library gives example code for I²C connectivity, and you can check out our Raspberry Pi tutorial for the A-Star 32U4 Robot Controller, which we will be updating for the Romi 32U4 Control board.
For more information about the Romi 32U4 Control Board or to order, please see its product page.
Related products


New version of the Wixel Shield for Arduino
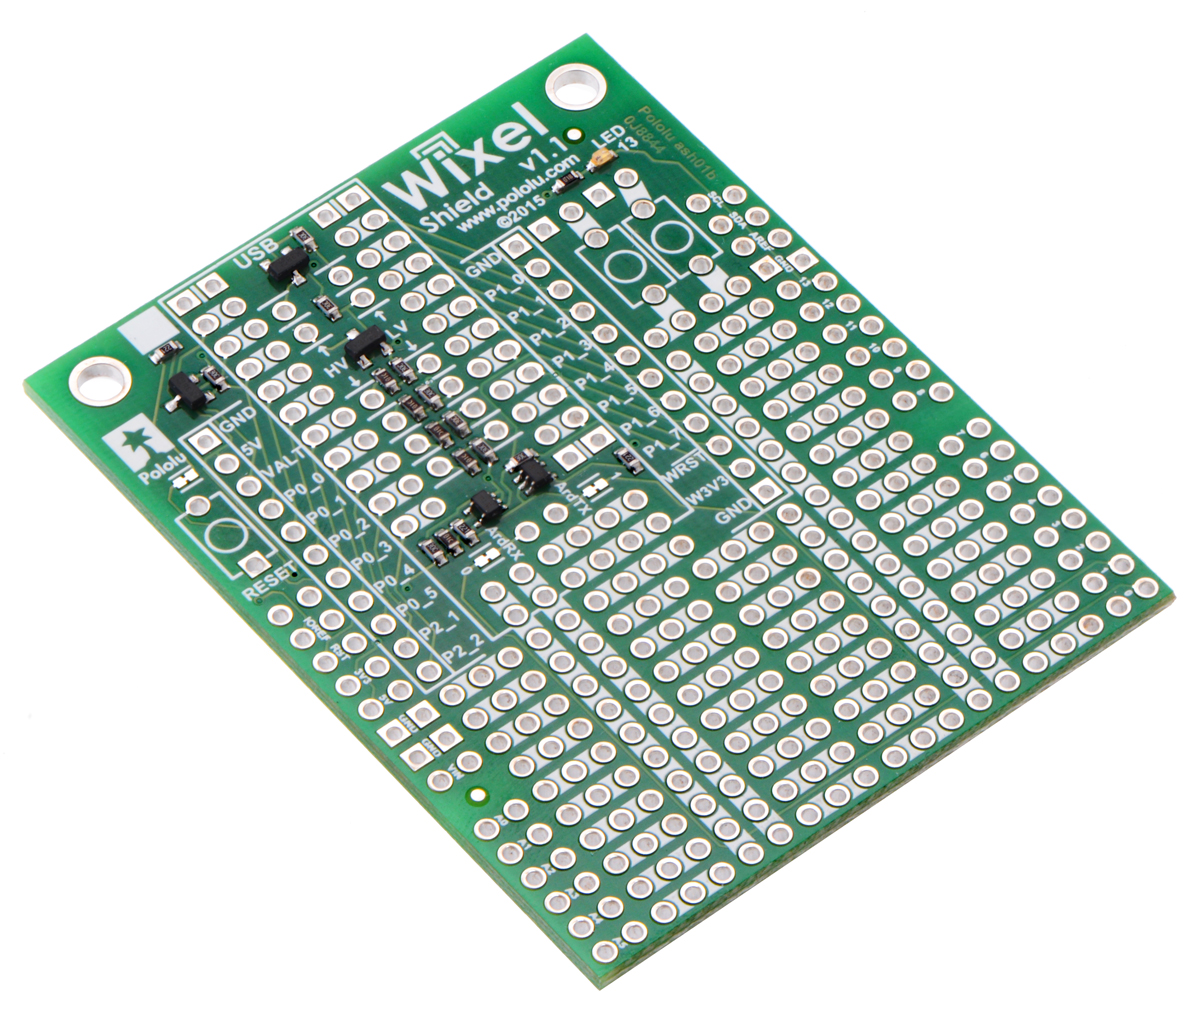 |
We’ve updated our Wixel Shield for Arduino with a few minor improvements. The Wixel Shield provides an easy way to connect a Wixel wireless module to your Arduino or A-Star 32U4 Prime, enabling wireless communication and even wireless programming (on some Arduinos). However, the original version of the shield was released many years ago, so it was not designed with the modern pinout of the Arduino Uno R3 in mind.
The Wixel Shield v1.1 adds pass-throughs for the four new pins—SCL, SDA, IOREF, and an unused pin—introduced by the R3 and present on all newer Arduinos, making it easier to stack other shields with it (especially ones that make use of the new I²C pin location). It also features improved level shifter circuits that make use of the IOREF voltage provided by the Arduino, allowing the shield to work automatically with both 5 V and 3.3 V Arduino boards.
The Wixel Shield for Arduino v1.1 is available by itself and as part of a combination deal that includes a pair of Wixels and a USB cable. See the user’s guide for the shield for additional information.
Related products


New product: Pololu USB AVR Programmer v2
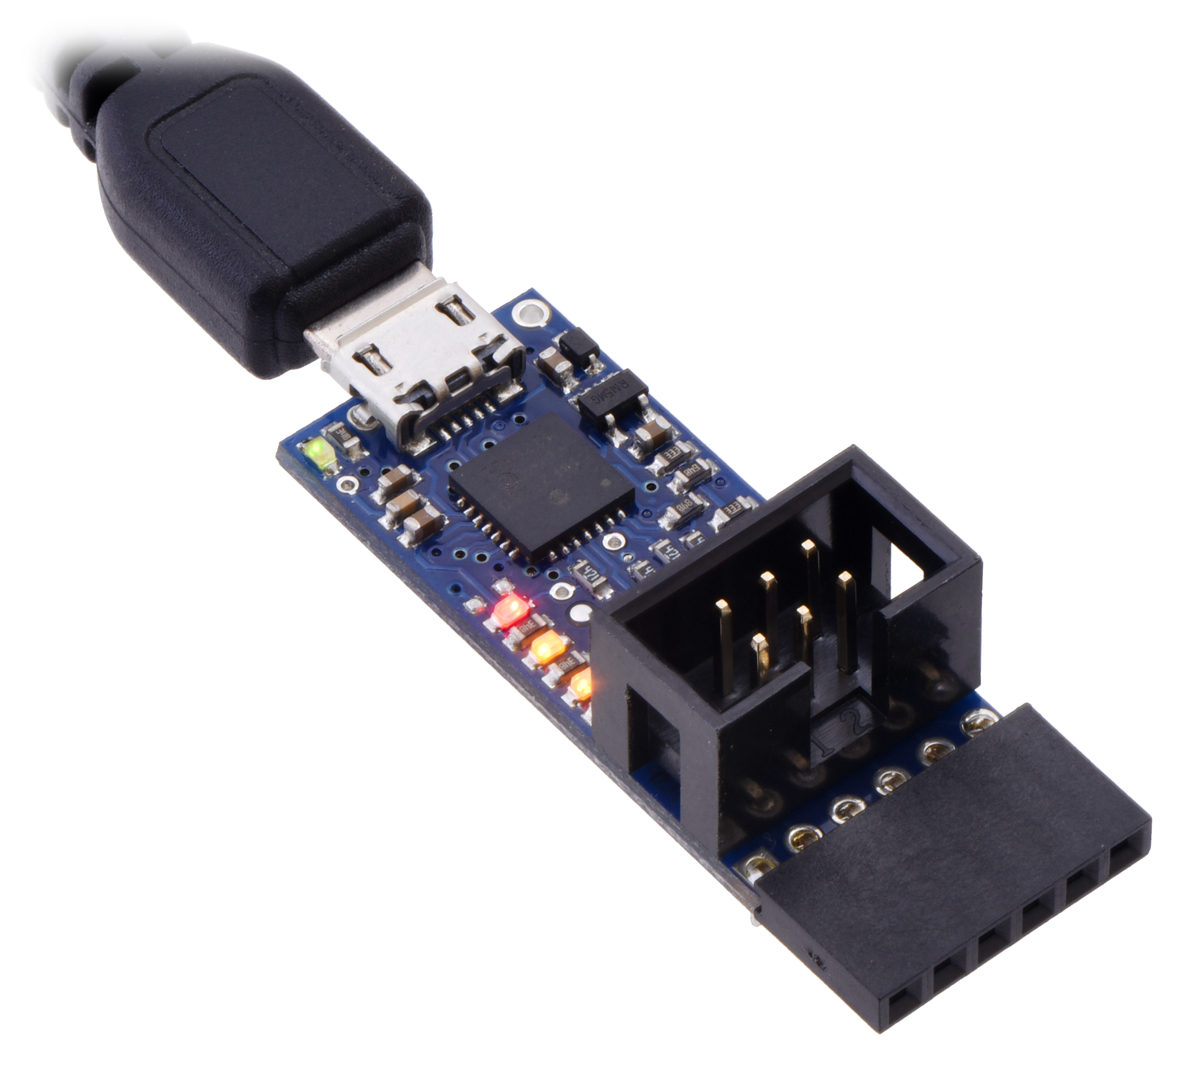 |
I am excited to announce the release of the Pololu USB AVR Programmer v2, a programmer for the popular AVR microcontrollers from Atmel.
Here at Pololu, we have been making AVR programmers for over eight years in order to support products like our Orangutan robot controllers and the 3pi robot. These programmers are used to transfer a compiled AVR program from your computer to the target AVR’s flash memory, allowing it to run the program.
 |
From left to right: the original Orangutan USB Programmer, the Pololu USB AVR Programmer, and the Pololu USB AVR Programmer v2 (which looks almost the same as v2.1). |
|---|
The new Pololu USB AVR Programmer v2 is our third-generation AVR programmer. It is an updated version of our Pololu USB AVR Programmer (product #1300) with many improvements and changes.
To support programming AVR microcontrollers running at 3.3 V, we added an adjustable voltage regulator that allows the programmer to set its own power voltage to either 3.3 V or 5 V. By default, the programmer will operate at 3.3 V, but it measures the voltage on its VCC pin and will automatically switch to 5 V if it detects a high-enough voltage on VCC. You can also disable the automatic switching and just set the programmer to always be 3.3 V or always be 5 V using our configuration software.
With the Pololu USB AVR Programmer v2, we made an effort to increase the programming speed for commonly-used types of AVRs, such as the ATmega328P. With the older Pololu USB AVR Programmer, if you wanted to program all 32 KB of the AVR’s flash memory, it would take about 6.8 s using the maximum ISP frequency of 2 MHz. With the Pololu USB AVR Programmer v2, it takes only about 4.8 s to do the same thing. Also, if your ATmega328P has a high-enough clock speed, you can increase the ISP frequency to 3 MHz and then it would only take 4.3 s. (These numbers are from tests done using AVRDUDE 6.2 in Windows.)
 |
The Pololu USB AVR Programmer v2 has 470 Ω resistors on all of its I/O lines, which will help protect the programmer and your target system from damage in case there is a voltage mismatch or a short circuit.
Programming the fuse bits on an AVR has always been scary because you can accidentally program the wrong clock settings and brick your AVR. With the new Pololu USB AVR Programmer v2, it is a little less scary: the programmer provides a 100 kHz clock output that can be used to send a clock signal to your AVR, which can help you revive it when it has the wrong clock settings. We tested this on the ATmega328P and it probably works on many other AVRs as well. You should still be careful when setting the fuse bits though!
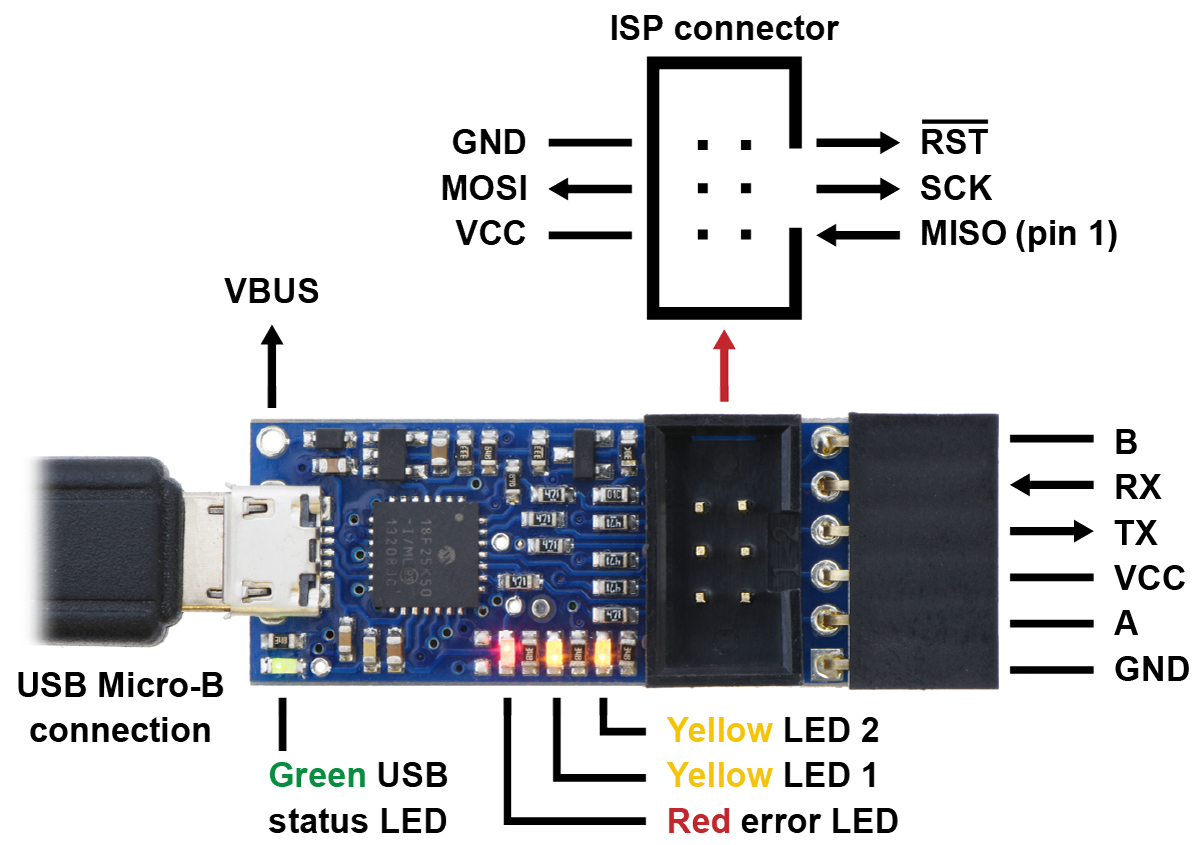
Like its predecessor, the Pololu USB AVR Programmer v2 can act as a USB-to-TTL serial adapter, so you can use it to debug or communicate with your projects over serial. We arranged the serial pins in a more standard arrangement that is similar to commonly-available FTDI USB-to-serial cables and breakout boards. The pins also come with a female header soldered in, so you can plug the programmer directly into a variety of Arduino boards and use it upload sketches via a serial bootloader.
The Pololu USB AVR Programmer v2 is compatible with commonly-used AVR programming software such as Atmel Studio, AVRDUDE, and the Arduino software (IDE).
You can use our open source configuration software for Windows, Linux, and Mac OS X, to change the configuration of your programmer and see useful information about it. We provide both a graphical user interface (GUI) and a command-line interface (CLI). Here is a screenshot of the GUI in Windows:
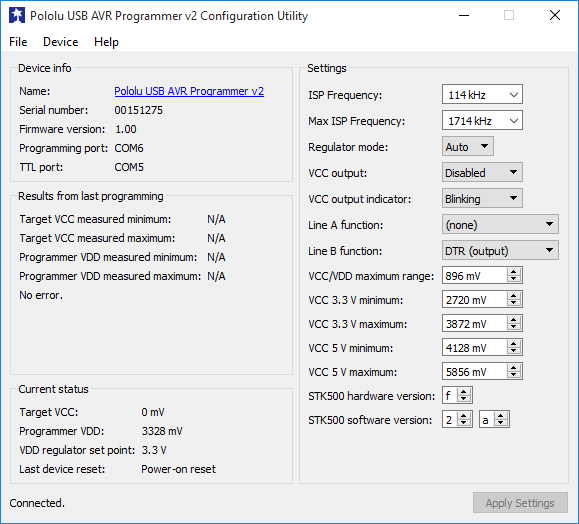 |
The Pololu USB AVR Programmer v2 Configuration Utility in Windows 10. |
|---|
The Pololu USB AVR Programmer v2 uses a relatively new PIC microcontroller, the PIC1825K50. We sell a user-programmable break-out board for this microcontroller called the P-Star 25K50 Micro. One of the exciting features of this microcontroller is that it can do full-speed USB without needing an external crystal or resonator. The USB specification requires devices to have a clock that is accurate to within ±0.25%. On previous products, we usually had to add an external resonator or crystal to the board to meet this requirement. However, the PIC18F25K50 has a neat feature called Active Clock Tuning, which means that it can automatically tune its internal oscillator by monitoring the timing of the USB signals from the computer. This allows the internal oscillator, which is normally not very accurate, to achieve the accuracy needed for USB. This feature allowed us to make the programmer a little smaller and a little less expensive.
For more information, see the Pololu USB AVR Programmer v2 product page.
Related products


Building a Raspberry Pi robot with the A-Star 32U4 Robot Controller
In this post I will show you how to build an expandable robot platform based on a Raspberry Pi and an A-Star 32U4 Robot Controller. With this platform, the powerful Raspberry Pi can take care of high-level tasks like motion planning, video processing, and network communication, while the A-Star, which mounts to the Pi’s GPIO header, takes care of actuator control, sensor inputs, and other low-level tasks that the Pi is incapable of. The total cost of the parts I used is about $120. Continued…
New product: A-Star 32U4 Robot Controller SV with Raspberry Pi Bridge
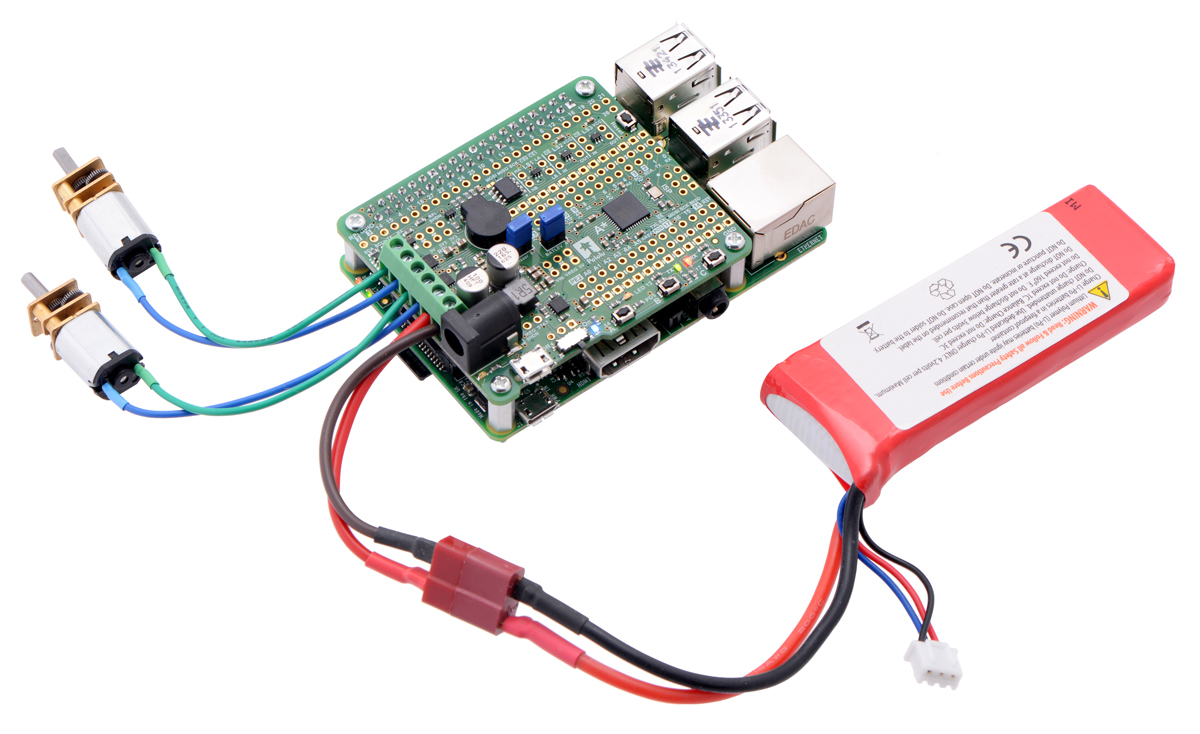 |
Our A-Star 32U4 Robot Controller SV with Raspberry Pi Bridge is now available, joining the LV version we released six months ago.
Similar to its lower-voltage sibling, the Robot Controller SV is a general-purpose robot controller that includes dual motor drivers and other useful peripherals like pushbuttons and a buzzer. It also has the same level shifters and power circuit that allow it to easily power and communicate with a Raspberry Pi when mounted as an auxiliary controller. Like our other A-Star controllers, the A-Star Robot Controller SV built around an ATmega32U4 microcontroller and ships preloaded with an Arduino-compatible USB bootloader.
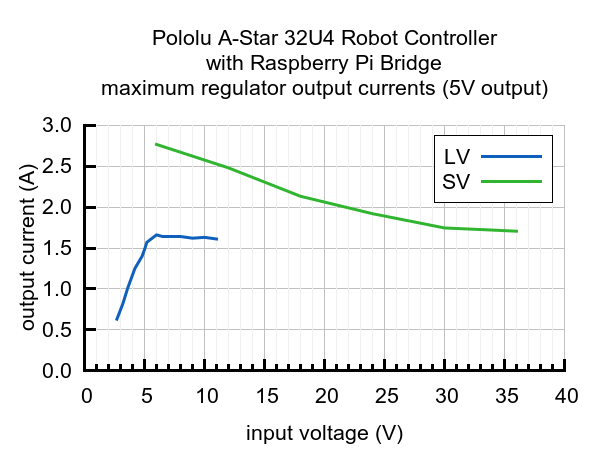
This SV version of the A-Star Robot Controller uses an efficient step-down switching regulator, enabling it to operate (and optionally supply power to an attached Raspberry Pi) with input voltages from 5.5 V to 36 V. Compared to the LV version, the Robot Controller SV can also supply substantially more current across its wide operating voltage range:
 |
We’ve been working on some (long-awaited) I²C software to allow the A-Star to be used as a slave controller with a Raspberry Pi master, as well as an example project that shows how to build a robot with this setup. They’re nearly ready, so watch for them on the blog in the coming weeks. But don’t forget that the A-Star board can also be used by itself as a capable robot controller, as my recent sumo robot demonstrates.
To facilitate both of these uses, the A-Star 32U4 Robot Controller SV is available either assembled for use as a Raspberry Pi add-on or in a more barebones configuration that is suitable for customized assembly or standalone use. See those product pages and the user’s guide for more information about the robot controller.
Related products


New product: A-Star 32U4 Robot Controller with Raspberry Pi Bridge
 |
I am excited to announce our new A-Star 32U4 Robot Controller LV with Raspberry Pi Bridge, a general-purpose robot controller based on Atmel’s ATmega32U4 microcontroller.
This new robot controller is the latest model in our A-Star line of Arduino-compatible USB microcontroller boards. We started with the A-Star 32U4 Micro and have been gradually expanding the line, adding peripherals and various form-factor and voltage options, with the goal of eventually replacing our older Orangutan robot controllers. The Zumo 32U4 was a major step in that direction, since its controller board is essentially an A-Star 32U4 plus extra peripherals for motor control and sensing. But while the Zumo 32U4 is a complete robot kit, this board is for people who want to design their own robot.
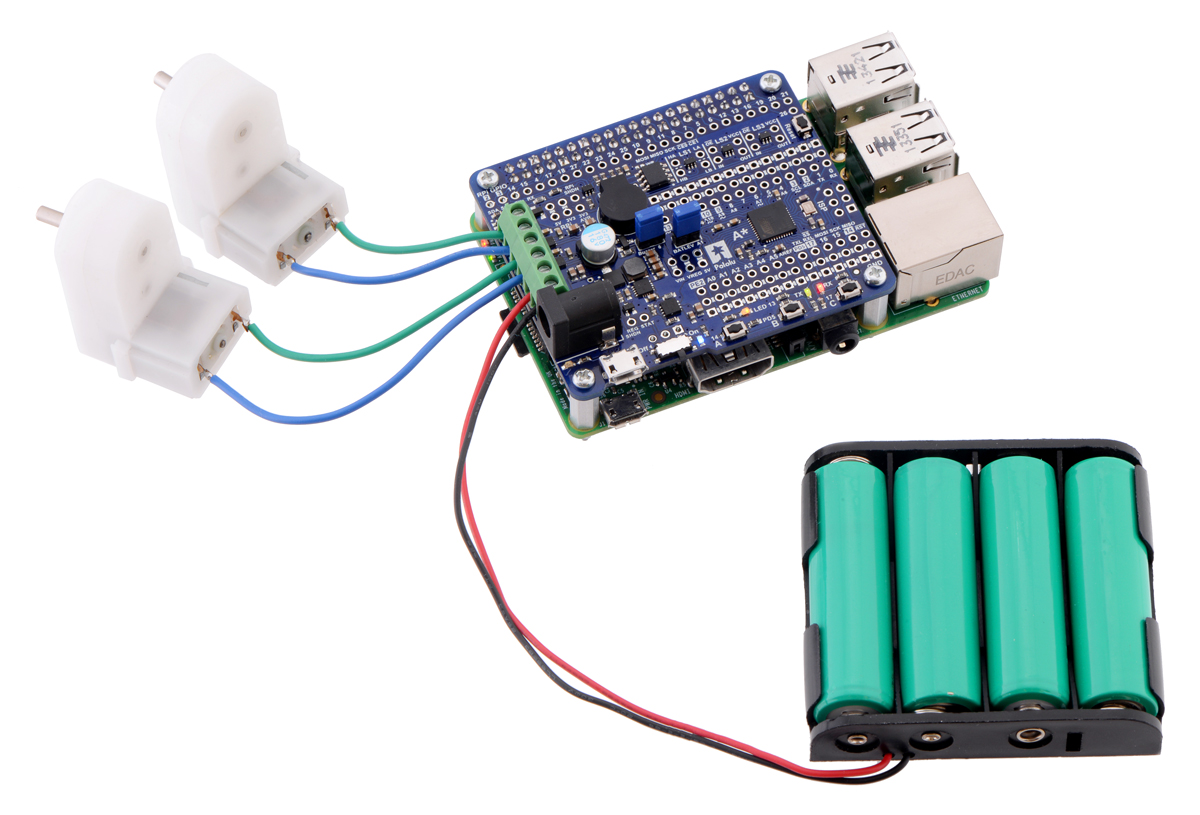
The A-Star 32U4 Robot Controller LV includes most of the features of the A-Star 32U4 Prime LV, including an Arduino-compatible USB bootloader, an efficient step-up/step-down regulator, and handy peripherals like the buzzer and buttons, and it expands on the A-Star line by adding a pair of Texas Instruments DRV8838 1.8 A motor drivers, the same motor drivers as on the Zumo. All of the AVR’s GPIO lines are broken out, and we have included handy power and ground rails so you can easily connect lots of things like servos and sensors:
 |
This board is well-suited for small robots that would have otherwise used an Orangutan controller like the SV-328 or SVP-1284. While we did not include an LCD like on the Orangutans, you can get far better display, monitoring, or data logging by making use of the Raspberry Pi connection, which I will talk about next.
Using the robot controller with a Raspberry Pi
The Raspberry Pi is a great board for an embedded project that needs serious computational power or connectivity. We have released a couple of Raspberry Pi motor driver boards over the past year, which give you a way to get started exploring robotics with your Raspberry Pi. But robotics projects tend to use a lot of analog sensors, timing-sensitive devices like servos, and other peripherals that are not compatible with the limited I/O capabilities of the Raspberry Pi. These types of things are what microcontrollers are designed for, so you can do a lot more if you pair your Raspberry Pi with a complete microcontroller board.
That’s why instead of using the standard Arduino form factor like the Prime, we built the A-Star 32U4 Robot Controller LV to double as a Raspberry Pi HAT:
 |
A-Star 32U4 Robot Controller LV with Raspberry Pi Bridge on a Raspberry Pi Model B+. |
|---|
The Robot Controller fits on top of a Raspberry Pi A+/B+/2, powers the Pi, and connects to it as an I²C slave device, giving you a bidirectional channel of communication between the two processors. We have broken out all of the GPIO of the Raspberry Pi, and there are a few general-purpose level-shifters included on the board to help you experiment with other communications protocols or interface other hardware to your system. We even include the EEPROM required by the HAT specification, though we have not found it to be particularly useful – we ship it blank and unlocked for you to experiment with.
For more information about the A-Star 32U4 Robot Controller LV, or to order, see the product page. You can also check out our open-source A-Star 32U4 Arduino library, which provides easy access to the main features of the Robot Controller, including its motor drivers; we will be adding examples showing I²C communication with the Raspberry Pi soon.
Related products


Arduino Day 2015 Sale
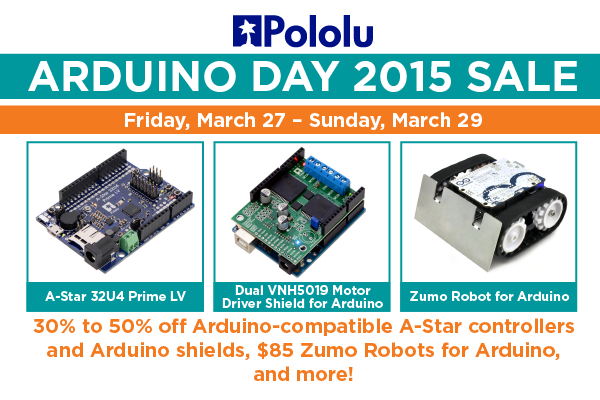 |
Tomorrow is Arduino Day, and we are joining in on the fun by offering big discounts on many of our Arduino-related products, including our A-Star programmable controllers and Arduino shields. The sale has already started, and it will run through the end of Sunday (I know, Arduino Day is a one-day event, but this makes sure the sale lasts all Arduino Day in every time zone). You can find all of the sale items on our Arduino Day 2015 sale page.
Update: Orangutans and 3pi robot can be programmed with Arduino 1.6.0
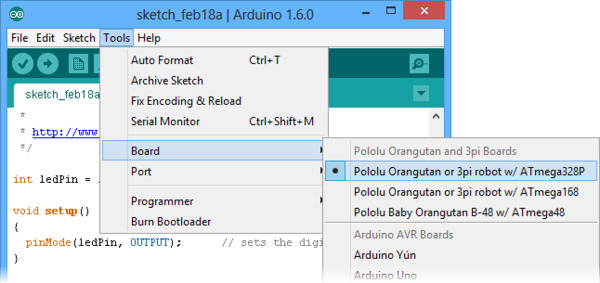 |
We have updated our Programming Orangutans and the 3pi Robot from the Arduino Environment document to support version 1.6.0 of the Arduino IDE, which is the latest stable version. Thanks to improvements in the Arduino IDE, we were able to make the instructions for getting started much easier.
|
|
The Orangutan line of AVR-based robot controllers started ten years ago and has since expanded to include boards with a variety of AVR processors and on-board peripherals, from the minimal Baby Orangutan B-328 to the powerful Orangutan SVP-1284 and X2. Many of the Orangutans share handy features like a buzzer, LCD, and buttons, but the integrated dual motor drivers found on every Orangutan are what justify calling it a “robot controller”. Our 3pi robot is an extension of Orangutan concept to a complete robot, so we think of the 3pi as pretty much part of the Orangutan family.
(Don’t need integrated motor drivers? Check out our Arduino-compatible A-Star family of microcontroller boards.)
 |
Original Pololu 3pi robot. |
|---|
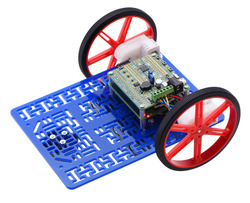
The Orangutan SV-328, Baby Orangutan B-328, and 3pi all use the same AVR ATmega328P processor as the Arduino Uno, so it is natural to want to program them from the Arduino environment. However, there are a couple of key differences to overcome. First, the boards have no pre-installed Arduino bootloader or built-in USB-to-serial adapter. This simplifies the design and frees up some resources for your application, but it means you have to program them with an external programmer like the Pololu USB AVR Programmer. Also, the clock on these boards runs at 20 MHz, while the official Arduinos are at 16 MHz, so time-sensitive code might not be compatible.
Adding support for the Orangutans and programmer to the Arduino IDE used to involve manually editing a few configuration files with a text editor. With this latest update, you can simply copy a folder into your Arduino sketchbook directory.
Another notable Arduino change is improved support for AVRs running at different speeds. Functions such as delay and pulseIn now adapt to the clock frequency specified by the F_CPU macro and should work fine on an Orangutan running at 20 MHz.
To get started, see our guide.
Related products


Maestro Servo Controller Arduino library

It has always been possible to control your Maestro Servo Controller from your Arduino-compatible controller with the Maestro’s serial interface, but now it is easier to get started using our new Arduino library. The library implements (and documents) all of the serial commands available on the Maestro controllers and supports all three sub-protocols (Compact, Pololu, and MiniSSC). Continued…


Home | Forum | Blog | Support | Ordering Information | Lists | Distributors | BIG Order Form | About | Contact
© 2001–2026 Pololu Corporation


