Pololu Blog » Posts tagged “arduino” »
Posts tagged “arduino” (Page 2)
You are currently viewing a selection of posts from the Pololu Blog. You can also view all the posts.
Popular tags: community projects new products raspberry pi arduino more…
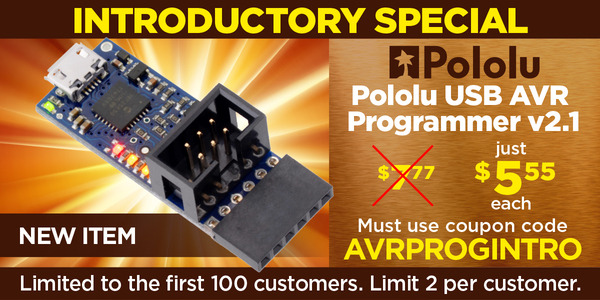
New product: Pololu USB AVR Programmer v2.1
Our new programmer, the Pololu USB AVR Programmer v2.1, was supposed to be a minor update to our existing programmer, coming right after the A-Star 328PB Micro that we released last month, with the main point of excitement being the Las Vegas-inspired $7.77 price. But as we were testing the combination of the programmer with the A-Star, we were getting brown-out resets on the programmer when it powered the A-Star. The relevant part of the circuit was just a P-channel MOSFET that connected the programmer’s own logic voltage (which we call VDD) to the VCC pin of the ISP connector:
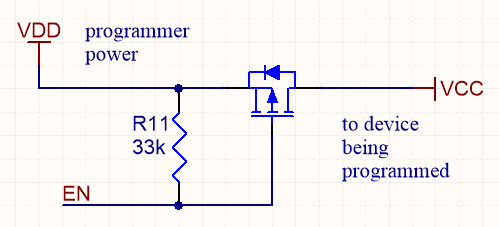 |
MOSFET-based target VCC power control used on Pololu USB AVR Programmer v2. |
|---|
The problem was caused by the MOSFET turning on too well (quickly and with low resistance), causing the logic voltage on the programmer to drop if the VCC of the target device had more than a few µF of discharged capacitance on it. The bigger the capacitance on VCC, the bigger the voltage drop on VDD, until eventually the drop was big enough to trigger the brown-out reset protection on the programmer’s microcontroller. We tried various firmware tricks with our existing hardware, such as turning on the MOSFET for very short pulses to gradually charge up the target device’s VCC capacitance, but none of them worked reliably enough. So in the end, we decided to redo our PCB and put in a dedicated high-side power switch with a controlled slew rate. The new programmer can now power target boards with up to about 33 µF on their logic supplies.
These are the two other improvements we made to the new v2.1 programmer over the older v2 programmer:
 |
- Plugging a v2 programmer into a 3pi robot could cause one of the motors to briefly run at full speed because the programmer’s circuitry for measuring VCC could inadvertently pull up one of the 3pi’s programming pins (which doubles as a motor driver input) before the GND connection was established. The v2.1 programmer has improved circuitry for measuring VCC which limits the duty cycle of this effect to about 0.2%, so the motor won’t move (but it might make a 25 Hz clicking sound).
- The v2 programmer would typically brown-out if a 5 V signal was applied to its RST pin while it was operating at 3.3 V. The v2.1 programmer does not have this problem.
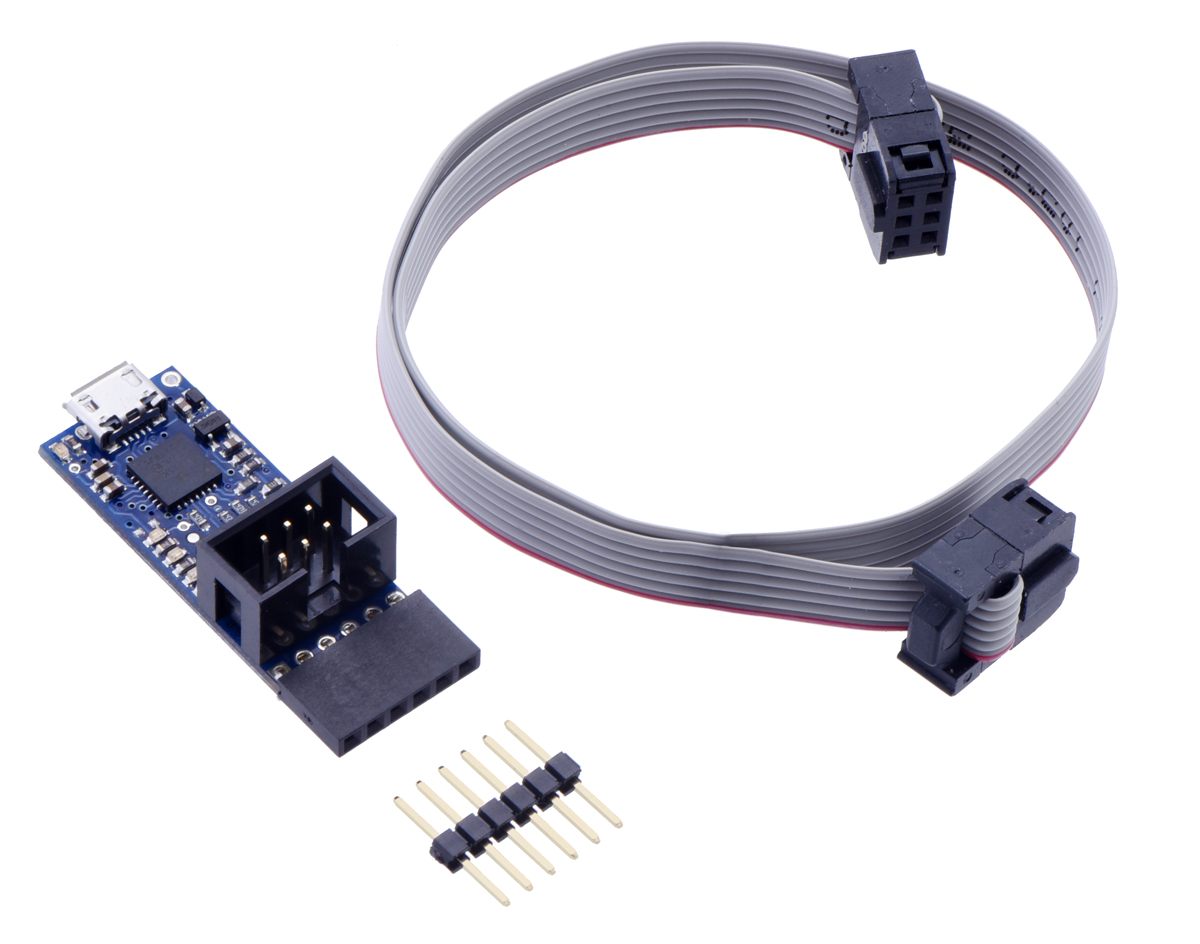
The v2.1 programmer is otherwise identical to the v2 programmer, which means it’s a USB AVR microcontroller programmer that can program targets at 3.3 V and 5 V and offers an extra UART-type TTL serial port (like the popular FTDI USB-to-serial adapters) that can be super handy for debugging, bootloading, or even general connection of your project to a USB port.
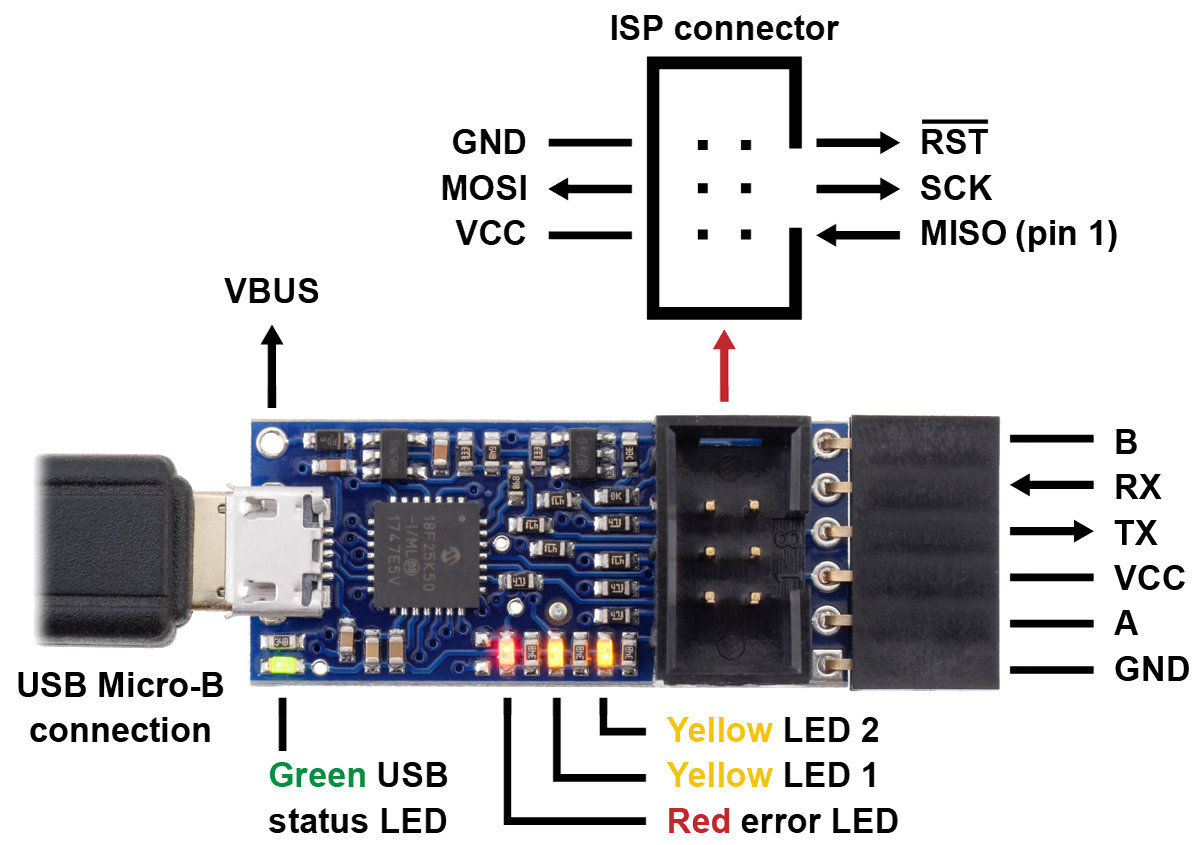 |
Pololu USB AVR Programmer v2.1, labeled top view. |
|---|
The v2 programmer was already a good deal at under $12, but at $7.77, and with free shipping in the USA, we hope to make AVR development extremely accessible. The manufacturing improvements and other cost reduction initiatives I have been blogging about this year help us make this offer without losing money on it, but I am not expecting to be making money directly off of the programmers, either. My goal is to give you the best value in a basic tool you will use over and over as you build your own projects, with the hope that that will help you keep Pololu in mind the next time you need some electronics or robotics parts.
And, as usual for our new product releases this year, we’re offering an extra introductory discount: the first 100 customers to use coupon code AVRPROGINTRO get that already great $7.77 price dropped to $5.55 (limit 2 per customer). (Click to add the coupon code to your cart.)
Related products

New product: A-Star 328PB Micro
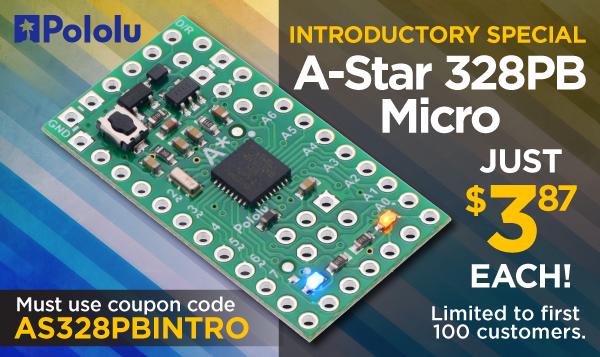
Today we are releasing our newest A-Star programmable controller, the A-Star 328PB Micro. It is basically our version of the ubiquitous Arduino Pro Mini type products, but with the newer ATmega328PB microcontroller. The board itself is pretty straightforward (though the updated AVR is exciting), so the main thing I want to share in this post is our history with the Atmel ATmega328PB microcontrollers (this was before Microchip acquired Atmel) and how this product would not have existed without our lower-cost manufacturing initiative that I have been discussing.
We have been using the ATmega8, and then the ATmega48, ATmega168, and ATmega328P, since 2004 in many of our user-programmable products because of their versatility and excellent free compiler support (which also made Arduino possible). We first heard about the ATmega328PB in early 2014. The product kept being delayed, and I did not get a quote for them until October 2015. I ordered a reel right away; it arrived in March 2016. Over those two years, we put our AVR-related efforts into the ATmega32U4, releasing several A-Star 32U4 programmable controllers and using it on robots like the Zumo 32U4. The ATmega32U4 was a superior part with native USB and more I/O lines, making it a better fit for many of our applications. By the time we finally got the ATmega328PB parts, we had the A-Star 32U4 Micro available for just $12.75, making it less exciting to put effort into a lower-performance product that might end up costing almost the same amount.
 |
Original ATmega168-based Baby Orangutan robot controller from 2005 (left) next to A-Star 32U4 Micro boards. |
|---|
The new manufacturing equipment I ordered in the fall of 2017, along with the availability of our latest AVR programmer, brought attention back to the feasibility of a basic ATmega328PB carrier. I was hesitant to put effort into a product where we could not offer something substantially more compelling than what was already available. Despite the ATmega328PB being out in the wild for almost two years, it still had not really made it into many Arduino products, so I thought that perhaps we could offer something there. But more importantly, I wanted to see how low we could price it. I was aware of Arduino Pro Mini clones available on eBay and the AliExpress-type sites for under $3. Most official Arduino Pro Mini type products cost more like $10. For this project to be worthwhile, I wanted to get under $5.
It turns out we had to squeeze quite a bit just to get to the upper limit of that “under $5” goal, and so we are releasing this product at a unit retail price of $4.95. It’s not the under-$3 you can find for the absolute cheapest clones, but if you get the A-Star 328PB Micro from us, you are getting a well-supported, well-made product (each unit is 100% automatically visually inspected and 100% functionally tested) and supporting a company that is doing more than just copying products that are already out there.
It is my hope that by being able to offer the A-Star 328PB Micro for under $5, we are offering something meaningful, giving you a new option for general-purpose controllers at the price of a cheap lunch. I am interested to hear what you think. Is the 328PB interesting when you can get USB for not much more? Is the price low enough for you to buy from us instead of getting it from China?
We are offering the A-Star 328PB Micro in four voltage and frequency combinations:
- 5 V, 16 MHz (blue power LED)
- 5 V, 20 MHz (red power LED) Note: See item-specific page for speed warning.
- 3.3 V, 8 MHz (green power LED)
- 3.3 V, 12 MHz (yellow power LED)
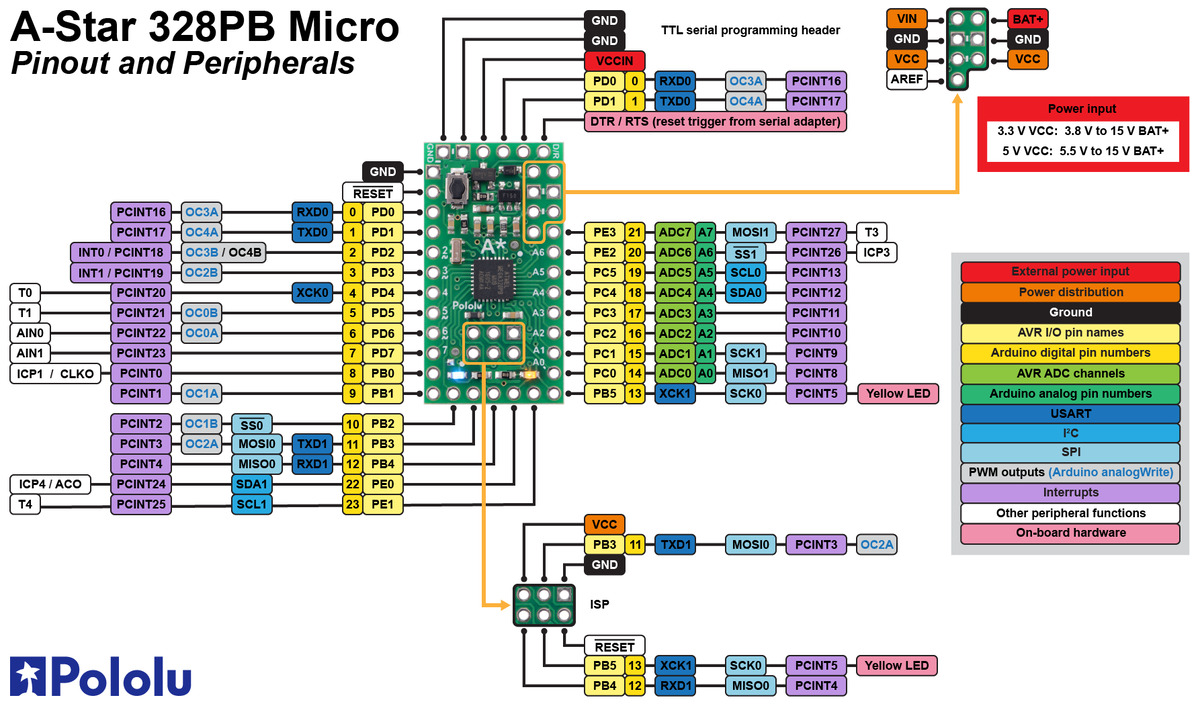 |
A-Star 328PB Micro pinout diagram. |
|---|
The A-Star 328PB Micro provides access to all 24 I/O lines of the microcontroller and ships with an Arduino-compatible serial bootloader; you can also use an AVR in-system programmer (ISP) for access to the entire chip. We recommend our USB AVR Programmer v2, which supports both programming interfaces and can be configured to run at either 3.3 V or 5 V.
Last but not least, we are continuing our plan of offering new products at the highest quantity price break at single unit quantities as an introductory celebration. That means that for the first 100 customers, you can get an A-Star 328PB Micro for just $3.87! (Must use coupon code AS328PBINTRO; click to add the coupon code to your cart.)
While we assemble (and design and document and ship and support) the boards here in Las Vegas, we still get the bare PC boards from China, where they are currently on holiday celebrating Chinese New Year. That is constraining how many units we can make at the moment, so we are limiting shipments to 5 units per customer. However, the introductory coupon has no quantity limit, and you can order more than five at that price if you would like. Backordered units are likely to ship within a few weeks.
Related products


Guide utilisateur du Robot Zumo Pololu
 |
MCHobby, a Pololu distributor, translated the Pololu Zumo Shield for Arduino User’s Guide to French as the Guide utilisateur du Robot Zumo Pololu (2MB pdf)! They describe it in French as “Un guide complet pour assembler, utiliser et exploiter rapidement votre Robot Zumo (version 0.1)”. If you’d like to see more translations like this, please let them you know that you enjoyed it and support them by buying from their shop.
Related products


How to make a Balboa robot balance, part 5: popping up and driving around
This is the fifth and final post in a series about how to make a Balboa 32U4 robot balance. In earlier posts I covered everything you need to get the robot balancing. In this post I will talk about how to get your Balboa to perform some fun and challenging maneuvers.
If you have been following along, you should now have your robot using its inertial sensors, motors, and encoders together to balance in place. Now it’s time to get it moving! Our first challenge will be to get it to “pop up” from a resting position into a balancing position. Then I will show how you can get the Balboa to drive around while balancing. Continued…
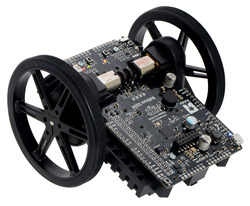
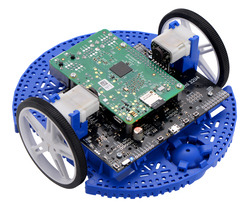
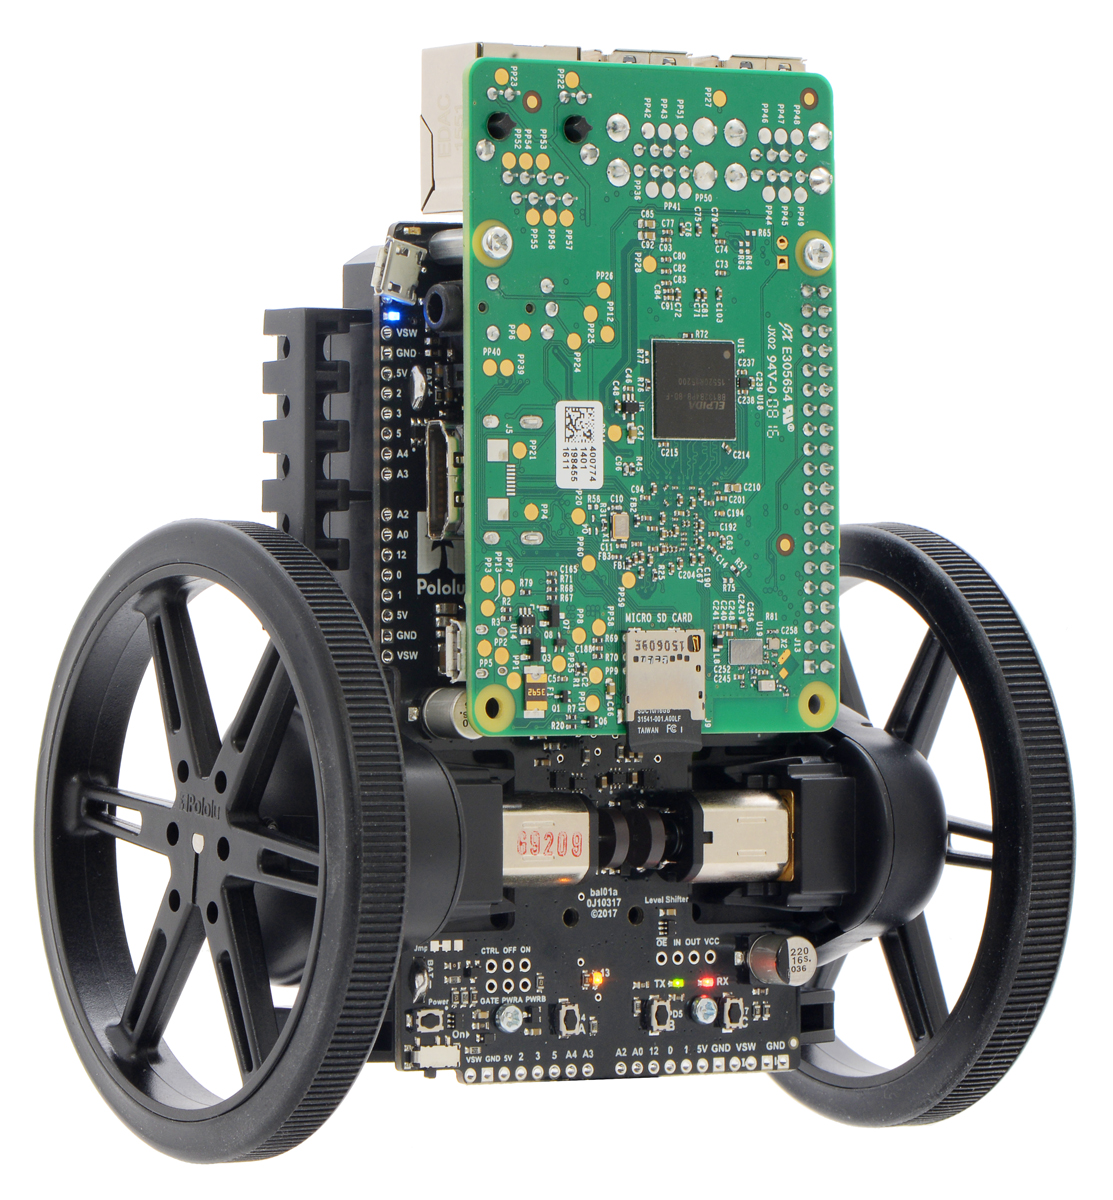
Building a Raspberry Pi robot with the Romi chassis
This tutorial shows how to build a basic Raspberry Pi robot with the Romi chassis and the Romi 32U4 Control Board, our Arduino-compatible microcontroller board designed specifically for the Romi. With this setup, the powerful Raspberry Pi can take care of high-level tasks like motion planning, video processing, and network communication, while the Romi 32U4 Control Board takes care of low-level tasks that the Pi is incapable of, such as motor control and sensing. Continued…
How to make a Balboa robot balance, part 4: a balancing algorithm
This is the fourth post in a series about how to make a Balboa 32U4 robot balance. In earlier posts I covered the basic sensors and mechanical parts used for balancing; in this post I will show you how to put everything together to make the robot actually balance.
From earlier posts we have obtained six basic variables for use in balancing: Continued…
Arduino library for Sharp distance sensors
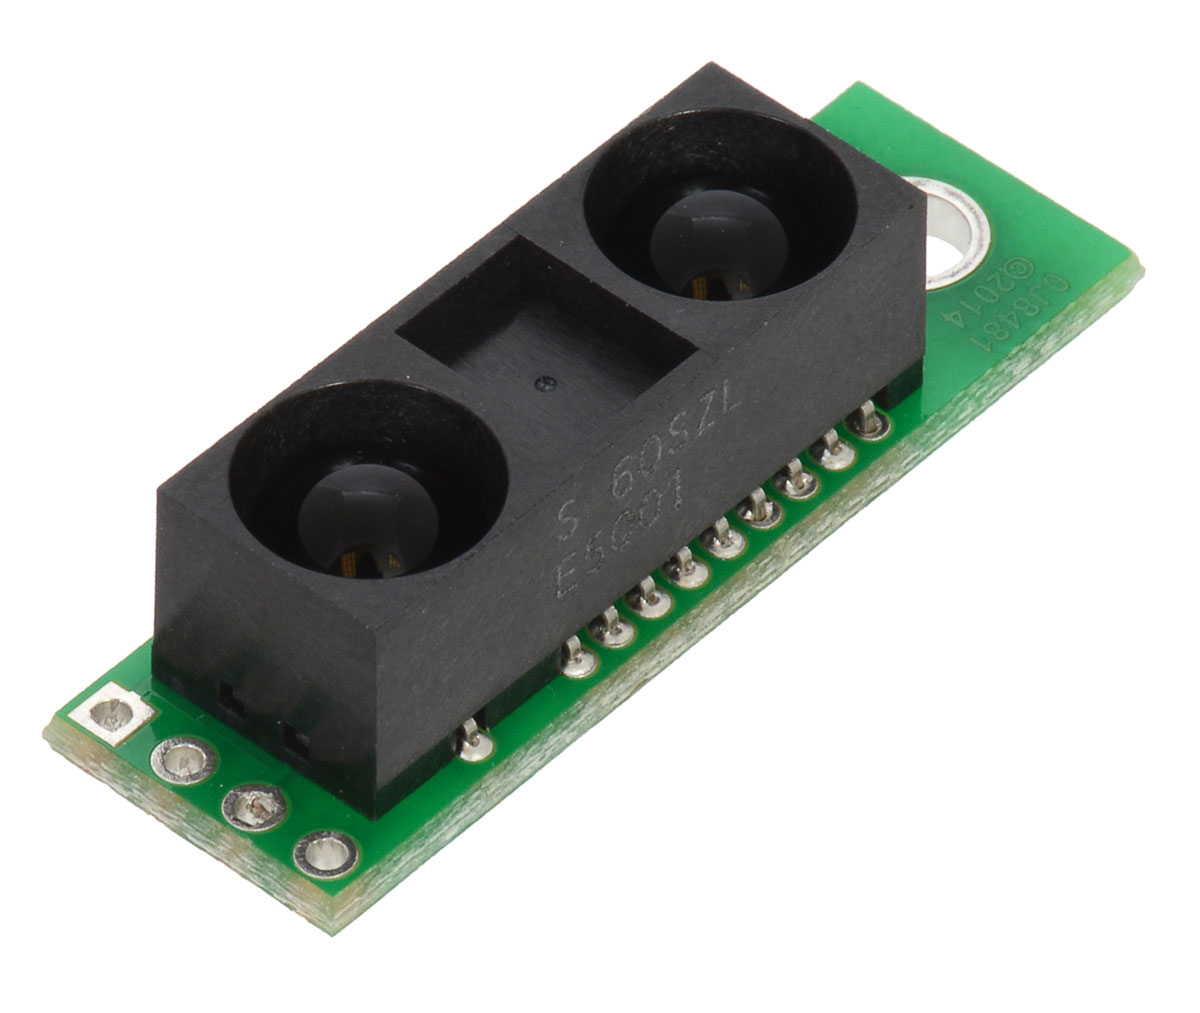 |
Julien de la Bruère-Terreault (also known as DrGFreeman on the Pololu Forum, creator of the Custom Mini Sumo robot and the Romi and Raspberry Pi robot shared on this blog) made “SharpDistSensor” an Arduino library for analog Sharp distance sensors. If you’re running a recent version of the Arduino IDE, you can install it with the Library Manager. The library reads the sensor’s analog voltage output, filters the data, and converts it to a distance measurement. By default it is calibrated to work with the Sharp GP2Y0A60SZLF analog distance sensor 10-150cm 5V, but you can calibrate it to other analog Sharp distance sensors (if you can fit a power function or a fifth order polynomial to the voltage vs distance response of your sensor). Pull requests are welcome for supporting other Sharp distance sensor models!
The readme, library code, and example sketches are available in the GitHub repository.
Related products


How to make a Balboa robot balance, part 3: encoders
This is the third post in a series about how to make a Balboa 32U4 robot balance. Last week I talked about inertial sensors, especially the gyro. In this post I will talk about the Balboa’s built-in encoders, which allow accurate measurements of motor speed and distance.
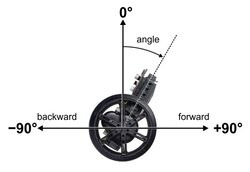
To get your Balboa to balance, you will soon need to create a balancing algorithm, a program that takes sensor input and computes the appropriate motor speed settings to keep the robot upright. So far our only inputs, both from the gyro, are the rate of rotation and current angle of the robot. These are not quite enough to make a good balancer. To see why, suppose that your program tries to balance by holding the angle at a constant 90°. If your definition of 90° is even slightly off-balance, the robot will need to keep accelerating, driving faster and faster to maintain it, until it reaches top speed or hits an obstacle. You might be able to account for this by using the motor output settings themselves as an input to your algorithm, but this is difficult, especially at the low speeds used for balancing. Also, even if you can avoid accelerating, your robot will gradually drift in one direction or the other. The Balboa’s encoders are valuable additional sensor inputs that allow you to measure how fast the wheels are actually turning, so you can directly control acceleration and drift. As a bonus, encoders are great for driving straight, precision turns, and navigation. Continued…
How to make a Balboa robot balance, part 2: inertial sensors
This is the second post in a series about how to make a Balboa 32U4 robot balance. Last week I talked about selecting mechanical components. In this post I will cover the inertial sensors included on the Balboa’s control board and how to use them in your code.
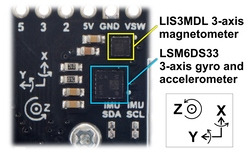
The key to Balboa’s balancing ability is the built-in ST LSM6DS33 IMU chip, which combines a 3D gyroscope and a 3D accelerometer. The Balboa also includes an ST LIS3MDL 3-axis magnetometer. Both sensors are connected to the AVR via I²C, giving it access to a total of nine sensor channels. These nine channels can be used in software to make an AHRS (attitude and heading reference system), a system that gives the robot a sense of its orientation in three dimensions. AHRS software is particularly important in aviation/drone applications, but for basic balancing, you don’t need anything that complicated. In fact, a single gyro channel is enough to determine the robot’s angle of rotation relative to vertical. The gyroscope’s y-axis channel measures the Balboa’s forward/backward rate of rotation; that is the channel we will be looking at here. Continued…
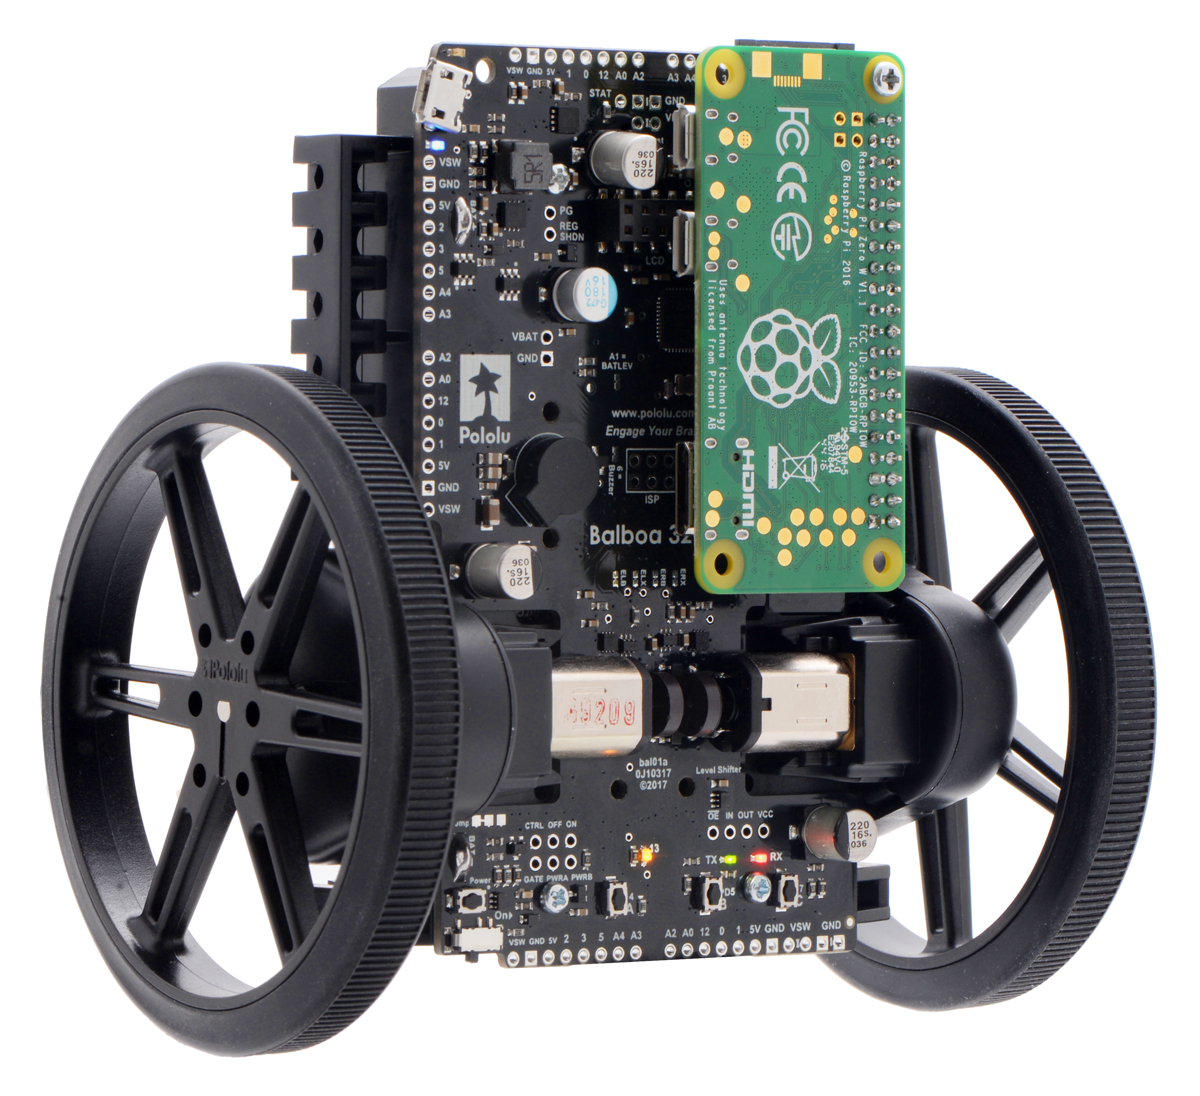
Balboa is here!
 |
I am excited to announce the release of the Balboa robot! The Balboa is a two-wheeled balancing robot platform that is small enough to tempt you to run it on a desktop, but it’s quick enough that you should probably stick to bigger, softer surfaces. Or at least put a safety net or foam pit around your desk. Here is a short video showing it kicking up into balancing position and driving around:
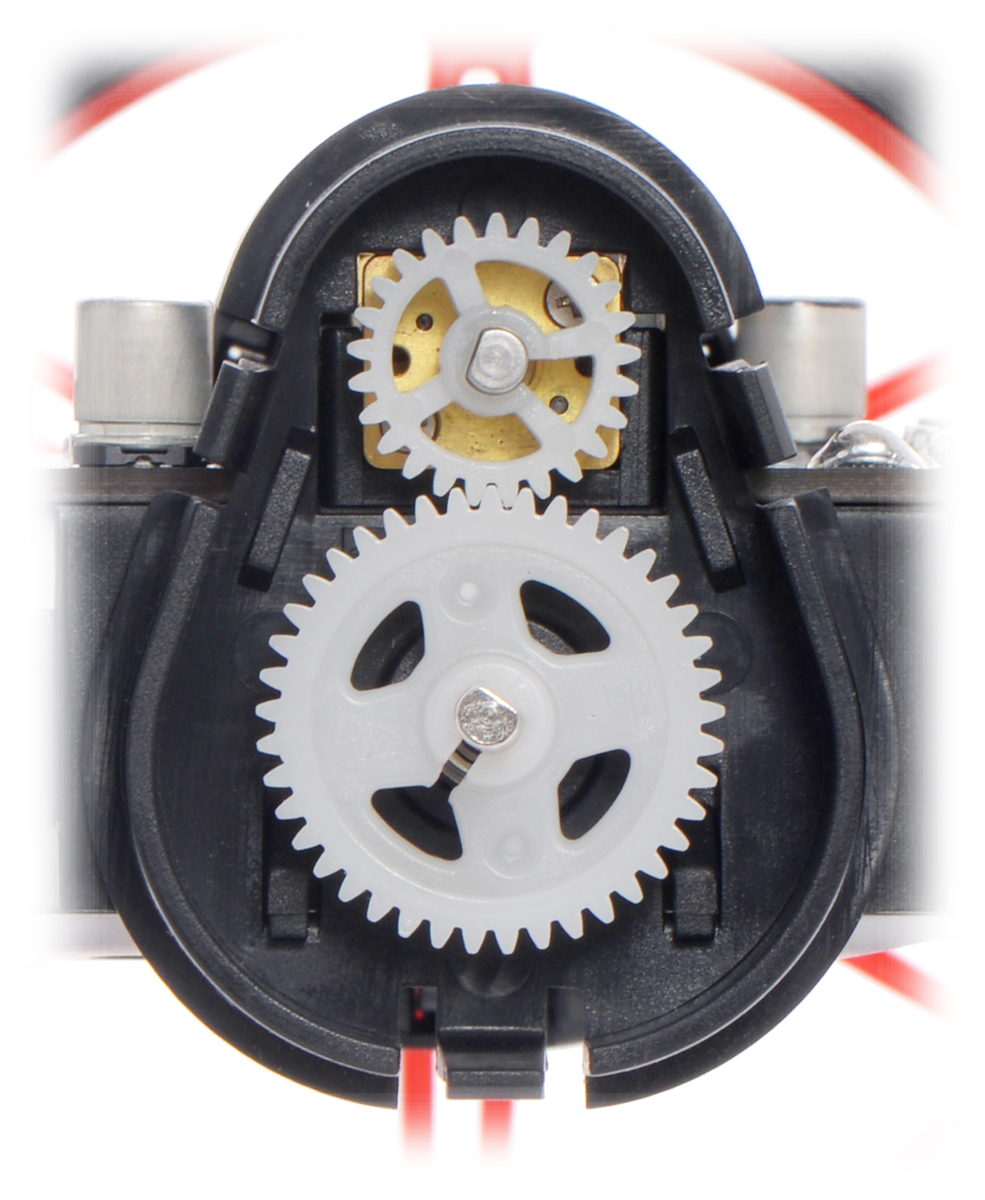 |
A look inside the external gearbox on the Balboa 32U4 Balancing Robot. |
|---|
One of our main goals in designing our robots is to make them complete and engaging on their own while making them open and expandable enough for all kinds of projects. We also don’t want them all to be the same. Most of the Balboa robots in our pictures have 80 mm wheels, but the chassis can also work with our 90 mm wheels (and to a lesser, barely practical extent, our 70 mm wheels). Because the chassis is made for our micro metal gearmotors, you have a few options for gear ratios as with our Zumo sumo robots, but what’s really exciting about the Balboa design is that there is an extra stage of gear reduction for which you get five different options (all included, and you can easily change the gear ratio from whatever you initially choose). The design also allows the drive wheels to be supported on ball bearings, reducing the stress on the micro metal gearmotor output shafts.
The Balboa chassis has a built-in battery holder for six AA cells, which typically give you several hours of run time, even if you add some extra power-hungry electronics like a Raspberry Pi.
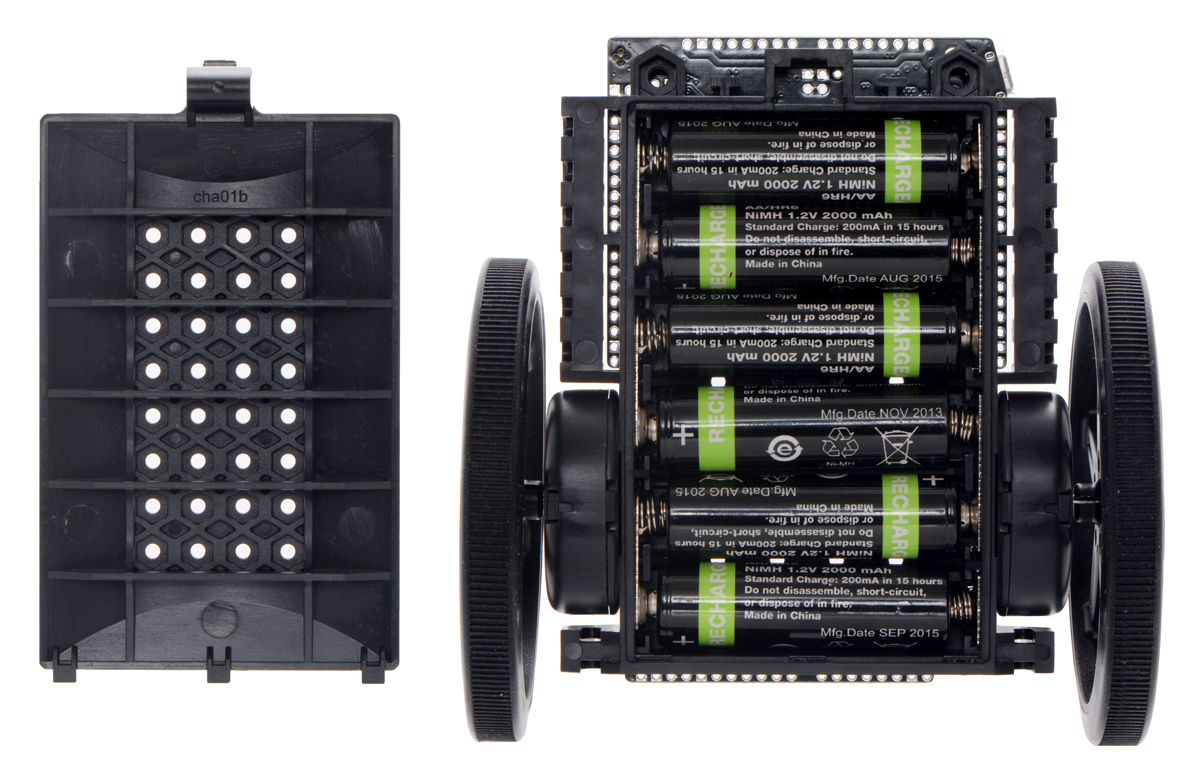 |
Balboa 32U4 Balancing Robot with battery cover removed. |
|---|
The main microcontroller is an Arduino-compatible ATmega32U4, which is powerful enough to read the on-board IMU sensors and encoders and to control the motors to balance the robot; it’s also great for introductory projects like line following or reading an RC receiver to make a radio-control balancing robot. For advanced projects, the Balboa is ready for you to add a Raspberry Pi computer to perform high-level algorithms while the ATmega32U4 microcontroller takes care of low-level tasks like motor control.
|
|
|

We will be adding more content to the Balboa’s product page and user’s guide, and we will have more blog posts about the Balboa robot. For today, we’ll end with some slow-motion footage of Balboa popping up on its own and then recovering when Paul knocks it around a bit:
Related products


Home | Forum | Blog | Support | Ordering Information | Lists | Distributors | BIG Order Form | About | Contact
© 2001–2026 Pololu Corporation


