Pololu Blog » Posts tagged “community projects” »
Posts tagged “community projects” (Page 6)
You are currently viewing a selection of posts from the Pololu Blog. You can also view all the posts.
Popular tags: community projects new products raspberry pi arduino more…
Bohlebots win West German Robocup soccer 2017
Congratulations to the Bohlebots teams for winning all four open categories of the West German Robocup soccer 2017! Robocup soccer is a competition where two autonomous robots on each side play soccer in a walled arena. We covered them winning multiple times in the past on this blog. Their robots use Pololu 20D mm metal gearmotors and VNH5019 motor driver carriers.
 |
Bohlebots junior team winning West German Robocup 2017 soccer open 1v1. |
|---|
Related products

ZumoMotors library for Netduino
|
|
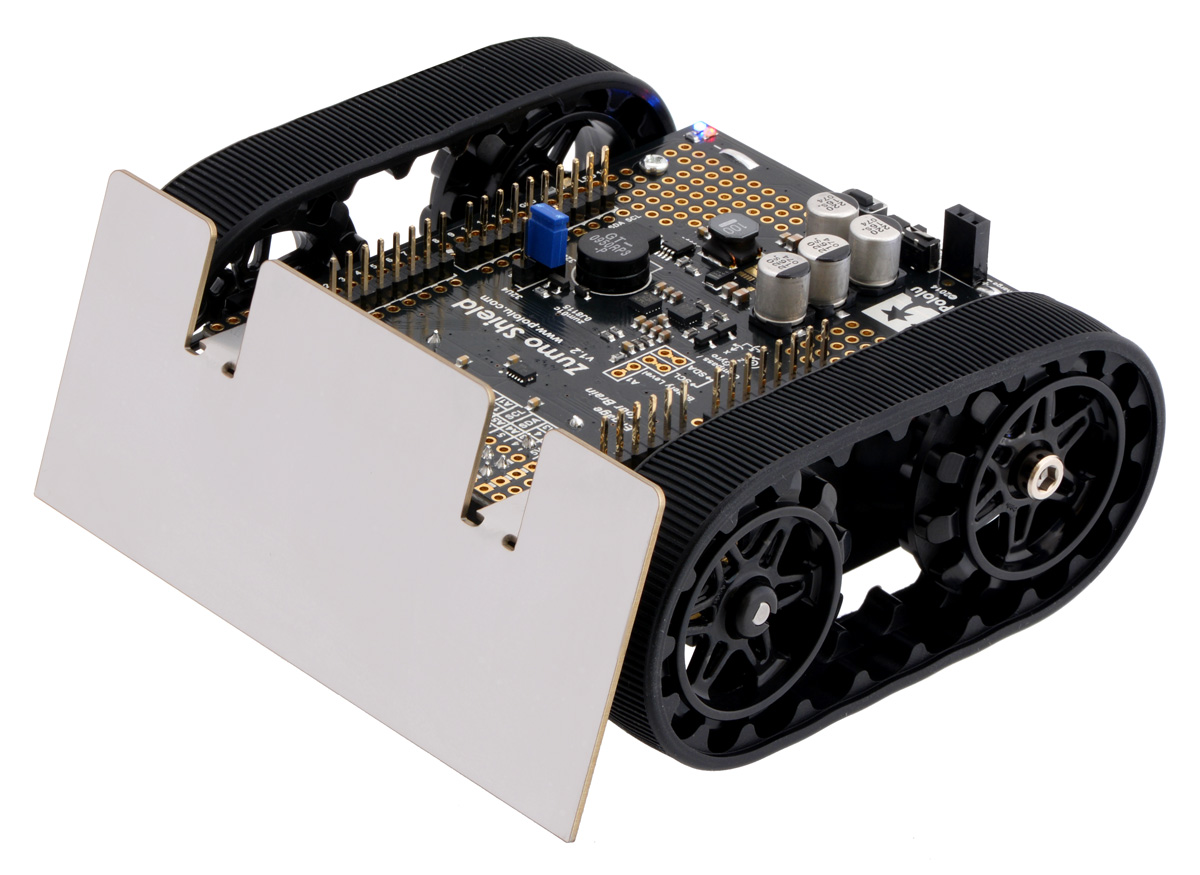
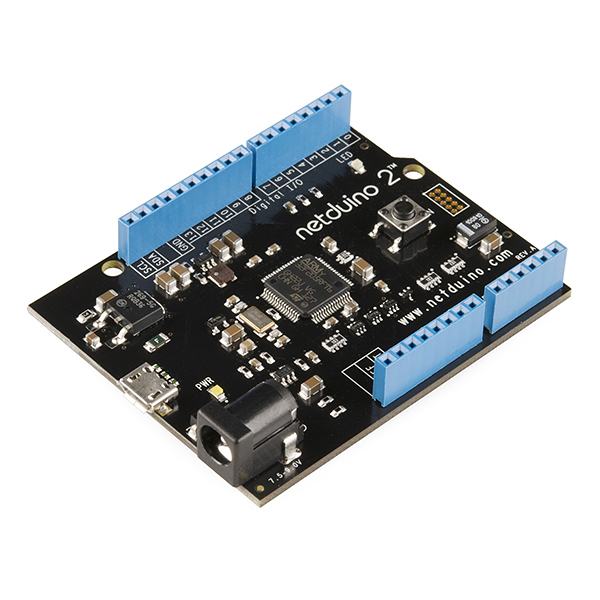
The Pololu Zumo Robot for Arduino is designed to be essentially a shield for the A-Star 32U4 Prime, Arduino Uno or Arduino Leonardo. Other Arduino boards that conform to the Arduino interface might work too. For example, customer Omar Elabd ported the ZumoMotors library to his Netduino 2! The Netduino is a 32-bit microcontroller board similar to Arduino that runs the .NET Micro Framework instead of using the Arduino environment.
He posted his code on GitHub and announced it on his blog. He is thinking of expanding his library to include ZumoBuzzer and ZumoReflectanceSensorArray libraries. The library is written in C#, which is exciting since I’m a C# programmer myself! If others would like to expand on these libraries, Omar is open to code contributions.
Related products

Ball-balancing robot
One of our customers, Jochen Alt, built a robot that balances on top of a ball by driving around on it with omni-wheels. Even better, he very thoroughly documented the project on GitHub! The robot uses a number of parts from Pololu including 37D mm metal gearmotors with encoders, stamped aluminum L-brackets for 37D mm metal gearmotors, and three VNH2SP30 motor driver carriers.
A good overview of the robot and the control system are on his Hackaday project page.
Related products


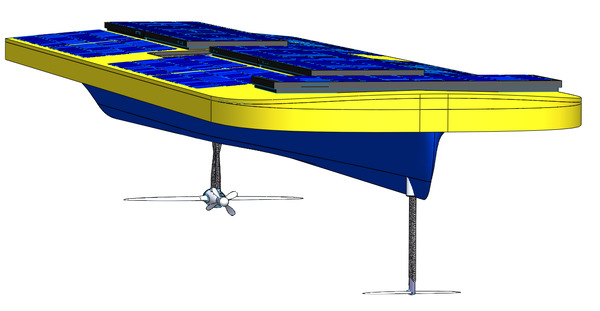
Cedarville University Solar Boat Team
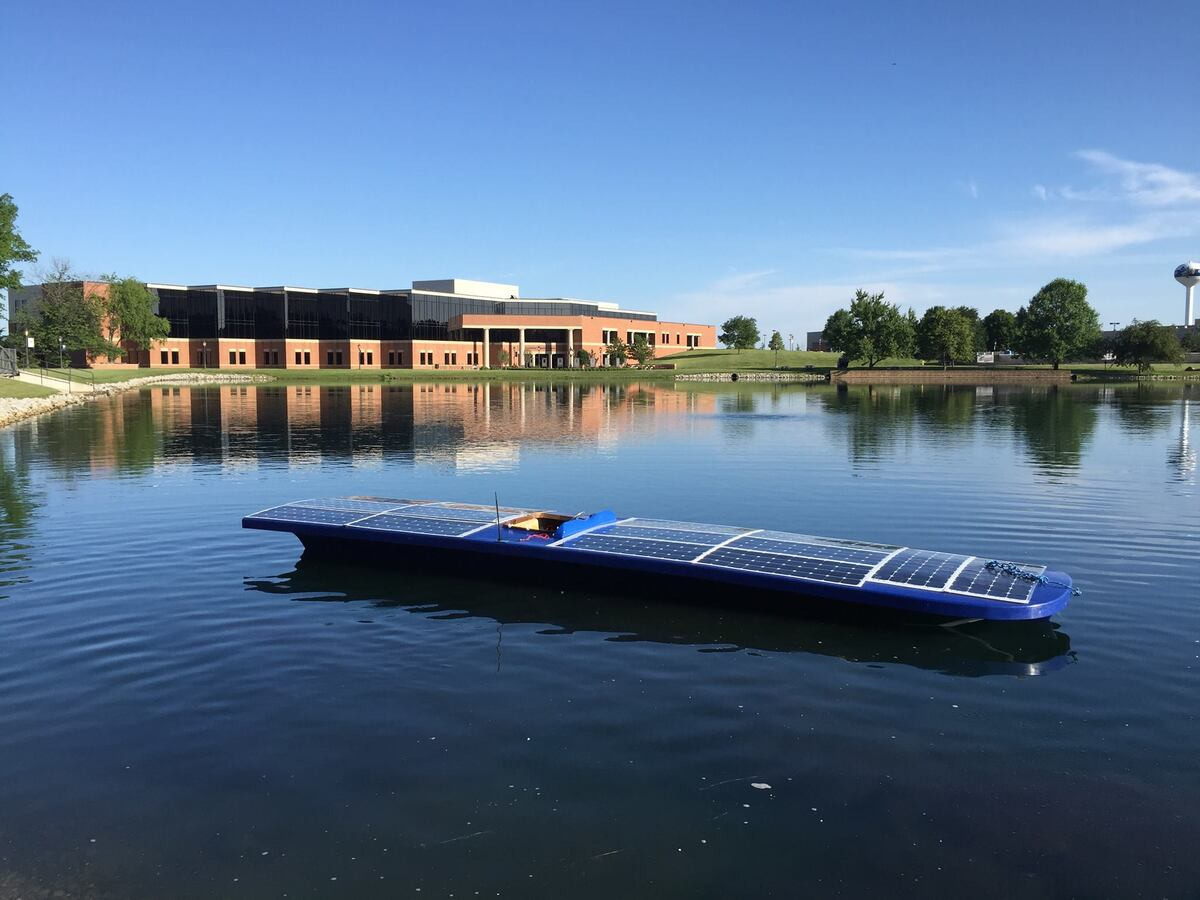 |
A technical paper about hydrofoil design by members of the Cedarville University Solar Boat Team won a $1,000 Honorable Mention in the 2016 Mandles Prize for Hydrofoil Excellence from the International Hydrofoil Society. The boat they’ve been building uses a few Pololu Jrk 12v12 USB motor controllers to drive linear actuators that control the hydrofoil angle of attack which controls the boat’s flight. (Yes, flight: a hydrofoil boat uses wing-like hydrofoils that lift up the hull as they “fly” through the water.) They plan to enter this boat in the “Top Class” of the Dutch Solar Challenge. The “Top Class” provides entrants the opportunity to design every aspect of their solar-powered boat, which they will use in a series of sprint and endurance races over the course of five days. They also plan on racing in the Solar1 Solar Boat World Championship at the Yacht Club de Monaco.
 |
Related products

Science Olympiad 2017 robot arm competition
Congratulations to Matthew Siracusa and William Rule who placed first in the Robot Arm competition of the Science Olympiad SE PA Regional Tournament last Wednesday! They used our custom laser cutting service to cut the base and structural components of the robot arm out of black ABS. We wrote about another one of Matthew’s projects on this blog when he made a 6-string banjo (that has a frame we also laser cut) as part of the 2014 Science Olympiad.
The Science Olympiad website has more information about the Robot Arm competition.
Related products

Web-based control of a telescope using Raspberry Pi
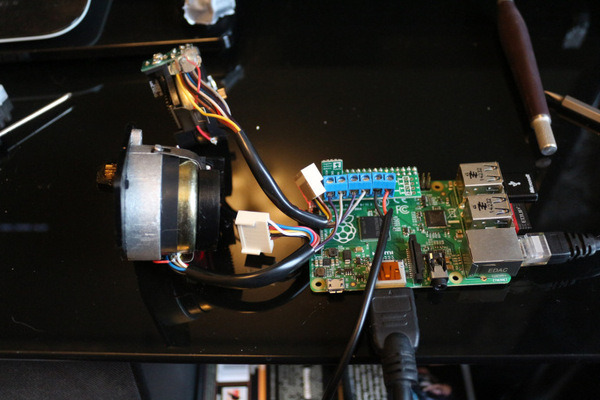 |
@MarcisShadow is working on a project using a Raspberry Pi with a Pololu DRV8835 Dual Motor Driver Kit for Raspberry Pi to control a Celestron NexStar GoTo Mount, allowing web-based control of a telescope. He also uses a Pololu 5V Step-Up/Step-Down Voltage Regulator S7V7F5 connected to the motor driver to power the Raspberry Pi from the motor power supply.
The project is being documented in a multi-part series on DirtyAstro.com. Part 1 covers the electronics that come with the telescope mount, part 2 is about assembling and testing the DRV8835 driver kit and motors, part 3 tackles setting up the Raspberry Pi and using an SSH client (PuTTY) to connect to it remotely via a PC, and part 4 is about getting Node-Red running to program the Raspberry Pi graphically using a web interface from any machine on the network.
He is not finished with the project, but I have a couple of suggestions for him or anyone doing something similar: First, since his 12 V supply exceeds the maximum operating voltage of both the motor driver (11 V) and the regulator (11.8 V), I would recommend using different ones. Keep in mind that “wall-wart” DC power supplies, especially older transformer-based ones, can have a voltage significantly higher than the rated voltage. Second, a board running a full operating system is usually not great for timing-sensitive operations like counting encoder ticks. If it can’t keep up with the pulse rate, I would recommend using a secondary microcontroller for the encoders. One possibility would be to use the A-Star 32U4 Robot Controller SV with Raspberry Pi Bridge, which incorporates a more appropriate 5.5 V – 36 V regulator, an Arduino-compatible microcontroller, and dual motor controllers.
Related products


Animatronic C-3PO replica
This animated C-3PO replica, made by one of our customers, moves its eyes, arms, head, and—in true C-3PO fashion—tells tasteless jokes. The movements are animated by a Pololu Mini Maestro 18-channel USB servo controller. A Pololu RC switch with relay (controlled by the Maestro, not an RC transmitter) shuts off the power to the head to avoid servo humming noises. (You can achieve a similar result with most servos by not sending RC servo pulses, which a Maestro does when the servo target is zero.)
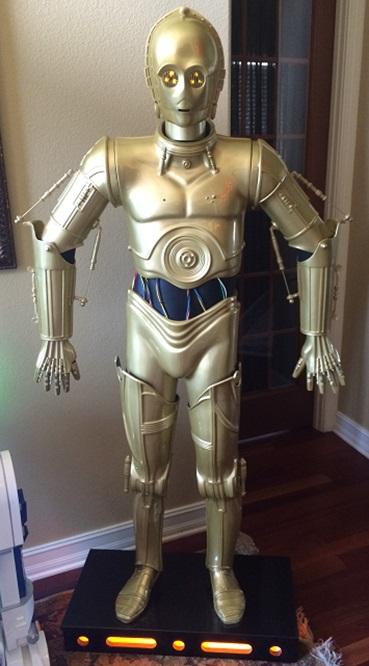 |
The customer’s C-3PO web page has more videos and extensive documentation on how the replica was built.
Related products


RC multiplexer for quadcopter operator mode switching
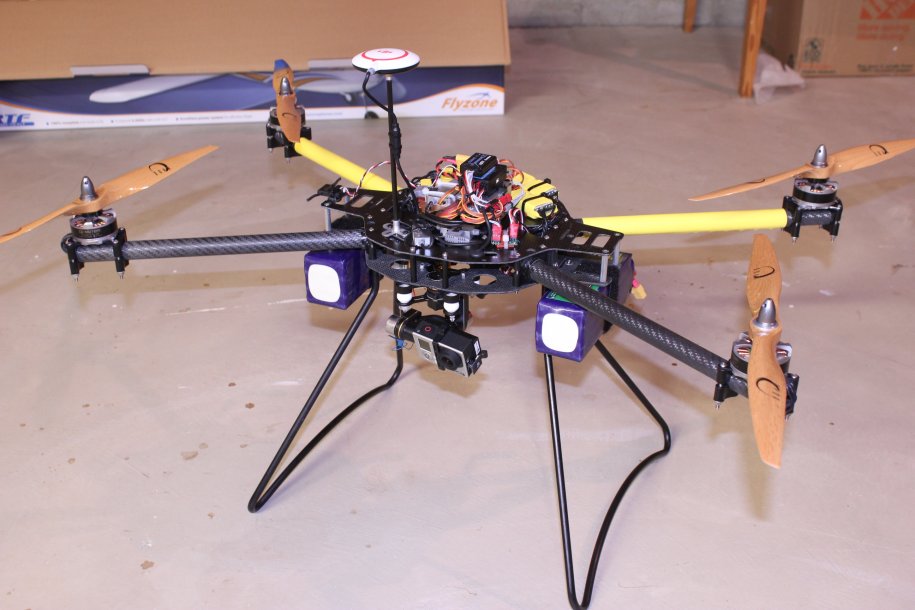 |
One of our customers, “Bartman” on the dronevibes.com forum, has made a video of himself planning his build and a forum post that explains how he built his quadcopter. He was inspired by the DJI Inspire 1, which raises its struts to get them out of the camera’s way. Bartman proposes a lighter and cheaper arrangement: when flying the quadcopter in its semi-autopilot “carefree” mode, he switches yaw control from the pilot to the camera operator. This gives the camera operator panning (via the entire copter’s yaw motion) without the need for a separate panning mechanism. He uses a Pololu RC multiplexer to achieve the control switching.
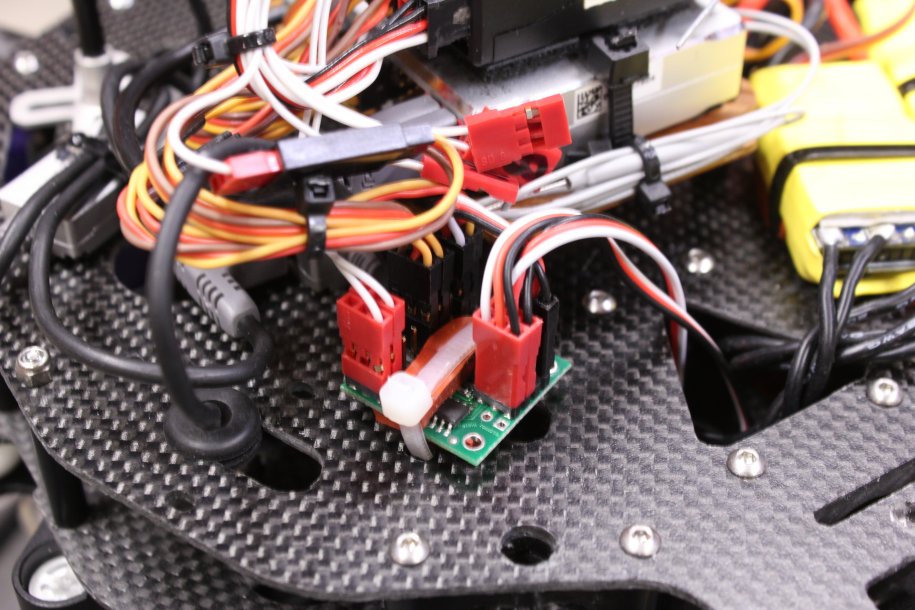 |
A close-up of the RC mux on Bartman’s multi-rotor. |
|---|
More details and discussion are in the forum thread.
Related products

Automatic rotating arcade cabinet display
It only took two years but finally the automatic monitor is PERFECT pic.twitter.com/NTG5CiShqT
— Raph Koster (@raphkoster) February 19, 2017
Customer Raph Koster made this slick automatic rotating arcade cabinet display, which allows the arcade cabinet to easily switch from landscape to portrait depending on the game. The monitor is rotated by a servo controlled by a Micro Maestro 6-Channel USB Servo Controller. The Maestro is especially convenient for this type of project, because you can connect it to the computer using USB then control the servo using our command line utility usccmd.
Raph shares his usccmd scripts for automating the rotation along with a full parts list and extensive step-by-step build information in his forum post at ArcadeControls.com.
Related products

TwoPotatoe and ThreePotatoe compete at AVC
 |
I am happy to bring some overdue attention to our customer who created TwoPotatoe, a balancing robot that I first wrote about on this blog a few years ago. This past fall, TwoPotatoe and his new robot ThreePotatoe competed in the Sparkfun AVC Competition. TwoPotatoe won first place for the 10 lb to 25 lb weight class. Check out the AVC video below! TwoPotatoe starts its run at about 53:00. ThreePotatoe won second place in the 25 lb to 40 lb weight class. Considering all the weight classes together, TwoPotatoe and ThreePotatoe scored third and fourth place overall, which is very impressive considering they were competing against four-wheeled robots that didn’t have to balance. ThreePotatoe’s run starts at about 1:08:30.
You can find more pictures and information about TwoPotatoe and ThreePotatoe in the AVC competition on the TwoPotatoe website.
Related products


Home | Forum | Blog | Support | Ordering Information | Lists | Distributors | BIG Order Form | About | Contact
© 2001–2026 Pololu Corporation


