Pololu Blog » User Profile: Brandon »
Posts by Brandon
You are currently viewing a selection of posts from the Pololu Blog. You can also view all the posts.
Popular tags: community projects new products raspberry pi arduino more…
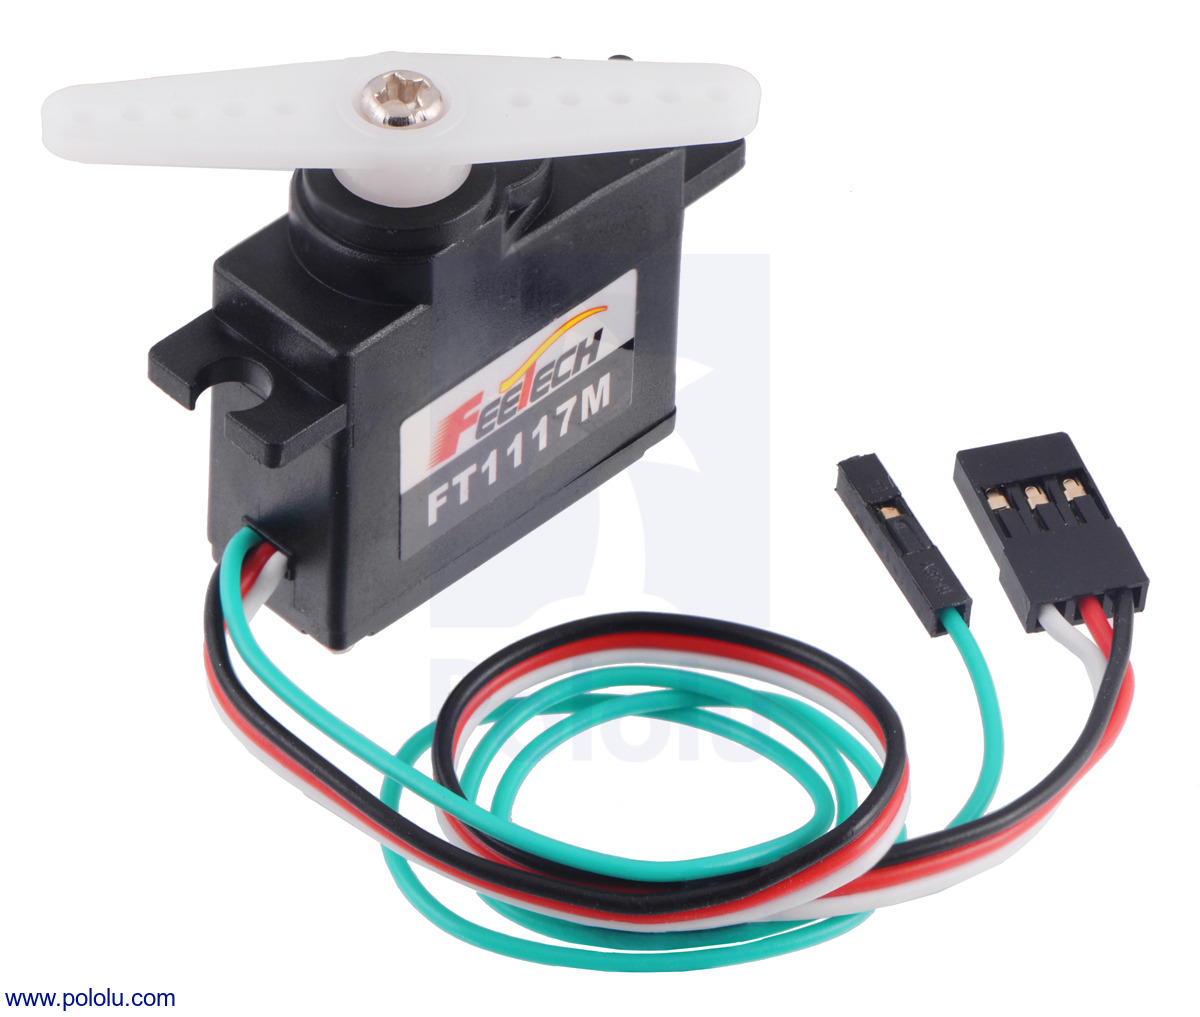
New products: more special servos with position feedback
We have expanded our selection of specially modified FEETECH servos that have direct access to the feedback potentiometer through an extra fourth (green) wire! Several months ago, we started carrying similarly modified micro FS90-FB and standard-sized FS5103B-FB servos. Now, our larger selection includes a variety of sizes from compact sub-micro servos all the way up to ultra-high torque giant servos:
- FEETECH Sub-Micro Servo FS0403-FB with Position Feedback
- FEETECH Mini Servo FT1117M-FB with Position Feedback
- FEETECH High-Torque Servo FS5115M-FB with Position Feedback
- FEETECH Ultra-High-Torque, High-Voltage Digital Giant Servo FT5335M-FB with Position Feedback
|
|
|
|
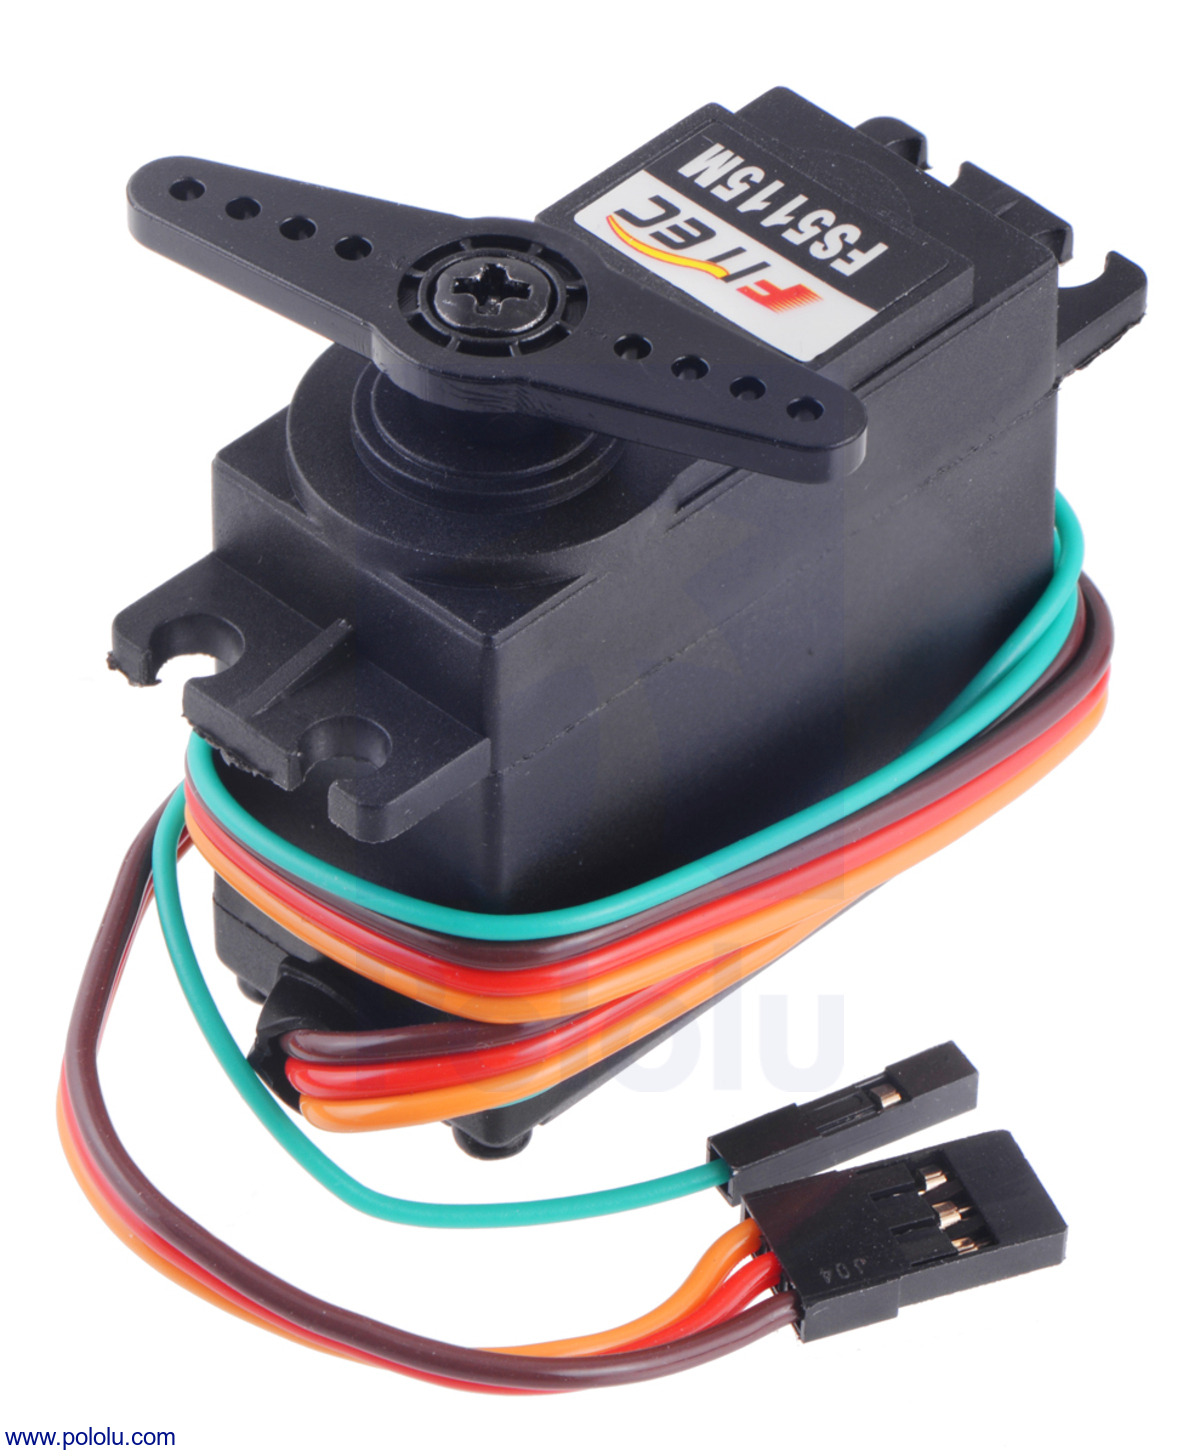
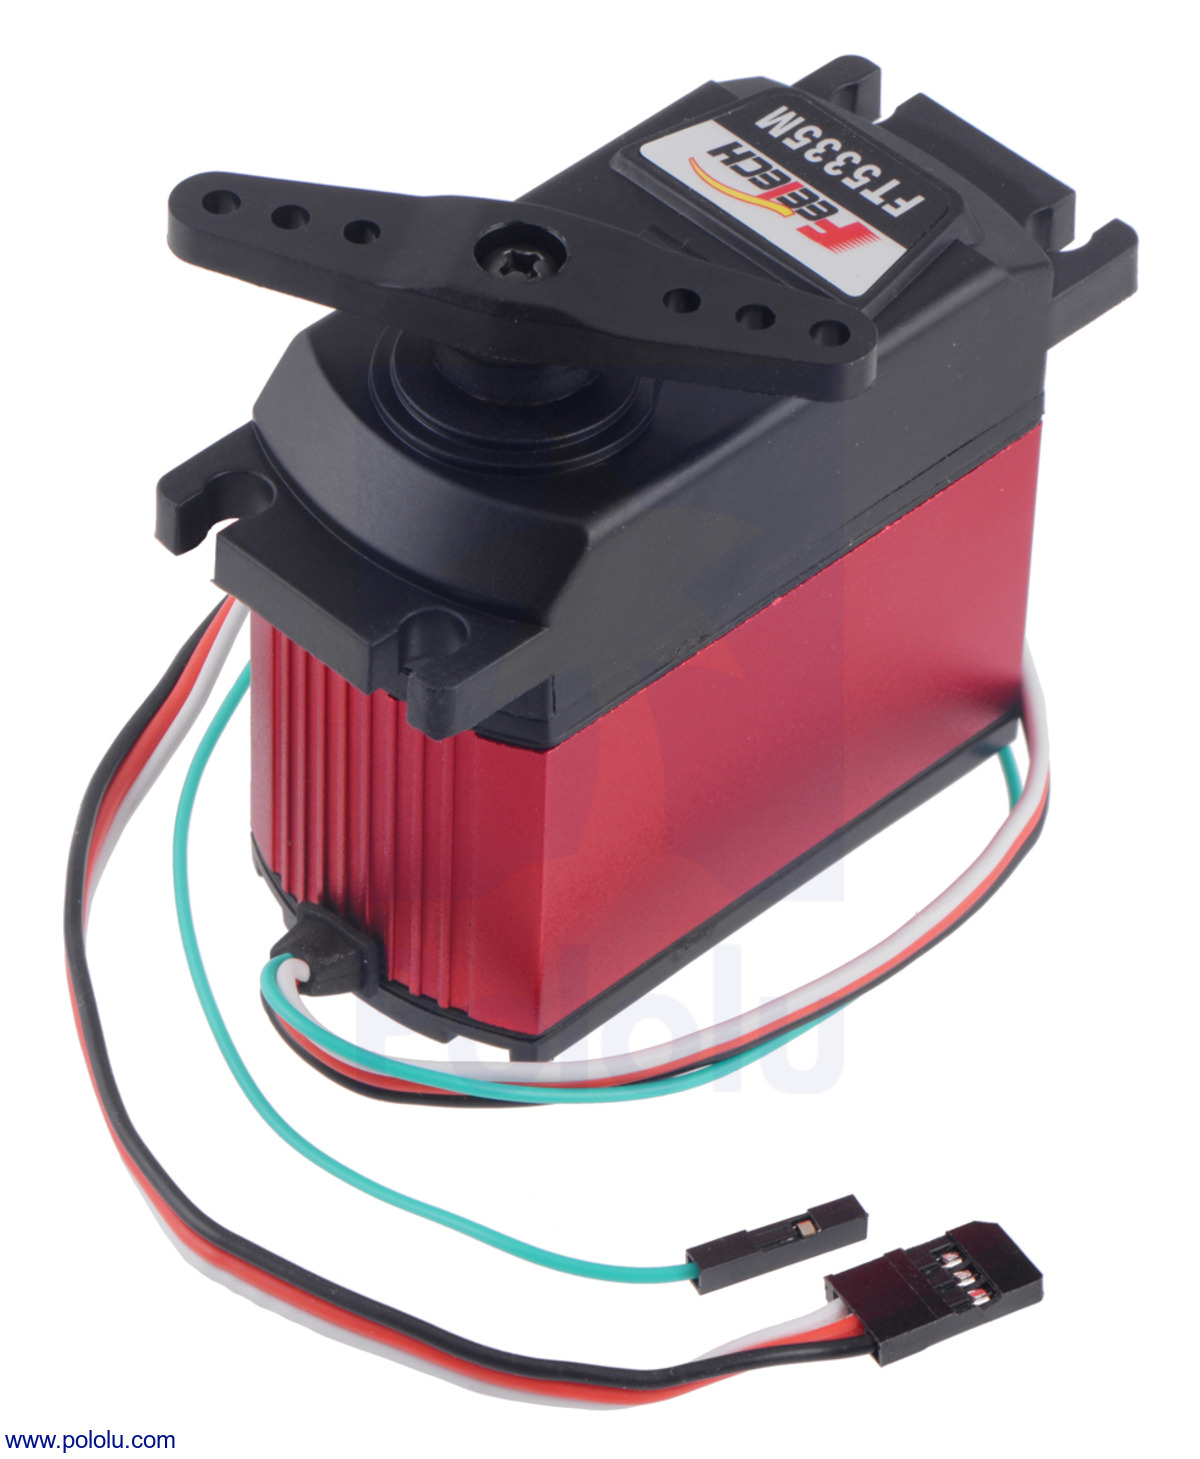
These new additions are special versions of the normal sub-micro FS0403, mini FT1117M, high-torque standard-size FS5115M, and ultra-high-torque giant FT5335M FEETECH servos.
The feedback voltage, which varies linearly over the servo’s range of motion by a couple of volts, is especially useful for more complex robotic applications that require monitoring the actual servo position. For example, it can be used for determining if the servo is stalled or when it has reached it’s target position. It also allows you to implement your own higher-level closed-loop position control or create servo movements by hand that you can record and play back later.
Related products


Bigger 3D printed buttons for the Zumo 32U4
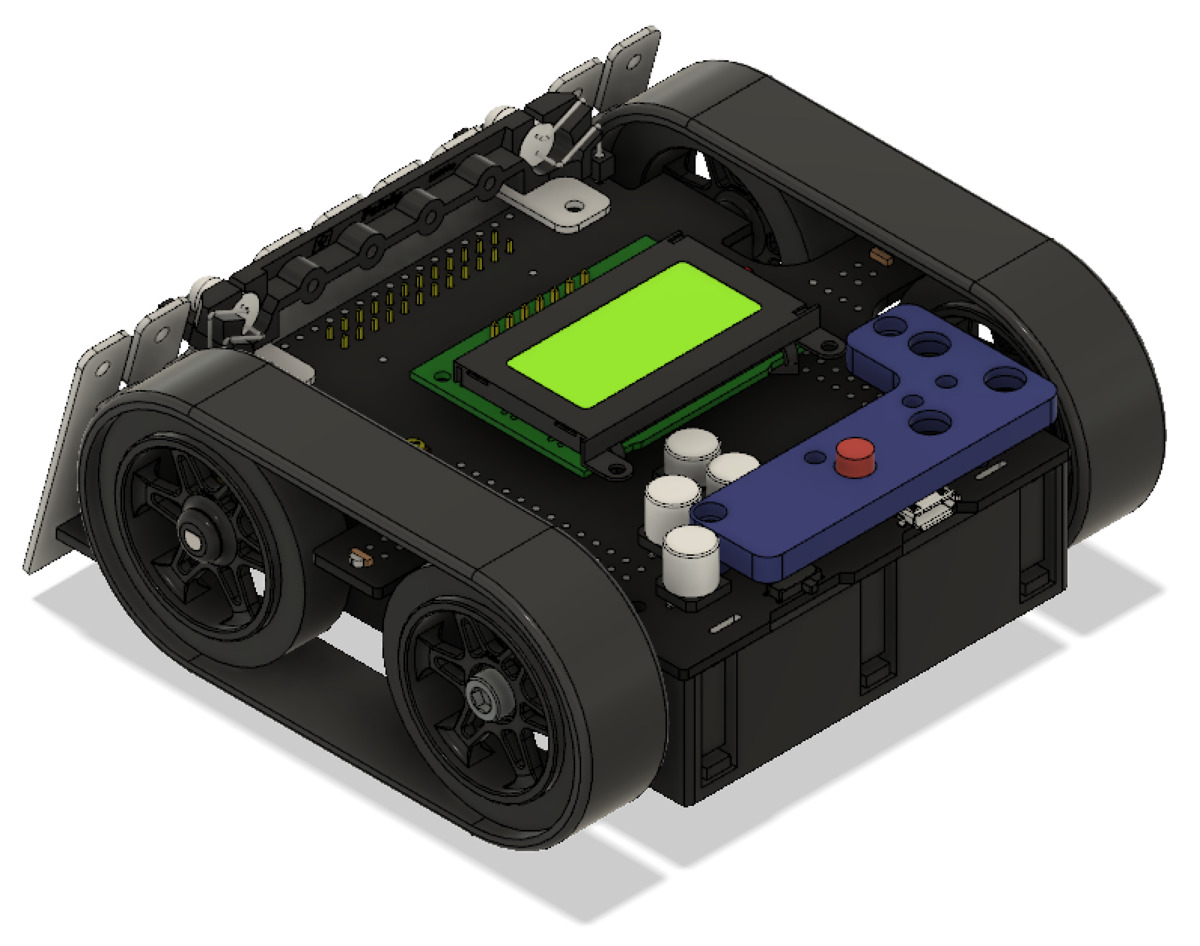 |
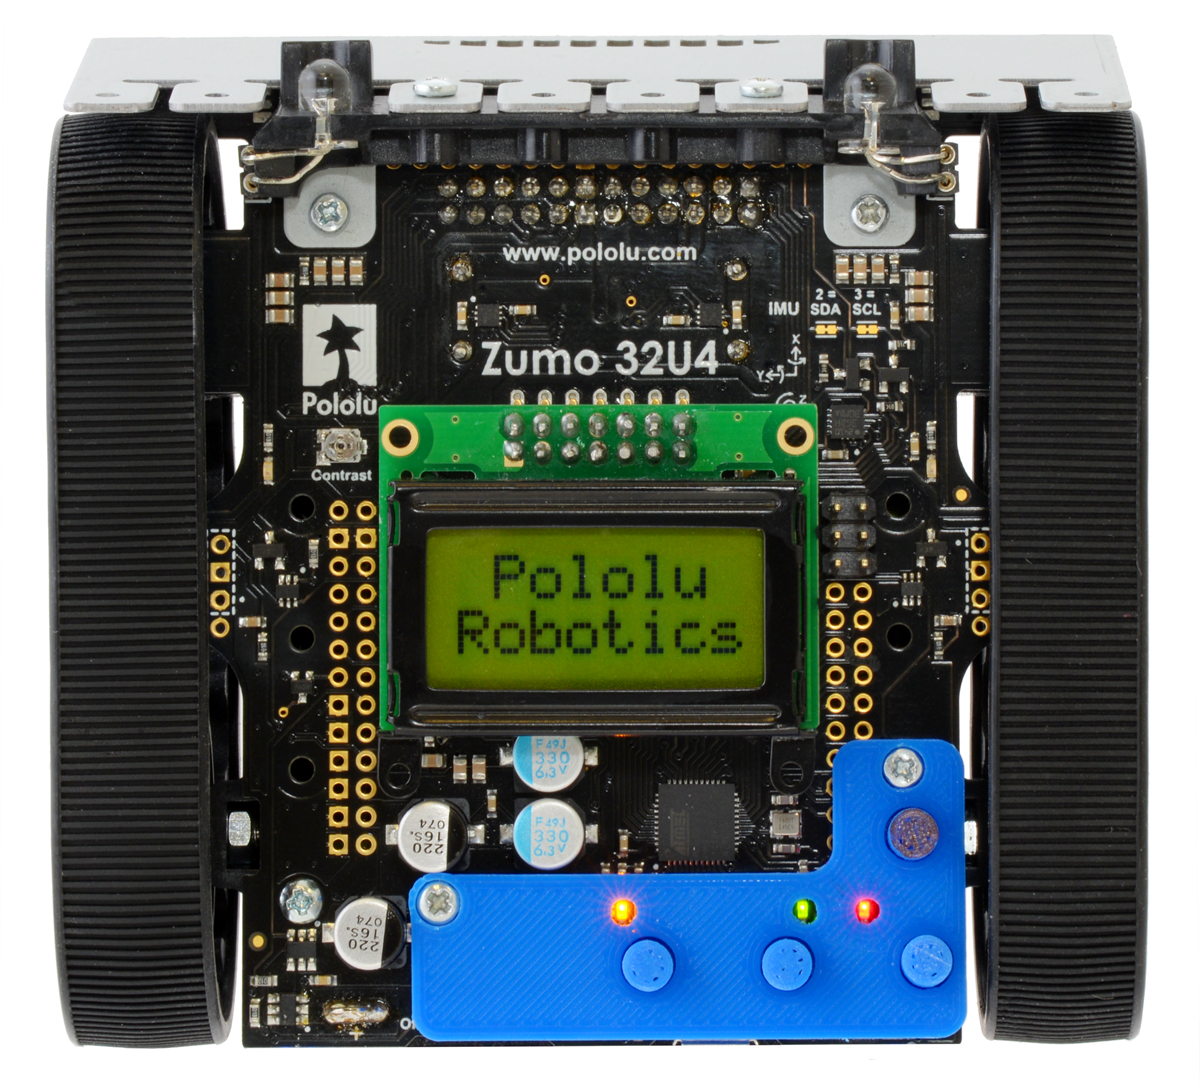
Mount Holyoke College professor Peter Klemperer designed a custom add-on for the Zumo 32U4 to give easier access to the user pushbuttons. Peter made the bigger buttons as a response to some of the students in his classes finding it difficult to use the small onboard pushbuttons.
The design even has small cutouts so you can still see the indicator LEDs. To add the adapter plate to the Zumo chassis, you can use two #2 screws and nuts (7/16 inch length screws worked great for me). The easy-to-print STL files along with the Fusion 360 files are available on Peter’s GitHub repository for the project, and you can find more information on Peter’s blog post on his website.
If you print your own bigger buttons for your Zumo 32U4 be sure to let him (and us!) know; we would love to see some pictures! Here’s a shot of the one I printed out for my personal Zumo 32U4:
 |
Related products


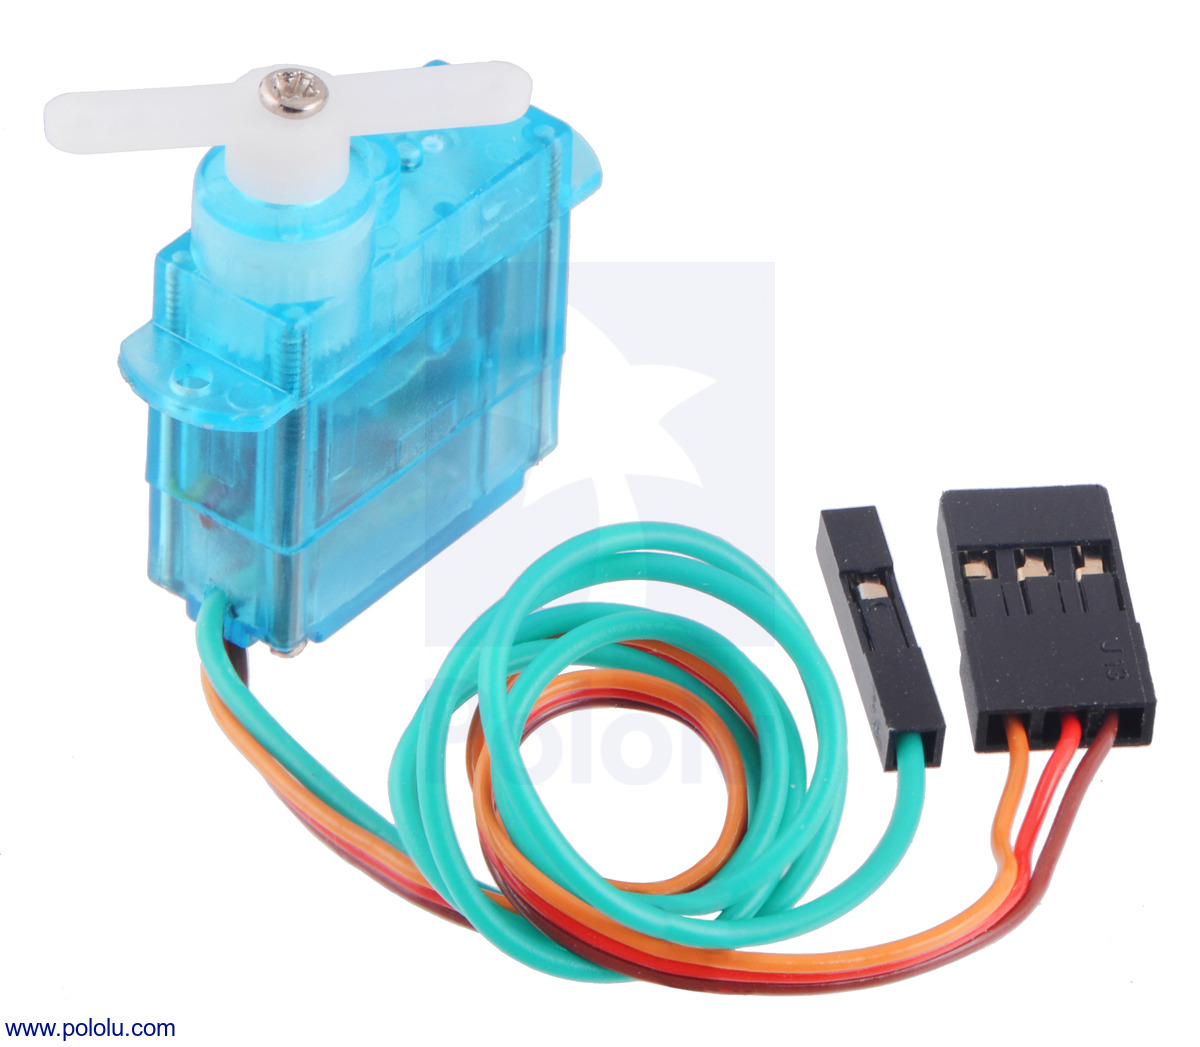
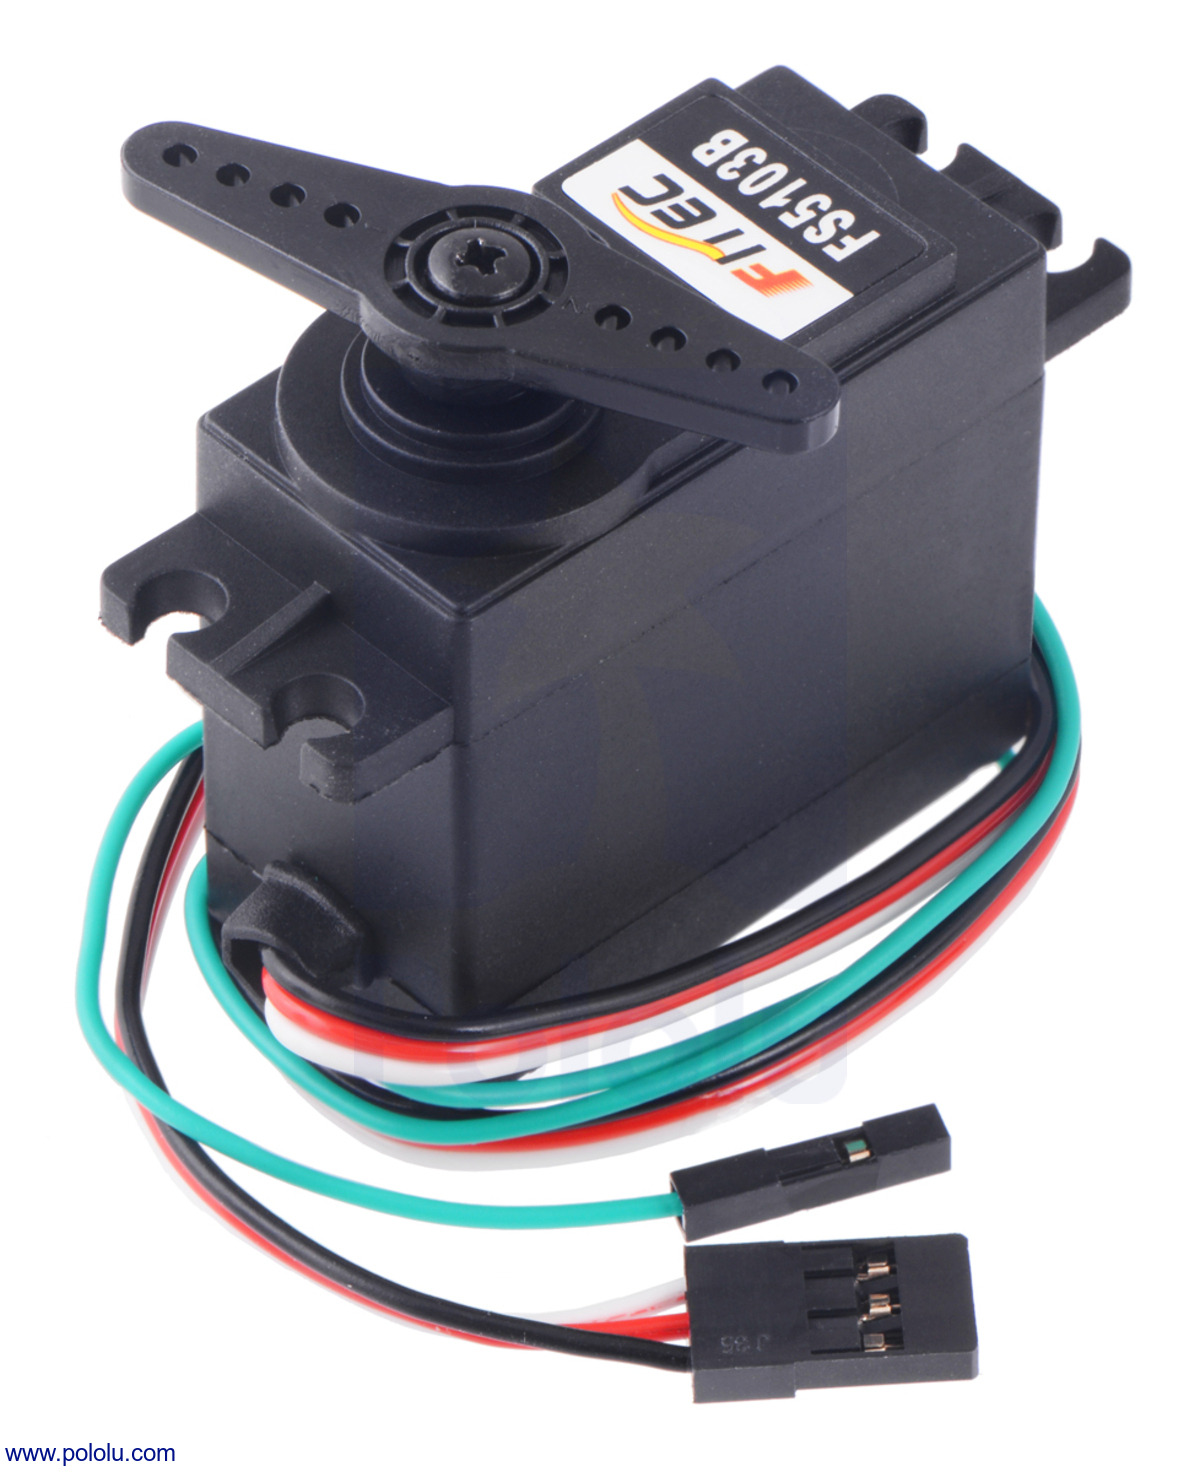
New products: special servos with position feedback
|
|

We are excited to announce the newest additions to our selection of servos:
- FEETECH FS90-FB Micro Servo with Position Feedback
- FEETECH FS5103B-FB Standard Servo with Position Feedback
These specially modified versions of the standard FEETECH FS90 and FS5103B servos provide direct access to the feedback potentiometer through an extra fourth wire. Additionally, the FS90-FB has an extra long cable relative to the standard FS90 micro servo. The inclusion of a feedback wire allows you to monitor the servo’s position, which is especially useful for more complex robotic applications. For example, it can be used for determining if the servo is stalled or when it has reached it’s target position. It also allows you to implement your own higher-level closed-loop position control or create servo movements by hand that you can record and play back later. This feedback voltage varies linearly over the servo’s range of motion.
 |
 |
These servos are similar to those used in the Robot Arm Kit for Romi and Micro Gripper Kit and can be used as replacements for those servos.
These are just the start of our eventual selection of FEETECH servos with position feedback, so keep an eye on our blog and New Products category for more to come!
Related products


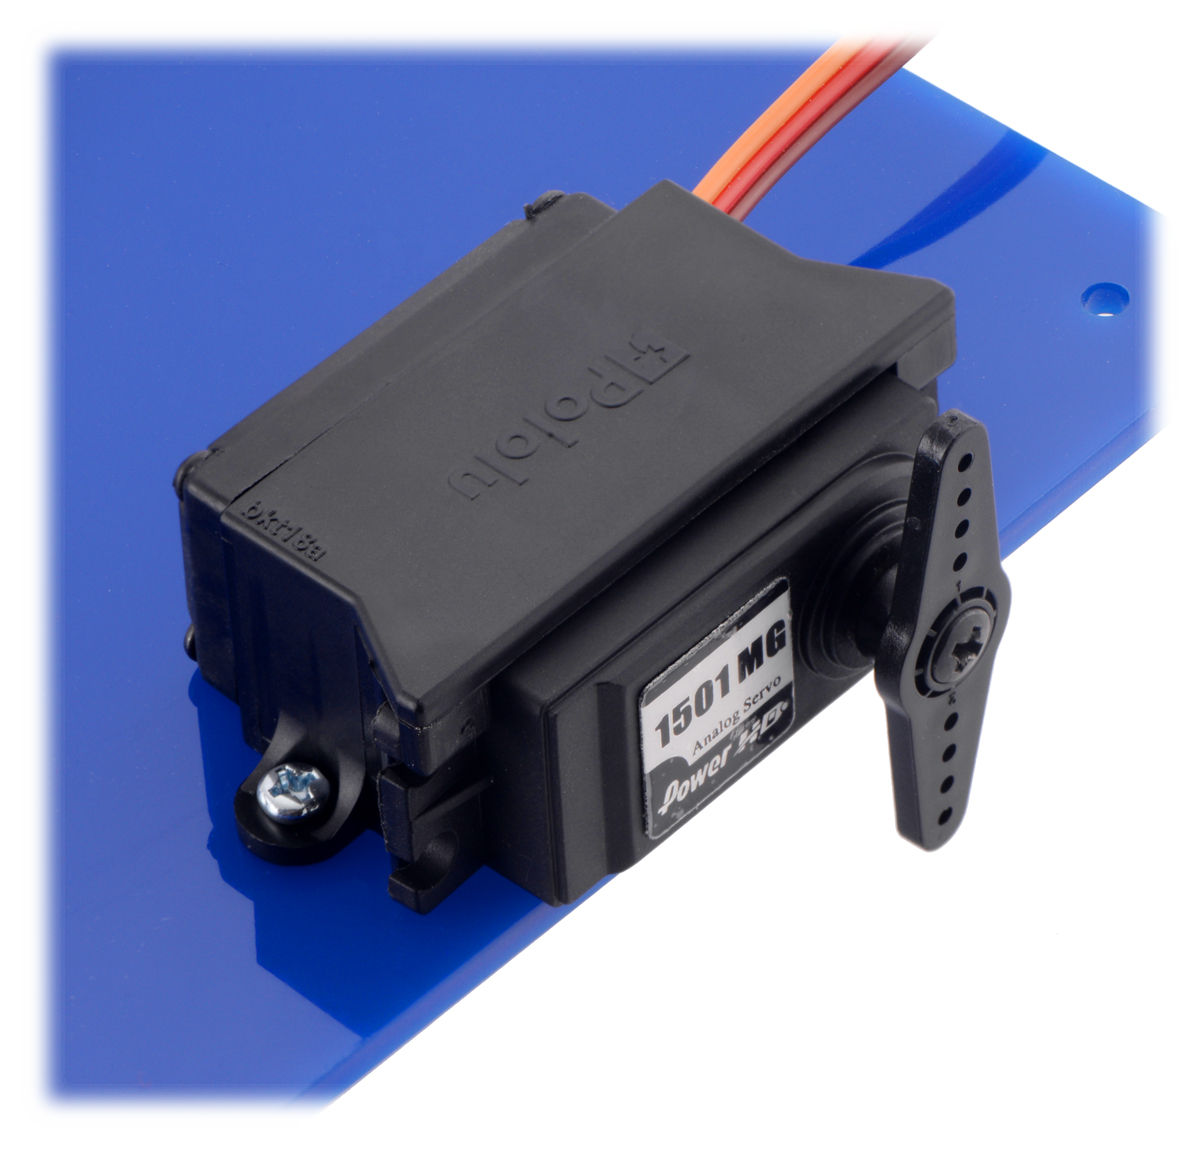
New product: Mounting Bracket for Standard-Size Servos
We now have a new mounting bracket available, this time designed for standard-size servos. Servos are very versatile and often make for an easy way to add precise motion to your project, but they can sometimes be difficult to mount due to their shape and the orientation of their intended mounting holes. Our new Mounting Bracket for Standard-Size Servos aims to solve that problem.
 |
Instead of using the servo’s intended mounting holes, this bracket clasps around the servo, capturing its mounting tabs and providing an easy way to mount a servo on its side. The mounting holes on the bracket are intended for use with M3 or #4 screws (sold separately).
|
|
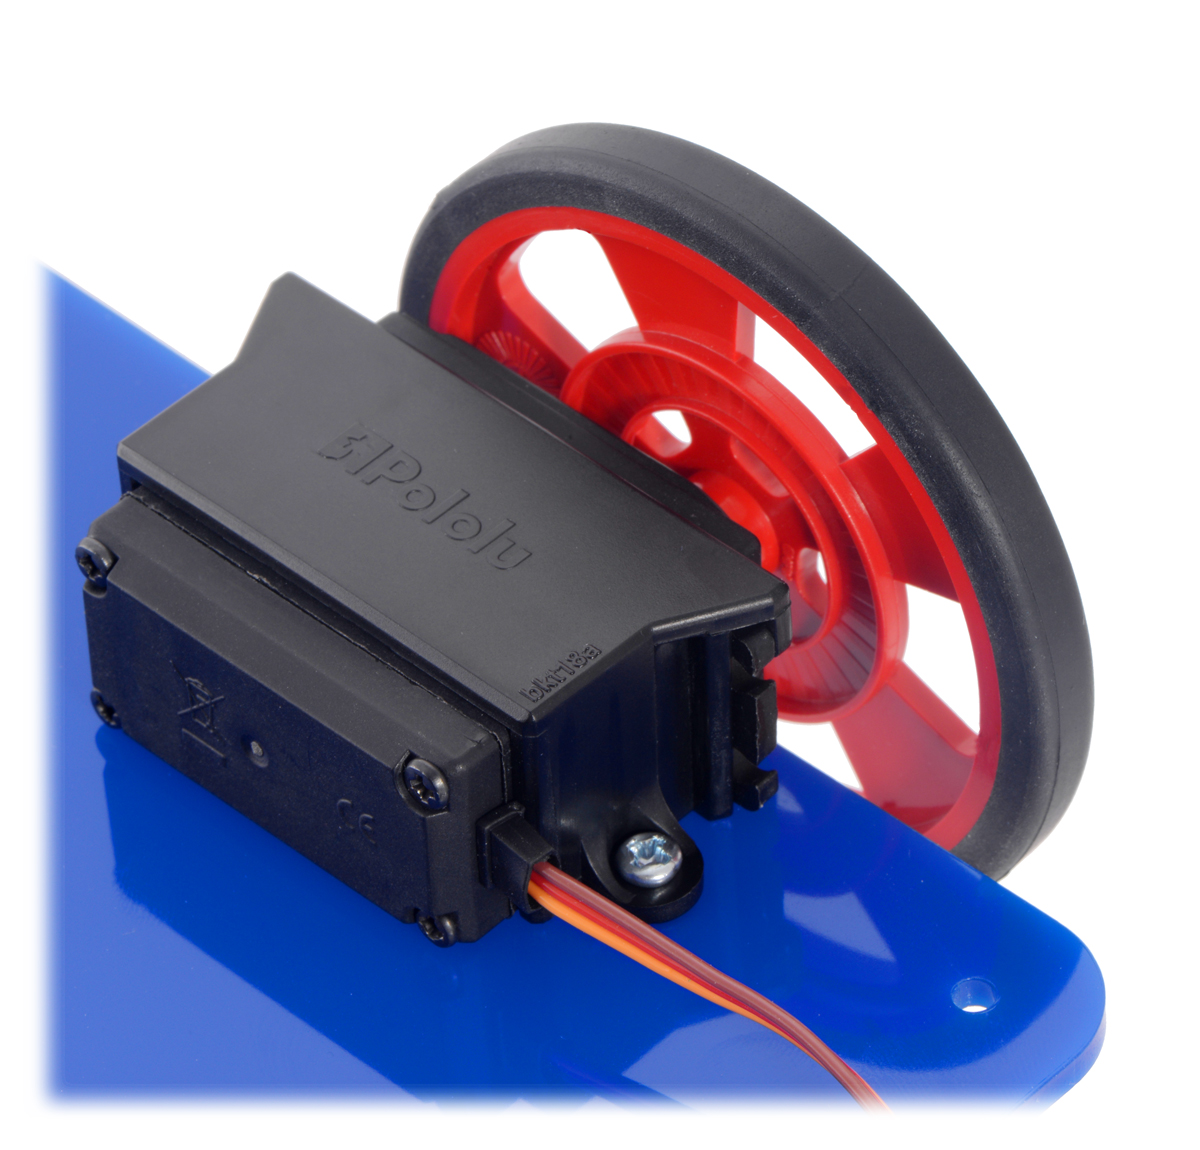
As with the Romi Expansion Plate we just released, this bracket was originally designed as part of our Robot Arm Kit for Romi.
Related products

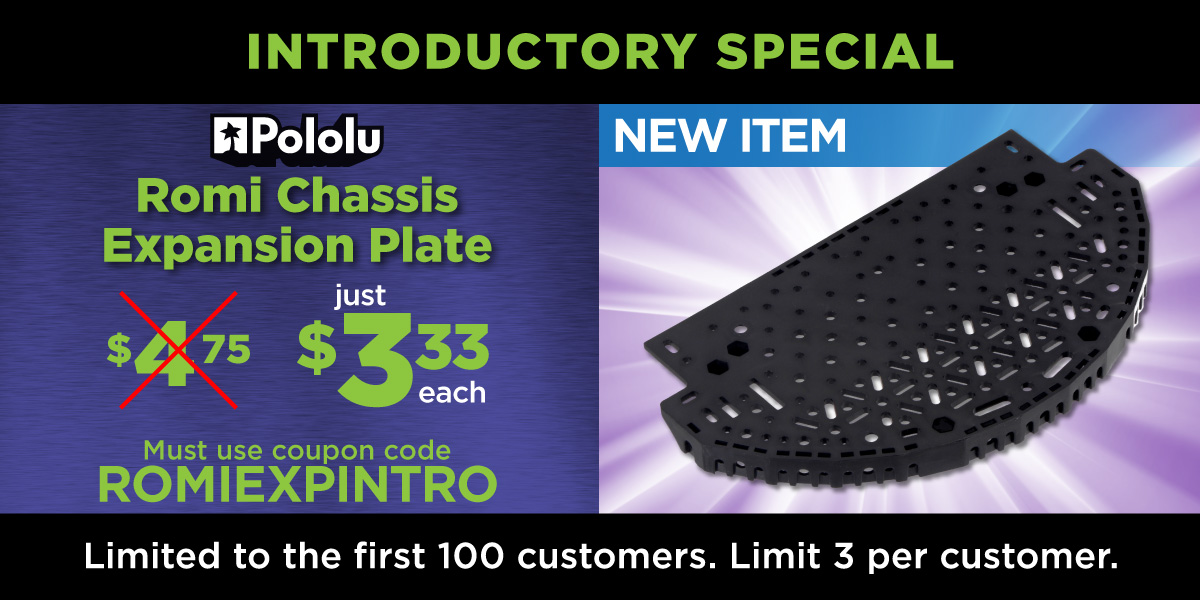
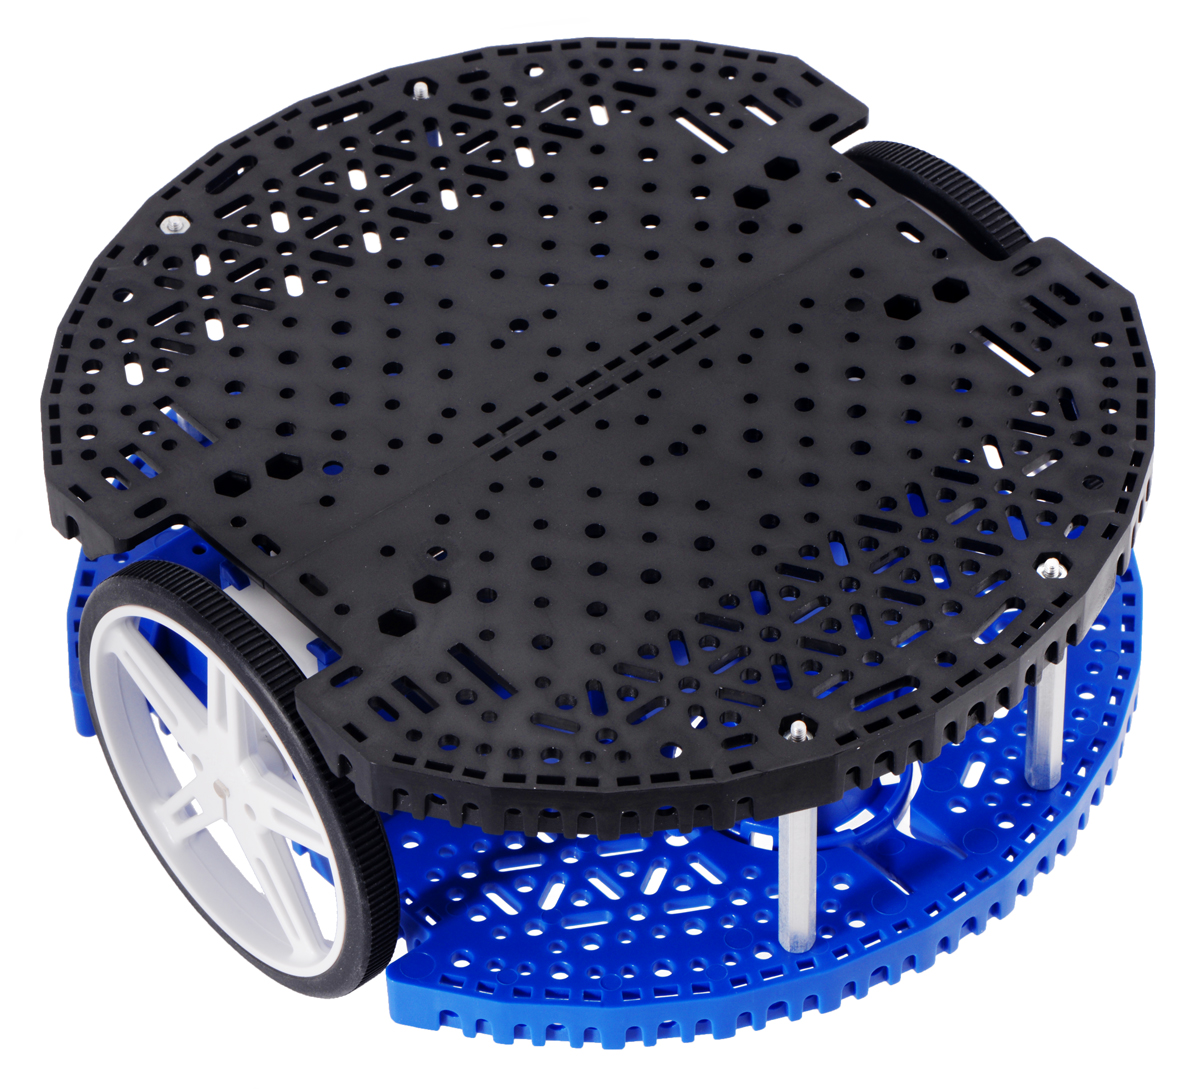
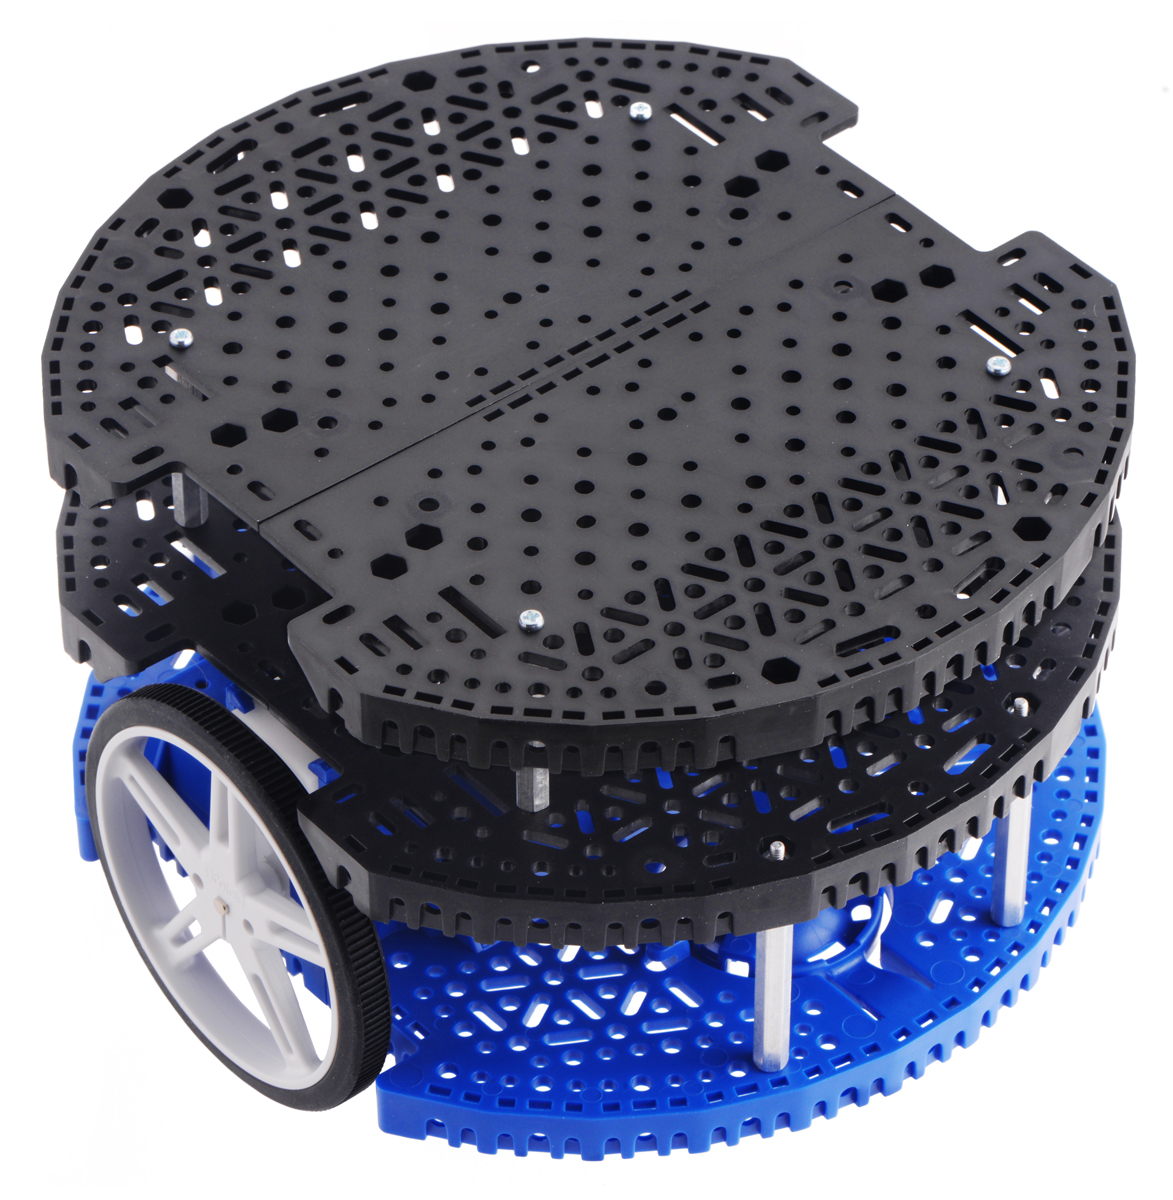
New product: Romi Chassis Expansion Plate
The Romi Chassis Expansion Plate is now available and is a great way to add even more space to the Romi. It is designed to function as a modular expansion option for the Romi. In fact, if you have been following our new product announcements, you might have already seen this plate as part of the Robot Arm Kit for Romi. The expansion plate is a half circle with the same diameter as the Romi base plate, and it can be installed over either the front or rear half of the Romi chassis. Abundant mounting holes and slots cover the plate, matching the pattern used on the Romi chassis base plate and supporting various sizes of screws.
|
|


You can combine two plates to make a full-sized platform.
|
|
|

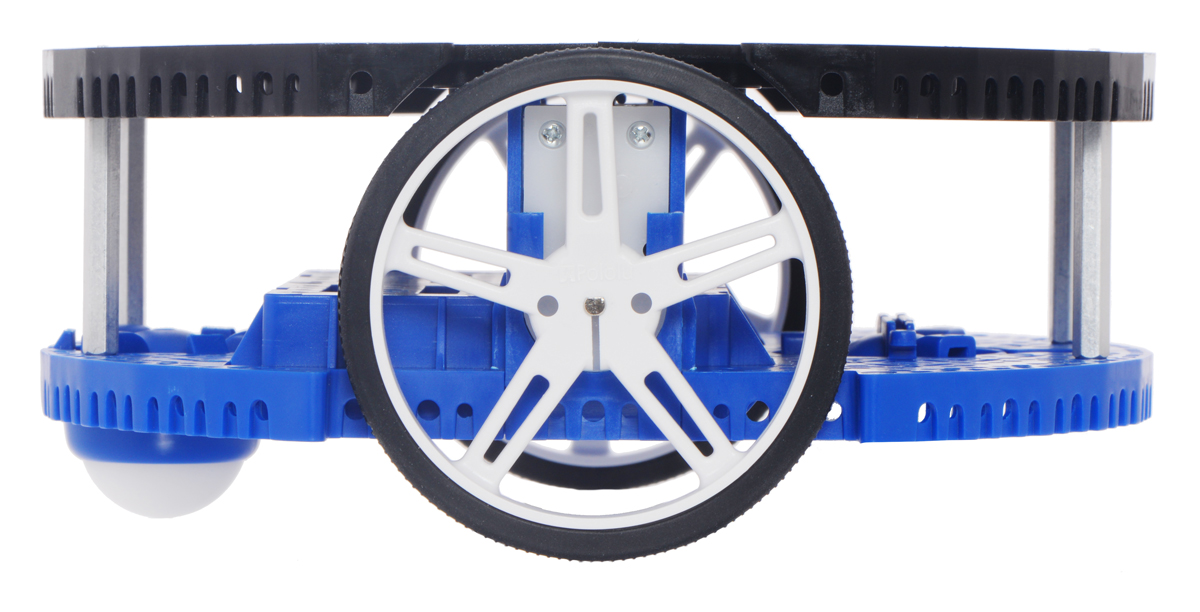
It is also possible to stack multiple expansion plates for even more versatility.
 |
Continuing with the special introductory discounts for all of our new products this year, the first 100 customers who use coupon code ROMIEXPINTRO can get up to 3 Romi Chassis Expansion Plates for just $3.33 each!
Related products

Web-based control of a telescope using Raspberry Pi
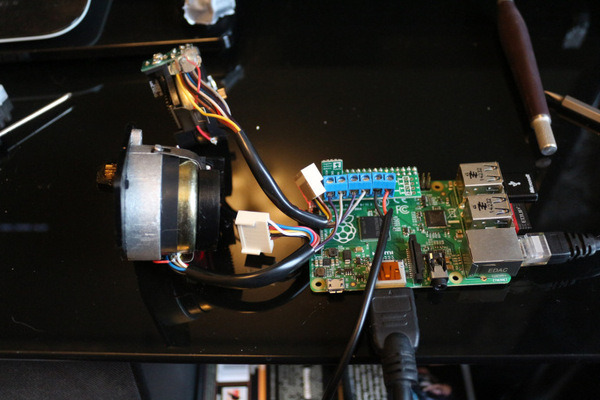 |
@MarcisShadow is working on a project using a Raspberry Pi with a Pololu DRV8835 Dual Motor Driver Kit for Raspberry Pi to control a Celestron NexStar GoTo Mount, allowing web-based control of a telescope. He also uses a Pololu 5V Step-Up/Step-Down Voltage Regulator S7V7F5 connected to the motor driver to power the Raspberry Pi from the motor power supply.
The project is being documented in a multi-part series on DirtyAstro.com. Part 1 covers the electronics that come with the telescope mount, part 2 is about assembling and testing the DRV8835 driver kit and motors, part 3 tackles setting up the Raspberry Pi and using an SSH client (PuTTY) to connect to it remotely via a PC, and part 4 is about getting Node-Red running to program the Raspberry Pi graphically using a web interface from any machine on the network.
He is not finished with the project, but I have a couple of suggestions for him or anyone doing something similar: First, since his 12 V supply exceeds the maximum operating voltage of both the motor driver (11 V) and the regulator (11.8 V), I would recommend using different ones. Keep in mind that “wall-wart” DC power supplies, especially older transformer-based ones, can have a voltage significantly higher than the rated voltage. Second, a board running a full operating system is usually not great for timing-sensitive operations like counting encoder ticks. If it can’t keep up with the pulse rate, I would recommend using a secondary microcontroller for the encoders. One possibility would be to use the A-Star 32U4 Robot Controller SV with Raspberry Pi Bridge, which incorporates a more appropriate 5.5 V – 36 V regulator, an Arduino-compatible microcontroller, and dual motor controllers.
Related products


Automated typewriter that takes dictation using Maestro
Forum user ZipZaps shared a fantastically charming project that uses a 24-channel Maestro servo controller to automate a Smith Corona typewriter using the speech recognition built into Windows. The Maestro controls a mechanism consisting of multiple rows of servos on some small linear rails to strike the keys in a manner resembling the way a person would normally interact with the typewriter. An Arduino paired with a Big Easy driver controls the stepper motor used to slide the carriage return system.
 |
You can find more pictures and information about this project in ZipZaps forum post.
Related products

New products: XYZrobot Bolide humanoid robot DIY kit and A1-16 smart servo
|
|


We are now offering two new products from XYZrobot: the Bolide Y-01 advanced humanoid robot DIY kit and the A1-16 smart servo.
The Bolide Y-01 DIY kit from XYZrobot comes with all of the components needed to build this advanced humanoid robot, including a Bluetooth controller, an Arduino-compatible ATmega1280 microcontroller, sensors, and 18 A1-16 smart servos. The ATmega1280 microcontroller comes preprogrammed to perform a range of complex movements, including dancing, walking and standing up in response to commands from the included Bluetooth remote or a smartphone or tablet running the XYZrobot app. The control board includes a three-axis accelerometer for maintaining postural stability and detecting falls, and the robot also has a distance sensor in its chest that can detect objects in front of it. For those interested in expanding the capabilities of this robot beyond the preprogrammed routines, the Bolide Y-01 control board can be programmed with the Arduino IDE and the XYZrobot Editor software. You can find more details about the Bolide Y-01 advanced humanoid robot DIY kit on its product page.
|
|

We are perhaps even more excited about carrying the A1-16 smart servos separately. These specialty servos are well suited for applications such as humanoid robots, hexapod robots, and robotic arms that require strong and complex actuation. Unlike the usual RC hobby servos, these servos are not only capable of 360° continuous rotation, but they also offer position control over an effective 330° range. To achieve this kind of motion, they use a TTL serial interface, which also allows them to be daisy chained and controlled from the same serial bus (this is their only method of control, so they will not work with standard RC receivers and servo controllers). In addition, these smart servos provide additional feedback such as position, speed, and temperature! The four-color LED featured on each servo is used as a visual error indicator by default, which is really handy to quickly determine if servos in a chain are experiencing a problem. Alternatively, this LED can be manually controlled through the serial interface. See the A1-16 smart servo product page for more information about this feature-packed servo.


New products: Scooter/Skate Wheels
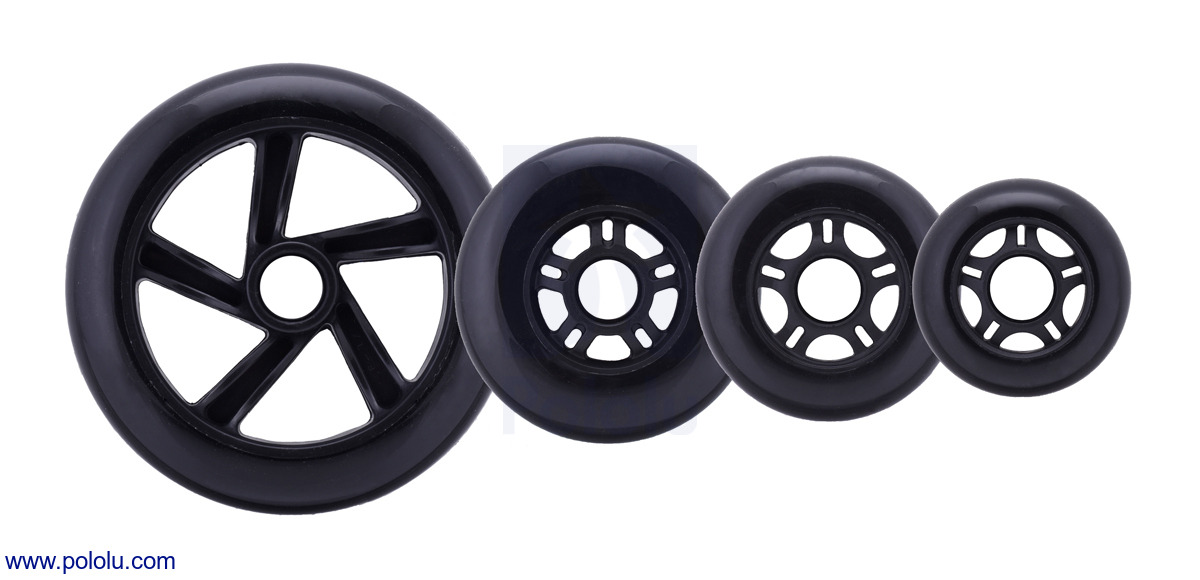 |
We are rolling out another set of new products here at Pololu: Scooter/Skate Wheels. They are available in 144×29 mm, 100×24 mm, 84×24 mm, and 70×25 mm sizes, offering larger alternatives to our line of Pololu Wheels. They are compatible with standard 608 bearings, so they also work with our Aluminum Scooter Wheel Adapters, which make it easy to connect these wheels directly to an assortment of motors for use in robot drive systems:
|
|
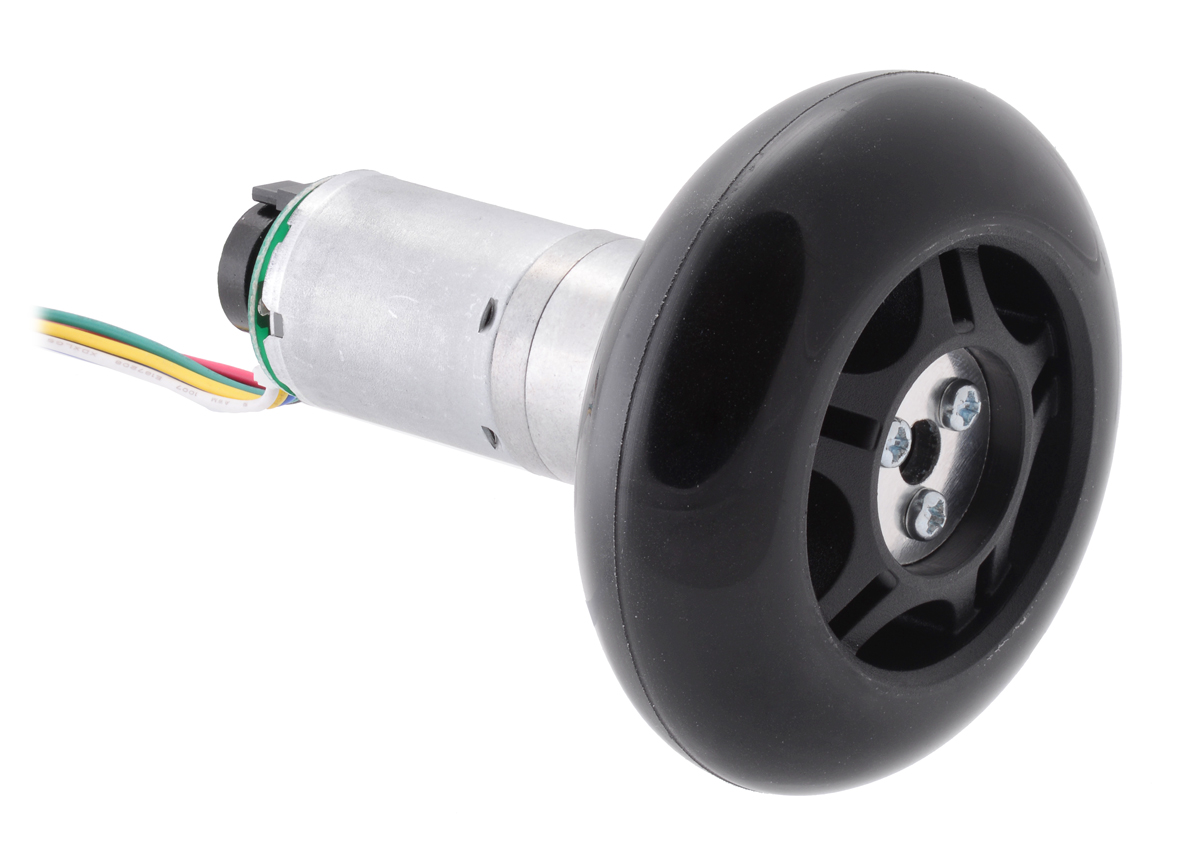

You can find more information about these wheels on their product pages:
Related products


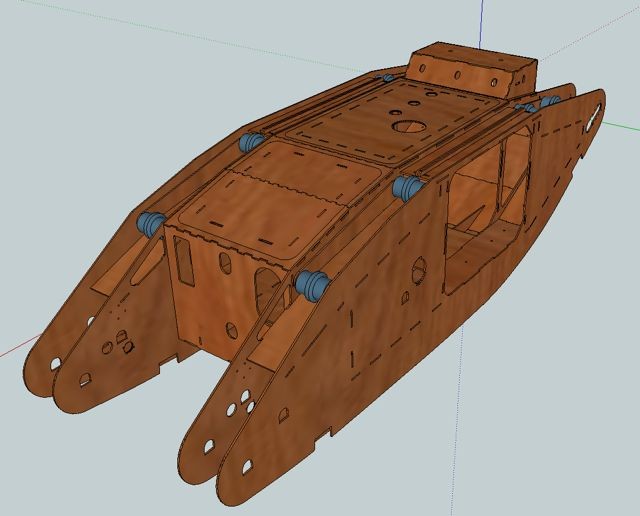
One-sixth scale Mark 1 British Heavy Tank by Helen Lawson
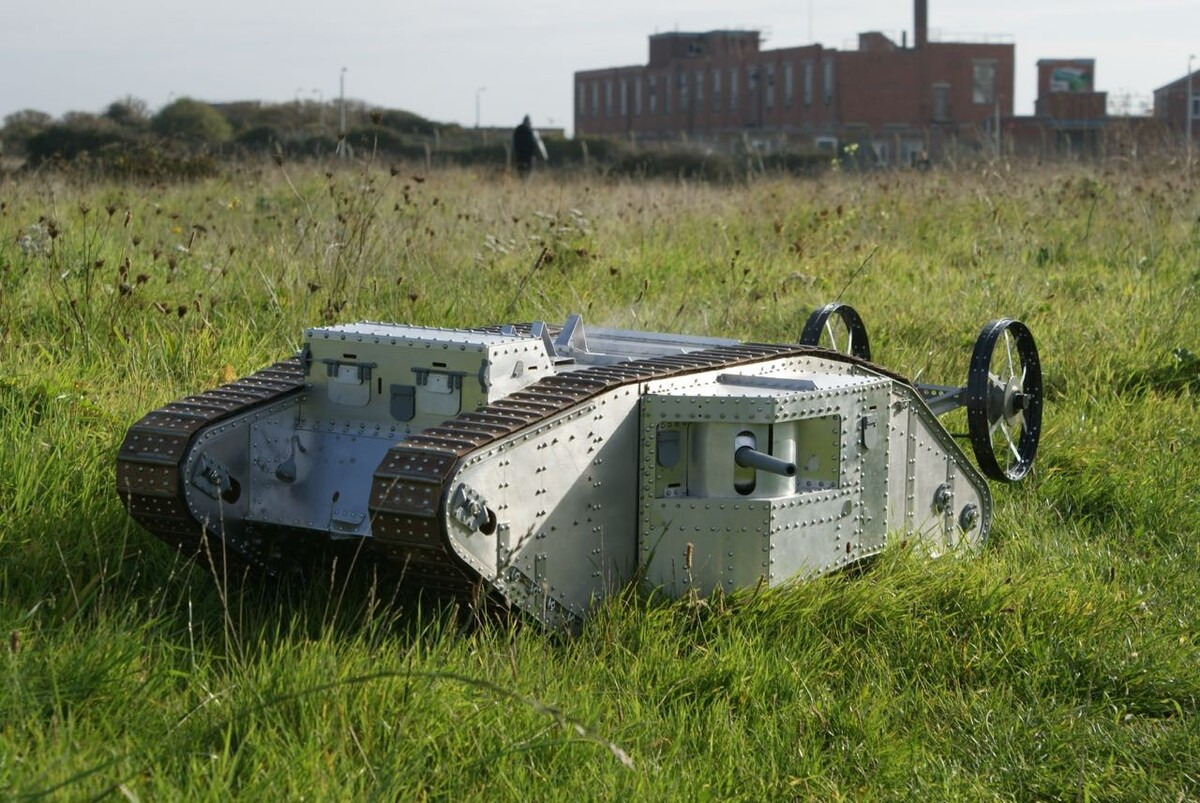 |
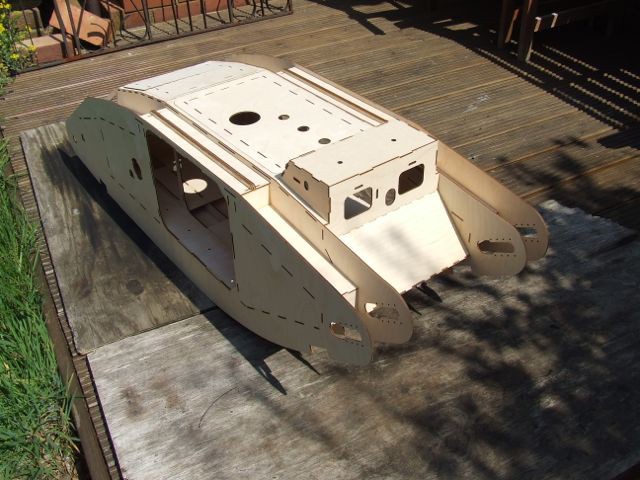
Helen Lawson designed and built a one-sixth scale Mark 1 British Heavy Tank replica that is a functional, radio controlled robot. The replica has been a work in progress for around three years and is now reaching completion. Helen designed the main chassis out of laser-cut wood and made other aspects of the chassis from aluminum and 3D printed parts.
|
|
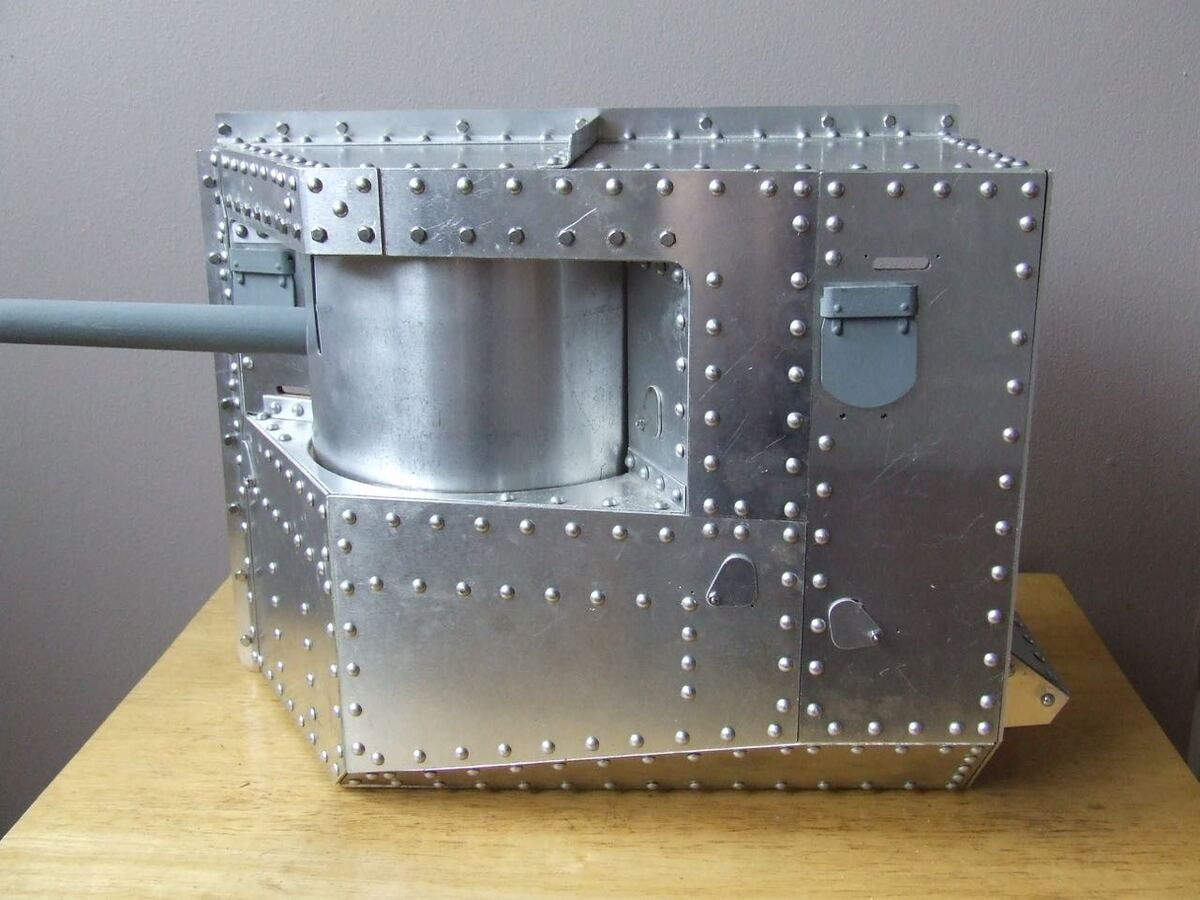
One distinguishing feature of a MK 1 British Heavy Tank is the lack of a central turret. Instead, it has a sponson on each side. This proved challenging for Helen’s build since most electronics made for RC tanks only allow for a single gun and turret. To make the sponsons functional, Helen used a combination of an RC receiver, an RC switch with digital output, an RC switch with relay, a Micro Maestro servo controller, a few servos, and a Taigen gun flash unit. You can find more detailed information about this part of the system (including a wiring diagram and Maestro script) in her post on our forum. The images below show each side of one of the completed sponsons:
|
|
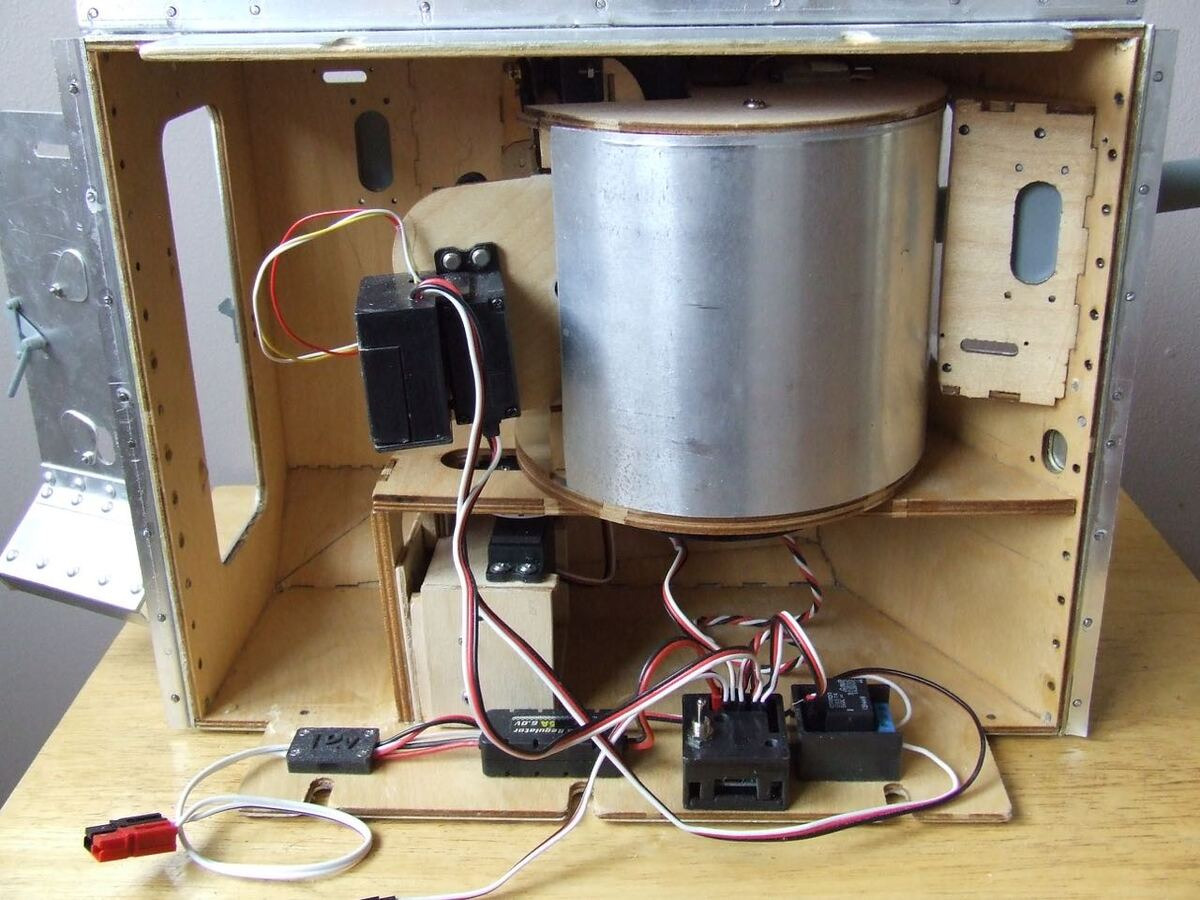
She also made a 3D-printed case for the Maestro (shown in the photo on the right) and a few of the other electronic components, which she made available on her Thingiverse page.
You can see a video of the robot in action on this Portsmouth Model Boat Display Team Armoured Division Facebook page, and even more information on her build, including many more pictures, in Helen’s forum thread at landships.net.
Related products


Home | Forum | Blog | Support | Ordering Information | Lists | Distributors | BIG Order Form | About | Contact
© 2001–2025 Pololu Corporation


