Pololu Blog » Posts tagged “new products” »
Posts tagged “new products” (Page 24)
You are currently viewing a selection of posts from the Pololu Blog. You can also view all the posts.
Popular tags: community projects new products raspberry pi arduino more…
New products: Brackets for Sharp GP2Y0A02, GP2Y0A21, and GP2Y0A41 distance sensors
 |
Our new stamped aluminum L-brackets are specifically designed for Sharp’s popular analog GP2Y0A02, GP2Y0A21, and GP2Y0A41 distance sensors, making it easy to mount them to your project in a variety of ways. The brackets are made of 0.8mm-thick aluminum, so they are light and bendable by hand if your application calls for something other than their default 90° angle, yet they are rigid enough to hold their position while in use.
These new brackets are sold in pairs and are available in three different versions: compact perpendicular and parallel versions, and a slightly larger but more versatile multi-option version.
|
|
|


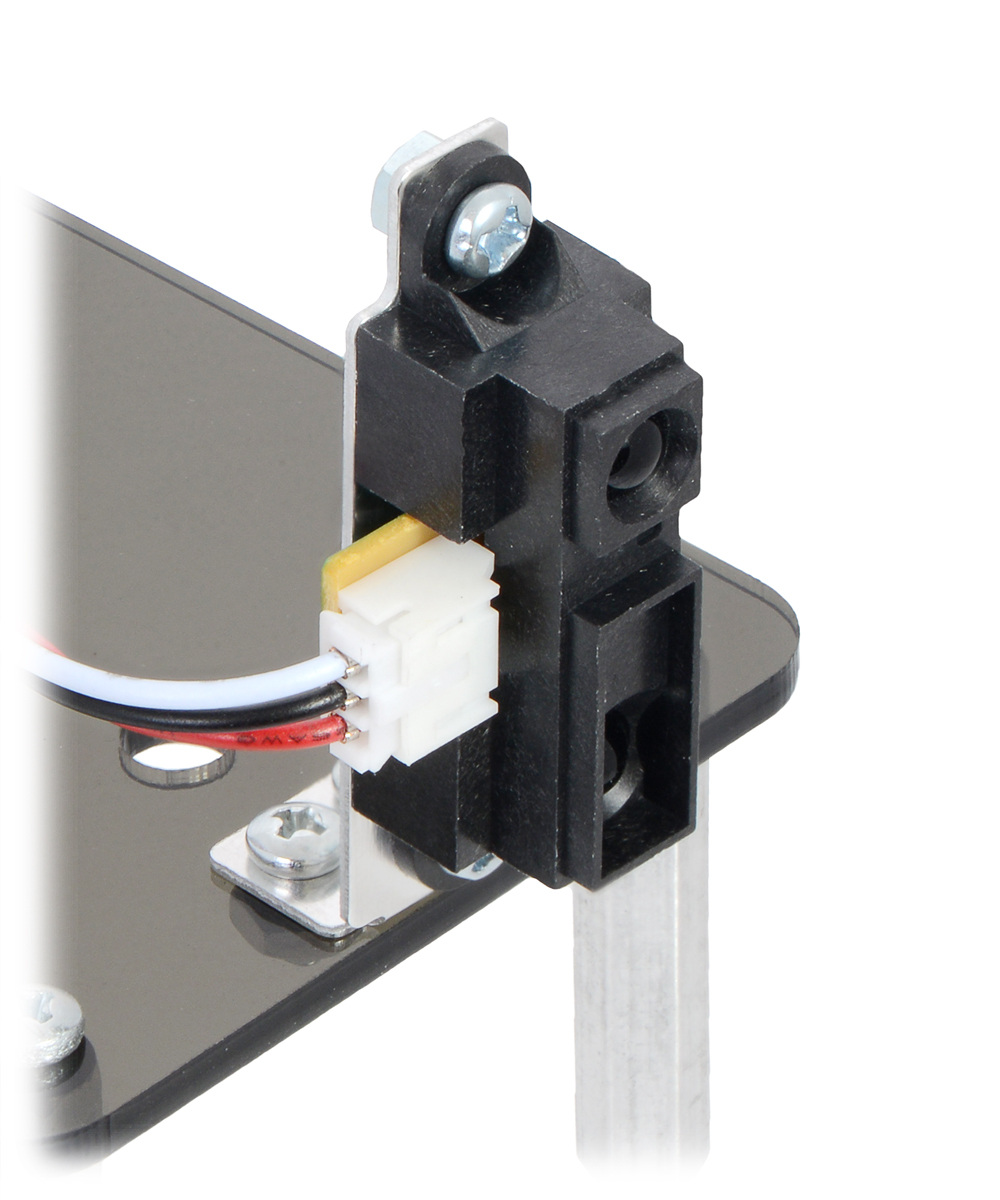
The appropriate bracket for your project depends on the specifics of how you would like to mount it. For example, if you want a low-profile installation on a horizontal surface, the parallel bracket (pictured above on the left) is a good choice. For a low-profile installation off of a vertical surface, the perpendicular bracket (pictured above on the right) might be most appropriate. The multi-option bracket (pictured above in the center) allows the sensor to be mounted to either face, so it supports both perpendicular and parallel orientations, and the long slots offer a lot of flexibility in sensor placement relative to the mounting surface.
See the product pages for additional information:
- Bracket Pair for Sharp GP2Y0A02, GP2Y0A21, and GP2Y0A41 Distance Sensors – Perpendicular
- Bracket Pair for Sharp GP2Y0A02, GP2Y0A21, and GP2Y0A41 Distance Sensors – Parallel
- Bracket Pair for Sharp GP2Y0A02, GP2Y0A21, and GP2Y0A41 Distance Sensors – Multi-Option
Related products


Free magazines: Circuit Cellar, Elektor, and now Robot!
|
|


Get FREE copies of Circuit Cellar magazine’s November issue and Elektor magazine’s November issue with your order, while supplies last. To get your free issues, enter the coupon codes CIRCUIT1114 and ELEKTOR1114 into your shopping cart. Each magazine will add 6 ounces to the package weight when calculating your shipping options.
For back issues and more information, see our free Circuit Cellar magazine offers and free Elektor magazine offers.
Introducing Robot Magazine
We are now also offering free issues of Robot, a bimonthly magazine specifically for the robot enthusiast! We have the three most recent issues available, while supplies last:
|
|
|


To get your free issues, enter the coupon codes ROBOT0714, ROBOT0914, and ROBOT1114 for July/August, September/October, and November/December, respectively. Each magazine will add 6 ounces to the package weight when calculating your shipping options.
For more information, see our free Robot Magazine offers category.
Related products


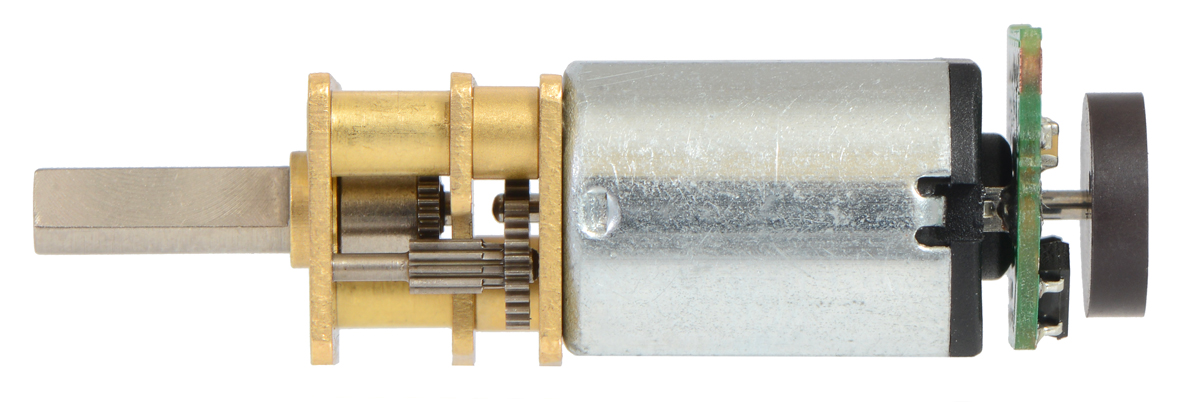
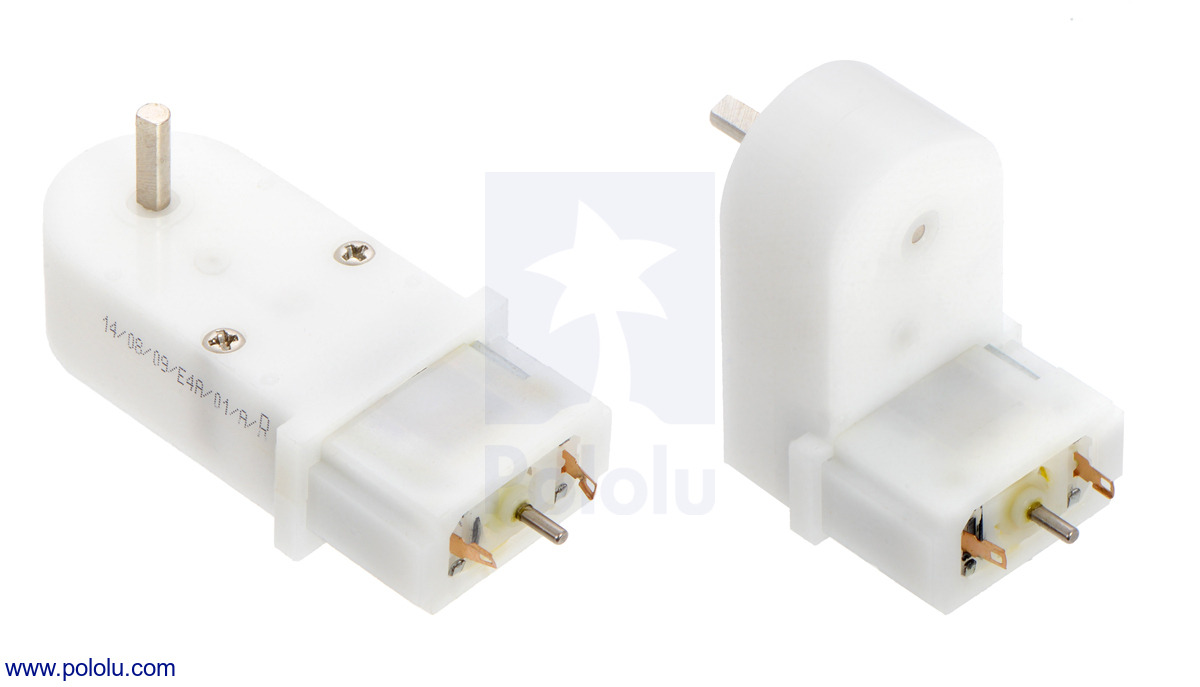
New products: MP micro metal gearmotors with extended motor shafts
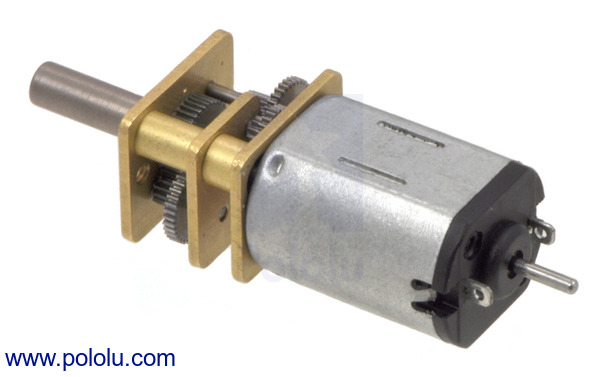 |
Several gear ratios of our medium-power (MP) micro metal gearmotors are now available with extended motor shafts:
- 10:1 MP micro metal gearmotor with extended motor shaft – 2200 RPM (no-load) and 3 oz-in torque (stall) at 6 V
- 75:1 MP micro metal gearmotor with extended motor shaft – 290 RPM (no-load) and 17 oz-in torque (stall) at 6 V
- 100:1 MP micro metal gearmotor with extended motor shaft – 220 RPM (no-load) and 19 oz-in torque (stall) at 6 V
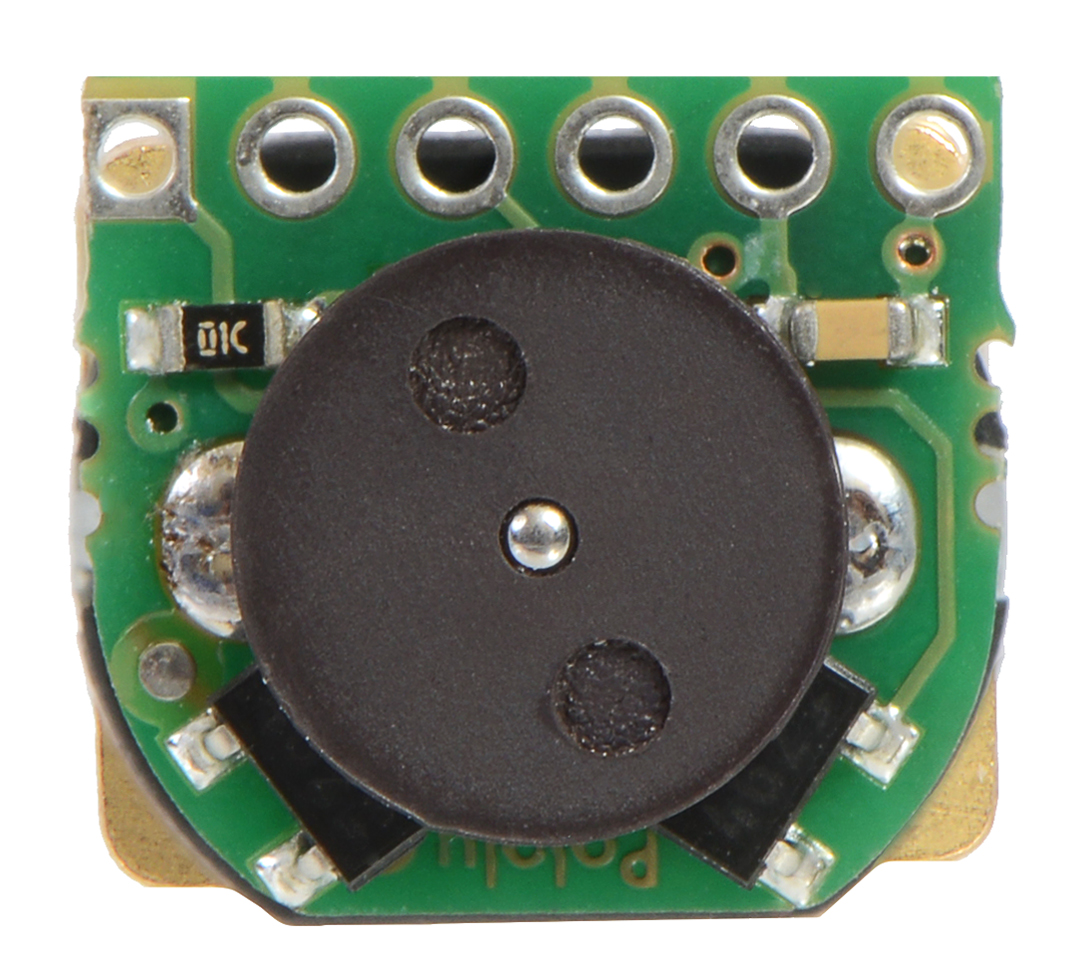
The extended motor shaft rotates at the same speed as the input to the gearbox and offers a way to add an encoder, such as our new magnetic encoder for micro metal gearmotors (pictured below), to provide motor speed or position feedback.
|
|
For more information, see the product pages or check out our entire category of micro metal gearmotors.
Related products

New products: Six new Mini Plastic Gearmotors
 |
Our family of Mini Plastic Gearmotors is growing! We have added HP versions with more powerful motors for increased torque and speed, and we are now carrying versions with extended motor shafts intended for use with custom encoders for motor speed and position feedback. (These extended-shaft versions are not compatible with the magnetic encoders we just released for our Micro Metal Gearmotors; we will have a similar encoder solution for these plastic gearmotors at some point, but for now we are offering them for people who want to make their own encoders.) The following table shows the current state of our Mini Plastic Gearmotor family:
| Motor Type | Stall Current @ 4.5 V |
No-Load Speed @ 4.5 V |
Stall Torque @ 4.5 V |
 90° output |
 90° output + motor shaft |
 offset output |
 offset output + motor shaft |
|---|---|---|---|---|---|---|---|
| high-power (HP) |
1250 mA | 150 RPM | 25 oz-in | 120:1 mini HP | 120:1 mini HP | 120:1 mini HP | 120:1 mini HP |
| low-power | 800 mA | 120 RPM | 20 oz-in | 120:1 mini | 120:1 mini | 120:1 mini | 120:1 mini |
| 80 RPM | 30 oz-in | 180:1 mini | 180:1 mini |
We are particularly excited about these gearmotors because they offer a great combination of performance and affordability; don’t be surprised if you find these motors in some of our future robots and robot kits! For more information about all of these gearmotors, see our Mini Plastic Gearmotors category.
Related products


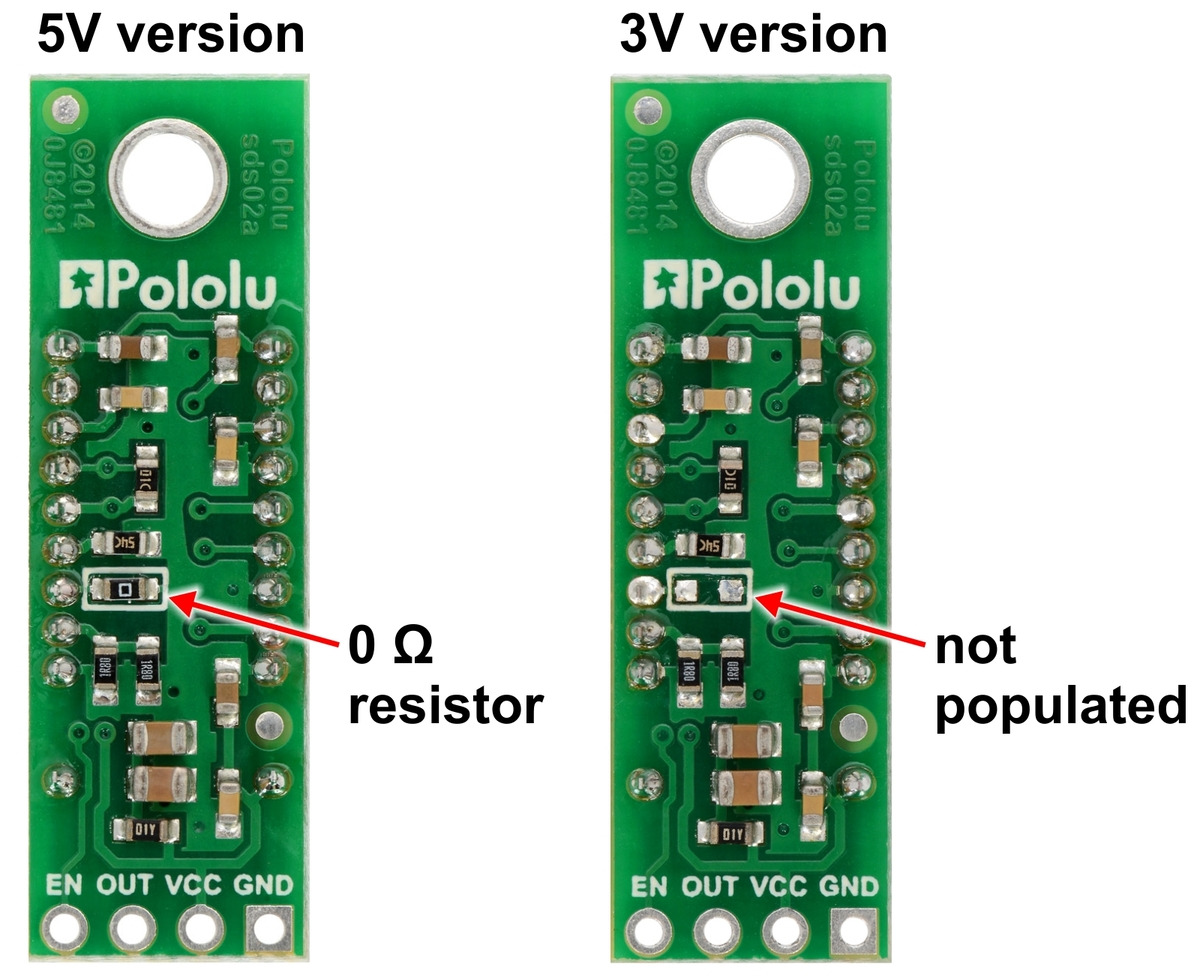
New products: Pololu Carriers for Sharp GP2Y0A60SZLF Analog Distance Sensor
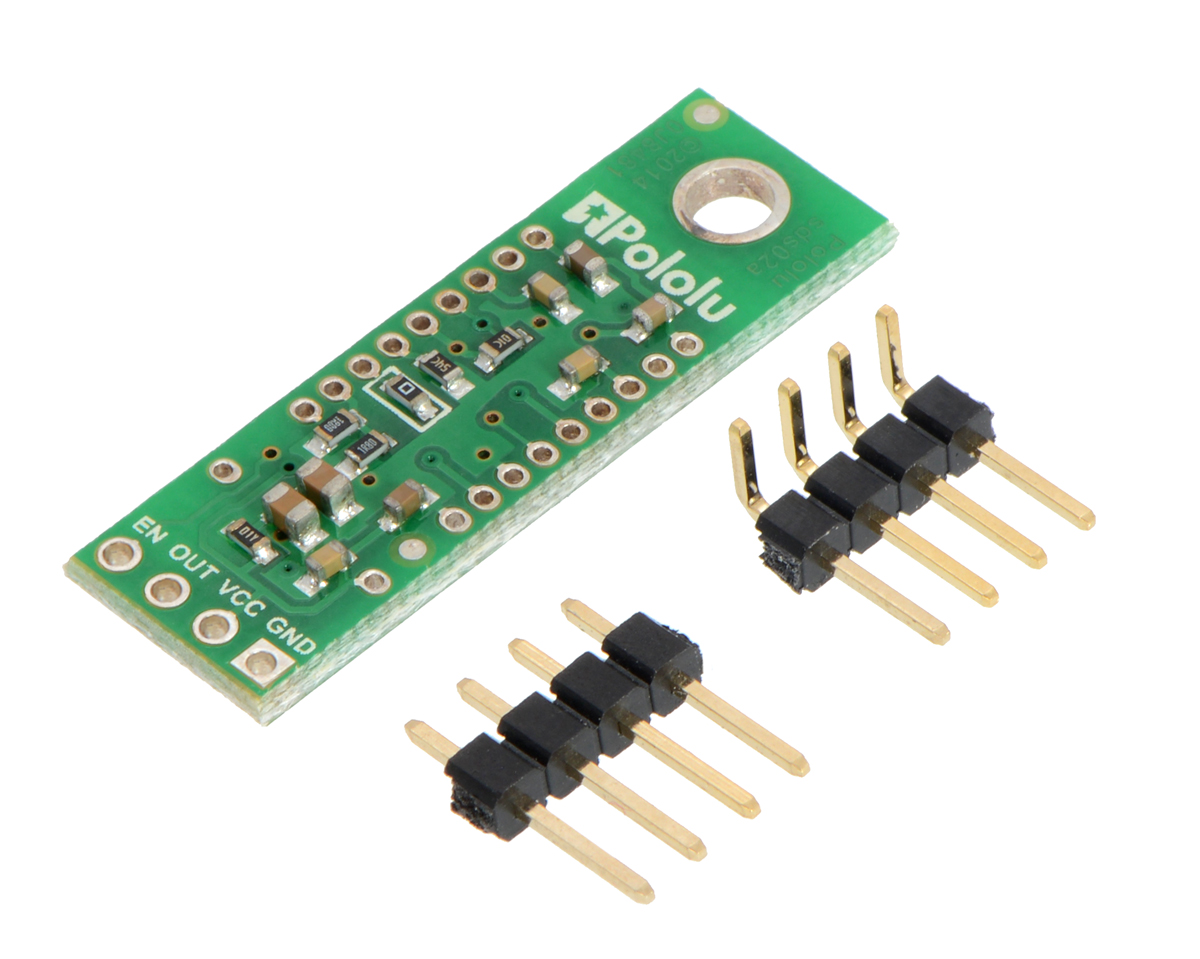 |
Last month, we introduced our new carriers with Sharp GP2Y0A60SZLF analog distance sensors, a part we are very excited about and have been trying to get for the past five years. Those complete sensor modules ship with the GP2Y0A60SZLF installed on our compact carrier board, which includes all of the required external components and provides a more convenient interface to the sensor (and a mounting hole!). Well, we are now offering the carrier boards without the sensor for those who already have Sharp GP2Y0A60SZLF units and are looking for an easy way to incorporate them into their projects. The carrier boards are available in two configurations: a 5V version for operation from 2.7 V to 5.5 V and a 3V version for operation from 2.7 V to 3.6 V:
 |
For more information, see the product pages.
Related products


Free magazines: October 2014 Circuit Cellar and Elektor
|
|

Get FREE copies of Circuit Cellar magazine’s October issue and Elektor magazine’s October issue with your order, while supplies last. To get your free issues, enter the coupon codes CIRCUIT1014 and ELEKTOR1014 into your shopping cart. Each magazine will add 6 ounces to the package weight when calculating your shipping options.
For back issues and more information, see our free Circuit Cellar magazine offers and free Elektor magazine offers.


New Product: 5V, 5A Step-Down Voltage Regulator D24V50F5
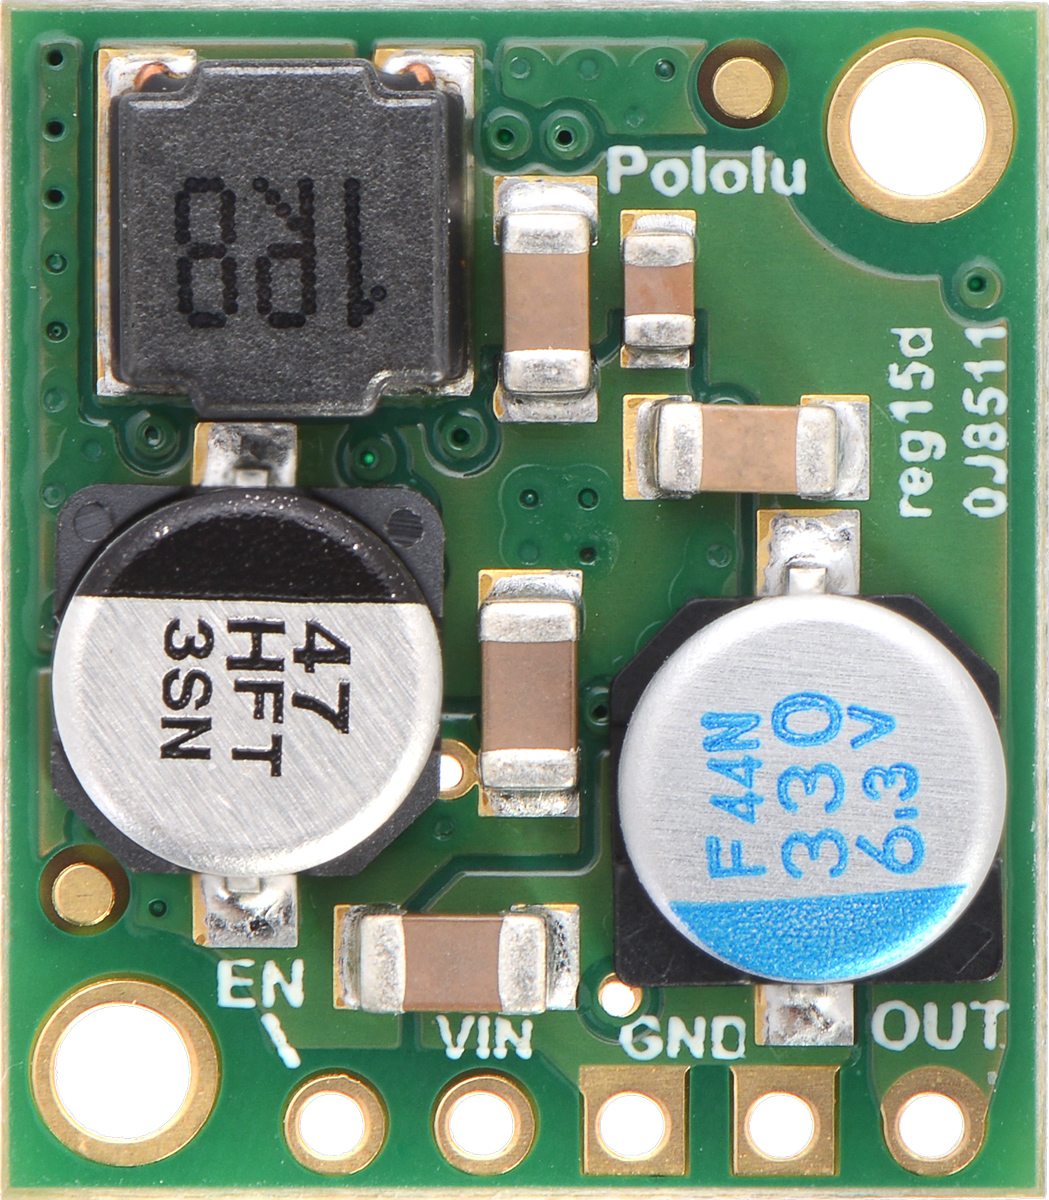 |
Remember the post I wrote two weeks ago about our tiny D24V25F5 voltage regulator and some of the testing that we did on it? Well, we were so happy with how that regulator turned out that we decided to make a higher-power version with a larger inductor and beefier MOSFETs. This new regulator is the D24V50F5, and while it is only 0.1″ bigger than its 2.5 A cousin, it can deliver 5 amps!
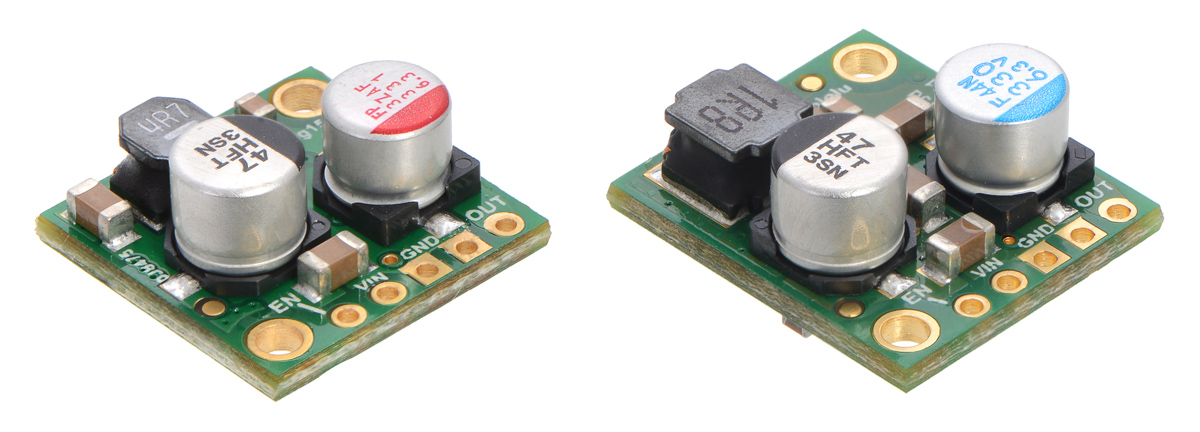 |
Side-by-side comparison of the 2.5A D24V25Fx (left) and 5A D24V50F5 (right) step-down voltage regulators. |
|---|
You can see the bigger MOSFETs on the bottom side:
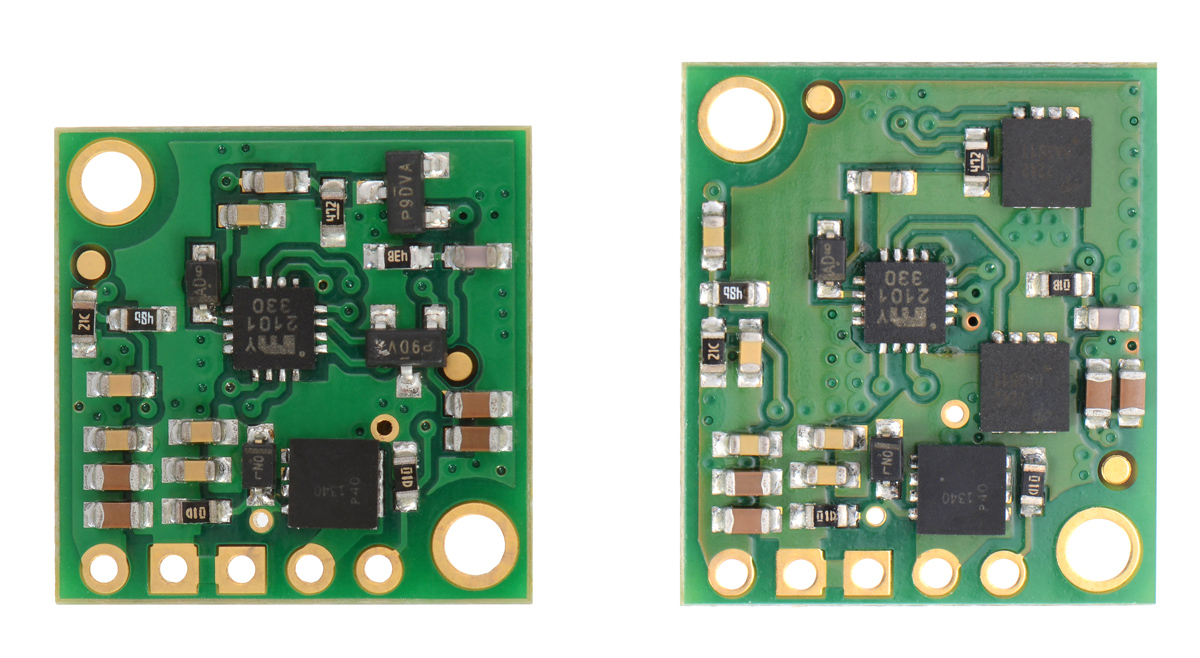 |
Comparison of the D24V25Fx (left) and D24V50F5 voltage regulators showing larger MOSFETs on the higher-power board. |
|---|
The D24V50F5 can also take inputs up to 38V and has typical efficiencies of 85% to 95%. It’s amazing how much power these little 3×3 mm MOSFETs can handle, and with its compact size and high power, this regulator is our new favorite.
Related products


New products: Magnetic quadrature encoders for micro metal gearmotors
Everyone wants encoders on their motors. If you think you don’t, you just don’t know it yet. I think the main reason is that we really just want motors to do what we tell them to do, but they don’t. One of the most common beginner questions we get is some variation of, “why doesn’t my robot go straight?” or “I got two of the same motor but they do not go the same speed; is something wrong with one of them?” More seasoned robot builders know that since there will always be variations in everything that contributes to a motor’s performance, our best hope is to put a sensor on the motor to monitor what is actually happening and then adjust the motor control to make reality better match our desires. Continued…
New product: Translucent Enclosure for Raspberry Pi Model B+
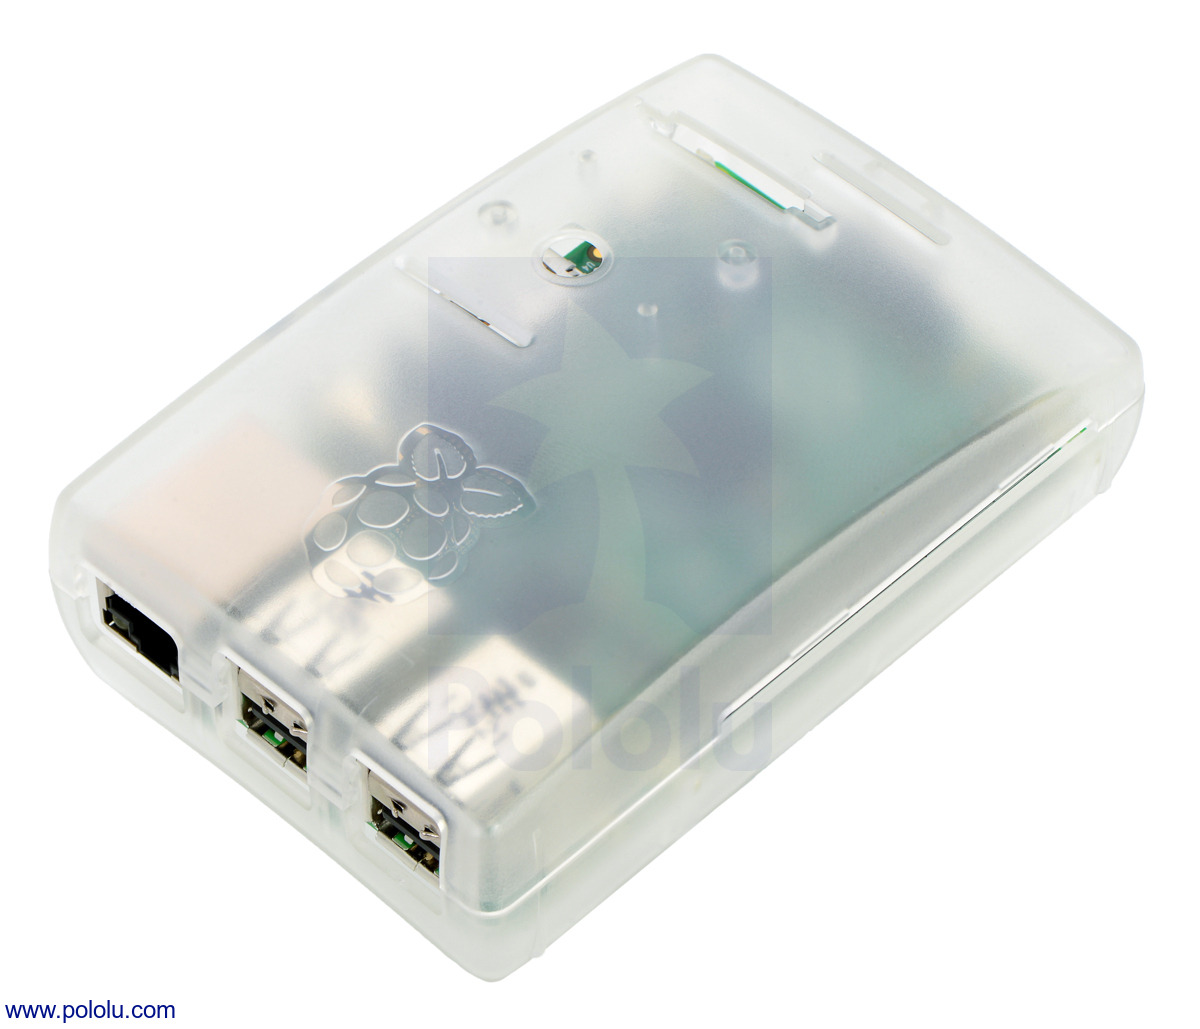 |
We are now carrying a translucent enclosure for the Raspberry Pi Model B+!


Free magazines: September 2014 Circuit Cellar and Elektor
|
|

Get FREE copies of Circuit Cellar magazine’s September issue and Elektor magazine’s September issue with your order, while supplies last. To get your free issues, enter the coupon codes CIRCUIT0914 and ELEKTOR0914 into your shopping cart. The Circuit Cellar magazine will add 6 ounces and the Elektor magazine will add 7 ounces to the package weight when calculating your shipping options.
For back issues and more information, see our free Circuit Cellar magazine offers and free Elektor magazine offers.


Home | Forum | Blog | Support | Ordering Information | Lists | Distributors | BIG Order Form | About | Contact
© 2001–2026 Pololu Corporation


