Pololu Blog »
Posts tagged “laser cutting”
You are currently viewing a selection of posts from the Pololu Blog. You can also view all the posts.
Popular tags: community projects new products raspberry pi arduino more…
Pololu laser-cut parts used by middle school team at the FIRST LEGO League championships
 |
Last week, 7th-grade robotics team ‘Lightning Strikes Twice!’ (LS2!) from Aspen Middle School in Colorado joined 160 teams from 66 countries to compete in the FIRST LEGO League Challenge World Festival held in Houston, Texas. It was their first time qualifying after winning multiple first-place awards at an event in Fort Collins, Colorado last November, and second place at the Colorado State Championship in December.
LS2! designed an autonomous turtle robot to conduct coral reef research, which uses LEGO electronics and pieces to control the flipper mechanism. Pololu supported the team with laser-cut plywood pieces for mounting the paddles and acrylic pieces for the tail and watertight body with gasketed openings.
 |
Turtle robot SHELTN2 submerged in a swimming pool. |
|---|
Working with Pololu was great. The parts arrived quickly and were very well packed. I suggested the students leave 3 mm of clearance around the LEGO structure to account for tolerance in the laser cutting and assembly but the parts were very accurate so we could have made it tighter. We used a combination of Weld-On 4 and 16 to glue the acrylic. The most challenging part was designing for the rubber shift boots we used to seal the joints while allowing movement. SHELTN’s total weight was approximately 7 kg plus 6 kg of ballast to achieve neutral buoyancy.
- William Gilmore, Mentor, Lightning Strikes Twice!

You can read more about the FIRST Championship in Houston in this FIRST press release, and visit the FIRST LEGO League blog for a full list of challenge and division award recipients.
We’re proud that parts from our Custom Laser Cutting Service helped LS2! bring their design to life and excel through their competition. Congrats to Lightning Strikes Twice! on all of their achievements!
Related products

We now offer UV printing and more metal laser cutting capabilities!
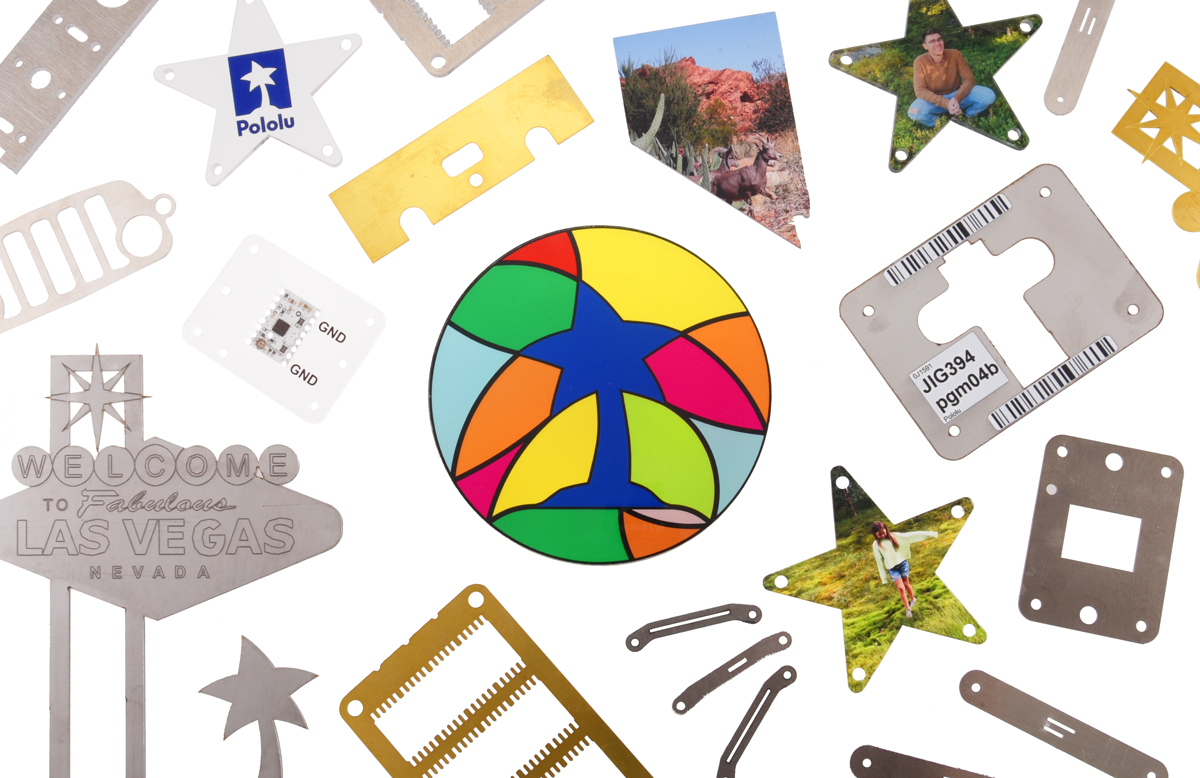 |
I’m excited to share some exciting improvements to our Custom Laser Cutting Service: a greatly expanded range of metal cutting capabilities and UV printing!
Metal laser cutting
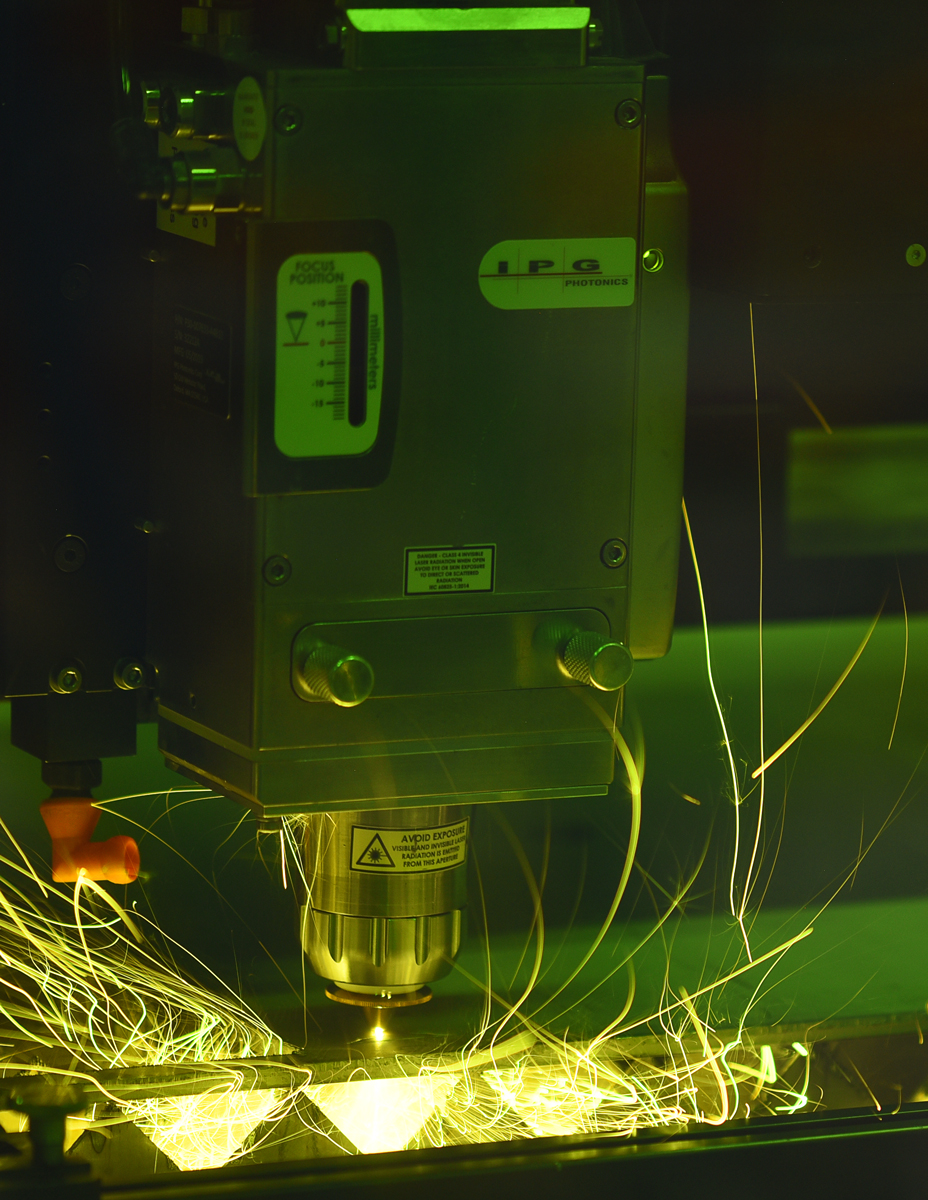
The last time we made a blog post about our laser cutting capabilities (over six years ago now), our most powerful machine was a 400 W CO2 laser cutter that could cut materials including plastics and woods up to 1″ (25.4 mm) thick, as well as steel up to 0.060″ (1.5 mm) thick. But we still weren’t satisfied with our metal cutting capabilities, so in the time since then, we have added an IPG Photonics LaserCube with a 3000 W fiber laser. The LaserCube is specifically designed to cut metals, enabling us to work with a wider variety of metals in thicknesses up to 1/4″ (6.35 mm).
|
|
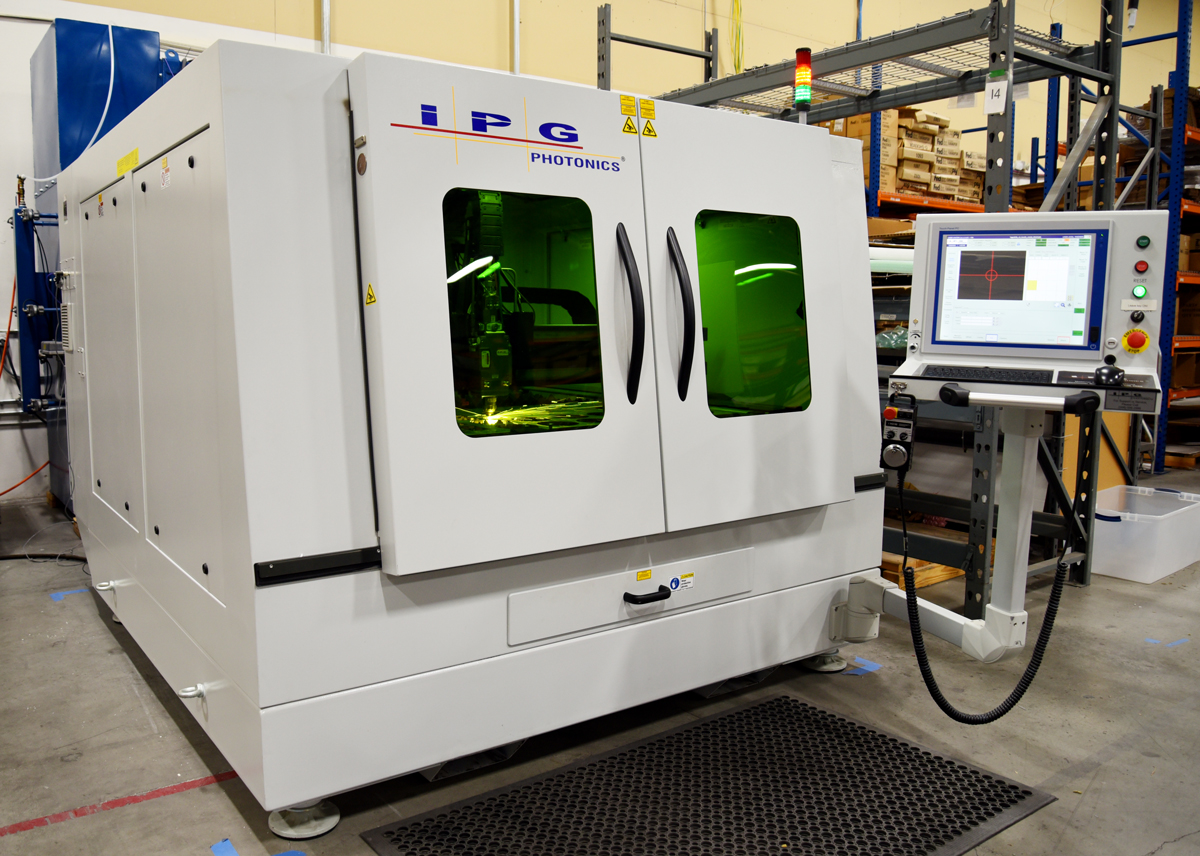
Jan briefly mentioned the LaserCube in a blog post back in March 2020 just after we finished installing it—and right as the world was locking down in response to the COVID-19 pandemic. With the disruptions first from pandemic and then from the subsequent global parts shortages, almost all of our efforts went into keeping daily operations going, and developing new processes for fundamentally new equipment like the LaserCube got put on the back burner. Fortunately, things have been gradually getting back to normal and we are now ready to officially announce the new metal cutting capabilities the LaserCube enables!
We can now cut:
- Steel up to 1/4″ (6.35 mm) thick
- Aluminum up to 1/4″ (6.35 mm) thick
- Brass up to 1/8″ (3.18 mm) thick
- Bronze up to 1/8″ (3.18 mm) thick
Correspondingly, we have added 5052 and 6061 aluminum to our regularly-stocked metals, joining 304 stainless steel and 1018 mild steel. We typically have sheets up to 24″ × 48″ (61 cm × 122 cm), but we can also order different metals/alloys or cut materials provided by customers up to 48″ × 48″. Additionally, since getting the LaserCube set up, we have started regularly using nitrogen (N2) as an assist gas, which helps cut parts with less discoloration and cleaner edges.
|
|
|
UV printing
Our newest equipment is a Mimaki UJF-6042 MkII e UV printer, which lets us add vibrant and colorful labels, logos, photos, and artwork to your laser-cut parts. It can print with 1200 DPI resolution to an area up to 24″ × 16.5″ (61 cm × 42 cm), and the UV-cured ink adheres to many of the materials we laser cut, including plastics, wood, and yes, metal!
 |
 |
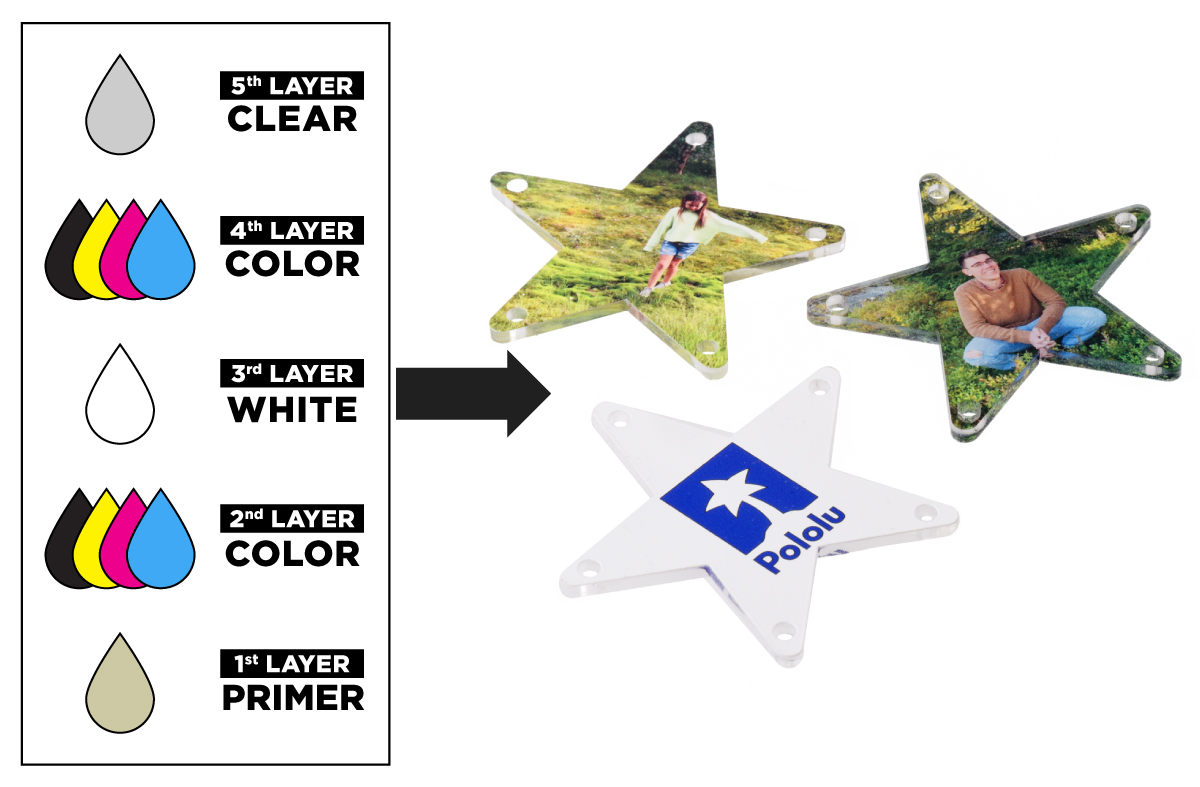
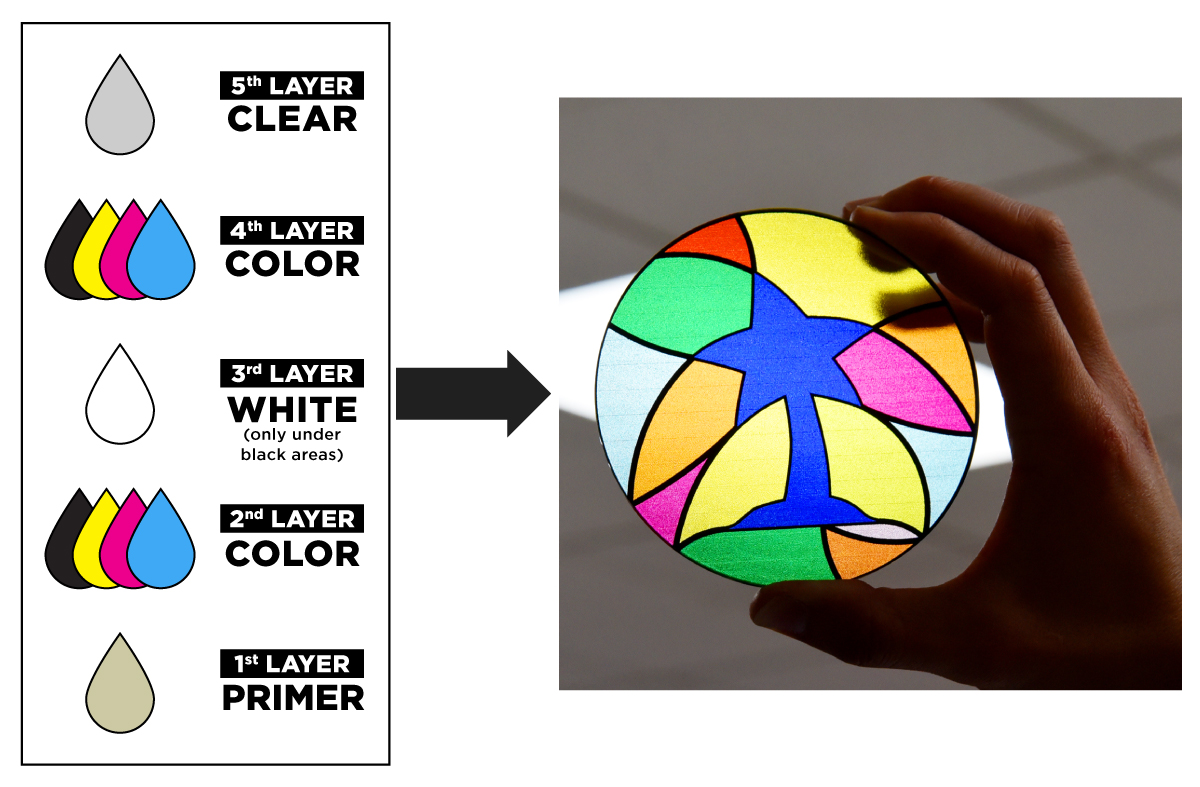
Our printer has inks for CMYK colors, plus a few special inks:
- White ink for printing vibrant colors on non-white materials
- Primer ink for helping the print better adhere to the material
- Clear ink for adding a layer of protection to the print
These different types of ink can be layered in various combinations for different effects.
|
|
|
|

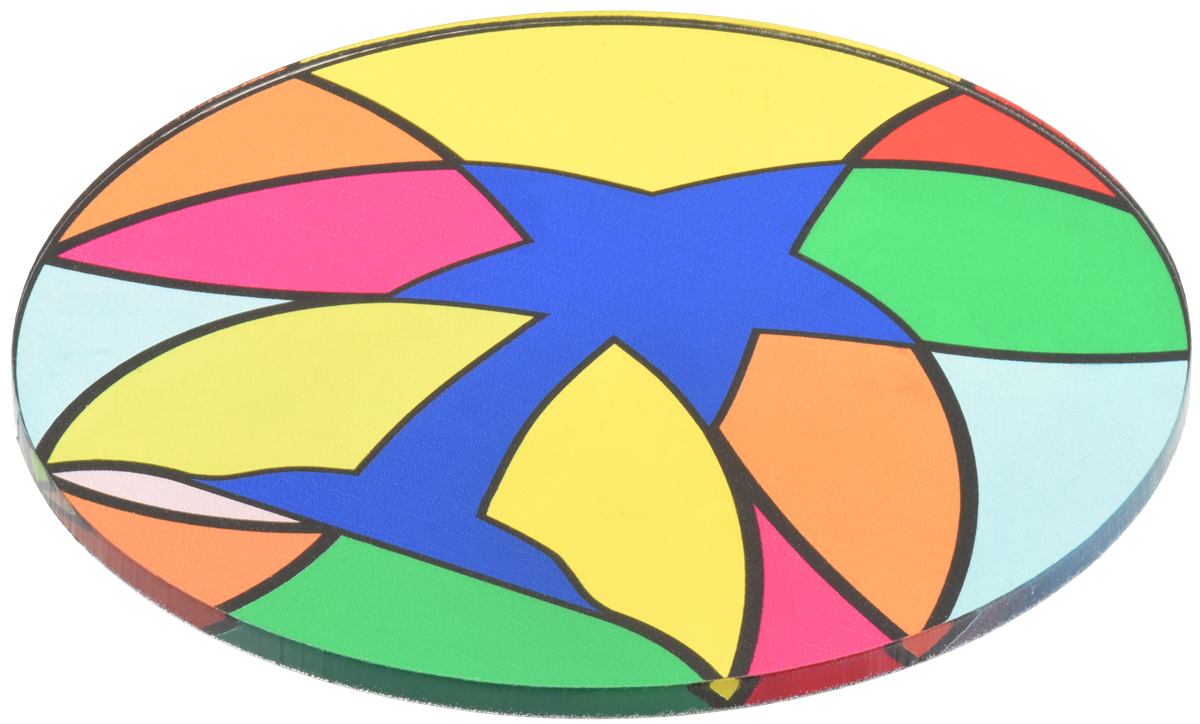
We especially like printing on transparent materials, like clear acrylic, since there are so many ways you can print different layers of ink to create unique parts. For example, we can make opaque images visible from either side of the part by printing a layer of white sandwiched by two color layers like we did for these personalized Christmas tree ornaments.
 |
Laser-cut and UV-printed acrylic Christmas tree ornaments with two color layers for double-sided appearance. |
|---|
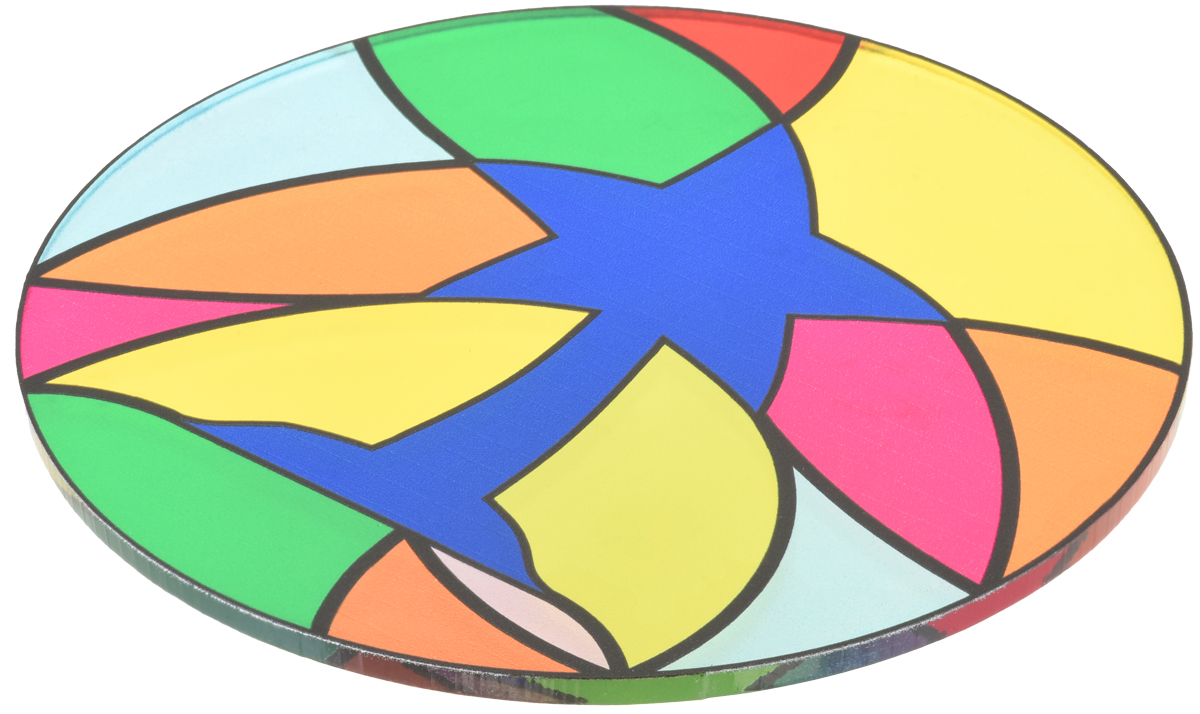
Alternatively, by strategically skipping the white layer in some areas of the print we can make transparent colorful parts that resemble stained glass.
 |
Laser-cut and UV-printed acrylic part with stained glass appearance. |
|---|
Getting a quote
You can submit a quote request for laser-cut metal parts, laser-cut parts with UV-printed artwork, or other types of laser-cut and engraved parts through our Custom Laser Cutting Service page. To get started, we recommend downloading one of our templates below, which already have the different layers set up.
 |
 |
 |
| CorelDRAW (340k cdr) | Adobe Illustrator (7MB ai) | Inkscape (457k svg) |
|---|
|
|
||||
|
|
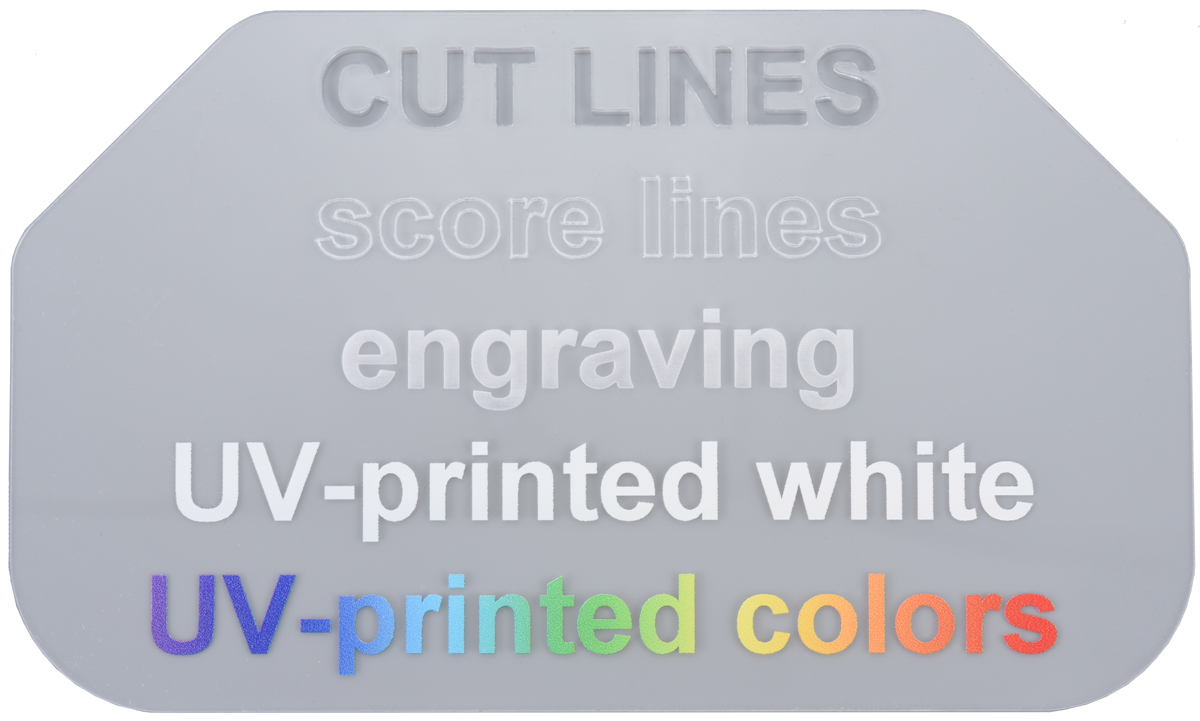
Then, all you will need to do is add your artwork to the appropriate layer, save it, and submit a quote request!
For more detailed information about all of our capabilities and how to set up your files to make the process as smooth as possible, check out our Custom Laser Cutting Guide.
Share with us
We are excited to see what parts you design and how they get used in your projects! When you get your parts, consider posting some pictures in the Share Your Projects category of our forum. If you are still brainstorming ideas for your next project, our forum and blog posts tagged laser cutting
are a great places to find inspiration.
Related products
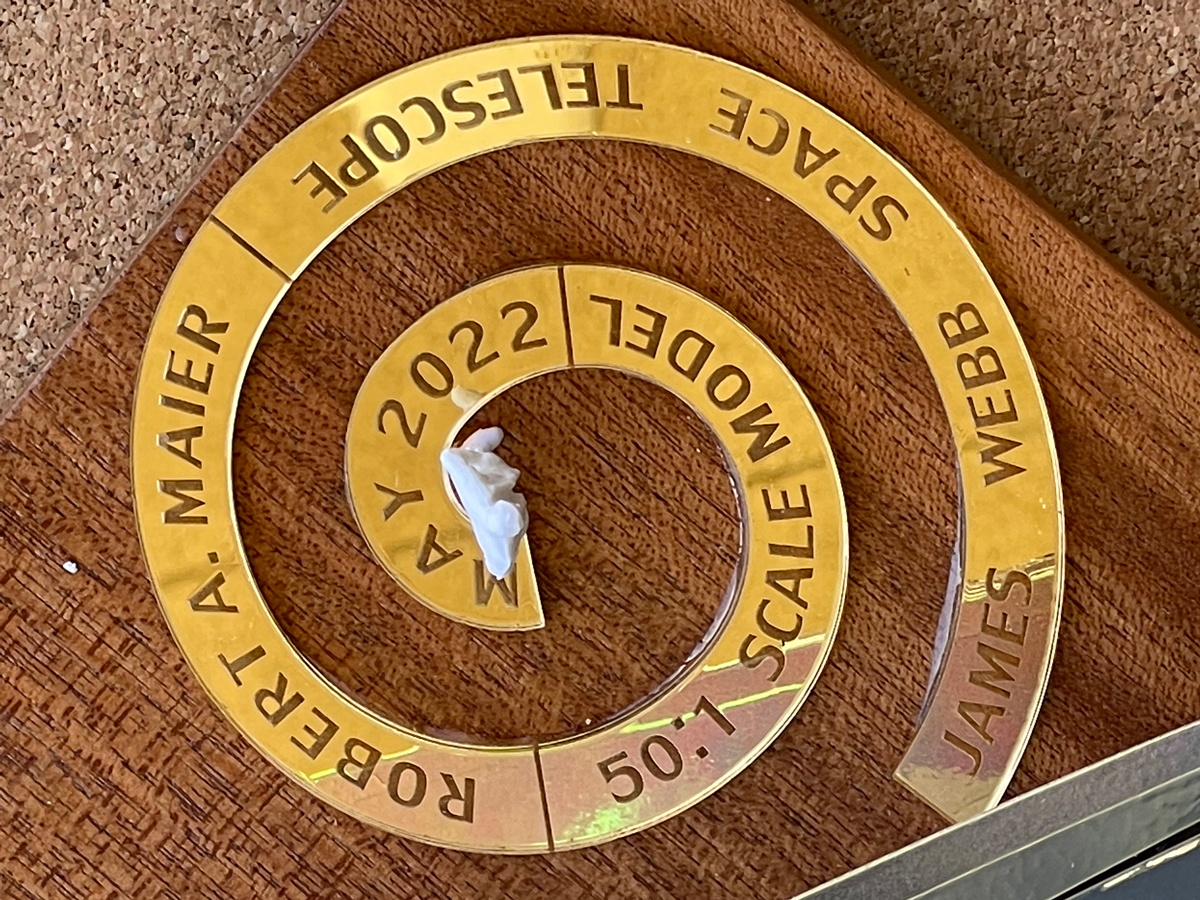
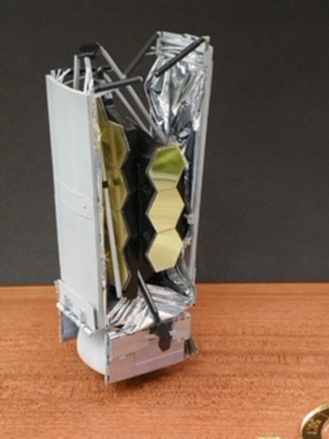
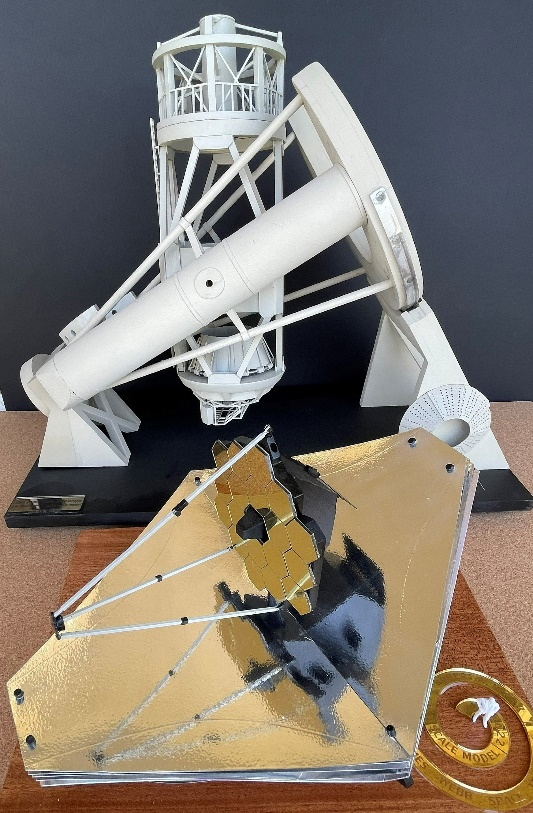
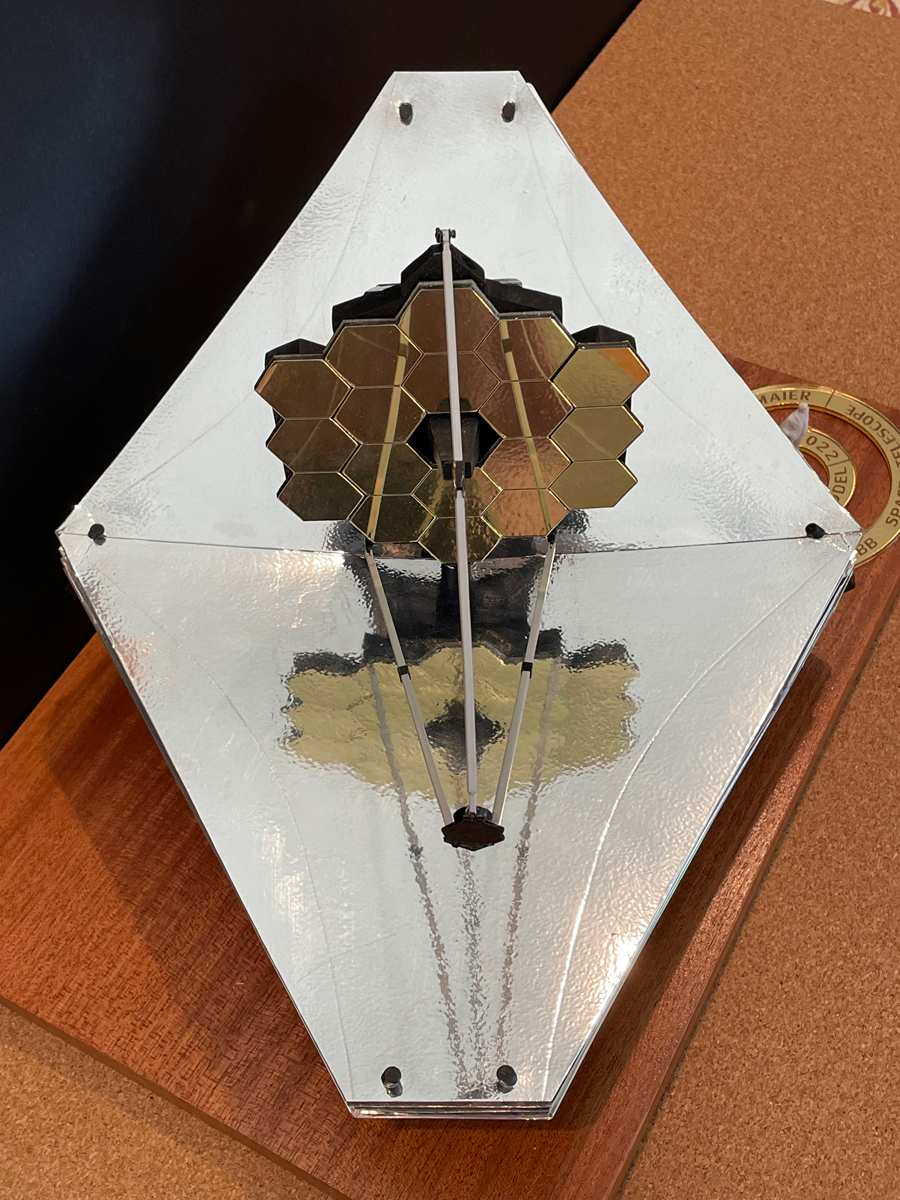
Laser cutting part of a 50:1 model of the James Webb Space Telescope
 |
50:1 scale model of the James Web Space Telescope model with laser-cut and etched gold-mirror acrylic and gold-mirror styrene parts. |
|---|
Retired aerospace engineer Robert Maier shared with us this awesome 50:1 scale model of the James Webb Space Telescope (JWST) he made with his brother Mark and a little help from our custom laser cutting service. We cut the JWST’s main mirrors for him out of 1.5 mm gold mirrored styrene sheets from Midwest Products, and the hexagon patterns were laser etched onto the surface. He also had us laser cut various silicone bands to hold the moving pieces of the structure as the model folds/unfolds.
|
|

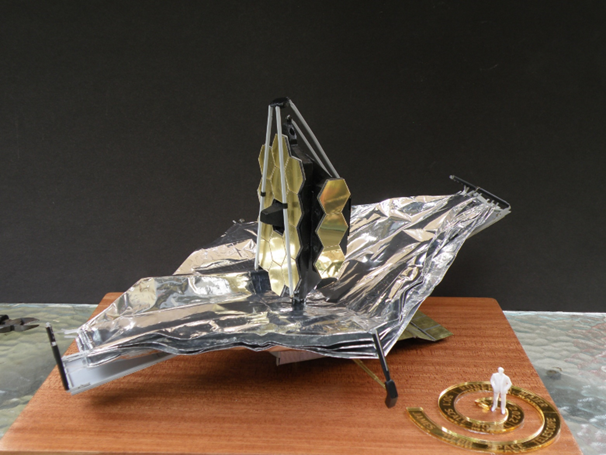
We more commonly work with 3 mm mirrored acrylic, but the model’s mirror required something thinner, and the more expensive styrene was perfect for the job. For comparison, the spiral label sitting beneath the figurine’s feet was cut from gold mirror acrylic.
|
|
Mark uses the model in the Astronomy 101 classes he teaches at San Jacinto College in Southern California. He recently wrote an article about the model, which is published in the April 2023 issue of Sky and Telescope magazine (it’s on page six). Additional photos of the model are included below, and even if you’re not a subscriber to the magazine, you can preview the article online.
|
|
|
Do you have a fun idea in mind that can benefit from laser-cut parts? Submit a quote request or contact us to discuss how we can help.
Related products
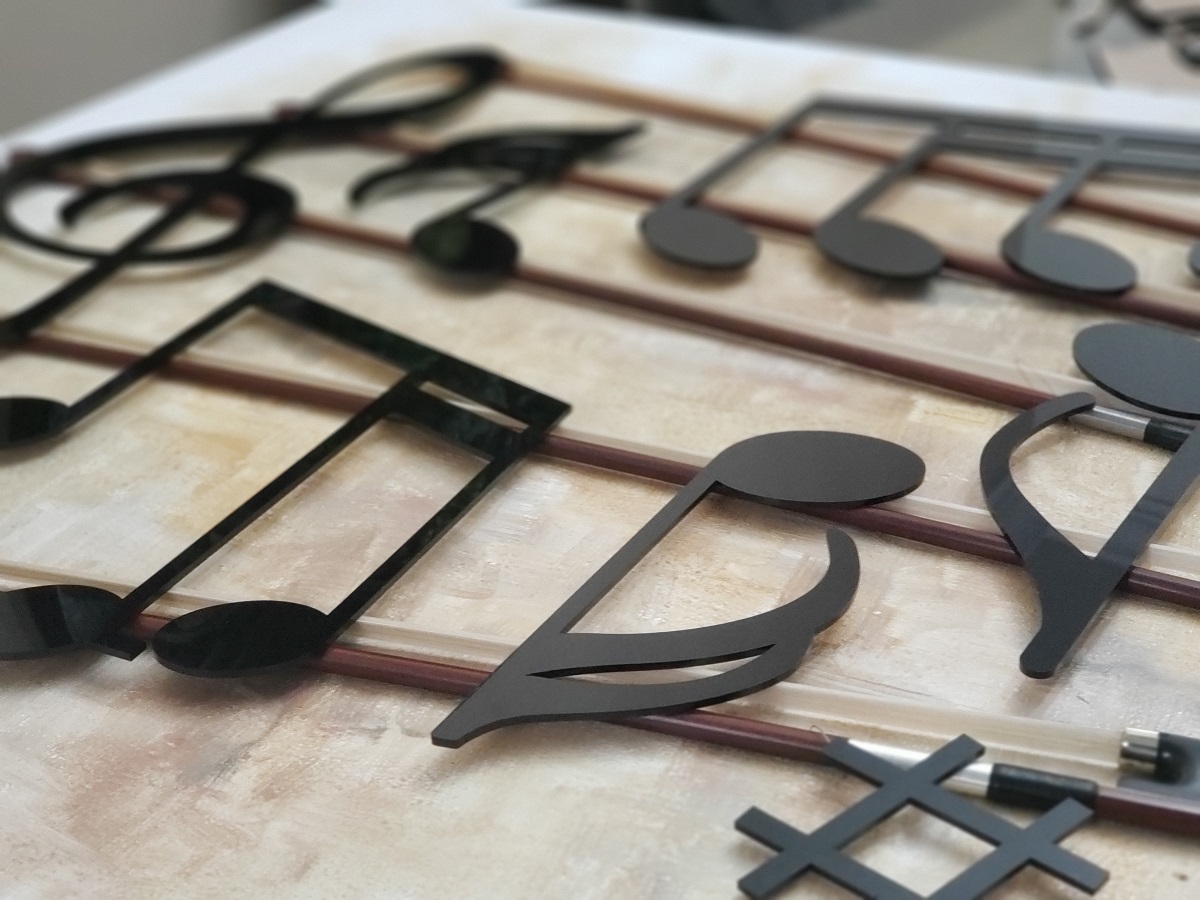
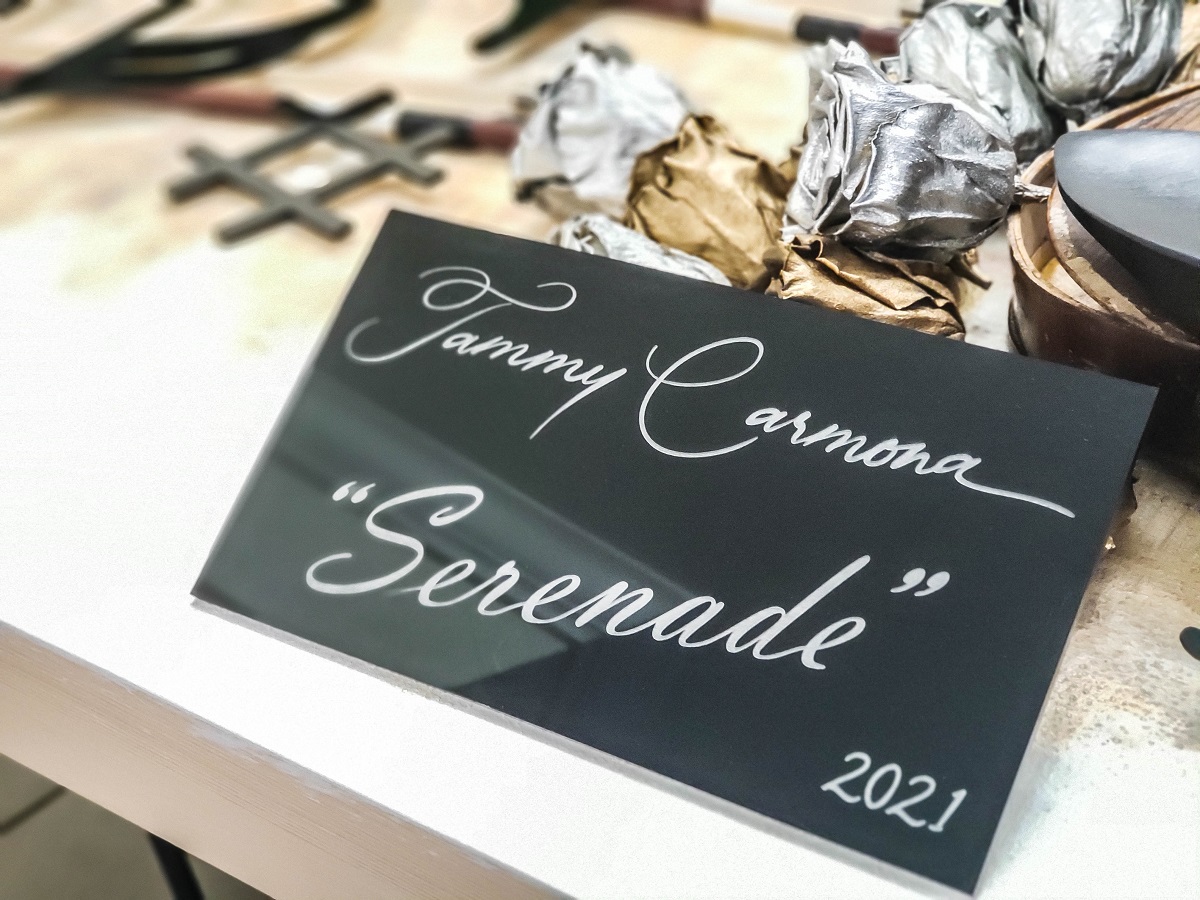
"Serenade"; 3D Mixed-Media Artwork by Tammy Carmona
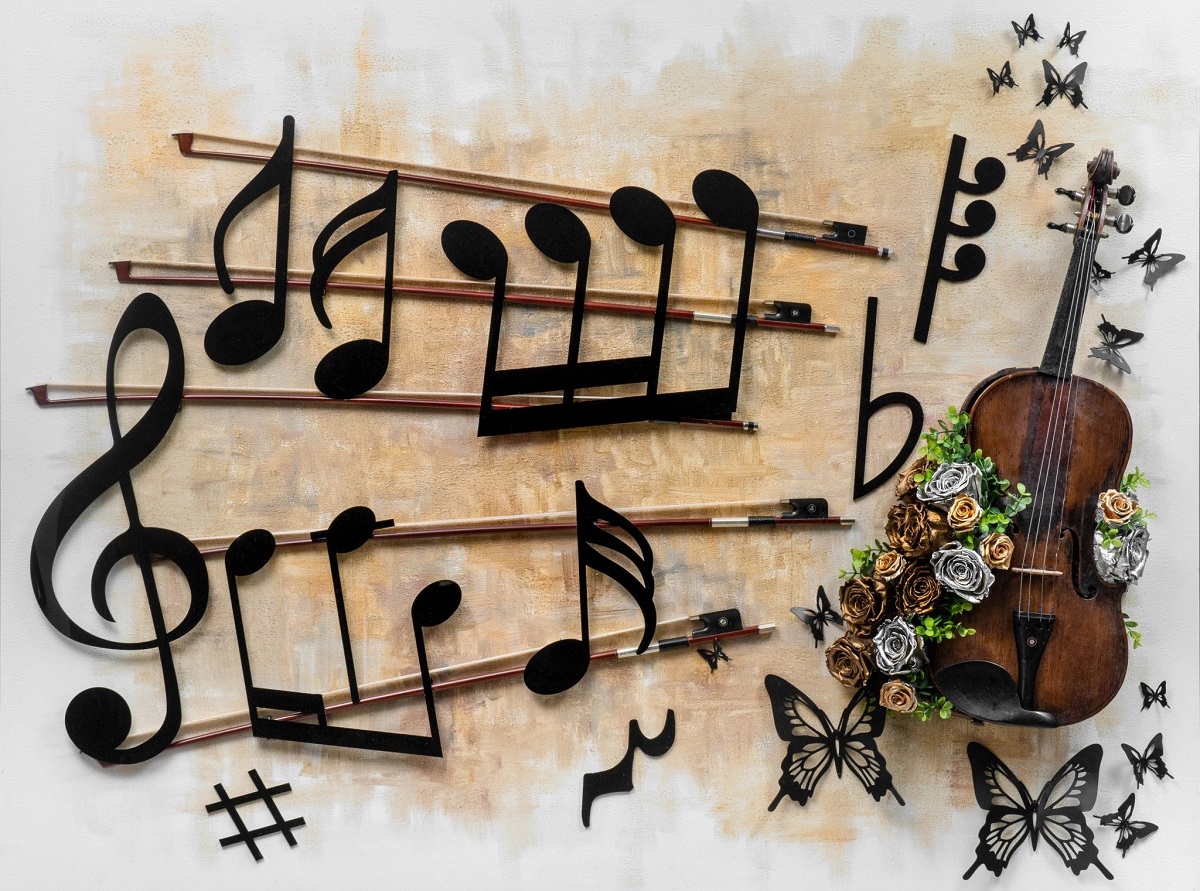 |
Artist Tammy Carmona recently used our laser cutting service to help create her 3D mixed-media artwork, “Serenade”, pictured above. Carmona writes about the piece:
This mixed-media composition takes classical elements of music, and combines them with art in a decadent, delicious “feast for the eyes”.
The piano-glossy notes, the authentic violin bows and an actual violin, the laser-cut butterflies, the preserved roses – each element brings a different sensation and a different meaning.
Themes of rebirth and remembrance permeate this piece. The old violin is reborn with bursts of flowers, the old bows have found a new life supporting musical notes, the flowers are real preserved roses.
The music notes were laser cut out of black cast acrylic, which we stock regularly. The title sign for the piece, pictured below, was cut from the same material and raster engraved. A nice feature of the cast acrylic used in this piece is that it turns frosty white when engraved, which provides high contrast engravings.
For a more detailed description of Carmona’s piece and additional pictures, visit her website here. More information about our laser cutting service can be found here.
|
|
 |
Related products
Curtis's laser-cut arcade stick case
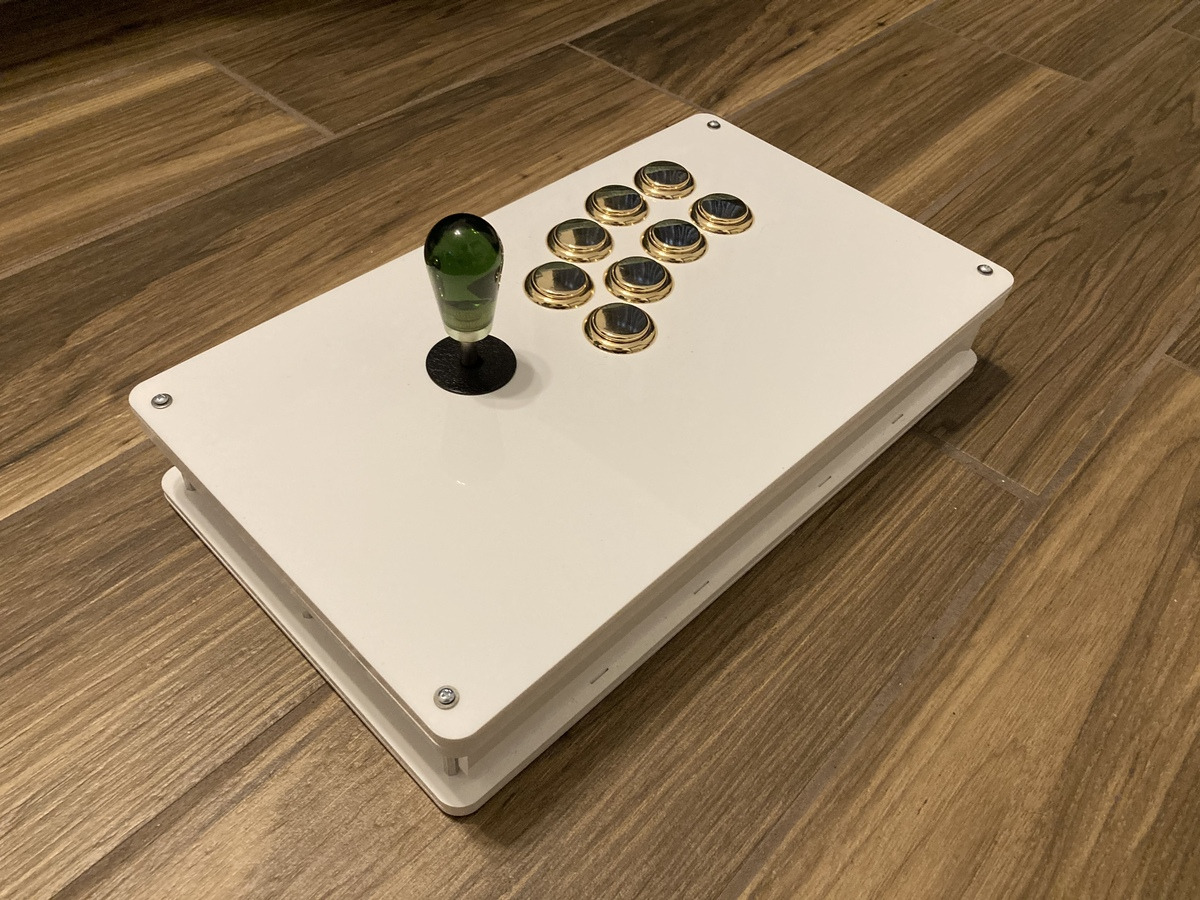 |
Hello, I’m Curtis, an engineering intern at Pololu. I’m studying mechanical engineering at University of California, Irvine. I’ve been playing a lot of Tekken during the pandemic. In fighting games like Tekken a lot of people use arcade sticks to play. So, I wanted to build my own.
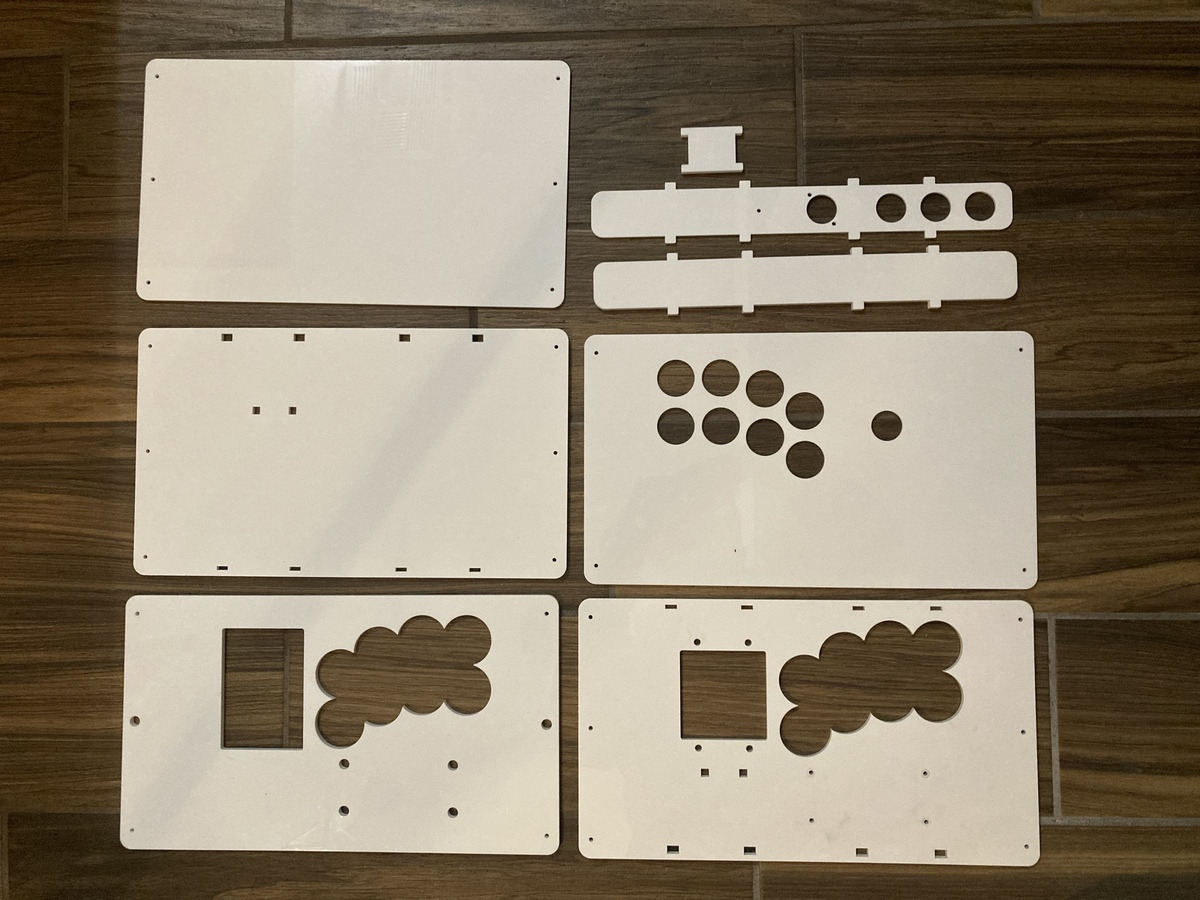
I built an arcade joystick case using acrylic parts (3mm and 6mm thickness) that I made with our Custom Laser Cutting Service as well as various M-F standoffs, F-F standoffs and screws and nuts.
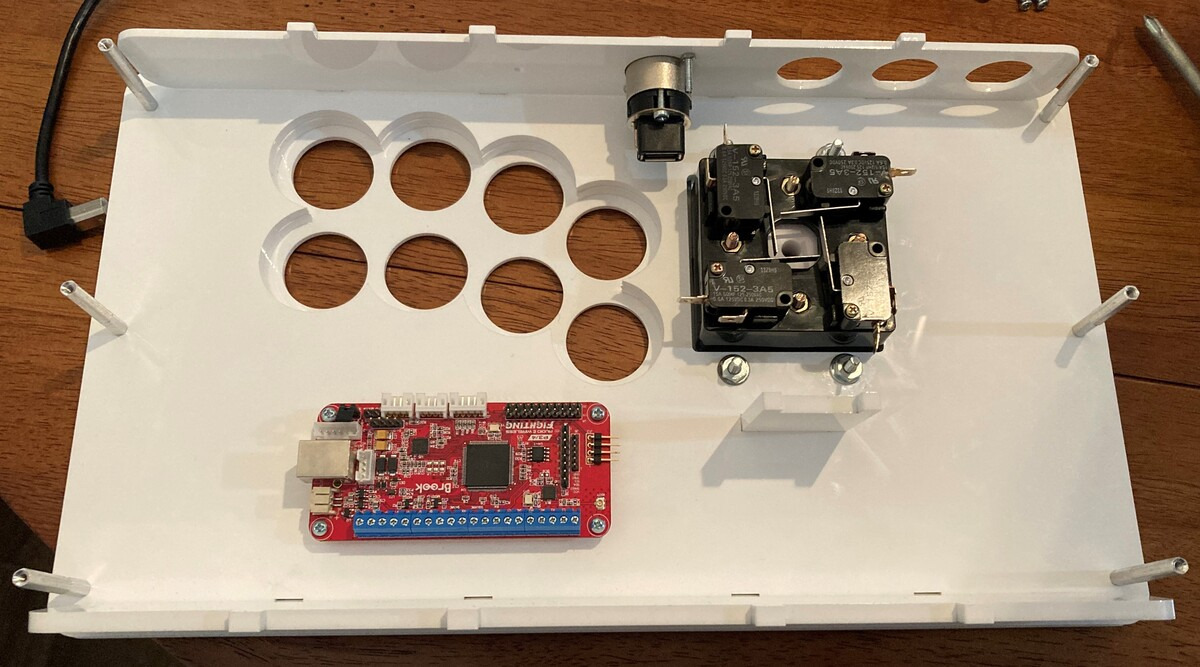
I designed the case myself in Solidworks. I decided on a length and width of 8" × 14" because that makes it large enough to be comfortable, while being small enough to fit in a backpack and carry around. The positioning of the buttons and joystick is based on Hori arcade sticks, with some modification to fit my hands. The difficult part was figuring out how to mount all the components. I ended up layering the acrylic pieces to form the top and bottom plates. This let me mount components in between the layers, which hid screws and made the case look better. I was also able to cut holes to position vertical supports, like the front and back walls, to increase the case’s rigidity.
 |
It’s designed to fit:
- 8 × 30mm and 3 × 24mm Sanwa buttons
- Neutrik USB type A to B pass-through
- Brook Wireless Fighting Board
- IST Alpha 49s Joystick.
PCBs from Brook are popular for arcade sticks. They have low latency and are compatible with PC and consoles. Button and joystick choices are based on personal preference, similar to mechanical keyboard switches. Sanwa buttons are popular as well, and pretty standard in a lot of arcade cabinets, so I picked them because I’m used to them. I chose the IST joystick because the joystick tension is stiffer, which I prefer because it makes quick movements easier.
It can be a little tricky to put together. I didn’t realize that the joystick switches had tabs that extended beyond the sides of the joystick, so it couldn’t slide into the case. To get around this, the joystick just has to be taken apart and put back together inside the case.
 |
Overall the case works really well. I was worried that the acrylic wouldn’t be stiff enough, but the case is rigid, and all the components fit.
You can download my CAD files (.DXF and .CDR) for the laser cut parts here (97k zip) to cut out the same case I designed, or as a starting point to design your own.
Related products
Starlite by Grant Grummer
Grant Grummer used our laser cutting service to create 6- and 8-point acrylic stars for his project, Starlite: A programmable star-shaped canvas for displaying light patterns.
Starlite uses a 3mm thick laser-cut piece of translucent white acrylic (#7328 white, also called “sign white”) for the front face. The LEDs mount onto a thinner (1.5mm thick) piece that has rectangular cutouts that allow the LEDs to connect to the controls, the main control board, and an UPduino daughter board.
You can read more about Starlite on Grant’s Make: Projects and GitHub pages.
If you are interested in making a similar light display, be sure to check out our selection of LED strips!
Related products


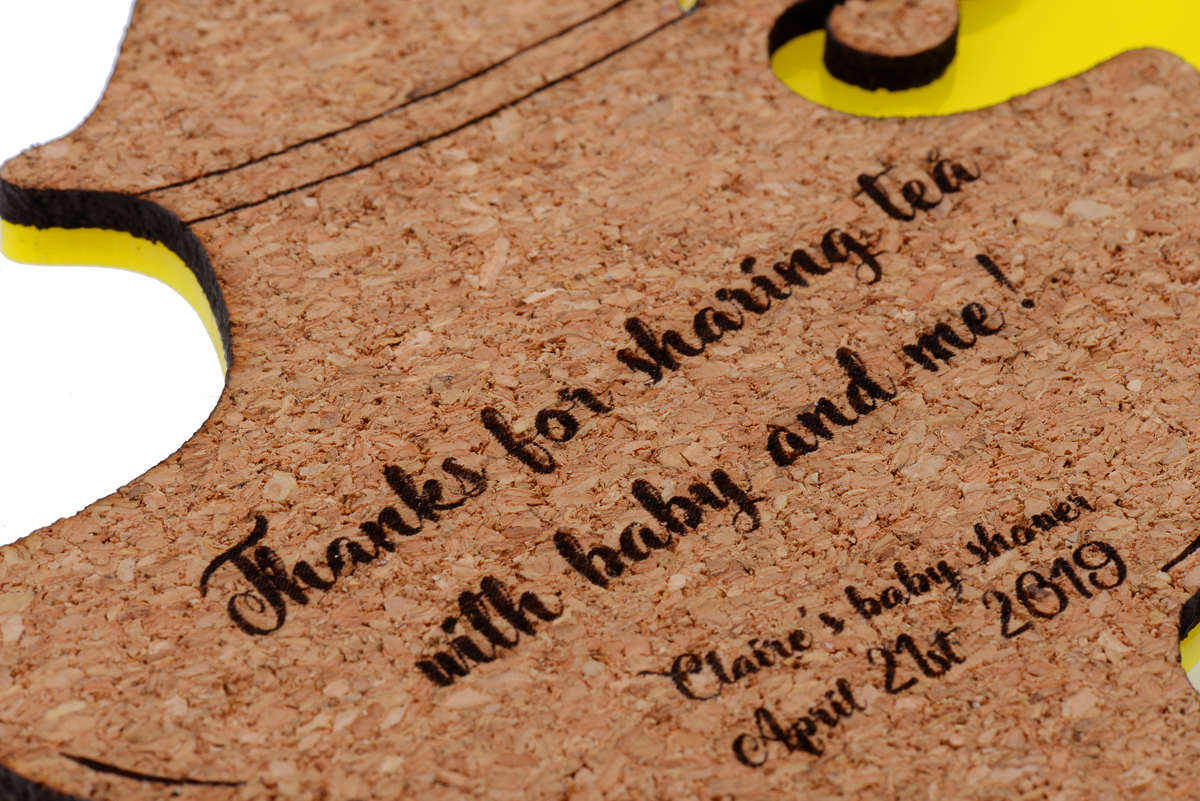
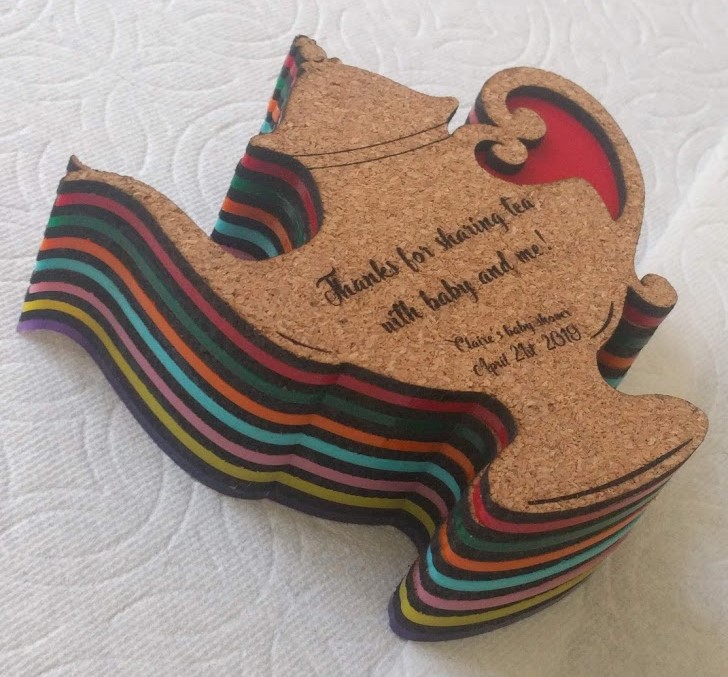
Laser-cut teapot coasters
This past weekend my mom hosted a tea-themed baby shower for me, and after looking around and not finding any party favors I liked, I decided to make my own custom laser-cut teapot-shaped coasters for it. To get started, I searched some free vector file sites for a vector file of a teapot that I liked and could easily prepare for laser-cutting with CorelDRAW. I chose this one designed by Freepik. Once loaded into the software, I resized the teapot and added text. I personally really like cork as a coaster material since it keeps the cup from slipping and absorbs moisture well, so I also picked up some 1/8″ cork place mats from IKEA.
Evidently, cork is not a material we are asked to laser-engrave very often, so I had to do some experimenting with the engraving settings before cutting out prototypes.
|
|

I generally liked the look of the first draft, but realized that at 4 inches total width it was too small to be practical (and readable). In addition, the handle of the teapot was fairly fragile since the cork was only an eighth of an inch thick. Below you can see the first draft of the cork teapot in the upper left. It is missing the small circular embellishment at the base of the handle.
 |
Comparison of different test coaster sizes. |
|---|
For the second draft, I increased the size to about 5.5 inches, edited my file to thicken the areas of the teapot where the handle connects to the base, and started playing with different acrylic backings to make the coasters more durable and colorful. I tried a version with an outline around the cork teapot and one that fit directly beneath the cork.
|
|
|

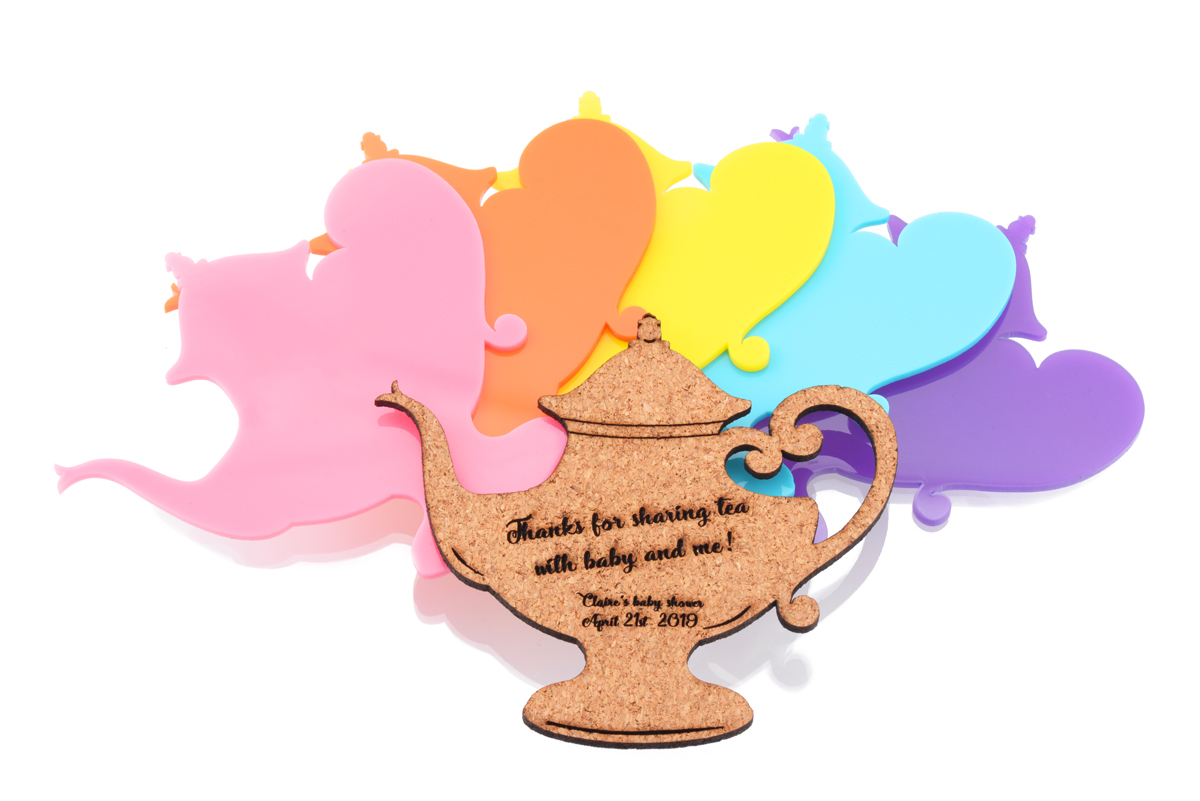
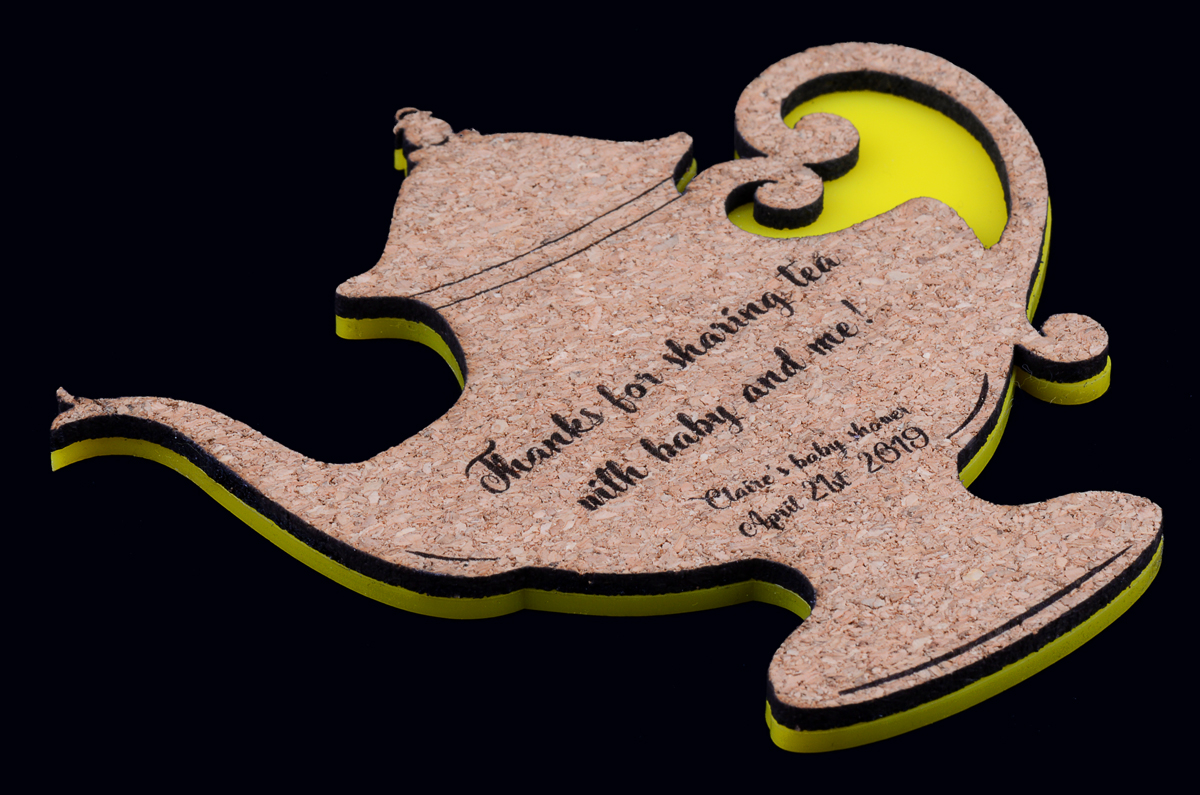
In the end, I went with the sleeker acrylic with no outline, though most of the others I consulted here preferred the mirrored outline shown on the left above (despite my insistence that it looked like a magic lamp). I cut out a variety of colors and glued them to the back of the cork with rubber cement.
|
|
|
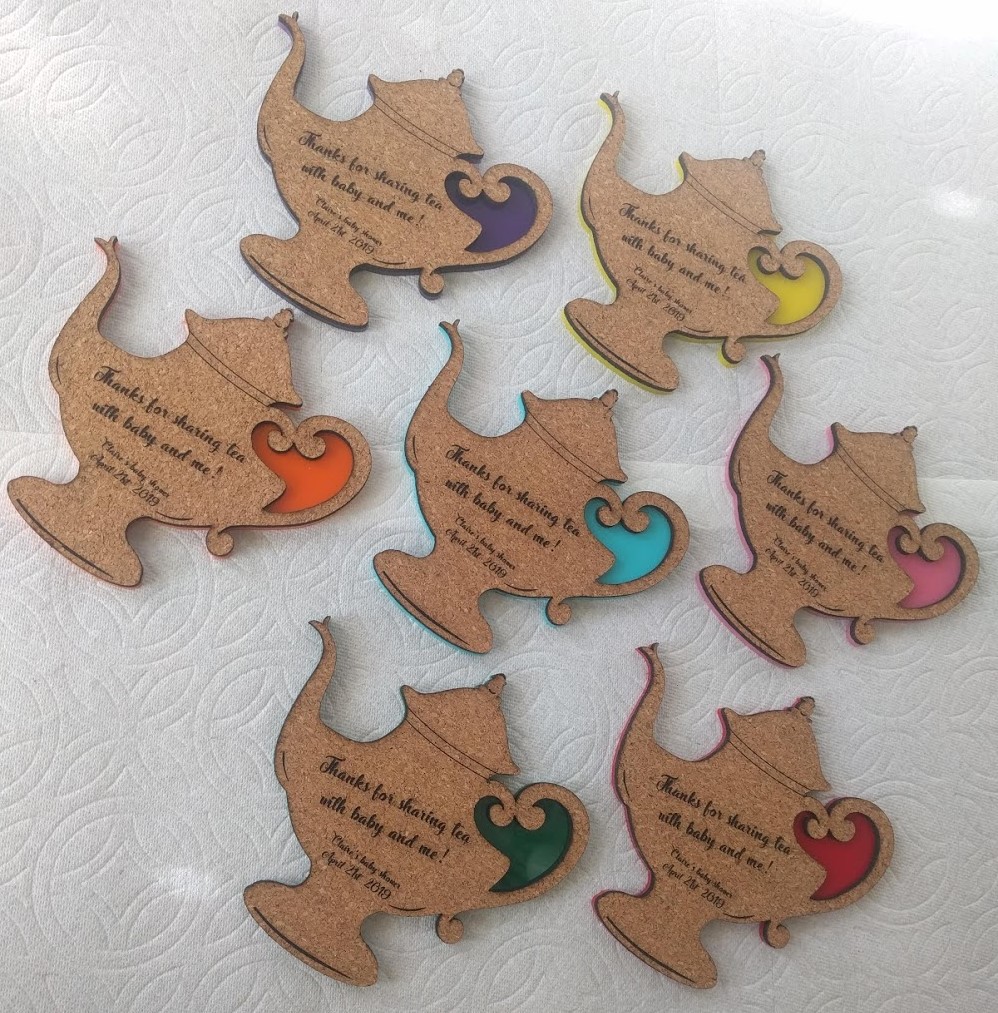
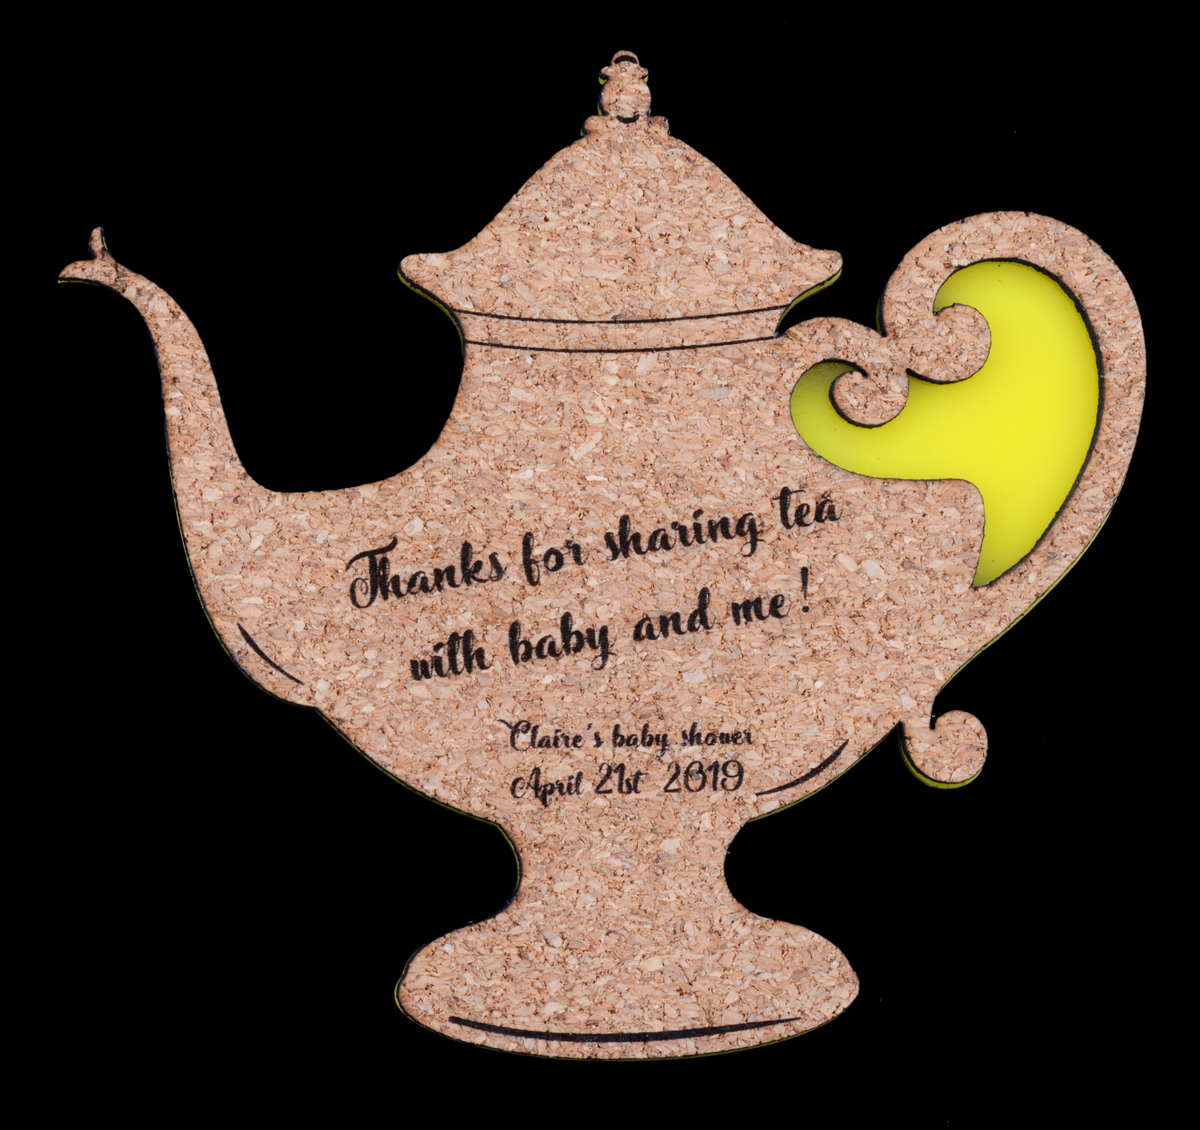
All in all I think they came out well (though I could have made the attachment for the small circle at the bottom of the handle even thicker), and they were definitely a big hit at the party!
If you want to try your own laser cutting project, submit a quote request here!
Related products
Video: Easy Acrylic Unmasking
We do a lot of laser cutting here at Pololu as part of our custom laser-cutting service, so we know first hand how tedious it can be to remove the paper masking from laser cut parts like acrylic. Check out the video below for a simple trick you can use to speed up the process.
Related products
Modified Han Solo toy blaster controls LED displays of Star Wars characters
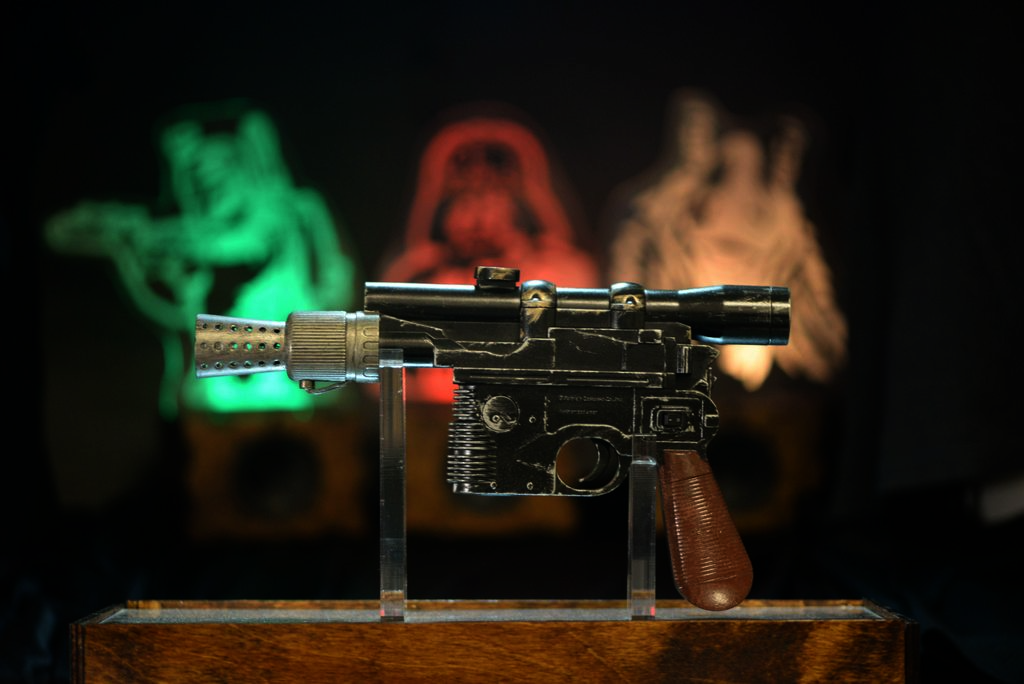 |
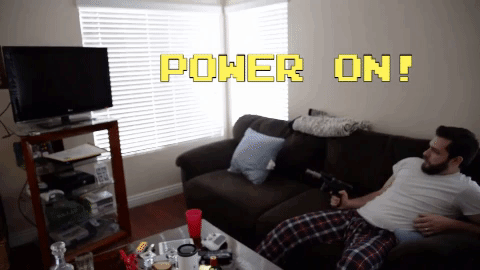
A while ago, I made a wedding gift for some friends, both of whom are avid Star Wars fans. The gift was basically a multi-piece decorative set that consisted of a modified toy Han Solo blaster, a stand to hold the blaster, and three edge-lit LED displays: one each of Boba Fett, Darth Vader, and Jar Jar Binks. I painted over the toy blaster to make it look more like it came straight out of the movies and added electronics so that it could interact with the displays (and the couple’s TV!).
The blaster uses IR TV remote codes to do several things: it can shoot the LED displays (and they’ll respond by blinking and playing audio recordings unique to each character), change the color and brightness of each display, and it can act as a limited TV remote by turning on or off the TV. At the heart of the blaster lies an A-Star 32U4 Mini ULV, which monitors the state of a switch, a couple of buttons, and a few potentiometers in order to decide which actions to carry out. The ULV version of the A* Mini is especially convenient for this setup because the toy blaster was originally powered by two AAA batteries, which produce too low of a voltage for a 5V microcontroller. The ULV’s built-in switching step-up voltage regulator allows it to operate directly off of the batteries and power the other components, unlike typical Arduinos that need at least 7V.
|
|


The blaster has two modes: one for shooting the displays and turning on/off the TV and another for adjusting color and brightness of the displays. Which mode the blaster is in is determined by the state of the programming mode switch, which is accessible with a flick of the thumb. While powered on, the A* continually checks to see if the programming mode switch is enabled. If it is disabled, the blaster will respond to trigger presses. When the trigger is depressed, the A* does two things: it sends a pulse train to a 5mm IR LED and drives an input pin low on an Adafruit Audio FX Mini sound board, which then outputs sound to a speaker through a 2.5W audio amplifier, producing DL-44 blaster firing noises. The blaster and displays use the IRremote Arduino library for sending and receiving the pulses. For these blaster shots, the blaster emits the IR TV remote code that corresponds to the generic power-on/power-off code for an LG TV. This same code is decoded by the Star Wars displays as a “hit” and the characters react to being shot. You can watch videos of those reactions in the YouTube playlist below (the playlist also includes the displays’ bonus Easter egg content, which is only accessible by sending certain button presses from the LG TV remote!). The sound level is a little low, so you might need to increase your volume to hear what the characters are saying:
If the programming mode switch is enabled, the blaster repeatedly emits a set of IR TV remote codes that contain information on what color and how bright the displays should be. Color is adjusted in the HSV color space using the blaster’s three rotary potentiometers (one each for hue, saturation, and value). There is also a linear potentiometer that can be used to set overall brightness (this effect combines with the change in brightness from adjusting the value potentiometer). So long as a display’s IR receiver can detect the IR signal sent by the blaster, the LED information can be decoded and the LED arrays can be updated.
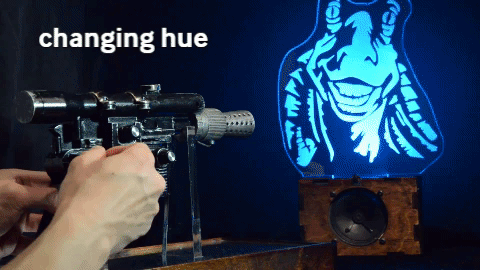 |
Each display features a ~12″ tall profile of the head or upper body of a Star Wars character. The profiles are laser-etched onto a 1/2″ thick clear acrylic piece, which also has holes at its base. The holes allow the piece to be fastened to a recessed channel at the top of the display box. A short segment of an APA102C LED strip lines the bottom of the recessed channel and faces upward into the acrylic profile, which allows its light to disperse across the laser-etched surfaces. The display box has the same sound board and amplifier as the blaster, but uses a more powerful 1W speaker. An A-Star 32U4 Prime controls everything and power is supplied via a 9V 3A wall power adapter.
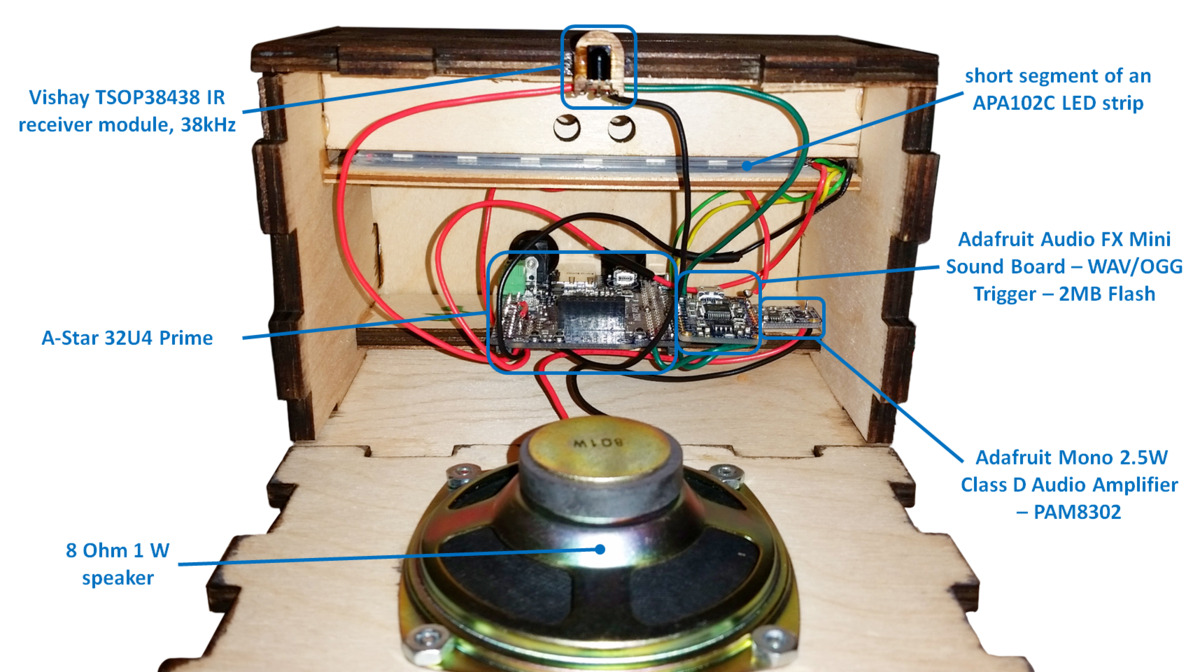 |
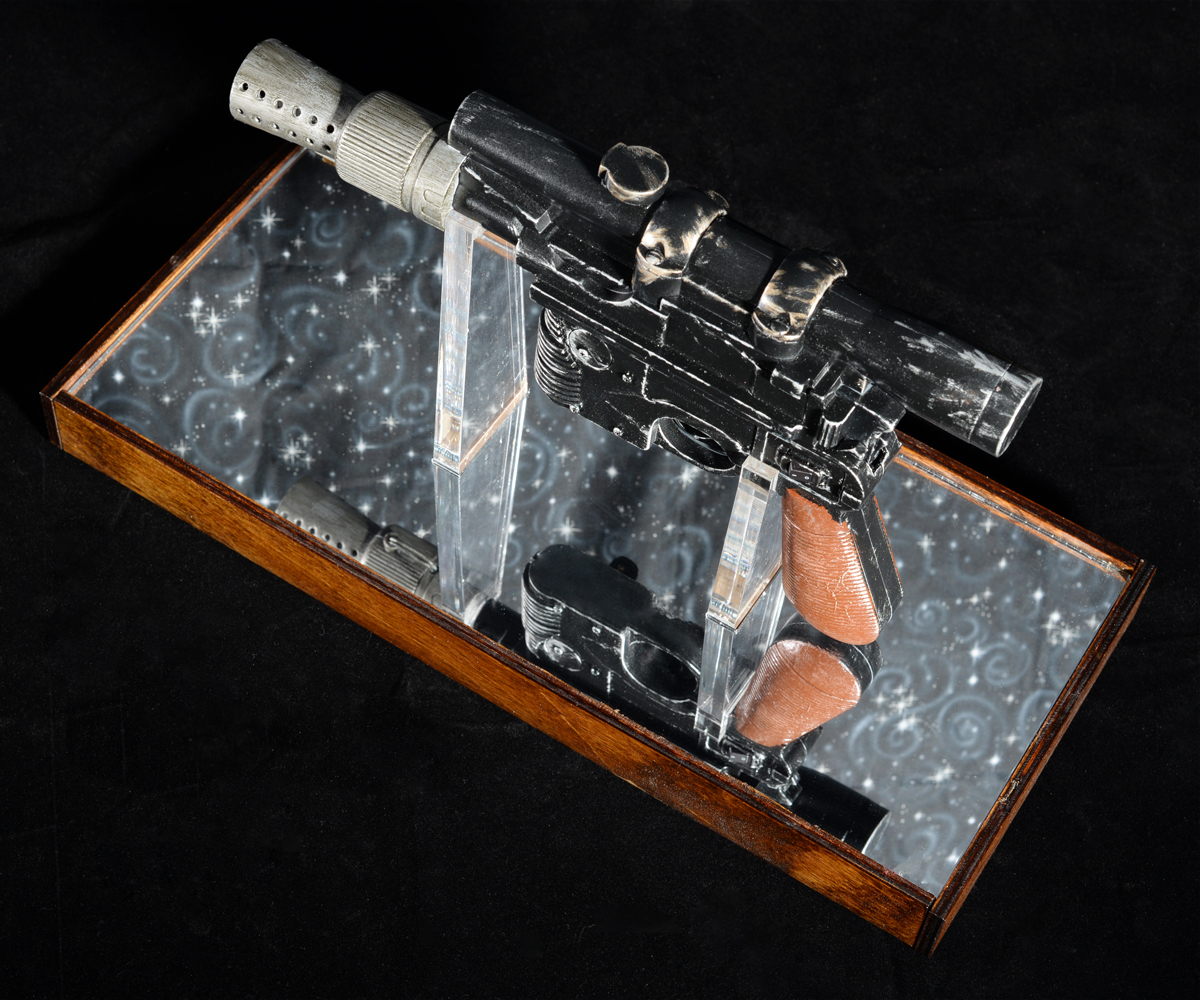
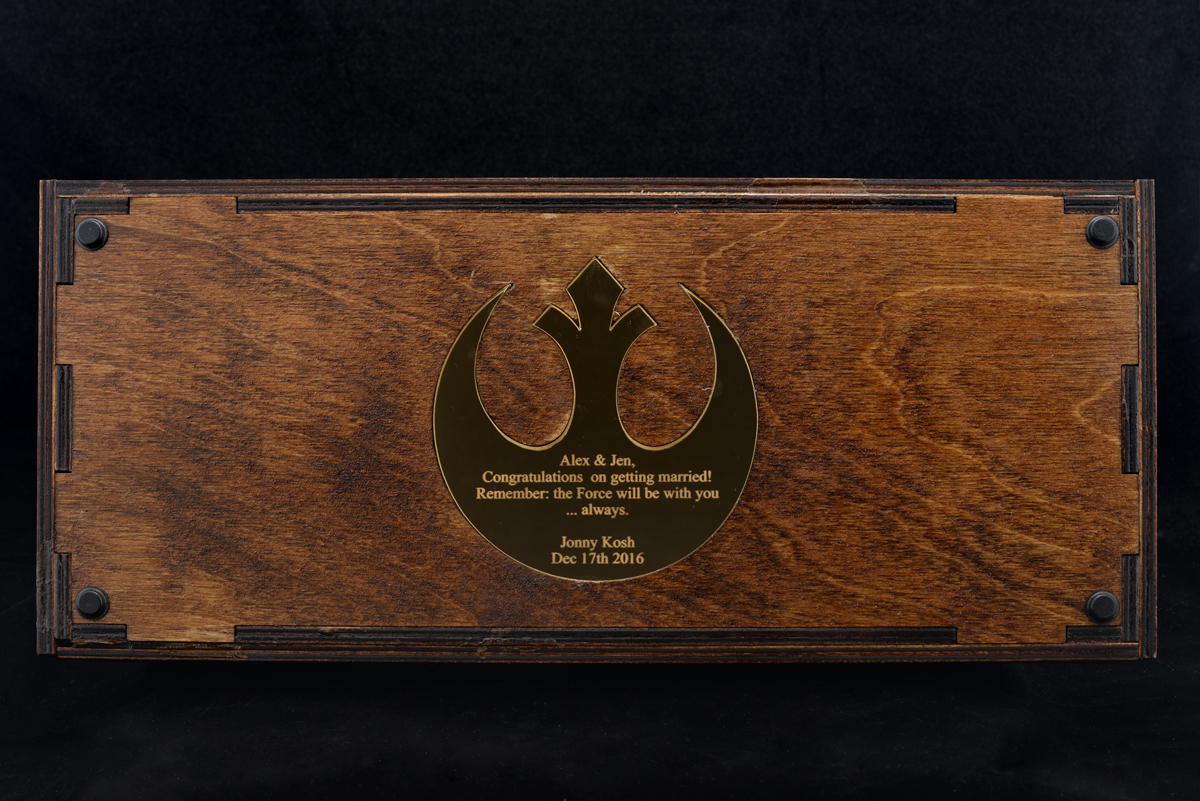
Compared to the rest of the system, the design of the blaster stand is pretty straightforward: it is just several pieces of 1/4″ plywood arranged into a frame that houses two channels. Those two channels have mounting holes which allow two clear acrylic pieces, which conform to the shape of the blaster, to be fixed to the frame. A lip along the inside of the frame makes it easy to mount the silver mirrored acrylic piece. The bottom of the mount features a personal well-wish from me to the couple. The message is written on the inside of the Alliance Starbird, which is cut from gold mirrored acrylic. The stand also houses some scrap metal parts (a bunch of prototype Zumo blades) to give it some weight. Four adhesive rubber feet, one for each corner of the stand, help make sure the stand doesn’t slide around easily and scrape the gold Starbird piece.
|
|
I owe a part of the inspiration of this gift to my coworker, Kevin, since in some ways I was basically trying to one-up his Harry Potter-themed wedding gift, which was given to another coworker, Brandon, for his wedding. Kevin also ended up helping me make some good decisions and generate some clean-looking CorelDraw files for the display cutouts/rastering. So, thanks, Kevin! You the real MVP.
For more pics, gifs, and a build log, check out this Imgur album! Also, you can find 2D (.DXF and .CDR) and 3D (.STL, .STEP, and .SLDPRT) CAD files for the laser cut parts on my Thingiverse page!
 |
Related products


Video: LVBots May 2018 line following competition
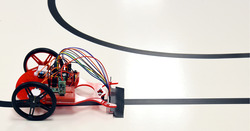
LVBots held a line following competition at Pololu on May 24th. This time we had our “classic” line following course like in previous competitions, and an “advanced” course with gaps, intersections, tighter turns, and shortcuts. Continued…


Home | Forum | Blog | Support | Ordering Information | Lists | Distributors | BIG Order Form | About | Contact
© 2001–2025 Pololu Corporation


