Pololu Blog »
Posts tagged “halloween”
You are currently viewing a selection of posts from the Pololu Blog. You can also view all the posts.
Popular tags: community projects new products raspberry pi arduino more…
Creepy eyes Halloween prop upgrade

There are only a couple days left in our Halloween sale! Visit the sale page for more information, and if you are in need of some inspiration, check out our Halloween-tagged blog posts for some sample projects, including this upgrade to my creepy eyes prop:
 |
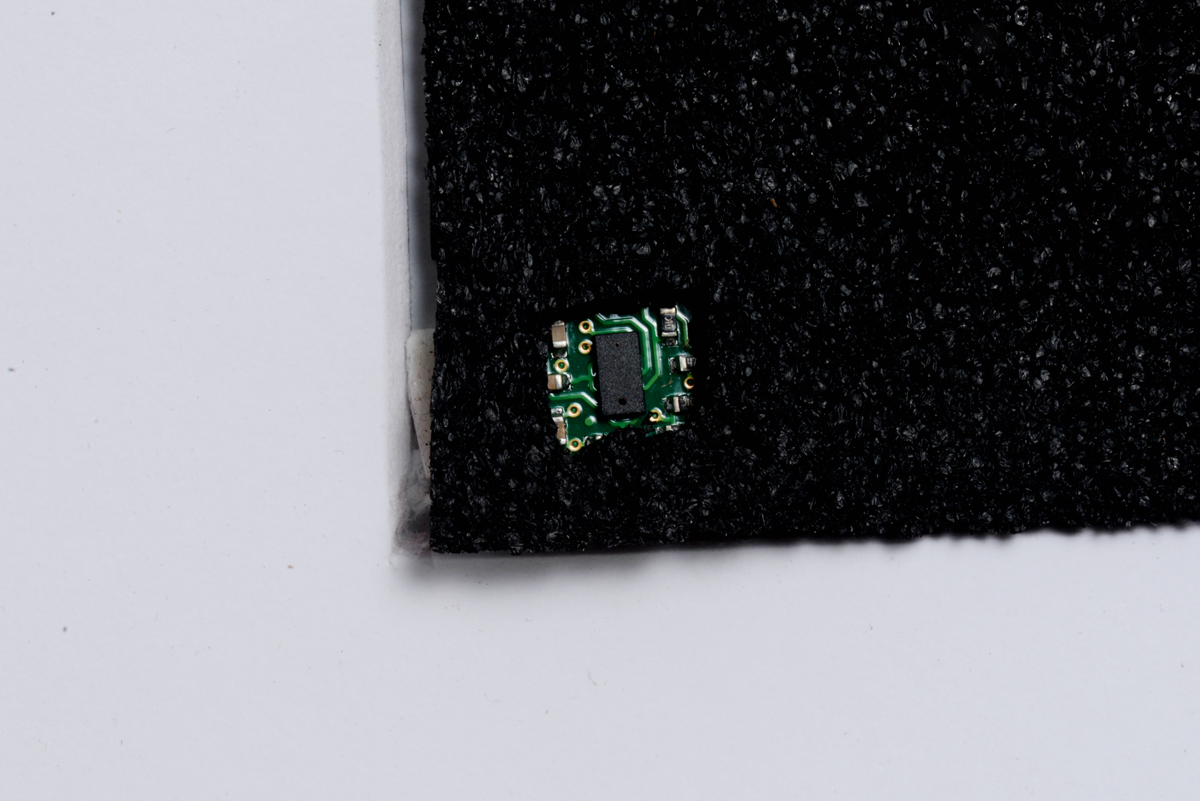
I finally got around to upgrading my creepy eyes Halloween prop. As shown above, I mounted the mask on a picture frame to make it more presentable. I also added some of our VL53L0X time-of-flight distance sensor carriers so that the eyes could follow people in front of the mask. I camouflaged the sensors behind the black layer of foam behind the mask. Below is an image showing how the sensors were hidden in the lower corners of the picture frame:
 |
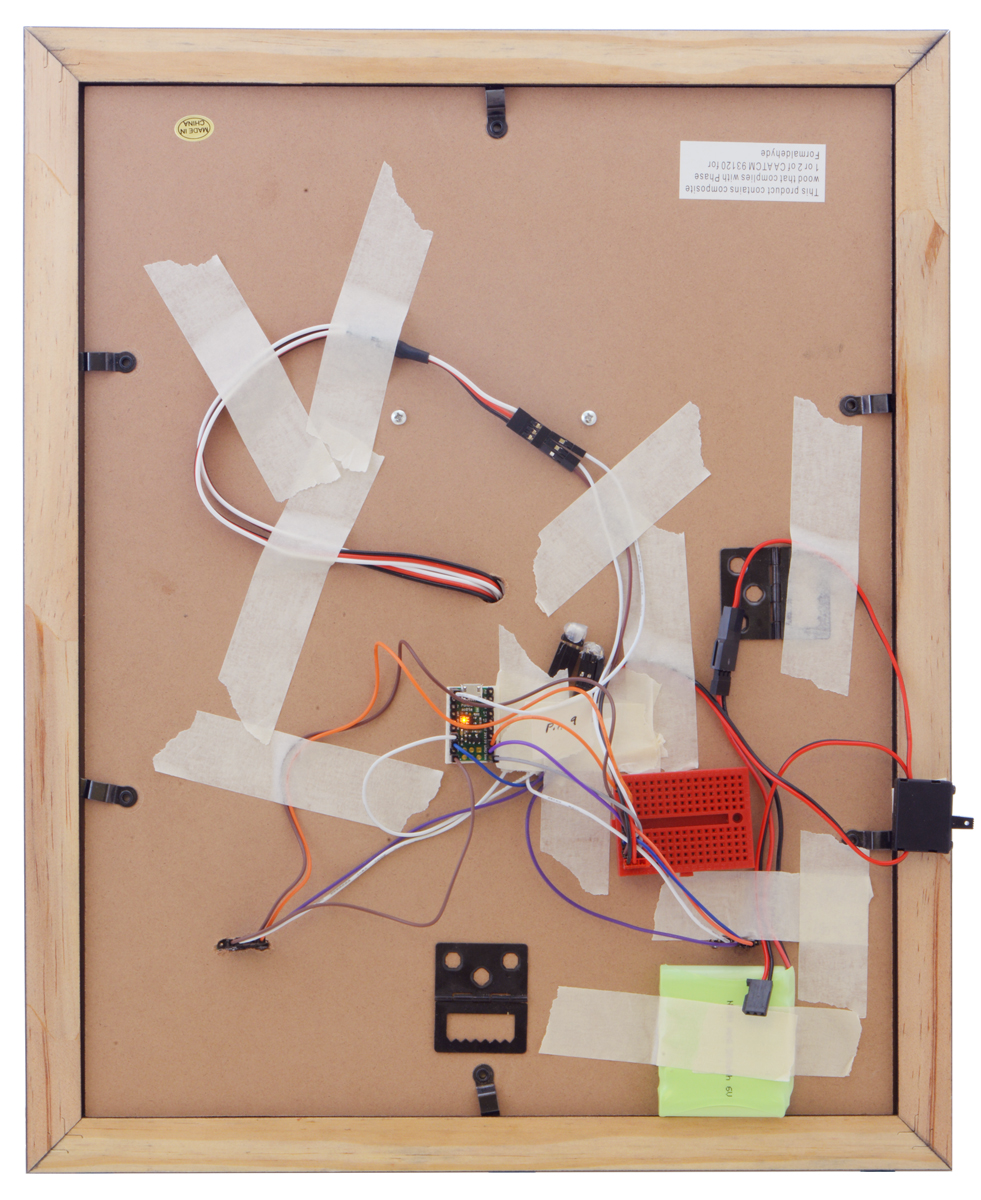
I also swapped the Maestro out for an A-Star 32U4 micro, so I could communicate with the sensors through I²C. Due to switching to the A-star micro, I added one of our small solderless breadboards to help distribute power and a servo Y splitter cable since both sub-micro servos can use the same signal. I also added a power switch and used some of our premium jumper wires to make connections. You can see all the electronics taped to the back of the picture frame in the picture below.
|
|

Related products


RC crawling skeleton

Our Halloween sale is still going strong! Visit the sale page for more information, and if you are in need of some inspiration, check out our Halloween-tagged blog posts for some sample projects, like this simple RC crawling skeleton that I made:
 |
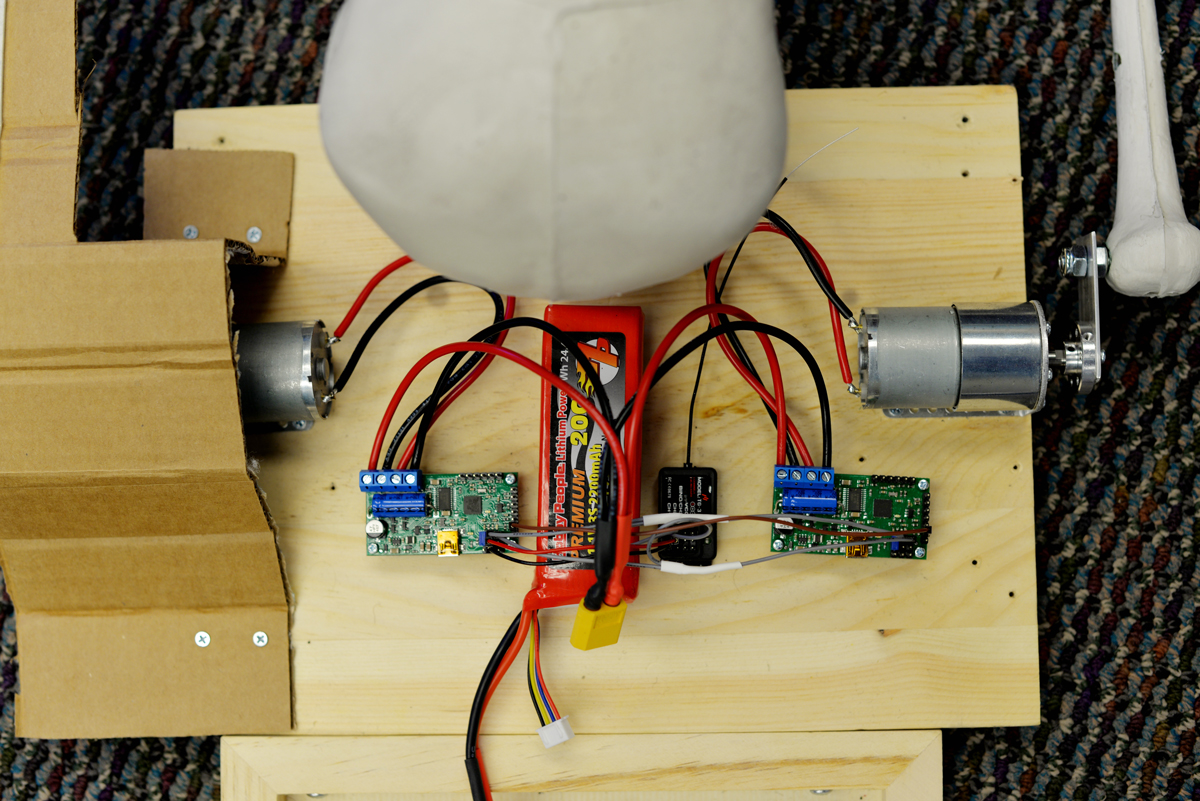
The setup for this project is pretty straightforward: a hobby RC transmitter sends signals through its receiver to a pair of Simple Motor Controllers, which each control a 37D mm gearmotor. The motors mount to a wooden base with a pair of L-brackets and connect to skeleton arms via universal aluminum mounting hubs and a short length of aluminum plating. The offset created by the aluminum plating causes the skeleton to move in a way that makes it look like it is slowly inching towards its next victim!
 |
A 3S LiPo provides power to the system through a pair of XT60 connectors, and the RC connections are made through some spliced female-female premium jumper wires. A black T-shirt covers up the electronics and a pair of cardboard “shoulder pads” help ensure the tee does not get tangled up in the rotation of the arm-bones.
|
|

In practice, the crawling skeleton is more amusing than scary: it crawls really slowly and the sound of the motors turning is too industrial/mechanical to haunt anyone’s dreams. The sound is, however, loud enough to startle any unsuspecting friends!
Related products


SK9822 LED jack-o-lantern

To kick off our 2018 mini-series of spooky Halloween projects, I’ll go over how I fixed and modified my family’s broken light-up jack-o-lantern, but first I want to remind you that our Halloween sale is still going on. Visit the sale page for more information, and if you are in need of some inspiration, check out our Halloween-tagged blog posts for some sample projects. Now, on to the jack-o-lantern…
 |
The lantern suffered from a couple of burnt out incandescent bulbs and an unreliable power switch. The switch had a poor mechanical connection somewhere, which meant that in addition to sliding it into the “on” position, the case had to be pressed/squeezed in just the right spot to connect power. I absolutely needed to replace the switch, but in addition, this was a good time to upgrade from a bland set of incandescent lights to a more customizable lighting solution by adding some individually addressable RGB LEDs.
I wanted to preserve the battery-powered functionality of the lantern, and since it is powered by 4 C batteries, it has a supply voltage that could be anywhere between about 4V and 6V. The SK9822 LED strips that I wanted to use run on 5V, so I would need some kind of regulator to power them, as well as a microcontroller to send them control signals. Fortunately, our A-Star Mini microcontrollers have onboard regulators that allow them to work with a wide operating range of voltages, and provide ample current that can be used for other devices in the system, like the SK9822. In particular, the A-Star Mini LV was a good fit for a system like this with a voltage that started above 5V and could drop below it as the batteries were drained. (That A-Star’s regulator can also provide about 1A of current!)
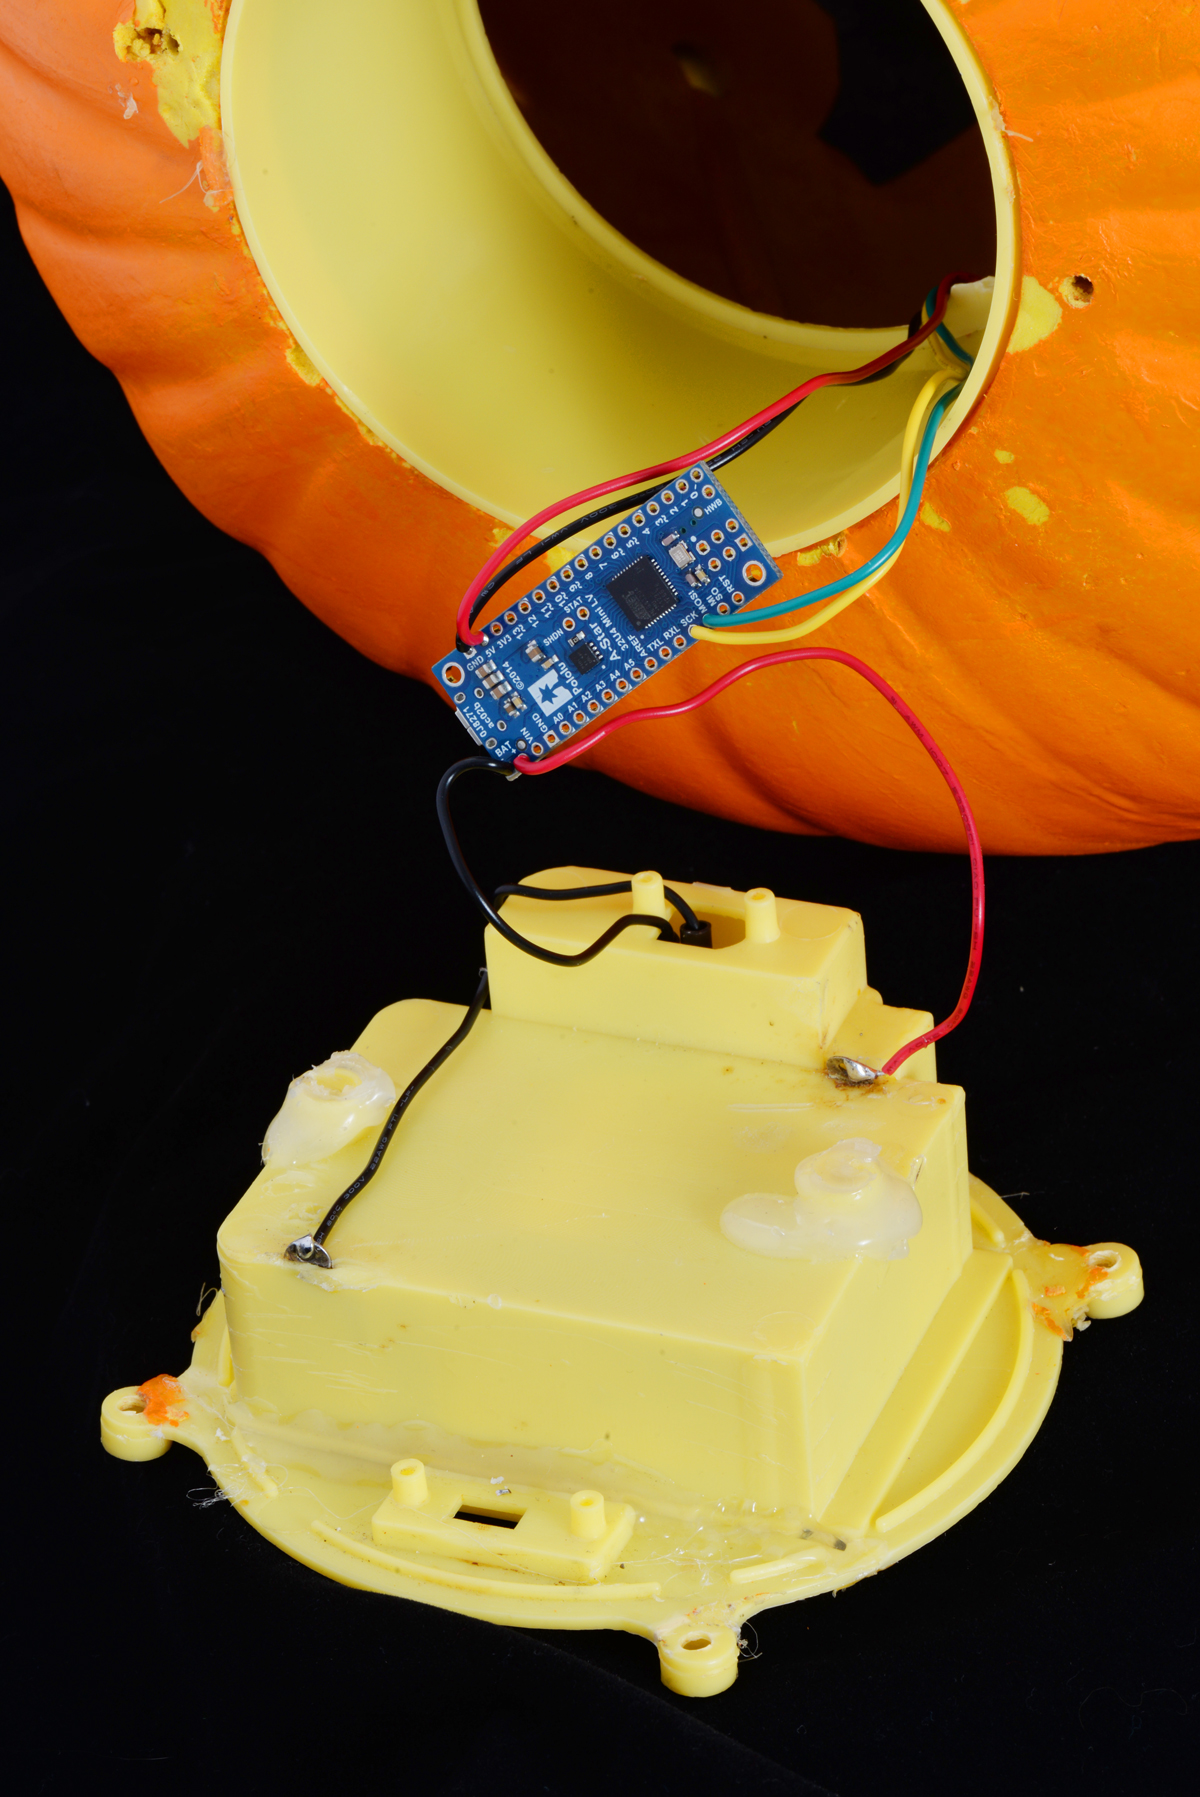 |
The A-Star mini LV and its connections. |
|---|
Starting the upgrade was pretty straightforward: remove all of the old hardware (the mess of old rusty wiring, the incandescent bulbs, and the switch), and solder in the A-Star to the battery holder terminals. From there, I soldered in a rocker switch that was much more satisfying to flip on and off than the older nonworking slide switch. Finally, I soldered up the four connections to the LED strip.
 |
The SK9822 LED strip segment taped to the outside of the plastic holder piece, as seen from the back of the jack-o-lantern. |
|---|
The strip itself only used 4 LEDs, since the lantern illuminates well and I didn’t want to unnecessarily consume lots of power (especially because the lantern was battery powered). The 4 piece segment was cut from one of the low density 30 LEDs per meter strips. The lower density meant that the LEDs were spaced out farther apart, which was useful to spread the LEDs across the plastic tube on the inside of the lantern and more evenly distribute the light. Our LED strip library made it easy to get started programming!
Another benefit of this hardware upgrade is the ability to reprogram the lighting display to whatever I want. Also, since the LED strips use so few IO pins, the decoration is in a good state to add additional electronics (like a proximity sensor or MP3 trigger)!
Related products


Happy Halloween!
 |
Another Halloween means another batch of great costumes from the people at Pololu!
Highlights from this year include Jennifer’s impressively detailed Ghostbuster costume, complete with a “working” proton pack (well, at least the lights worked) built around some laser-cut parts…
 |
and Jon’s elaborate representation of the Cassini-Huygens spacecraft, which included an actual magnetometer on the tip of his boom and a buzzer to audibly indicate magnetic measurements.
 |
Did you use any Pololu products in your Halloween costume or decorations? We’d love to hear about it on our forum or in the comments below, and we might even feature it in a future blog post!
Have a Happy Halloween!
Reaper puppet master Halloween prop using a Mini Maestro 24
If you are looking for some inspiration for scary Halloween prop ideas, check out the truly creepy reaper puppet master that forum user rasco66 built! The prop is a tall, menacing installation: a grim reaper with glowing red eyes and outstretched hands overlooks a dark stage containing a lone skeleton. Once activated, the reaper commands the puppet to dance and animates its movement to a cover of Blue Oyster Cult’s Don’t Fear the Reaper. The skeleton animation is achieved with seven servos and a linear actuator; a Mini Maestro 24 controls all of the servo sequences and is triggered by a PicoBoo Max, which also coordinates the music, strobe, and linear actuator. You can watch a video of the prop on YouTube or read more about the project, including some code, in this forum post.
By the way, there are still 10 days left to take advantage of our Halloween sale and save on parts for your own grim reaper puppet master or whatever other terrifying thing you want to create (but you really shouldn’t wait that long if you want something done by Halloween as these things almost never work on the first try!).

Related products

Motion tracking skeleton at Cedar Gables Inn
Forum user Ken constructed a spine-chilling Halloween project that is featured at the Cedar Gables Inn Bed and Breakfast in Napa, California. His project is based on Brandon’s Motion Tracking Skull Halloween prop, but instead of just using a head-turning skull, Ken used a full-scale skeleton body to complete the creepy look.
 |
Motion tracking skeleton at the Cedar Gables Inn. |
|---|
Just like in Brandon’s example, Ken used two Sharp GP2Y0A60SZ analog distance sensors to detect objects (or humans) and a Micro Maestro servo controller to read the output values from the sensors and control the servo that moves the head. Ken improved on Brandon’s code by returning the skeleton’s head to its starting position after a short delay so the skeleton wouldn’t stare rudely at the inn’s guests.
 |
For more information about Ken’s Halloween project, see his forum post, and if you happen to be in the Napa Valley area this Halloween, stop by the Cedar Gables Inn and check it out in person!
In case you missed it, we have Maestros and Sharp distance sensors on sale right now as part of our Polo-BOO! Halloween Sale. The sale ends in less than two days, so if you want to try doing a project like this, now is the time to get started!

Related products


Simple Animatronic Skull, Part 2

As promised in my previous animatronic skull post, this is the update where I integrate the skull with a baby doll. I would like to introduce you to Daisy Spooks. Continued…
Severed fingers Halloween prop
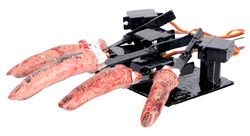
At Halloween parties, it is common to see a punch bowl with one or more eyeballs floating in it and stomach-churning decorations like severed fingers or gelatin worms lining the festive dishes. However, the problem with most of these is that they are motionless and bland. Inspired by Thing, the disembodied hand from The Addams Family, I decided to make a creepy animatronic hand to add some thrill to an otherwise boring table display. Continued…
Candy bowl surprise

Anyone who has gone trick-or-treating has seen the house that puts a bowl of candy on the front porch and knows that there are those greedy trick-or-treaters who take more candy than they are supposed to. Well, if you are that person who puts the bowl of candy out on your front porch, you can make trick-or-treaters think twice before they take more than one piece of candy. In this project, I actuate a severed arm to slap down at the candy bowl whenever someone goes to reach into it. Continued…
Ascending/descending spider
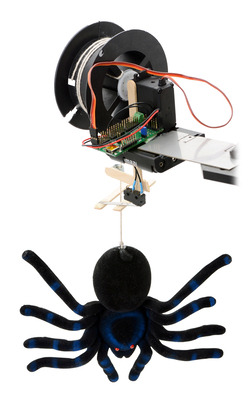
This animated spider prop takes a traditionally static Halloween display to new heights! The setup is simple: a Maestro servo controller and a continuous rotation servo raise and lower a spider with the help of a limit switch. Continued…


Home | Forum | Blog | Support | Ordering Information | Lists | Distributors | BIG Order Form | About | Contact
© 2001–2026 Pololu Corporation


