Pololu Blog »
How to make a Balboa robot balance, part 5: popping up and driving around
This is the fifth and final post in a series about how to make a Balboa 32U4 robot balance. In earlier posts I covered everything you need to get the robot balancing. In this post I will talk about how to get your Balboa to perform some fun and challenging maneuvers.
[See also: Part 1: selecting mechanical parts, Part 2: inertial sensors, Part 3: encoders, or Part 4: a balancing algorithm.]
If you have been following along, you should now have your robot using its inertial sensors, motors, and encoders together to balance in place. Now it’s time to get it moving! Our first challenge will be to get it to “pop up” from a resting position into a balancing position. Then I will show how you can get the Balboa to drive around while balancing.
Popping up
 |
It’s no fun to have to lift your robot into a balancing position every time you start it up. A decent balancing robot should be capable of starting from a lying down position and using its motors to power itself up to its upright position. This is not a subtle movement requiring precise calibration like the balancing algorithm I discussed in the last post. Instead, you will be applying power close to the motors’ limits, attempting to violently jerk the robot upward. Since we are talking about violent motions, you should do something to protect the components on the PCB, if you haven’t already. I recommend attaching a pair of arms to the mounting holes on the side of the chassis, for example like these LEGO ones:
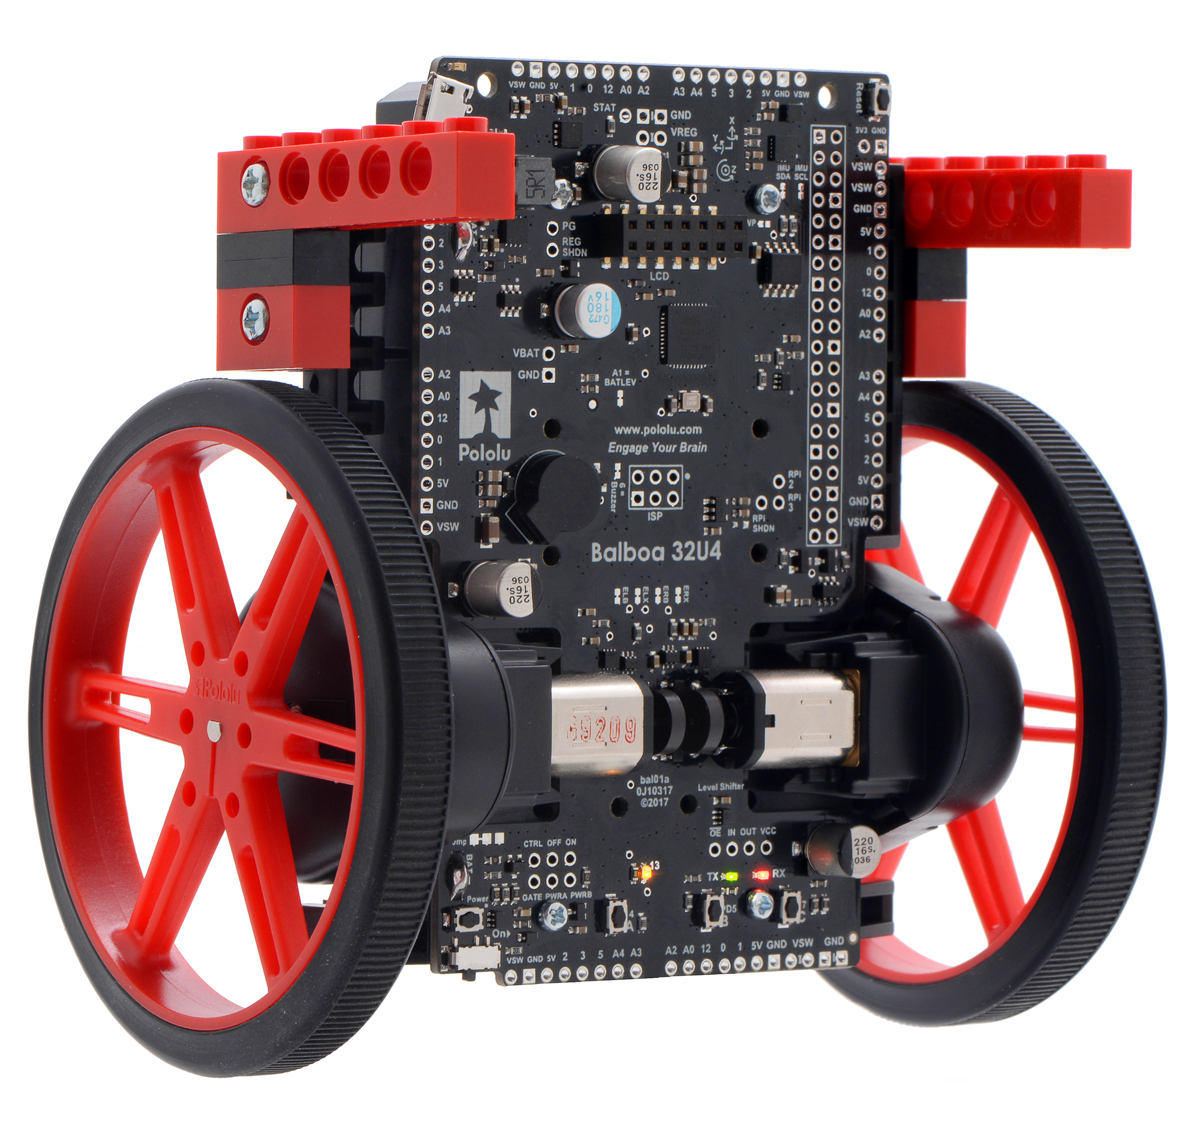 |
Balboa 32U4 Balancing Robot with 80×10mm wheels and arms made from LEGO blocks. |
|---|
As an alternative, if you have an extra tire or a similarly soft item, wrapping it around the top of your robot can provide some protection.
Now let’s try writing some code. Something as simple as driving backward at full speed then putting on the brakes can flip the robot up. Try this, for example:
void setup()
{
  delay(1000);
  motors.setSpeeds(-400,-400);
  delay(1000);
  motors.setSpeeds(0,0);
}
Start the Balboa lying down with the PCB up. You should see the wheels quickly spin up; the robot will head off in one direction then stop suddenly and rotate upward. Depending on your gear ratio and the surface you are testing on, it might quickly flip all the way over or just pop up a few degrees. It will not be very predictable. One problem is that the wheels spin up so quickly that they will probably lose traction with the floor, causing random turning and also not producing as much acceleration as they could. A better strategy is to accelerate gradually:
void setup()
{
  delay(1000);
  for (uint16_t i = 1; i <= 100; i++)
  {
    motors.setSpeeds(-4*i, -4*i);
    delay(10);
  }
  motors.setSpeeds(0,0);
}
The for loop here gradually ramps up the motor speed to the full -400 over one second. You might need to adjust the numbers a little, but this should reduce slipping and get the robot to a more predictable, higher speed, causing a better “pop” when it puts on the brakes. Next, to make it an even stronger pop, try reversing direction instead of just stopping:
void setup()
{
  delay(1000);
  for (uint16_t i = 1; i <= 100; i++)
  {
    motors.setSpeeds(-4*i, -4*i);
    delay(10);
  }

  for (uint16_t i = 1; i <= 100; i++)
  {
    motors.setSpeeds(4*i, 4*i);
    delay(10);
  }

  motors.setSpeeds(0,0);
}
The Balboa should ramp up to full backwards speed in over one second, then change direction, ramping its speed up to full forward over the next second. This additional forward motion applies much more torque to the chassis than simply stopping; in fact, with some configurations of the robot you might even be able to get it to pop up by going directly into a forward drive, without reversing at all. I have found that a balanced combination of forward and backward motion gets my Balboa to pop up quickly without driving too far away from where I started it.
The exact speeds and angles that you get will depend on factors like friction with the surface and battery voltage. To get it to smoothly transition to balancing, you need to get rid of some of that uncertainty. For example, you might want the robot to accelerate backward until it reaches a certain speed, then accelerate forward until it reaches some angle, then launch the balancing algorithm. This means you need to be running the sensor updating code we developed in parts 2 and 3 while doing the pop-up. That’s why I wrote these loops with a 10 ms delay – to match the normal 10 ms update cycle of our main loop and let the sensor updates work just like they do while balancing. After adding a sensor update call, breaking out of the for loops at the desired speed and angle, and playing with all the numbers for a while to optimize it, here’s the pop-up code I ended up using on my Balboa:
  for(uint8_t i=0;i<40;i++)
  {
    motors.setSpeeds(-i*20, -i*20);
    delay(10);
    balanceUpdateSensors();
    if(speedLeft < -40)
    {
      break;
    }
  }

  for(uint8_t i=0;i<20;i++)
  {
    motorSpeed = i*18;
    motors.setSpeeds(motorSpeed, motorSpeed);
    delay(10);
    balanceUpdateSensors();
    if(angle < 35000)
    {
      break;
    }
  }
This code makes the robot accelerate backward until it reaches a speed of -40 as measured by the encoders (about 70 cm/s on my particular Balboa), then reverse direction and accelerate forward until it is 35 degrees from vertical, which turns out to be a good time for the balancing algorithm to take over. As a bonus, when the balancing code starts, it has a good initial value of angle to work with.
Driving around
Now that your robot can pop up and balance in place, you are going to want it to drive around. Say, for example, you want it to drive forward at a speed corresponding to 500 encoder ticks per second. With sensor updates running every 10 ms, that would give you speedLeft and speedRight values of 5. You might think you need to write an additional feedback loop, to constantly check these variables and adjust the motor power up or down proportionally, trying to get them to 5. But your balancing feedback loop is already monitoring the position and using it for feedback, constantly trying to get the position to 0. So all you need to do is subtract 5 from distanceLeft and distanceRight every 10 ms, and the robot will automatically drive forward at the corresponding rate, while balancing. Adding something to the distance variables every cycle will cause the robot to drive backward, and changing the distance variables by different amounts can be used for turns.
The idea is that you are fooling the robot into thinking that it is staying in place as long as it is driving at the desired speed, so that the balancing algorithm does not have to change at all. To complete the illusion, you will need to adjust both the position and speed variables. Here’s the code from our balancer example that accomplishes this:
  distanceLeft -= driveLeft;
  distanceRight -= driveRight;
  speedLeft -= driveLeft;
  speedRight -= driveRight;
The variables driveLeft and driveRight store the desired drive speed for the two motors, and we subtract them from the distance and speed parameters every cycle, after reading the sensors. Of course, this “fooling the robot” technique has some limitations, since the motor’s responses will be different when driving compared to operating near zero speed. For example, driving fast limits the robot’s ability to recover from a forward fall by speeding up even more. But as long as you don’t go too fast, this is a great way to get your robot driving around.
You can use the millis() function along with the modulo operator % to choreograph a little repeating dance. This code makes my Balboa drive in a figure-eight pattern once every 8.192 seconds (divsion by 8192 is a fast operation on a microcontroller, since it is a power of two):
  uint16_t time = millis() % 8192;
  if (time < 1900)
  {
    driveLeft = 20;
    driveRight = 20;
  }
  else if (time < 4096)
  {
    driveLeft = 25;
    driveRight = 15;
  }
  else if (time < 4096 + 1900)
  {
    driveLeft = 20;
    driveRight = 20;
  }
  else
  {
    driveLeft = 15;
    driveRight = 25;
  }
Note that I am just controlling speed here. It’s not actually keeping track of its position and trying to follow a path, so I just had to adjust the timing and speeds until it happened to look like a figure eight. Over time, errors will build up, and it will get off course, and robots with different gear ratios won’t even follow the same path.
What next?
I have said enough on the topic of how to make your Balboa balance, but this is just the beginning of what you can do with your Balboa. Here are some ideas for projects to work on next:
- Remote control
- Line and obstacle sensing
- Raspberry Pi integration
- Encoder-based dead reckoning for precise path following
Please let us know what you are doing with your Balboa! We would be happy to hear about your progress and answer questions on the Pololu Forum. If you have anything to say about this series or suggestions for future posts, feel free to post a comment below.
Related products

-
Ten-Tec 1254 Receiver Display Upgrade Kit
- 27 April 2017Edward Cholakian (call sign KB1OIE) makes and sells a Ten-Tec 1254 Receiver Display Upgrade Kit that is designed to upgrade a Ten-Tec 1254 shortwave...
-
Video: Raspberry Pi robot with the Romi chassis
- 3 May 2017A few weeks ago I posted a tutorial on building a Raspberry Pi robot with the Romi 32U4 Control Board and Romi Chassis. Now we have a short video...
11 comments

Please; do you will continue making more parts on this tutorial?
I'm interested in movement control: rotation degrees, distance movements (not movements controled by time, like "8" shape form in Balance example)
Also i'm thinking to add some IR remote control... (like your next ideas of this post)
Well. I hope you will continue with this lessons...
Good job; thanks!

I don't have any immediate plans to do more tutorials. But if you have made it this far with your Balboa, you should be ready to explore these ideas on your own! Any of these ideas would be taking it further than what I have done, so I would be interested to hear what you try and comment on it; maybe you could post your progress to our forum. For navigation, you might be interested in my dead reckoning robot from a few years ago; you could probably use the same basic approach to do more precise navigation with Balboa. There are a ton of tutorials available for IR remote control; since the Balboa doesn't have any built-in support for this, just look for any Arduino remote control project. Here's an example from our Zumo library using the built-in sensors on the Zumo, which are also available as discrete modules (though there are other sensors that are more appropriate for remote control applications).
-Paul

Thank you for these amazing blog posts! I am confused about why we need to change the speedLeft and speedRight variables inside balanceDoDriveTicks(). Why is it not sufficient to simply change the distance variables to make the robot drive around?
Thanks for any inputs!
-Ali
I'm glad you are enjoying my posts! The reason to adjust
speedLeft and speedRight is that the main balancing algorithm tries to get all of these variables to zero. If you don't adjust the speeds, according to the formula for motorSpeed, something else is going to have to change to compensate; I think it will be slower to start moving and never catch up to where it's supposed to be.-Paul

will the robot be able to pop up in all motor and gear configurations? I was going to get the 50:1 motor and use the standard 80mm wheels. Would that work out?
Many thanks in advance!
John
You should be fine with the 50:1 motors and 80mm wheels that I used for this example, but there are many configurations that will work, especially considering that the bumper cage can help it start out with a boost toward vertical.
-Paul

I have a question: Assuming I will want to drive the wheels directly from the 1:50 motor shaft (without the plastic gears), what changes will I need to make in code for it to balance it self again.
One obvious change is the set the GEAR_RATIO to 50
I assume I will also need to reverse the movement of the motors because the 2 wheel plastic gear used to reverse it itself right?
If that is the case, what will happen to the readings from the motors encoders?
If someone has done this before or easily knows how to do it it will be great.
Thank you,
Nir
If you want to use our example code as a starting point, then yes, changing GEAR_RATIO is a good start. Of course other values might need to be calibrated too.
To flip the motor direction, you can use the flipLeftMotor() and flipRightMotor() functions in the Balboa library. You should also correspondingly flip the encoder readings, maybe right where getCountsLeft() and getCountsRight() are called.
It's probably a good idea to test these changes individually; make the robot drive forward and verify that it really goes the direction you expect and the encoder counts increment the way you expect. Then check the directions in the gyro and accelerometer too. Otherwise a single sign error might cause the behavior to seem totally wrong, and you'll have no idea where the error lies.
I would be interested to see pictures of how you are mounting the wheels directly to the motor shafts! Please note that the plastic gearbox is there partly to isolate the motor from physical shocks involved in balancing, especially when popping up or falling down; if you connect them directly you might risk damage to the metal gears.
-Paul
Thank you so much for your answer. I'm glad you are still around!
Yes, I have flipped both the motors and the encoders in the code and the little guy is almost stable again.
I think that the physical change in the location of the wheels (now without the plastic gear) relative to the mass of the robot has taken it out of the balance it was originally programmed for. What variables do you think I should play with to get it to balance once again?
Right now I am using a poor's man home made shaft extenders but once I get this work I will replace them with something better. Thank you for the heads-up on about metal gears.
Nir.
Sounds great that your robot is almost balancing!
In Balance.h there is a description about each constant that says how to adjust it. I think it makes sense to go through these basically from the top to bottom and follow the instructions. Can you let me know if you are getting stuck somewhere in particular?
-Paul
Nir
Post a comment


Home | Forum | Blog | Support | Ordering Information | Lists | Distributors | BIG Order Form | About | Contact
© 2001–2026 Pololu Corporation
