Pololu Blog »
Grant's mini sumo robot: Rattata
 |
Remember my super cool sumo robot? My sumo robot is different from regular sumo robots. It’s like my sumo robot is in the top percentage of mini sumo robots.
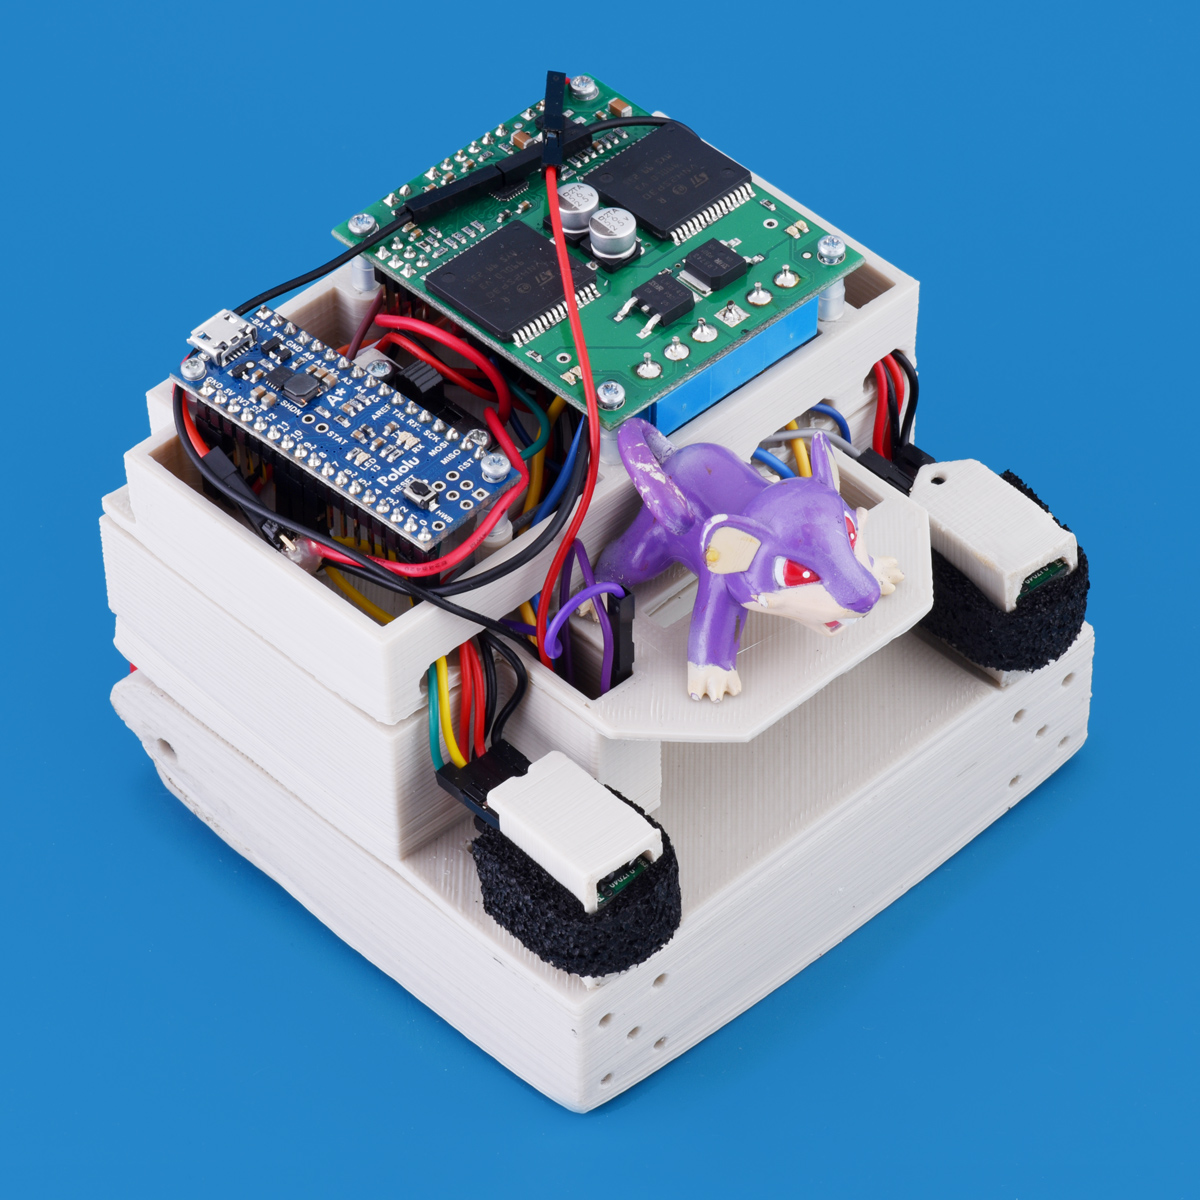
For those that don’t know, this is a reference to an internet meme about a character named youngster Joey from Pokémon. In the previous sumo competition, my sumo robot had a small toy figure of Magikarp (a Pokémon) mounted on it; the joke was that Magikarp is one of the most pathetic Pokémon and isn’t at all intimidating. Keeping with that theme I chose Rattata as the mascot for my new sumo robot. For those not familiar with Pokémon, Rattata is also a Pokémon that is not considered intimidating.
Concept
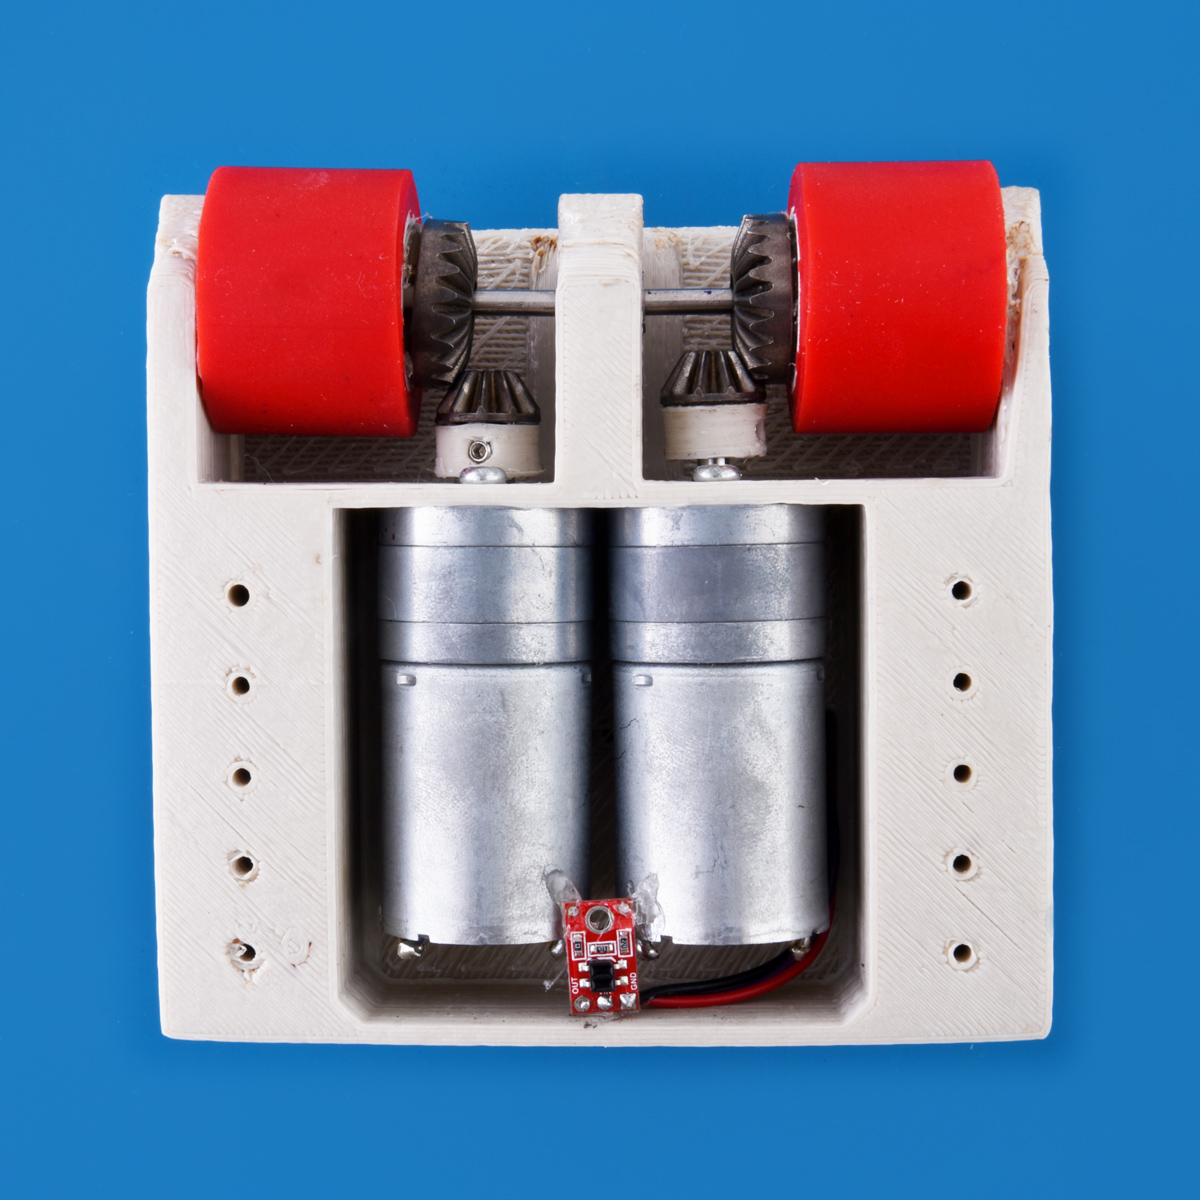
My plan was to make a mini sumo robot using the most powerful motors I could fit into the mini sumo size constraint. I determined that the most powerful gearmotors I could put into my mini sumo robot were our 25D gearmotors. While I might have been able to put the 37D gearmotors in a robot, it would probably not have been possible to keep the sumo robot within the weight limit. Even with the 25D motors the size constraint was an issue. If I put the motors in and directly mounted the wheels to the motors, the robot would not be able to fit within the 100 cm by 100 cm size limitation for mini sumo robots. To meet the size constraints, I would not be able to directly drive the motors, and since my last robot used pulleys I decided to try using gears in this robot. For the gears, I wanted something that was not too expensive; I found some gears that were for a differential in RC cars. These gears can be seen from the bottom of the robot.
 |
Body
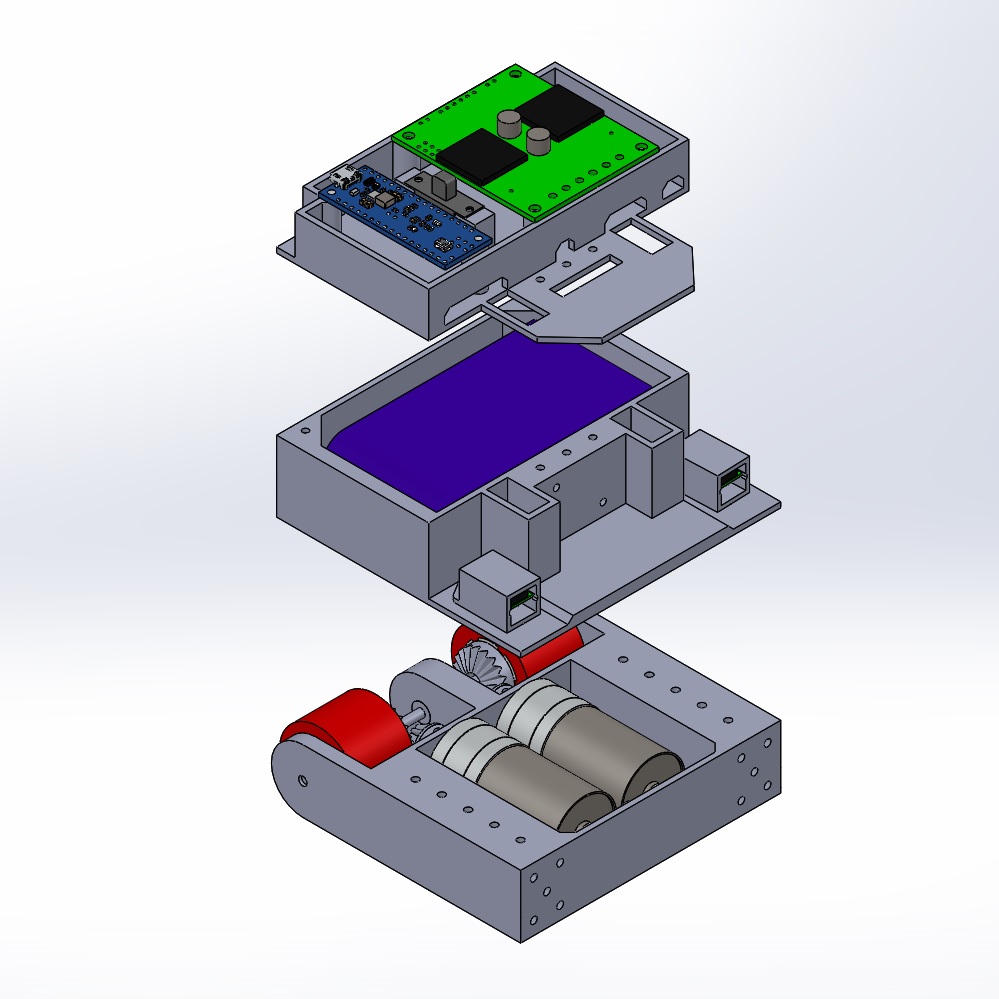
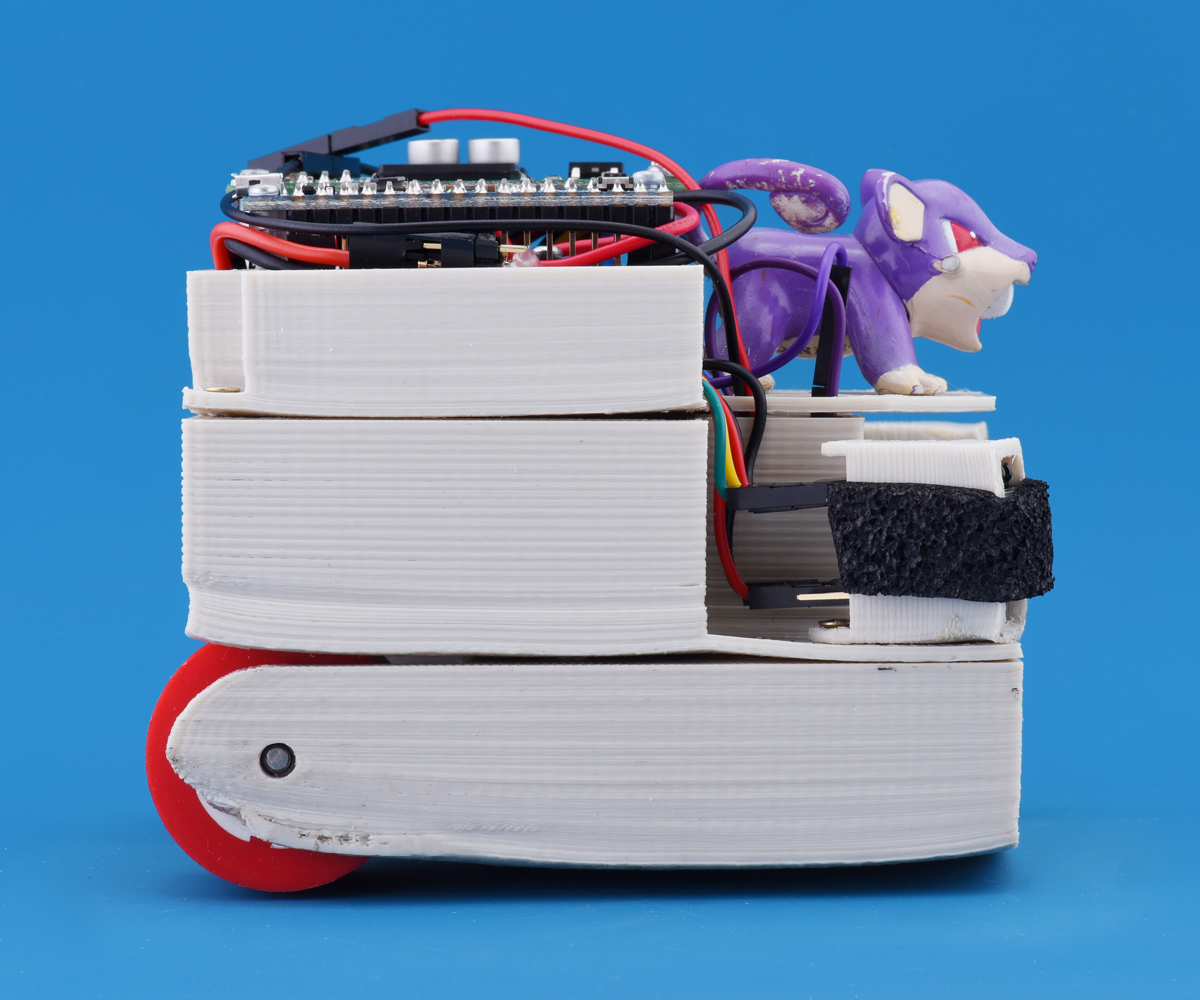
To make use of the power the motors have, I needed wheels that would give me good traction. I used a pair of Fingertech Robotics wheels for the wheels. To accommodate the gearmotors and gears, I designed and printed the chassis using my da Vinci 1.0 3D printer. The main body of the chassis is split into 3 parts: the bottom layer holds the gearmotors, wheels and gears, the middle layer holds the battery, and the top layer covers the battery and holds the electronics. I also printed some parts to mount to the gears. Below is a screen capture from SolidWorks showing the design.
 |
Electronics
When I started the robot I planned to have options for several types of sensors: QTR reflectance sensors, sonar range finders, and some of our 38 kHz IR proximity sensor. To make sure I would have enough pins for all the sensors, I chose the Qik 2s12v10 dual serial motor controller because it can be controlled with few wires (plus I had a qik 2s12v10 in my office). For the controller, I chose an A-Star 32U4 mini LV. Having used some of our 38 kHz IR proximity sensors before, I knew they were very sensitive and would often detect objects next to them instead of just items in front of them. To try and mitigate this issue, I made some holders for the sensors that would each hold two sensors. One sensor board would just be an emitter and the other board would just be a sensor. The holder would also allow me to aim the sensors off to the side more increasing the detection range of the over all robot. The holders still had issues after I made them; they still saw themselves, so I had to add a strip of black foam to each holder, and the range decreased significantly (to a couple inches).
Complications and the competition
As the competition date approached, some issues started to come up. One issue was that the weight of my robot was close to the limit. In fact, in order to make weight, I had to not use the blade I was planning to attach to the bottom of the robot because it would have put Rattata over the weight limit. I also ran out of time to add all the sensors to Rattata. I was unable to get the sonar sensor integrated into my code by competition time.
During the competition, Rattata mostly performed as I wanted it to. However, it would have been nice to get the sonar sensor working because that reduced detection range definitely limited Rattata’s performance. In the match that eliminated Rattata, one of the driving gears also came loose. From what I could determine, there were two problems: the set screws weren’t holding the shafts tightly enough (the set screws didn’t seem to work well in the 3D printed parts), and the glue holding the 3D printed part to the metal gear was not a strong enough bond. If I were to work on improvement for Rattata, I would add the sonar sensor and swap the proximity sensors for some of the newer Sharp GP2Y0A60SZ analog distance sensors. I would also find a way to better bind all the gears into the system.
 |
Related products


-
Video: Phone-controlled BB8 droid build tutorial
- 25 January 2016TechBuilder’s life-size phone-controlled BB8 droid uses a Pololu dual VNH5019 motor driver shield to drive two 19:1 37D metal gearmotors. For...
-
New products: MinIMU-9 and AltIMU-10 v5 IMU boards
- 4 February 2016We have released new versions of our MinIMU-9 and AltIMU-10 inertial measurement unit (IMU) modules, which use an I²C interface to provide nine...
0 comments
Post a comment


Home | Forum | Blog | Support | Ordering Information | Lists | Distributors | BIG Order Form | About | Contact
© 2001–2026 Pololu Corporation
