Support » Pololu Zumo Shield for Arduino User’s Guide » 3. The Zumo Shield in detail »
3.c. Jumper settings
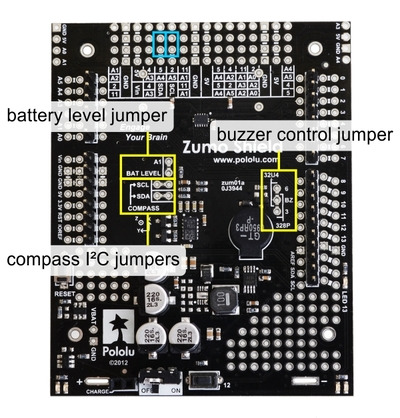
The Zumo shield has several jumpers that let you change the way it is connected to the Arduino, as shown in the picture below.
 |
- The battery level jumper connects the Arduino’s analog pin 1 to a voltage divider circuit that allows you to monitor the Zumo’s battery voltage. This jumper is disconnected by default and can be connected by soldering a short length of wire between the two holes.
The divider outputs a voltage equal to two-thirds of the battery voltage, which will always be safely below the Arduino’s maximum analog input voltage of 5 V. For example, at a battery voltage of 4.8 V, analog pin 1 will be at a level of 3.2 V. Using Arduino’s analogRead() function, where 5 V is read as a value of 1023, 3.2 V is read as a value of 655. To convert it back to the actual battery voltage, multiply this number by 5000 mV×3/2 and divide by 1023:
unsigned int batteryVoltage = analogRead(1) * 5000L * 3/2 / 1023;
- The buzzer control jumper connects one of the Arduino’s PWM outputs to the buzzer on the Zumo Shield. This jumper is disconnected by default on both the assembled and kit versions of the Zumo robot; it must be connected to enable the buzzer.
If you have an Arduino Uno or an older Arduino (with an ATmega328P or ATmega168 microcontroller), you should jumper the two holes bracketed with the label 328P to connect the BZ pin to digital pin 3. If you have an A-Star 32U4 Prime or Arduino Leonardo, you should jumper the two holes bracketed with the label 32U4 to connect the BZ pin to digital pin 6. These are the pins our Zumo Shield Arduino library expects the buzzer to be connected to for each respective microcontroller. More details about the buzzer can be found in Section 3.a.
- The compass/gyro I²C jumpers connect the I²C clock (SCL) and data (SDA) lines of the inertial sensors on the Zumo Shield to the SCL and SDA pins on the Arduino. These jumpers are connected by default, but can be disconnected by cutting the thin trace between each pair of holes.
On the Arduino Uno R3, SCL and SDA are duplicates of analog pins 5 and 4, respectively. On the A-Star and Arduino Leonardo, SCL and SDA are duplicates of digital pins 3 and 2, respectively. Using the I²C sensors on the shield will prevent these pins from being used for other purposes, and the I²C pull-up resistors will affect readings on these pins even if the compass is not being actively used, so you must cut the jumpers to disconnect the inertial sensors and pull-ups if you want to repurpose the SCL and SDA pins.
Please note that the SCL and SDA pins do not exist on Arduino hardware versions prior to the Uno R3, so you will have to manually connect SCL to analog pin 5 and SDA to analog pin 4 on the Zumo Shield in order to use the compass with an older Arduino. The most convenient place to do this is in the front expansion area, where these pins are all located together, as indicated by the light blue boxes in the picture above.
More details about the inertial sensors can be found in Section 3.d.
Instead of making a wire connection, you can solder a 1×3 male header to the buzzer jumper holes to allow the use of a shorting block for connecting the buzzer (note: this header is already installed if you got the assembled version of the Zumo robot, but the shorting block must be positioned in the appropriate place for the Arduino model you are using). You can also use male headers and shorting blocks for the battery level jumper and compass jumpers if you have an Arduino Uno with an SMD (surface mount) microcontroller, Arduino Leonardo, or A-Star 32U4 Prime. However, there is not enough clearance to use male headers on the battery level and compass I²C jumpers if you are using an Arduino with a DIP (through-hole) microcontroller.


