Support » Pololu Maestro Servo Controller User’s Guide » 6. The Maestro Scripting Language »
6.c. Example Scripts
Getting started: blinking an LED
The following script will cause the red LED on the Maestro to blink once per second:
# Blinks the red LED once per second.
begin
  led_on
  100 delay
  led_off
  900 delay
repeat
It is a good idea to try stepping through this script before doing anything further with scripts on the Maestro. In particular, pay attention to how the command “100” puts the number 100 on the stack, and the DELAY command consumes that number. In the Maestro scripting language, arguments to commands always need to be placed on the stack before the commands that use them, which makes the language seem backwards compared to other languages. It also means that you can arrange your code in a variety of different ways. For example, this program is equivalent to the one above:
# Blinks the red LED once per second.
begin
  900 100
  led_on delay
  led_off delay
repeat
The numbers are placed on the stack at the beginning of the loop, then consumed later on in execution. Pay attention to the order of the numbers used here: the 900 goes on the stack first, and it is used last.
A simple servo sequence
The following script shows how to direct servo 0 to five different positions in a loop.
# Move servo 0 to five different positions, in a loop.
begin
  4000 0 servo # set servo 0 to 1.00 ms
  500 delay
  5000 0 servo # 1.25 ms
  500 delay
  6000 0 servo # 1.50 ms
  500 delay
  7000 0 servo # 1.75 ms
  500 delay
  8000 0 servo # 2.00 ms
  500 delay
repeat
The serial mode must not be set to detect baud rate for this script to work. In detect baud rate mode, the Maestro does not enable any of the servo outputs until the start byte has been received.
Note that the servo positions are specified in units of 0.25 μs, so a value of 4000 corresponds to 1 ms. The text after the # is a comment; it does not get programmed on to the device, but it can be useful for making notes about how the program works. Good comments are essential for complicated programs. It is important to remember the DELAY commands; without these, the script will not wait at all between servo commands, running the loop hundreds of times per second.
Compressing the sequence
The program above takes 58 bytes of program space: 11 bytes for each servo position and 3 for the loop. At this rate, we could store up to 92 servo positions in the 1024-byte memory of the Micro Maestro, or 744 servo positions in the 8192-byte memory of the Mini Maestros. To get the most out of the limited memory, there are a variety of ways to compress the program. Most important is to make use of subroutines. For example, since we repeat the instructions “0 servo 500 delay” several times, we can move them into a subroutine to save space. At the same time, this simplifies the code and makes it easier to make future modifications, such as changing the speed of the entire sequence.
# Move servo 0 to five different positions, in a loop.
begin
  4000
  frame
  5000
  frame
  6000
  frame
  7000
  frame
  8000
  frame
repeat

sub frame
  0 servo
  500 delay
  return
Using the subroutine brings the script down to 31 bytes: 4 per position and 11 bytes of overhead for the loop and to define FRAME. We can go further: inspecting the compiled code shows that putting each number on the stack requires 3 bytes: one byte as a command, and two for the two-byte number. Numbers from 0 to 255 can be loaded onto the stack with just two bytes. Suppose in our application we do not need the full 0.25 μs resolution of the device, since all of our settings are multiples of 100. Then we can use smaller numbers to save another byte:
# Move servo 0 to five different positions, in a loop.
begin
  40 frame
  50 frame
  60 frame
  70 frame
  80 frame
repeat

# loads a frame specified in 25 us units
sub frame
  100 times
  0 servo
  500 delay
  return
This program is 29 bytes long, with 3 bytes used per position and 14 bytes of overhead. Note that we could get the same efficiency if we used the SERVO_8BIT command, which takes a one-byte argument from 0 to 254. We can go even smaller by putting all of the numbers together:
# Move servo 0 to five different positions, in a loop.
begin
  80 70 60 50 40
  frame frame frame frame frame
repeat

# loads a frame specified in 25 us units
sub frame
  100 times
  0 servo
  500 delay
  return
If you step through this version program, you will also notice that all five numbers are placed on the stack in a single step: this is because the compiler can use a single command to put multiple numbers on the stack. Using a single command for multiple numbers saves space: we are now down to just 26 bytes. Only 12 bytes are used for the 5 frames, for an average of 2.4 bytes per frame. This is probably compact enough – by duplicating this structure we could fit 420 different positions into the 1024-byte program memory of the Micro Maestro. However, the code can get even smaller. Consider this script, which uses 31 frames to make a smooth back-and-forth motion:
# Moves servo in a sine wave between 1 and 2 ms.
begin
  60 64 68 71 74 77 79 80 80 79 78 76 73 70 66 62
  58 54 50 47 44 42 41 40 40 41 43 46 49 52 56
  all_frames
repeat

sub all_frames
  begin
    depth
  while
    100 times
    0 servo
    100 delay
  repeat
  return
In this version of the code, we have rewritten the FRAME subroutine, using the DEPTH command to automatically load frames from the stack until there are none left. This program uses 34 bytes to store 31 frames, for an average of just 1.1 bytes per frame. We could store a sequence containing 900 different positions in the memory of the Micro Maestro using this kind of script.
Making smooth sequences with GET_MOVING_STATE
Speed and acceleration settings can be used to make smooth motion sequences with the Maestro. However, a common problem is that you do not know how much you need to delay between frames to allow the servo to reach its final position. Here is an example of how to use the built-in function GET_MOVING_STATE to make a smooth sequence, instead of DELAY:
# This example uses speed and acceleration to make a smooth
# motion back and forth between 1 and 2 ms.
3 0 acceleration
30 0 speed

begin
  4000 0 servo # set servo 0 to 1.00 ms
  moving_wait
  8000 0 servo # 2.00 ms
  moving_wait
repeat

sub moving_wait
  begin
    get_moving_state
  while
    # wait until it is no longer moving
  repeat
  return
GET_MOVING_STATE returns a 1 as long as there is at least one servo that is limited by a speed or acceleration setting still moving, so you can use it whenever you want to wait for all motion to stop before proceeding to the next step of a script.
Using an analog input to control servos
An important feature of the Maestro is that it can be used to read inputs from sensors, switches, or other devices. As a simple example, suppose we want to use a potentiometer to control the position of a servo. For this example, connect the potentiometer to form a voltage divider between 5V and 0, with the center tap connected to channel 1. Configure channel 1 to be an input, and examine the signal on the Status tab of the Maestro Control Center. You should see the position indicator vary from 0 to 255 μs as you turn the potentiometer from one side to the other. In your script, this range corresponds to numbers from 0 to 1023. We can scale this number up to approximately the full range of a servo, then set the servo position to this number, all in a loop:
# Sets servo 0 to a position based on an analog input.
begin
  1 get_position    # get the value of the pot, 0-1023
  4 times 4000 plus # scale it to 4000-8092, approximately 1-2 ms
  0 servo           # set servo 0 based to the value
repeat
Alternatively, you might want the servo to go to discrete positions depending on the input value:
# Set the servo to 4000, 6000, or 8000 depending on an analog input.
begin
  1 get_position    # get the value of the pot, 0-1023
  dup 300 less_than
  if
    4000   # go to 4000 for values 0-299
  else
    dup 600 less_than
    if
      6000 # go to 6000 for values 300-599
    else
      8000 # go to 8000 for values 600-1023
    endif
  endif
  0 servo
  drop     # remove the original copy of the pot value
repeat
The example above works, but when the potentiometer is close to 300 or 600, noise on the analog-to-digital conversion can cause the servo to jump randomly back and forth. A better way to do it is with hysteresis:
# Set the servo to 4000, 6000, or 8000 depending on an analog input, with hysteresis.
begin
  4000 0 300 servo_range
  6000 300 600 servo_range
  8000 600 1023 servo_range
repeat

# usage: <pos> <low> <high> servo_range
# If the pot is in the range specified by low and high,
# keeps servo 0 at pos until the pot moves out of this
# range, with hysteresis.
sub servo_range
  pot 2 pick less_than logical_not    # >= low
  pot 2 pick greater_than logical_not # <= high
  logical_and
  if
    begin
      pot 2 pick 10 minus less_than logical_not   # >= low - 10
      pot 2 pick 10 plus greater_than logical_not # <= high + 10
      logical_and
    while
      2 pick 0 servo
    repeat
  endif
  drop drop drop
  return

sub pot
  1 get_position
  return
This example uses one range for deciding where to go when making a transition, then it waits for the servo to leave a slightly larger range before making another transition. As long as the difference (10 in this example) is larger than the amount of noise, this will prevent the random jumping.
Note that this example will only work if you connect your potentiometer to one of the analog input capable channels (channels 0–11). The inputs on the other channels are digital.
Using a button or switch to control servos
It is possible to connect a button or switch to a Maestro and detect the state of the button in your script. The script below moves a servo through a predefined sequence of movements, advancing to the next step each time the button is pushed. It uses channel 0 for the button and channel 1 for the servo.
The button channel must be configured as an input and wired correctly. See Section 7.b for instructions on how to wire a button to your Maestro using a pull-up resistor, so that the input is normally high, and when the button is pressed it goes low.
goto main_loop    # Run the main loop when the script starts (see below).

# This subroutine returns 1 if the button is pressed, 0 otherwise.
# To convert the input value (0-1023) to a digital value (0 or 1) representing
# the state of the button, we make a comparison to an arbitrary threshold (500).
# This subroutine puts a logical value of 1 or a 0 on the stack, depending
# on whether the button is pressed or not.
sub button
  0 get_position 500 less_than
  return

# This subroutine uses the BUTTON subroutine above to wait for a button press,
# including a small delay to eliminate noise or bounces on the input.
sub wait_for_button_press
  wait_for_button_open_10ms
  wait_for_button_closed_10ms
  return

# Wait for the button to be NOT pressed for at least 10 ms.
sub wait_for_button_open_10ms
  get_ms # put the current time on the stack
  begin
    # reset the time on the stack if it is pressed
    button
    if
      drop get_ms
    else
      get_ms over minus 10 greater_than
      if drop return endif
    endif
  repeat

# Wait for the button to be pressed for at least 10 ms.
sub wait_for_button_closed_10ms
  get_ms
  begin
    # reset the time on the stack if it is not pressed
    button
    if
      get_ms over minus 10 greater_than
      if drop return endif
    else
      drop get_ms
    endif
  repeat

# An example of how to use wait_for_button_press is shown below:

# Uses WAIT_FOR_BUTTON_PRESS to allow a user to step through
# a sequence of positions on servo 1.
main_loop:
begin
  4000 frame
  5000 frame
  6000 frame
  7000 frame
  8000 frame
repeat

sub frame
  wait_for_button_press
  1 servo
  return
Just like the sequencing examples above, the script steps through a sequence of frames, but instead of a timed delay between frames, this example waits for a button press. The WAIT_FOR_BUTTON_PRESS subroutine can be used in a variety of different scripts, whenever you want to wait for a button press. You could also expand this example to allow multiple buttons, continuous motion, or a variety of other types of button control.
Using multiple buttons or switches to control servos
This script demonstrates how to connect your Maestro to multiple buttons. When a button is pressed, it runs the corresponding sequence.
# When the script is not doing anything else,
# this loop will listen for button presses.  When a button
# is pressed it runs the corresponding sequence.
begin
  button_a if sequence_a endif
  button_b if sequence_b endif
  button_c if sequence_c endif
repeat

# These subroutines each return 1 if the corresponding
# button is pressed, and return 0 otherwise.
# Currently button_a is assigned to channel 0,
# button_b is assigned to channel 1, and
# button_c is assigned to channel 2.
# These channels must be configured as Inputs in the
# Channel Settings tab.
sub button_a
  0 get_position 500 less_than
  return

sub button_b
  1 get_position 500 less_than
  return

sub button_c
  2 get_position 500 less_than
  return

# These subroutines each perform an arbitrary sequence
# of servo movements.  You should change these to fit
# your application.
sub sequence_a
  4000 3 servo 1000 delay
  6000 3 servo 500 delay
  return

sub sequence_b
  8000 4 servo 900 delay
  7000 4 servo 900 delay
  6000 4 servo 900 delay
  return

sub sequence_c
  10 4 speed
  7000 4 servo 3000 delay
  6000 4 servo 3000 delay
  return
Please note that this script does not do multi-tasking. If a sequence is running, the script will not detect other button presses until the sequence is done. It is possible to make the buttons operate independently, but the script would need to be much more complicated. Depending on how skilled you are at writing scripts, you might prefer to use multiple Maestros instead.
Long delays
The longest delay possible with the DELAY command is approximately 32 seconds. In some cases, you will want to make delays much longer than that. Here is an example that shows how delays of many seconds or minutes can be accomplished:
# Moves servo 0 back and forth, with a delay of 10 minutes between motions.
begin
  4000 0 servo
  10 delay_minutes
  8000 0 servo
  10 delay_minutes
repeat

# delay by a specified number of seconds, up to 65535 s
sub delay_seconds
  begin dup while      # check if the count has reached zero
    1 minus 1000 delay # subtract one and delay 1s
  repeat
  drop return          # remove the 0 from the stack and return

# delay by a specified number of minutes, up to 65535 min
sub delay_minutes
  begin dup while
    1 minus 60 delay_seconds # subtract one and delay 1min
  repeat
  drop return                # remove the 0 from the stack and return
It is easy to write subroutines for delays of hours, days, weeks, or whatever you want. Keep in mind, however, that the timer on the Micro Maestro is not as accurate as a stopwatch – these delays could easily be off by 1%.
Digital output
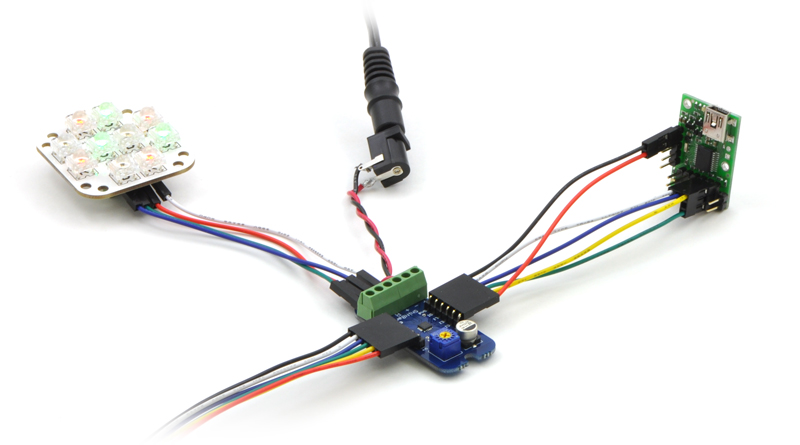 |
Connecting the Micro Maestro to a chain of ShiftBars. A single 12V supply powers all of the devices. |
|---|
The digital output feature of the Maestro is capable of controlling anything from simple circuits to intelligent devices such as the ShiftBrite LED Modules and ShiftBar LED Controllers, which use a simple synchronous serial protocol. In this example, the clock, latch, and data pins of a ShiftBrite or ShiftBar are connected to servo channels 0, 1, and 2, respectively, and these channels are all configured as outputs. The subroutine RGB defined here takes 10-bit red, green, and blue values from the stack, then sends a 32-byte color packet and toggles the latch pin to update the ShiftBrite with the new color value. The subroutine could be modified to control a larger chain of ShiftBrites if desired.
begin
  1023    0    0 rgb  500 delay  # red
     0 1023    0 rgb  500 delay  # green
     0    0 1023 rgb  500 delay  # blue
repeat

# Subroutine for setting the RGB value of a ShiftBrite/ShiftBar.
# example usage: 1023 511 255 rgb
sub rgb
  0 send_bit # this bit does not matter
  0 send_bit # the "address" bit - 0 means a color command
  swap rot rot
  send_10_bit_value
  send_10_bit_value
  send_10_bit_value
  0 1 8000 1 servo servo # toggle the latch pin
  return

# sends a numerical value as a sequence of 10 bits
sub send_10_bit_value
  512
  begin
    dup
  while
    over over bitwise_and send_bit
    1 shift_right
  repeat
  drop drop
  return

# sends a single bit
sub send_bit
  if 8000 else 0 endif
  2 servo                # set DATA to 0 or 1
  0 0 8000 0 servo servo # toggle CLOCK
  return
Note that we use 0 to set the output low and 8000 to set the output high. These are reasonable choices, but any value from 0 to 5999 could be used for low, and anything from 6000 to 32767 could be used for high, if desired.
Serial output (Mini Maestro 12, 18, and 24 only)
On the Mini Maestro 12, 18, and 24, a script can be used to send serial data out on the TTL-level serial port (TX). This means that the Maestro can control additional Maestros, allowing for large numbers of channels without a separate microcontroller. Here is a simple program that shows how a serial command can be used to control another Maestro. To use this code, configure both Maestros in UART mode at the same baud rate, and connect TX on the master to RX on the slave.
100 delay # initial delay to make sure that the other maestro has time to initialize

begin
  127 0 mini_ssc # set servo 0 to position 127, using the mini-SSC command
  254 0 mini_ssc # set servo 0 to position 254
repeat

sub mini_ssc
  0xFF serial_send_byte serial_send_byte serial_send_byte
  return
Related products


Home | Forum | Blog | Support | Ordering Information | Lists | Distributors | BIG Order Form | About | Contact
© 2001–2026 Pololu Corporation
