Support » Pololu m3pi User’s Guide » 4. The Expansion Board in Detail »
4.i. 3pi Base Pins
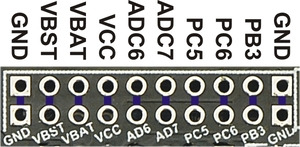
The m3pi expansion board has access to a number of pins from the 3pi base via a 20-pin header near the center of the PCB:
 |
m3pi PCB header for accessing pins on the 3pi robot base. |
|---|
Two rows of pins are identical, with columns connected by traces on the underside of the PCB. Typical users might find this header is useful for accessing power for additional sensors and custom electronics (see Section 4.b). Advanced users may also find this header useful for accessing the free or partially free I/O lines of the 3pi base’s AVR microcontroller. If you want to use the 3pi’s microcontroller as the main controller of the m3pi robot, you can connect your extra electronics to these I/O lines on the expansion board. If you are using the mbed as your main controller, these I/O lines will probably not be very useful.
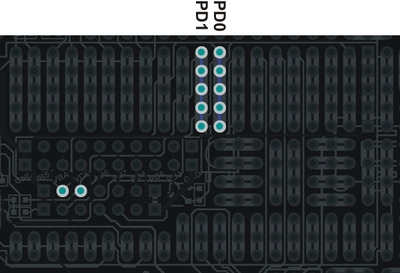
Pins PD0 and PD1 are also free by default on the 3pi (i.e. they are not connected to anything on the 3pi other than AVR I/O pins). These are the 3pi’s hardware serial pins, and the default 3pi firmware uses these pins to receive commands that tell the 3pi base what to do. These pins connect to serial lines on the m3pi’s mbed socket and can be connected through jumpers on the m3pi expansion board directly to the serial pins of a socketed Wixel or XBee wireless module (see Section 4.a). If you want to use these as general-purpose I/O lines, you can access them through the appropriate mbed socket pins. Alternatively, you can use your favorite microcontroller board to control your m3pi by routing its serial pins to PD0 and PD1 through the mbed socket and sending the appropriate serial commands. The commands for the 3pi’s default serial slave program are documented in section 10.a of the 3pi user’s guide.
 |
m3pi mbed socket pins that connect to PD0 and PD1 on the 3pi base. |
|---|
You can find out more about these I/O lines from section 10.c of the 3pi user’s guide. The most relevant part of that section is quoted below:
You can freely use PD0 and PD1 for general-purpose digital I/O, or you can use them for serial communication with another microcontroller, a serially-controlled device, or a computer (note that you will need to convert the signal to RS-232 levels or USB to communicate with a computer).
In addition to PD0 and PD1, the 3pi robot has a limited number of I/O lines that can be used as inputs for additional sensors or to control additional electronics such as LEDs or servos. These I/O lines can be accessed through the pads at the center of the 3pi, between the two motors, labeled PD0, PD1, ADC6, ADC7, and PC5. If you are using an expansion kit, these lines are brought up to the expansion PCB.
Pins PC5, ADC6, and ADC7 are all connected to 3pi hardware via removable shorting blocks. By removing the shorting block, you can use these pins for your own electronics. Pin PC5 can be used as either a digital I/O or an analog input. When its shorting block is in place, it controls the emitters for the IR sensors; when its shorting block is removed, the emitters are always on. Pin ADC6 is a dedicated analog input that connects to a voltage divider circuit that monitors the battery voltage when its shorting block is in place, and pin ADC7 is a dedicated analog input that connects to the user trimmer potentiometer when its shorting block is in place.
Note: 3pi pin PB3 doubles as a 3pi motor driver input and an AVR programming pin. We strongly recommend that you not connect this pin to anything.
By default, pin PC5 is an AVR output whose state depends on what the 3pi is doing with its line sensors, even with the PC5 jumper removed. Unless you modify the 3pi base firmware appropriately, do not connect an output to this pin!


