Pololu Blog »
Video: Getting started with the Maestro
We are excited to release this new video for our Maestro Servo Controllers! Get some ideas for cool things you can do with the Maestro, and see how easy it is to get started with our custom software. This is the first of many fun new Pololu videos to come! Let us know what you think or what other products you would like to see in action in the comment section below.
Products featured in this video:
- Maestro Servo Controllers
- Power HD High-Torque Servo 1501MG
- SpringRC SM-S4303R Continuous Rotation Servo
- Rechargeable NiMH Battery Pack
- Pololu RP5/Rover 5 Expansion Plate
- Emily’s T-shirt
Projects featured in this video:
- Simple Hexapod Walker
- Mars Rover from Beatty Robotics
- Brian Patton’s PsychoRowRow featuring talking robots from Robodyssey
Related products


-
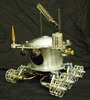
Lunokhod
- 8 July 2013Lunokhod, which means “Moon Walker” in Russian, was built for a space museum in Prague and is a miniature version of the first remote-controlled...
-
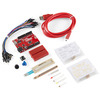
New product: Sparkfun Starter Kit for RedBoard
- 30 July 2013The SparkFun Starter Kit for RedBoard is an easy way to get started building entertaining and educational circuits with SparkFun’s RedBoard, an...
11 comments


If you want to power your Maestro from a wall outlet, all you need is an appropriate wall power adapter:
https://www.pololu.com/category/196/wall-power-adapters
From there, I recommend using our DC Barrel Jack to 2-Pin Terminal Block Adapter to connect the power to your Maestro:
https://www.pololu.com/product/2449
- Patrick
https://forum.pololu.com/t/how-to-power-12-channel-servo-with-one-supply/18108/3

Thanks,
Edson

You can see how to connect buttons or switches in the "Attaching Servos and Peripherals" section of the Maestro user's guide. Additionally, you can find multiple example scripts for using inputs with servos in the "Example Scripts" section of the same user's guide.
-Derrill

I am totally new to the world of robotics, servos, motors etc. What I am trying to achieve is basically having a computer case with a lid that can be opened from a windows application and it should be powered/controlled through a USB header. As the case is tiny (only 3L volume), I am looking for very small components and most motors, servos or linear actuators are way too big. I found your brushless DC motors like the 298:1 Micro Metal Gearmotor LP 6V https://www.pololu.com/product/1094
Is it possible to control this motor with the Micro Maestro?
thanks in advance,
Wolfgang

Please note that our Micro Metal Gearmotors are brushed DC motors (not brushless). The Maestro cannot directly control a brushed DC motors like that. If you want to control a brushed DC motor through a USB interface, you could use something like our G2 Jrk Motor Controllers, but please note that you would have to add extra components like a potentiometer to do closed-loop position control like a servo. Alternatively, you could use a G2 Simple Motor Controller (SMC) which supports limit switches that you can use to stop the motor at the extremes of your range of motion.
The combination of a Micro Maestro servo controller and a micro servo is probably the more practical option, and it is fairly comparable in size to a Jrk or SMC paired with a Micro Metal Gearmotor, especially if you have to use additional components like a potentiometer or limit switches to get it to behave like you want.
If you want to continue the discussion or need more assistance in choosing components, please post a request for help on our forum, which is a much better place for this kind of discussion, and we would be glad to assist you further.
Brandon

Thank you for your suggestion. We will keep it in mind. In the meantime, you can find information about using the Maestro with an Arduino (such as connections and Maestro configuration settings) in the README of our Maestro Servo Controller library for Arduino. Additionally, that library has various examples. If you have additional questions, you can post a request for help on our forum, and we would be glad to help.
Brandon

I have a question around mounting the Maestro controller.
I purchased the "Pololu RP5/Rover 5 Expansion Plate" as shown in the youtube video, and I have standoffs to mount the servos to that board but I am having trouble identifying the hardware needed to mount the maestro board.
I tried 2mm standoffs but the threaded portion is too big.
What size do I need for this and do you sell this hardware?
Thank you,
Jim
In the video from this blog post, we just used some #2-56 screws to mount the Maestro directly to the Pololu RP5/Rover 5 Expansion Plate, but our #2-56 M-F standoffs (or #2-56 F-F standoffs if you prefer) should work to elevate it if that's what you are after. I am not sure what you mean when you say the threaded portion is too big, but if you continue having problems with it, you can post on our forum or email us with more details, such as pictures, and I would be happy to help there.
Brandon
Post a comment


Home | Forum | Blog | Support | Ordering Information | Lists | Distributors | BIG Order Form | About | Contact
© 2001–2026 Pololu Corporation


