Support » Pololu A-Star 328PB User’s Guide » 4. Getting Started »
4.3. Programming using the Arduino IDE
The A-Star 328PB ships with a preloaded Arduino-compatible TTL serial bootloader (which uses 0.5 KB of flash memory, leaving 31.5 KB available for the user program). We provide a software add-on that enables you to program the board from the Arduino integrated development environment (IDE). The Arduino IDE is a cross-platform, open source application that integrates a C++ code editor, the GNU C++ compiler, and a program upload utility.
These instructions assume that you have already powered your A-Star 328PB (see Section 4.1) and connected its serial interface to your computer using a serial adapter (see Section 4.2).
- Download the Arduino IDE from the Arduino Download page, install it, and start it. These steps were tested with the Arduino IDE 1.8.19, so we recommend using version 1.8.19 or later.
- In the Arduino IDE, open the File menu (Windows/Linux) or the Arduino menu (macOS) and select “Preferences”.
- In the Preferences dialog, find the “Additional Boards Manager URLs” text box (highlighted in the picture below). Copy and paste the following URL into this box:
https://files.pololu.com/arduino/package_pololu_index.json
If there are already other URLs in the box, you can either add this one separated by a comma or click the button next to the box to open an input dialog where you can add the URL on a new line.
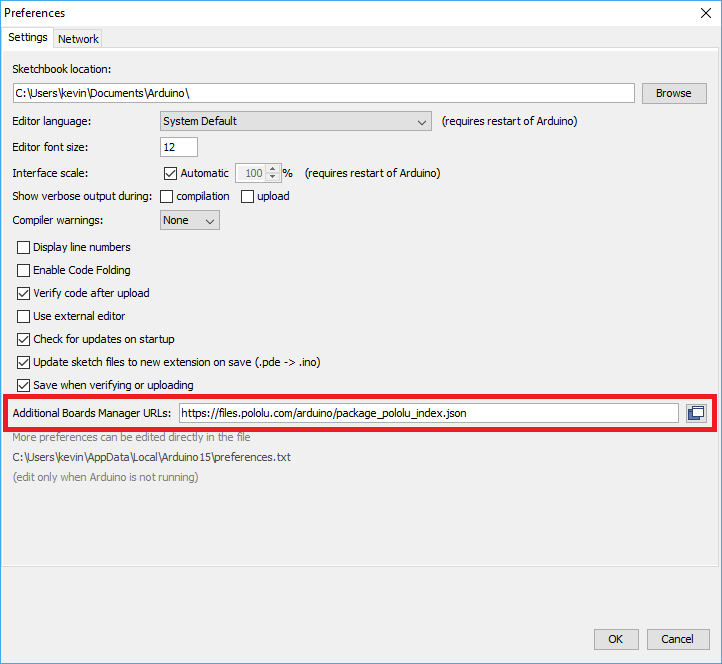 |
Adding a Boards Manager index for Pololu boards in the Arduino IDE’s Preferences dialog. |
|---|
- Click the “OK” button to close the Preferences dialog.
- In the Tools > Board menu, select “Boards Manager…” (at the top of the menu).
- In the Boards Manager dialog, search for “Pololu A-Star Controllers”.
- Select the “Pololu A-Star Controllers” entry in the list, and click the “Install” button.
- After the installation finishes, click the “Close” button to close the Boards Manager dialog.
- In the Tools > Board menu, select “Pololu A-Star 328PB” from the “Pololu A-Star Boards” category. If you do not see the A-Star entries in the Board menu try restarting the Arduino IDE.
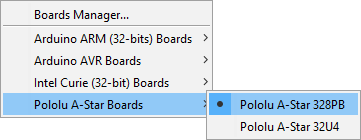 |
Selecting the Pololu A-Star 328PB in the Boards menu. |
|---|
- After you select the A-Star 328PB, the Tools > Version menu should appear. In this menu, select the entry that corresponds to your board.
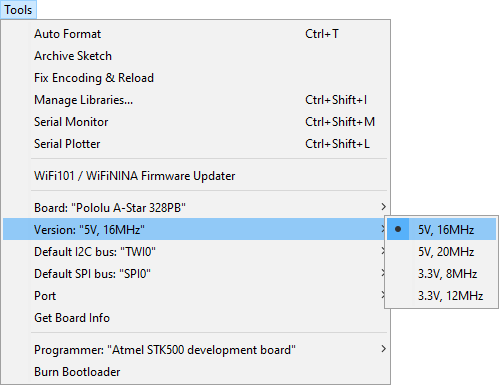 |
Selecting the right version of the A-Star 328PB in the Version menu. |
|---|
- In the Tools > Port menu, select the port for your serial adapter. If you are using the Pololu USB AVR Programmer v2, you should select its TTL port.
- Open up the “Blink” Arduino example, which can be found under File > Examples > 01.Basics > Blink. The code in this example will blink the yellow LED. When you select the Blink example, a new Arduino IDE window will open up. It is OK to close the first window.
 |
Selecting the Blink example in the Arduino IDE. |
|---|
- Press the “Upload” button to compile the sketch and upload it to the device. If everything goes correctly, you will see the message “Done uploading” appear near the bottom of the window. If you see an error message, refer to the “Upload Troubleshooting” section below.
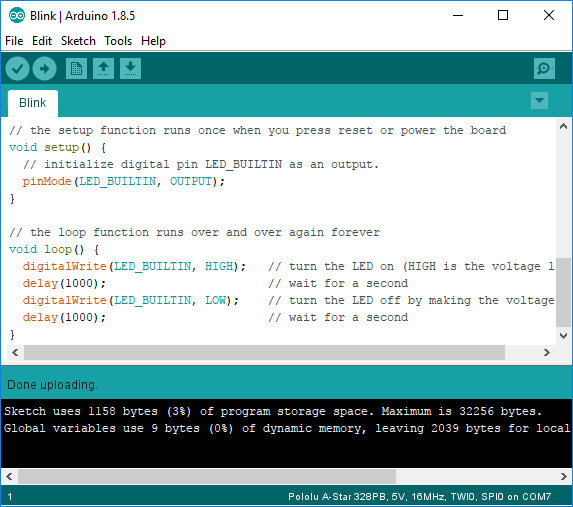
Uploading a sketch to the A-Star 328PB using the Arduino IDE.
- If you uploaded the Blink sketch, then the yellow LED should be blinking once every two seconds. However, we ship the A-Star 328PB with that same example already programmed onto it, so you might not be convinced that anything has changed. Try changing the delay values in the sketch to something else and uploading again to see if you can change the speed of the LED.
After you succeed in programming your device from the Arduino IDE, there are many resources you can use to learn more:
- See Section 4.4 for information about ATmega328PB support in the Arduino IDE.
- The Arduino IDE has many examples that can run on A-Stars.
- The Arduino website has a Language Reference, a wiki called the The Arduino Playground, and other resources.
- The ATmega328PB is very similar to the ATmega328P used on boards like the Arduino Uno, so you can search the Internet for relevant projects that use one of those boards. Almost any code that works on the ATmega328P will work on the ATmega328PB.
Upload troubleshooting
If you get errors when uploading a sketch to the Arduino IDE, here are some things to try:
- Make sure that the A-Star 328PB is powered on (see Section 4.1). The power LED should be on.
- Make sure that the A-Star serial interface is connected to the serial adapter (see Section 4.2) and that the serial adapter is connected to your computer. The A-Star’s GND, RX, TX, and D/R pins must all be connected to the serial adapter.
- Make sure you have selected the right board in the “Board” menu. You can look at the color of power LED to tell what kind of board you have if you are not sure (see Section 3).
- Make sure you have selected the correct port for your serial adapter in the Arduino IDE’s Port menu. If you are using a Pololu USB AVR Programmer v2 as your serial adapter, you can verify that you are connecting to the right port by opening the programmer’s configuration utility and making sure the “TTL port” name shown there matches the selection in the Arduino IDE’s Port menu.
- If the Arduino IDE has trouble connecting to your serial adapter, try unplugging the adapter from your computer, closing any programs that might be using the serial port, restarting the Arduino IDE, and then plugging the adapter back in.
- Try pressing the reset button on the A-Star 328PB to see whether the bootloader is installed and able to run. You should see the yellow user LED blink quickly three times, and then the LED should be off for the next second while the bootloader waits for serial commands. If this test fails, there could be a problem with your power supply or it could be that the bootloader has been erased. If you have previously programmed the A-Star 328PB using the ISP interface, then the bootloader was probably erased and you will need to burn it again as described in Section 5.
- Look at the A-Star 328PB’s user LED after clicking the upload button. If you see it blink quickly three times and then turn off for at least a second, it most likely means that your serial adapter was able to reset the board and start the bootloader.
- Try doing a loopback test to make sure your serial adapter is working: disconnect your serial adapter from the A-Star, then connect its TX line to its RX line. Open the serial monitor in the Arduino IDE, type some letters in the input box at the top, and click send. You should see the letters that you type appear in the output area below, meaning that the serial adapter received those same letters. If the loopback test fails, then you might be connected to the wrong serial port or the serial adapter might be malfunctioning.
- In the Arduino IDE preferences dialog, click the “upload” checkbox next to “Show verbose output during”. The next time you try to upload, the Arduino IDE will show you more details about what is happening.


Home | Forum | Blog | Support | Ordering Information | Lists | Distributors | BIG Order Form | About | Contact
© 2001–2026 Pololu Corporation
