Support » Pololu P-Star User’s Guide »
10. Compiling a program with MPLAB X and MPASM
This section explains how to get started programming the P-Star in assembly using MPLAB X and XC8. MPLAB X a free integrated development (IDE) from Microchip for programming their PIC microcontrollers. MPASM is an assembler that comes with MPLAB X.
For most people, we recommend “developing P-Star apps with XC8”:Section 5.3, which allows a mixture of C and assembly code. This section is for advanced users who only want to use assembly.
MPASM supports two types of code: absolute and relocatable. These instructions will show how to write absolute code, where the location of every instruction and variable is known ahead of time. The alternative is relocatable code, which allows multiple assembly files to be combined into one program using a linker.
- Download and install the latest version of MPLAB X.
- Find “MPLAB X IDE” in your Start Menu and run it.
- From the File menu, select “New Project”.
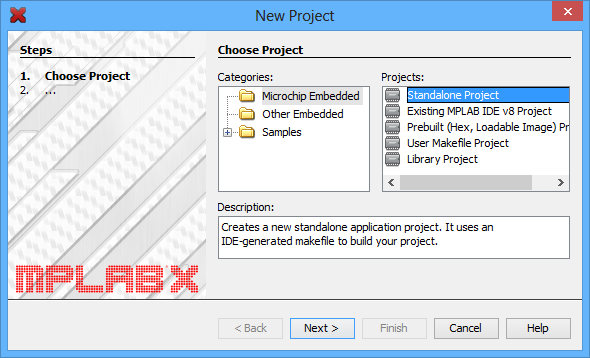
- On the first screen of the New Project wizard, select the “Microchip Embedded” category and then select “Standalone Project”. Click “Next”.
 |
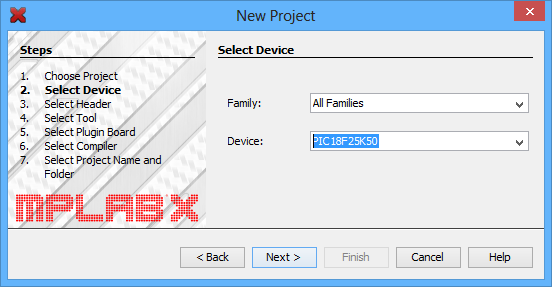
- For the Device, type the name of the microcontroller on your P-Star, which is either “PIC18F25K50” or “PIC18F45K50”. Click “Next”.
 |
- On the “Select Tool” screen, you can select “PICkit 3” but this choice does not matter because we will not use MPLAB X to the load the program onto the board.
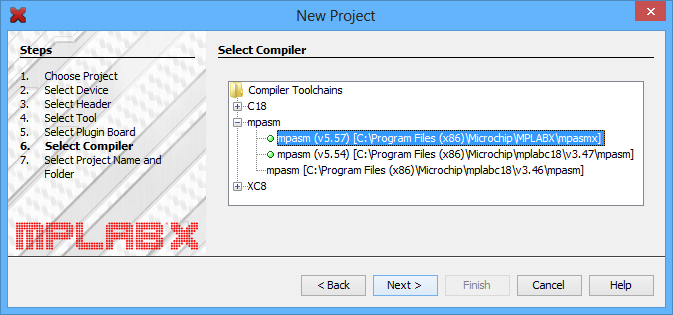
- For the compiler, select MPASM.
 |
- For the Project Name, choose something like “p-star1”, and choose the folder you want it to be in. Click “Finish” to create the project.
 |
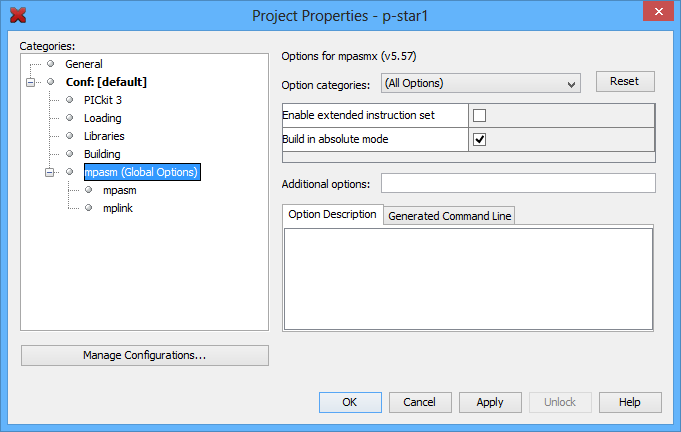
- In the “File” menu, select “Project Properties”. In the “MPASM (global options)” category, check the “Build in absolute mode” check box, then click “OK”.
 |
- Now we need to create the assembly source file. Locate the “Projects” pane. If the “Projects” pane is not visible, you can open it by opening the “Window” menu and selecting “Projects”. Left-click the “+” sign next to “Source Files” to expand it and verify that your project has no source files yet. Then right-click on “Source Files”, select “New”, and then select “pic_8b_simple.asm…”. If “pic_8b_simple.asm” is not visible in the menu, you can find it by selecting “Other…”, “Microchip Embedded”, and then “MPASM assembler”.
 |
- Choose a file name such as “main” and then click “Finish”. This should create a new file named “main.asm” and open it for editing.
- Copy and paste the following code into main.asm, replacing all the code that was there by default:
- To compile the code, open the “Run” menu and select “Build Main Project”.
- The “Output” pane should show the build output from MPLAB X. One of the last lines of the output should say “Loading code from” and have the full path to the HEX file produced during compilation.
    #include <p18f25k50.inc>

    org     0x2000
    goto    start

    org     0x2020
ledRedOn:
    bcf     TRISC, 6
    return

ledRedOff:
    bsf     TRISC, 6
    return

start:
    bcf     LATC, 6      ; Set up the red LED

    ; Enable Timer 0 as a 16-bit timer with 1:256 prescaler:
    ; since the instruction speed is 12 MHz, this overflows about
    ; every 1.4 seconds.
    movlw   b'10000111'
    movwf   T0CON

mainLoop:
    movf    TMR0L, W    ; Trigger an update of TMR0H

    ; Blink the red LED with a period of 1.4 s.
    btfss   TMR0H, 7
    rcall   ledRedOff
    btfsc   TMR0H, 7
    rcall   ledRedOn

    goto    mainLoop

    end
If your P-Star has a PIC18F45K50, the code above will work as is, but you should change it to include p18f45k50.inc instead of p18f25k50.inc.
Where to find more information
For information about the instruction set, hardware peripherals, and registers on the PIC, see the PIC18F25K50/PIC18F45K50 datasheet.
For information about MPLAB X, you can find useful resources under the “Help” menu and in the “docs” directory inside your MPLAB X installation.
For information about MPASM, see its user’s guide, which is in the “mpasmx/docs” directory inside your MPLAB X installation.
If you have questions, you can post in Microchip’s MPASM forum or the Pololu Robotics Forum.
Related products


Home | Forum | Blog | Support | Ordering Information | Lists | Distributors | BIG Order Form | About | Contact
© 2001–2026 Pololu Corporation
