Support » Pololu P-Star User’s Guide »
11. Compiling a program with PICBASIC PRO
The P-Star is compatible with PICBASIC PRO, a BASIC language compiler from microEngineering Labs that runs on Microsoft Windows and targets PIC microcontrollers. This section explains how to compile a program and load it onto the P-Star using MicroCode Studio, the IDE that comes with PICBASIC PRO. PICBASIC PRO is not free, but there is a trial version that you can try for a limited number of days before deciding whether to purchase PICBASIC PRO.
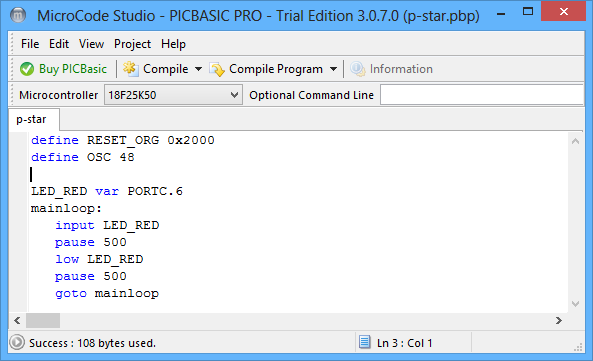 |
MicroCode Studio with a simple program for the P-Star 25K50 Micro. |
|---|
- Download and install PICBASIC PRO from the PICBASIC PRO Compiler Downloads page.
- Find “MicroCode Studio (MCSX)” in your Start Menu and run it.
- Locate the “Microcontroller” dropdown in the upper-left corner, and select the microcontroller on your P-Star, which is either “18F25K50” or “18F45K50”.
- Copy and paste this code into your program:
Define RESET_ORG 0x2000
Define OSC 48

LED_RED VAR PORTC.6
mainloop:
   Input LED_RED
   Pause 500
   Low LED_RED
   Pause 500
   Goto mainloop
- Click the “Compile” button to compile the program. If you have not saved yet, you will be prompted to choose a location to save the program. After the compilation succeeds, you will have a valid HEX file and you could load it onto the P-Star using the Pololu USB Bootloader Utility (p-load) from the command line. However, we recommend following the instructions below which explain how to integrate p-load with MicroCode Studio so you can load your program onto the P-Star without leaving the IDE.
- Locate the “Compile Program” toolbar button and open its menu by clicking the triangle to its right. If you see p-load as an option in this list, then you have probably done these steps before and can skip to step 13.
- Select “Install New Programmer…”. In the dialog that opens, select “Create a custom programmer entry” and click “Next”.
- For the “Display Name”, enter “p-load”. Click “Next”.
- For the “Programmer Filename”, enter “p-load.exe”. Click “Next”.
- Click the “Find Manually…” button and select the p-load “bin” folder. If you installed p-load in the default location, the bin folder can be found at “C:\Program Files (x86)\Pololu\USB Bootloader Utility\bin”. Click “Next”.
- For the “Parameters”, enter the following line:
--pause-on-error -w "$hex-filename$"
- Click “Finished” to finish adding the new programmer, and click “OK” to exit the parent dialog box.
- Open the menu for the “Compile Program” toolbar button again to make sure that “p-load” is checked.
- Make sure that the P-Star is in bootloader mode as described in Section 5.2. The yellow LED should be on and the green LED should be showing a double-blink pattern.
- Click the “Compile Program” button. This compiles the program and runs p-load to load it onto the P-Star.
You should briefly see a window that shows the output from p-load. If everything worked, then the P-Star’s red LED should now be blinking with a period of one second.
Related products


Home | Forum | Blog | Support | Ordering Information | Lists | Distributors | BIG Order Form | About | Contact
© 2001–2026 Pololu Corporation
