Support » Pololu Wixel User’s Guide » 3. Getting Started »
3.d. Loading an Example App
When you first get your Wixel it will have no application loaded. To make your Wixel do something useful, you must load an app onto it. This section guides you through the steps needed to load an example application onto the Wixel using the Wixel Configuration Utility.
- Install the Wixel drivers and software by following the instructions in the preceding sections.
- Download the example application here: Example Blink LED App v1.0 (11k wxl). If you want to see the source code, it is in the Wixel SDK under
apps/example_blink_led. (See Section 10.a.) - Open the app in the Wixel Configuration Utility. To do this in Windows, you can simply double-click on the Wixel App (WXL) file. Alternatively, you can open the Wixel Configuration Utility, click the “Open…” button, and select the Wixel App file. In Windows, you can find the Wixel Configuration Utility in the Pololu folder in your Start Menu.
- Connect a Wixel to your computer via USB. You should see it appear in the “Wixels” list. If it does not appear, you might need to use a button or wire to get your Wixel into bootloader mode (see Section 5.c). At this point, your screen should look something like this:
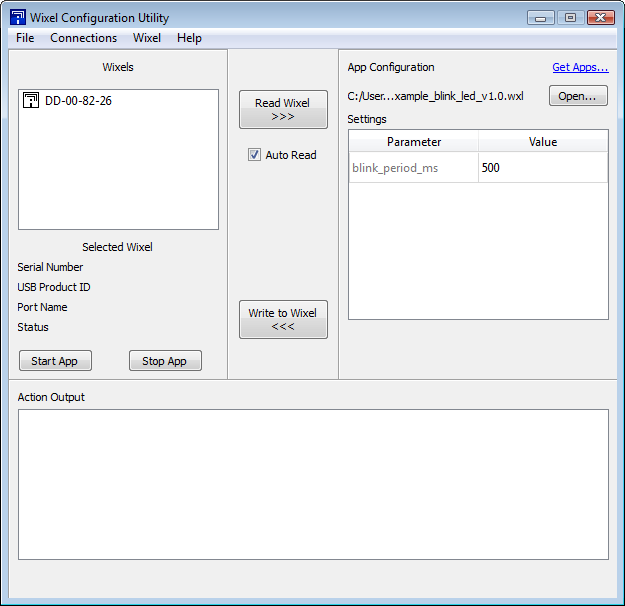 |
The Wixel Configuration Utility with the Example Blink LED App open. |
|---|
- Note that in the Wixels box, there is a list of all the Wixels connected to USB that the Wixel Configuration Utility can recognize. There is one Wixel connected, and its 32-bit serial number is displayed in the list. Also note that in the App Configuration box, we have opened the example_blink_led_v1.0.wxl app. This app has one parameter, blink_period_ms, and it is currently set to 500 (the default).
- Select the Wixel by left-clicking on its entry in the Wixels list. If you see a dialog box pop up, this is because the Wixel already has an application on it and the Auto Read checkbox is checked. Click the “Cancel” button in that dialog because we are not interested in reading the contents of the Wixel yet.
- Click the Write to Wixel button. This writes the currently open app and the settings to the selected Wixel, and then starts running the application.
- The example blink LED application should be running now. The Wixel’s yellow LED should be off, and the red LED should be blinking. If you are in Windows XP and this is the first time you have run an application on this Wixel, the Found New Hardware Wizard will pop up and you will have to follow steps 5–9 from Section 3.a to install the drivers properly. After the USB drivers are installed properly, the green LED should be on solid. Congratulations, you have successfully configured your Wixel!
- The speed of the blinking is determined by the blink_period_ms parameter. The units of this parameter are milliseconds (ms). Try changing blink_period_ms to 100 by double-clicking on the number and typing “100”. You can now write the new configuration to the Wixel by clicking the “Write to Wixel” button. After the writing is done and the app is running, you should see the red LED blinking 5 times faster than it was before.
- The Wixel Configuration Utility can also read the settings from the Wixel. To demonstrate this, close the Wixel Configuration Utility, reopen it, and select your Wixel. Since the Auto Read checkbox is checked by default, and there is an application on the Wixel, the Wixel Configuration Utility will attempt to read the Wixel’s settings. If you have not yet opened the correct app, a dialog box like the one below will pop up:
 |
If Auto Read is enabled when you select a Wixel with an app on it, then you might be prompted you to open the App File. |
|---|
- To read the settings from a Wixel, you will need to open the app that is currently on the Wixel. Click the “Open” button in the dialog, and select example_blink_led_v1.0.wxl.
It is necessary to open the app file that you originally loaded onto the Wixel because the file contains metadata required to interpret the settings contained in the Wixel’s flash memory. If you open a different app file, even a different version of the same app, your settings will likely be corrupted. In this case, a warning dialog box will pop up to warn you and give you some options. Since you still have the correct app file, you should not see that dialog now.
- After you open the Wixel App file, the Wixel Configuration Utility will read the Wixel and compare its contents to what is in the app. You will then see the Wixel’s settings displayed on the right: blink_period_ms should be 100. Note that the number 100 is displayed in bold. This is because it differs from the default setting, which is 500. You can reset it to the default at any time by right-clicking on the number and selecting “Reset to Default Value”.
After completing this tutorial you should be comfortable with writing apps to the Wixel and reading back the settings. This is all you need to know in order to configure your Wixels. When you load a real application, such as the Wireless Serial App, the only thing that will be different are the names and meanings of the parameters. To understand what the different parameters mean, refer to the documentation for your specific app.
Some apps might implement a non-standard USB interface (or no USB interface at all). In that case, they will not be recognized by the Wixel Configuration Utility while the app is running, so you will need to get them into bootloader mode manually (see Section 5.c and also the app’s documentation).


Home | Forum | Blog | Support | Ordering Information | Lists | Distributors | BIG Order Form | About | Contact
© 2001–2026 Pololu Corporation
