Support » Pololu Maestro Servo Controller User’s Guide » 3. Getting Started »
3.b. Installing Linux Drivers and Software
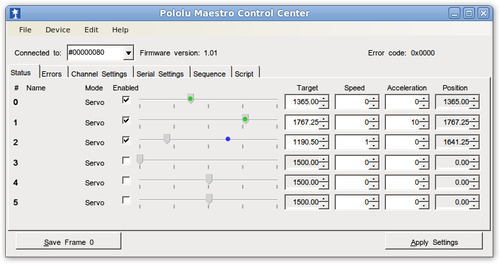 |
The Maestro Control Center running in Ubuntu Linux. |
|---|
You can download the Maestro Control Center and the Maestro command-line utility (UscCmd) for Linux here:
- Maestro Servo Controller Linux Software (127k gz)
Unzip the tar/gzip archive by running “tar -xzvf” followed by the name of the file. After following the instructions in README.txt, you can run the programs by executing mono ./MaestroControlCenter and mono ./UscCmd.
You can also download the C# source code of UscCmd as part of the Pololu USB Software Development Kit. Read README.txt in the SDK for more information.
The Maestro’s two virtual serial ports can be used in Linux without any special driver installation. The virtual serial ports are managed by the cdc-acm kernel module, whose source code you can find in your kernel’s source code drivers/usb/class/cdc-acm.c. When you connect the Maestro to the PC, the two virtual serial ports should appear as devices with names like /dev/ttyACM0 and /dev/ttyACM1 (the number depends on how many other ACM devices you have plugged in). The port with the lower number should be the Command Port, while the port with the higher number should be the TTL Serial Port. You can use any terminal program (such as kermit) to send and receive bytes on those ports.
Troubleshooting missing button text
You might encounter unlabeled buttons with no text on them while using the Maestro Control Center on Linux. This is a bug caused by one of the graphics libraries the Maestro Control Center indirectly uses on Linux.
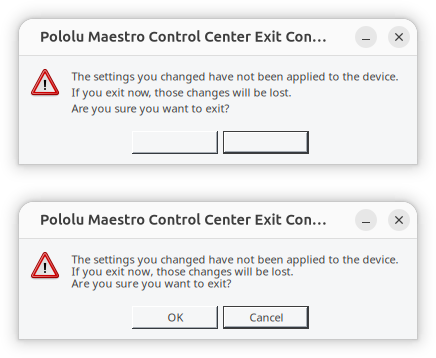 |
Maestro Control Center exit confirmation dialog with missing text (above) and with a fixed libgdiplus (below). |
|---|
If you want to fix this problem you can use our slightly-modified version of libgdiplus:
- Install the development dependencies for libgdiplus. On Ubuntu, the command to do this is:
sudo apt install git autoconf libtool automake build-essential \
  gettext libcairo2-dev libexif-dev libgif-dev libglib2.0-dev libtiff-dev
- Download our version of libgdiplus and get ready to build it by running these commands:
git clone https://github.com/pololu/libgdiplus
cd libgdiplus
./autogen.sh
The last command inspects your system, determines how to configure libgdiplus, and outputs a configuration summary that should look similar to this:* Installation prefix = /usr/local * Cairo = 1.18.4 (system) * Text = cairo * EXIF tags = yes * X11 = yes * Codecs supported: – TIFF: yes – JPEG: yes – GIF: yes – PNG: yesThe most important part of this output is summary isText = cairo, which means the library is correctly configured to use the cairo library on your system for rendering text instead of using pango. The Maestro Control Center also relies on X11 and JPEG support. - Build and install the library by running these commands:
make
sudo make install
- You need to configure the Mono runtime to use the newly-built library instead of the version installed by your system’s package manager. To do this, run
sudo nano /etc/mono/config, find the four lines that refer tolibgdiplus.so.0, and change them to refer to/usr/local/lib/libgdiplus.so.0. Those lines should look like this when you are done:<dllmap dll=“gdiplus” target=“/usr/local/lib/libgdiplus.so.0” os=“!windows”/> <dllmap dll=“gdiplus.dll” target=“/usr/local/lib/libgdiplus.so.0” os=“!windows”/> <dllmap dll=“gdi32” target=“/usr/local/lib/libgdiplus.so.0” os=“!windows”/> <dllmap dll=“gdi32.dll” target=“/usr/local/lib/libgdiplus.so.0” os=“!windows”/> - Save the configuration file and try running the Maestro Control Center again.
Troubleshooting display issues due to scaling
To support modern high-resolution displays, Linux desktop environments have a scaling option that attempts to increase the size of all applications by a percentage such as 125%, 150%, or 200%. On Ubuntu, you can find the scaling setting on the “Displays” screen in the “Settings” application. The Maestro Control Center works best at 100%. At other scaling settings, you are likely to experience issues with controls being mis-sized and text getting clipped. If you do not want to change your scaling to 100%, you can use the following steps to make the Maestro Control Center think it is running at 100% and have the scaling handled by your desktop’s window manager instead. This makes the Maestro Control Center appear blurry, but usable.
- Run
echo $XDG_SESSION_TYPEin a shell and make sure the result iswayland. For now, these instructions only work if your desktop uses Wayland. - Run
echo $XDG_CURRENT_DESKTOPin a shell and make sure the output containsGNOME. For now, these instructions only work if your desktop uses GNOME. - Run
xrdb -queryand note the reported value ofXft.dpi. If the DPI is 96, these instructions are not likely to do anything for you because X11 clients like the Maestro Control Center are already operating at 100% scaling. - Run
xlsclientsto see a list of the currently-open programs that are using X11 through Wayland. Unfortunately, these programs will likely be affected and look blurrier after you complete these steps. - Run
gsettings get org.gnome.mutter.wayland xwayland-scaling-factorto get the scale factor GNOME uses for Xwayland applications and take a note of the value it prints out (probably0.0, which means it automatically chooses the scaling factor). - Run
gsettings set org.gnome.mutter.wayland xwayland-scaling-factor 1.0to change the scaling to 100%. - Log out or restart your computer to make the new scaling factor take effect. Try running the Maestro Control Center again.
Troubleshooting “Gtk not found” warning
The Maestro Control Center uses Mono’s Windows Forms library, which uses native Linux libraries at run time. If MaestroControlCenter prints a warning message like
Gtk not found (missing LD_LIBRARY_PATH to libgtk-x11-2.0.so.0?), using built-in colorscheme
then install libgtk2.0-0.
Troubleshooting “Could not get XIM” warning
If you see “Could not get XIM”, install your desktop’s input method packages (for example ibus and im-config on Ubuntu) or run the program with X input methods disabled:
XMODIFIERS=@im=none mono ./MaestroControlCenter
Related products


Home | Forum | Blog | Support | Ordering Information | Lists | Distributors | BIG Order Form | About | Contact
© 2001–2026 Pololu Corporation