Support » Programming Orangutans and the 3pi Robot from the Arduino Environment »
4. Using the Arduino IDE: Blinking an LED
Now it’s time to take the Arduino IDE for a spin. Our first goal will be to load a simple LED-blinking sketch (Arduino program) onto our Orangutan or 3pi.
Open the Arduino IDE and create the following sketch:
/*
 * Blink
 *
 * The basic Arduino example, modified to work for Orangutans.
 * Turns on an LED for one second, then off for one second,
 * and so on...  We use pin 1 because Orangutans have an LED
 * on PD1, which corresponds to Arduino pin 1.
 *
 * http://www.arduino.cc/en/Tutorial/Blink
 */

int ledPin = 1;                 // LED connected to digital pin 1 (PD1) on Orangutans

void setup()                    // run once, when the sketch starts
{
  pinMode(ledPin, OUTPUT);      // sets the digital pin as output
}

void loop()                     // run over and over again
{
  digitalWrite(ledPin, HIGH);   // sets the LED on
  delay(1000);                  // waits for a second
  digitalWrite(ledPin, LOW);    // sets the LED off
  delay(1000);                  // waits for a second
}
Copy the above code into a new, blank sketch.
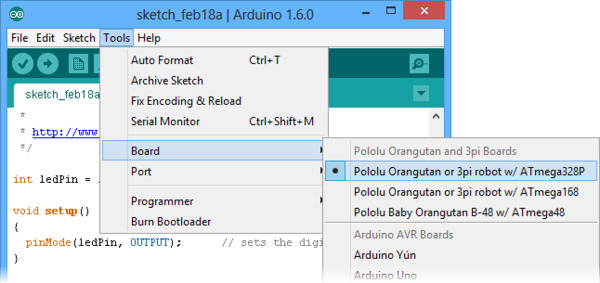
Select one of our specially-created boards using the Tools > Board menu:
 |
Select the programmer:
If you are using a Pololu USB AVR Programmer, select Atmel STK500 development board in the Programmer menu. Otherwise, consult the documentation of your programmer to find out which option to select.
Select the programmer’s serial port:
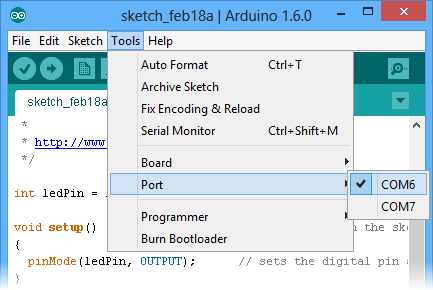 |
If you are using a Pololu USB AVR Programmer, make sure you have installed the proper drivers (see the programmer’s user’s guide) and have connected it to your computer. Once this is done, you should be able to see its COM port listed under the Tools > Port menu. If you are using Windows and do not know which COM port your programmer is on, you can determine this by bringing up your computer’s Device Manager and expanding the Ports (COM & LPT) list. The programmer provides two virtual serial ports, and the correct port to use is the one with “Programming Port” in its name.
Program your Orangutan or 3pi with the sketch:
Make sure your Orangutan or 3pi is connected to power and turned on. The power LED on the board should be on.
Connect your programmer to the Orangutan or 3pi via its six-pin ISP header, making sure that pin 1 of the programmer lines up with pin 1 of the target’s programming header. The Orangutan SV-xx8, Orangutan LV-168, and 3pi each have a shrouded header that will enforce correct pin orientation, but the Baby Orangutan B does not. Pin 1 on the Baby Orangutan is marked by a copper arrow on the PCB and pin 1 on our USB AVR Programmer is marked by a raised plastic triangle on the IDC connector.
With the programmer connected to both your computer and your Orangutan or 3pi, select Upload using programmer from the Sketch menu or press Ctrl+Shift+U to compile the sketch and upload it to your target device. If everything has worked correctly, you should now see the target’s red user LED blinking on and off every second. Please note that if you are using a 3pi and have not yet soldered in the optional through-hole LEDs, you will need to look at the underside of the robot to see the flashing LED.
Related products


Home | Forum | Blog | Support | Ordering Information | Lists | Distributors | BIG Order Form | About | Contact
© 2001–2026 Pololu Corporation
