Pololu Blog »
Jon's dead reckoning robot
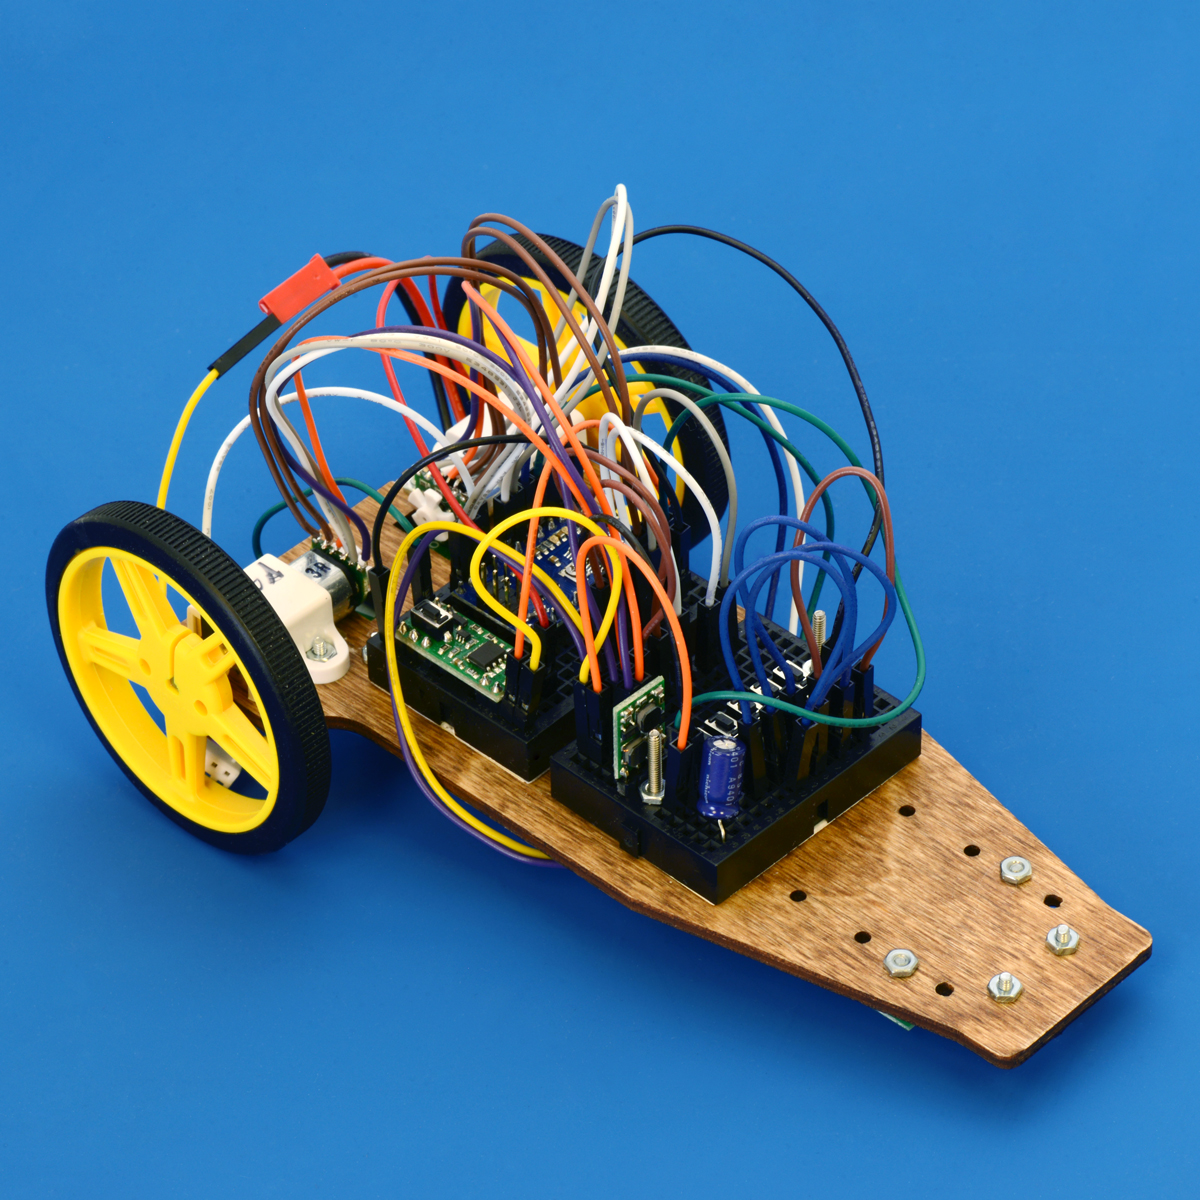 |
Like other engineers here, I made a robot for the LVBots dead reckoning competition. Before I knew about this competition, I hadn’t made a successful dead reckoning robot. By the end of this competition, I still hadn’t made a successful dead reckoning robot. However, I did learn more about myself and a little more about line following. This post describes my robot, Usain Volt, and details some of what I was thinking when I designed it. If you want to know more about the competition rules and how it was judged, see the LVBots dead reckoning rules (23k pdf).
The first part of the dead reckoning competition is basically a line following exercise. Not having made a successful line follower before, it seemed reasonable to base my entire robot off of the 3pi, which is a great starting platform for line following. My plan was to closely mimic the 3pi’s hardware, get a working robot, then make progressive hardware upgrades to make Usain Volt fast enough to resemble his namesake. I accomplished just about half of that.
Legacy hardware
The 3pi robot uses an ATmega328 microcontroller, TB6612FNG dual motor driver, two 30:1 low power micro metal gearmotors, and five of the sensors used in our QTR-1RC. Usain Volt uses a version of those 30:1 gearmotors with an extended motor shaft, so that it can be used with our 5V optical encoder kit. Instead of five QTR-1RC sensors, I opted to use a single QTR-3RC, since I was convinced that I only needed three sensors to detect the line. The bot is controlled by a Baby Orangutan robot controller, which features both the ATmega328 and TB6612FNG on a single convenient board. The controller is set up to read output from the QTR sensors and encoder counts.
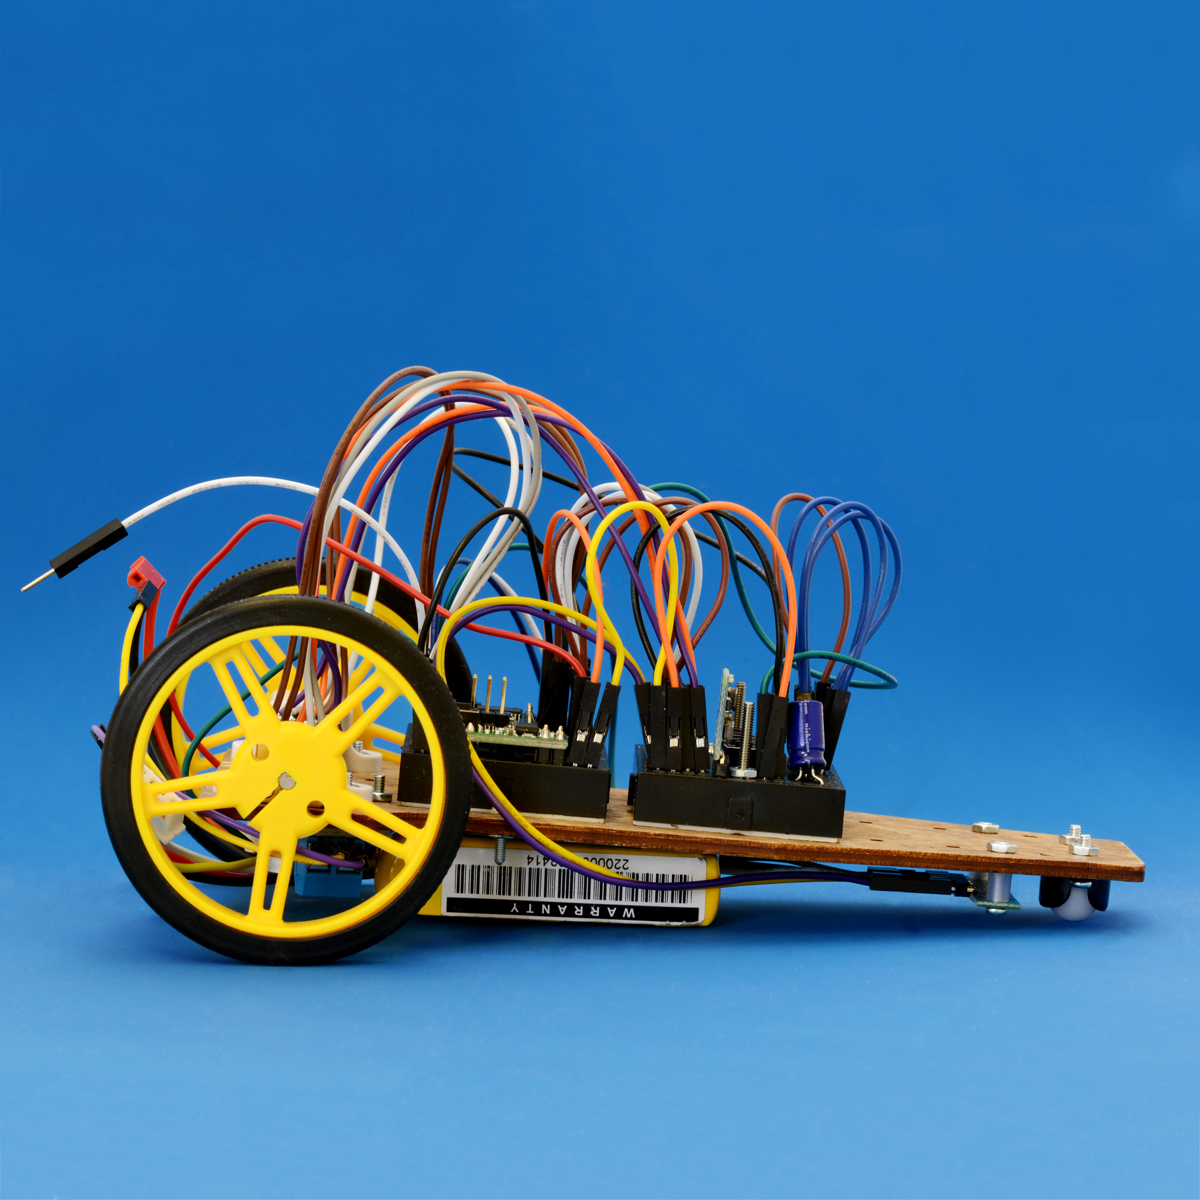 |
Don’t worry, Usain Volt’s battery does not sink lower than the bottom of the wheels and caster. |
|---|
Every robot a snowflake
While I did stick with most of the same hardware the 3pi uses, I also allowed myself a little flexibility by gearing my design towards a more prototyping-friendly robot. I knew from previous builds that I could save construction time by using solderless breadboards to make my connections. So, my robot’s chassis was designed to have space for at least two 170-point breadboards in addition to mounting the legacy hardware. Because I had yet to solidify my choice of power source, I had the chassis laser cut from plywood (⅛"), which allowed me to hand drill additional mounting holes with ease. You can see in this bottom view of Usain Volt that I ended up using this to my advantage to mount the main regulator:
 |
It’s not ideal, but the wires can be forced into a position where they do not interfere with the rotation of the wheels. |
|---|
I found our step-up/step-down voltage regulators particularly useful when selecting a power source for my robot – the wide range of input voltages both above and below my desired output voltage (6V) lifted the constraints on the nominal voltage of my power source.
I use our pushbutton power switch to turn the robot on and off, and added several pushbuttons while tuning my PID controller so I could more or less tune “in the field”, and not have to run back to my office, connect the bot to my computer, and upload a different value each time I wanted to make a slight adjustment. I used our 5V regulator to supply a constant voltage to the QTR-RC sensors. Instead of mounting a battery holder and alkaline batteries, I used a lightweight 2S LiPo and double sided tape. I also opted for a slightly larger diameter wheel than the one used on the 3pi, which would allow it to rotate faster when supplied with the same voltage. Bonus: those wheels are black and yellow, which are definitely appropriate colors for Usain Volt.
After construction, I had left only time enough to tune Usain Volt’s PID controller so it could follow a line. Unfortunately, I was not able to begin any real dead reckoning coding, so you won’t be able to see my robot in the dead reckoning video.
Future plans
I do plan to eventually make my robot capable of completing our dead reckoning course. After that, I want to upgrade the gearmotors and motor driver for faster completion times. Also, sometime in the near future, I plan to recut the chassis in ⅛" acrylic – green, of course.
Related products


-

New product: 130-size, high-power brushed DC motor
- 3 April 2014These new 130-size motors are great for applications that require a lot of power in a small package. They are a generic alternative the Solarbotics...
2 comments


I had not thought of that. It sounds like a fun alternative configuration (the movement would be fun to watch!), but I suspect that there might not be enough time for the microcontroller to react to the readings from the QTR sensors if the array is placed directly between the drive wheels. In fact, I think it's better to have the sensor as far forward on your robot as it can go, though the length of your robot should probably be limited by the smallest turn radius in the line following course.
I should also point out that I based my chassis off of this line following robot.
It's pretty quick, follows the line well, and has very far forward line sensors. So, I suspect that while moving the location of that sensor array back toward the drive wheels now might make it easier for my current code to follow the line, I should probably just change up my code to line follow better.
-Jon
Post a comment


Home | Forum | Blog | Support | Ordering Information | Lists | Distributors | BIG Order Form | About | Contact
© 2001–2026 Pololu Corporation
