Support »
Controlling devices with the serial port and writing graphical interfaces
View document on multiple pages.
You can also view this document as a printable PDF.
- 1. Introduction
- 2. Materials
- 3. Installing Cygwin (Windows only)
- 4. Writing a program in C
- 5. Adding a GUI with Tcl/Tk
- 6. Compiling and running the program
- 7. Conclusion
1. Introduction
The serial port found on the back of most PCs is extremely useful
for robotics work. A variety of devices are configured to communicate
via a serial port, and you can use it to debug or control your own
projects. This project shows you how to use free tools to write
programs that use your serial port. We’ll show you how to make your
programs compatible with both Microsoft Windows and Linux, and
present a method for creating simple graphical interfaces. We will
assume you know a bit of C and are comfortable installing software on
your computer. Knowing Linux commands like cd,
mkdir, and ls will also be helpful.
2. Materials
Here’s what you’ll need to follow along:
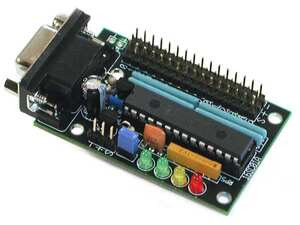
- Pololu 16-servo controller (that’s what we’ll use; you could use any other serial device)
- A PC with a serial port running Microsoft Windows or Linux. If your PC doesn’t have a serial port, USB serial port adapters are available for just a few dollars.
- A serial cable to connect your device to the computer. For most devices, a “modem” or “extension” cable is what you want. Don’t get a “null modem” or “crossover” cable unless you know you need it.
3. Installing Cygwin (Windows only)
Cygwin is a set of programs for Windows that gives you an environment very similar to linux. To install it, go to the Cygwin website and download the installer by clicking “Install cygwin now”. You will get a program called setup.exe. Run it, answer some basic questions, and you will be presented with a list of options. Make sure that the following packages are selected for “install” (click once on the name of the package and wait a second):
- Under the Devel section: “gcc” and “make”
- Under the X11 section: xorg-x11-devel
- Under the Libs Section: tcltk
Finish installing all of the software, and run the Cygwin shell. To make sure you have everything, try running “gcc”, “make”, and “wish”. Messages other than “no such command” should appear.
All of the cygwin files can be found from Windows in the default directory C:\CYGWIN. Your personal files will be in C:\CYGWIN\HOME\USER, where USER is your username. Take a look around the Cygwin system now.
4. Writing a program in C
First we’ll check that your C compiler is working fine. Open your
favorite editor and make a file called hello.c with the
following contents:
main() {
  printf("hello, world!\n");
}
Now, from the same directory in the Cygwin/Linux shell, run the command
make hello
A program called hello (or hello.exe) should
automatically be created. Run it by typing hello, and
your message should be displayed.
If that worked, download ssc-tester.zip (3k zip), our sample project, and take a look at it. The program is divided into three main files:
*ssc.c contains functions for communicating over the
serial port
*ssctester.c contains “wrappers” for those functions
that allow them to be accessed from the GUI
*ssc-tester.tcl is the GUI. It is a Tcl/Tk script
that displays a window with some sliders and buttons.
We’ll discuss in detail what is going on here before we run the
program, starting with ssc.c. When the program starts,
the first thing to run is the function connectSsc, which
opens a connection to the serial port with the line
s->fd = open("/dev/ttyS1", O_RDWR | O_NOCTTY);
The port /dev/ttyS1 in linux is called COM2 in Windows -
if you would like to use COM1 instead, change it to
/dev/ttyS0. One problem with the serial port is that it
can be very hard to tell the difference between a malfunctioning
device and an incorrect port number, so make sure you choose the right
one now. The cryptic commands below,
  cfsetispeed(&options, B9600);
  cfsetospeed(&options, B9600);

  options.c_cflag |= (CLOCAL | CREAD); /* enable */

  options.c_cflag &= ~PARENB; /* 8N1 */
  options.c_cflag &= ~CSTOPB;
  options.c_cflag &= ~CSIZE;
  options.c_cflag |= CS8;
simply set up the serial parameters. You’ll need to pick the right ones for your device, but for most devices, 8N1 is what you need. Make sure to set the right baud rate in the first two lines. A common option that must be set is flow control — for Xon/Xoff (software flow control) add this line:
options.c_iflag |= (IXON | IXOFF | IXANY); /* Xon/Xoff */
and for RTS/CTS (hardware flow control) you will need this one:
options.c_iflag |= CRTSCTS; /* RTS/CTS */
Devices might use any combination of the two types of flow control - refer to the device manual for details, and be prepared to experiment. For devices that can be controlled with textual commands, a terminal emulator such as Hyperterm (Windows) or Minicom (Linux) might be useful, because it will let you select communication parameters on the fly.
The actual commands are sent to the serial port in the
sendCommand function. Refer to the user’s guide for the
16-servo controller if you want
to understand exactly what we’re sending here. The important thing is
that you need to use the write command to write any data
out to the port, like this:
write(s->fd,buf,5);
In this case, buf is a single command containing five
bytes. The third argument to write specifies the number
of bytes, so make sure to adapt this correctly to your own device.
Opening the port and writing data to it is the tricky part — once you
understand that, go on to the next section and read about creating a
GUI.
5. Adding a GUI with Tcl/Tk
Tcl/Tk is the most convenient way to create GUIs that will work on both Windows and Linux. Even if you only use one system, you will benefit from the fact that Tcl/Tk is quite easy to learn and used by a lot of people. The particular mix of Tcl/Tk and C that we recommend here was the best solution we found; if you know of other ways to do it, let us know!
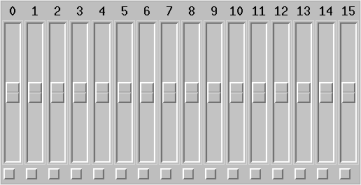
Now, take a look at ssc-tester.tcl. This program is very
simple: it contains a loop that runs 16 times to create sixteen
sliders, one for each of the servos that can be controlled by the
servo controller. The critical command is
    scale .servo$i.scale -width 20 -length 200 -orient vertical
      -from 500 -to 5500 -command "stepTo 0 $i " -showvalue 0
This creates a slider with values from 500 to 5500, so that whenever you adjust the slider, the command
stepTo 0 slider position
will be run, with slider and position replaced by
the slider number and position. This command is defined in ssctester.c by the line
Tcl_CreateObjCommand(interp, "stepTo", &stepToProc, NULL, NULL);
The arguments are interpreted by the C function
stepToProc and passed on to stepTo in
ssc.c, where they are translated into commands to be sent
to the serial port. When modifying the program for your own purposes,
you will need to find the documentation for both commands in the
Tcl/Tk language and special C functions used for interacting with
Tcl. The Tcl/Tk manual will probably be your most useful reference.
6. Compiling and running the program
 |
Instructions for compilation are defined in the Makefile.
Type make and all of the C files will be combined into a
shared object (or DLL) called ssctester.so. Since there
is no main function, this is not a program you can run by
yourself, just a library of functions that will be used by ssc-tester.tcl. That file is a script, which means that
it is interpreted on the fly and does not need to be compiled. To run
it, type
wish ssc-tester.tcl
and a window with 16 sliders should appear. Connect the servo controller and a servo, then try moving the sliders to see if it works!
7. Conclusion
A combination of C and Tcl/Tk is an easy and powerful way to make graphical controls for your devices. Tcl/Tk gives you a flexible set of commands for creating the graphical interface, while C lets you execute the low-level commands necessary to get at the serial port. This technique is good for making a wide variety of computer programs, for robotics and other things. Personally, we have been using four variations of it: the one you saw in this demo, programs for interfacing with a stepper motor controller and a nanometer-precision piezo controller, and even a jukebox for playing music from our mp3 collection! We hope you find it as useful as we have.


Home | Forum | Blog | Support | Ordering Information | Lists | Distributors | BIG Order Form | About | Contact
© 2001–2026 Pololu Corporation


