Support »
Sample Project: 3pi Wall Follower
View document on multiple pages.
You can also view this document as a printable PDF.
- 1. Introduction
- 2. Materials and Tools
- 3. Construction
- 4. Software
- 5. Suggested Improvements
- 6. Conclusion
1. Introduction
 |
3pi wall follower’s path around an irregularly shaped object. |
|---|
The 3pi robot is complete mobile platform designed to excel in line-following and maze-solving competitions. The 3pi has user accessible I/O lines that can be connected to different sensors to expand its behavior beyond line-following and maze-solving. This project shows just one possible configuration where two Sharp analog distance sensors are connected with minimal soldering. Many other sensors could be used to expand the 3pi: a radio-control receiver could make an RC 3pi gyro could enable precision spinning, a sonar range finder could improve the 3pi’s sensing range, and a digital distance sensor could offer speedy front obstacle detection!
Mounting two distance sensors as described in Section 3 and running the program detailed in Section 4 enables the 3pi to explore a room by following the wall and avoiding obstacles that it encounters. It tries to keep a safe distance from the wall or any other obstacles it sees on its left side and turns in place to the right if it detects an obstacle in directly in front of it. As an added safety precaution, every 15 seconds the robot tries to back up in case it has unknowingly gotten stuck while exploring. The figure above shows the path the 3pi wall follower might take around an irregularly shaped obstacle, and the video below shows the 3pi wall follower in action.
2. Materials and Tools
Beyond the Polou 3pi robot + USB programmer + cable combo, you will need a few other materials for this project. You only need the materials listed under the “required” section to make the wall follower work, but the optional headers make it easier to reconfigure your 3pi with other sensors later by allowing you to unplug your distance sensors.
Required
- 2 Sharp GP2Y0A21YK0F distance sensors
- 1 140-piece wire kit
- Double-sided foam tape
- a Soldering iron and solder
Optional
3. Construction
Begin by soldering the 2×7 female header where it fits between the 3pi’s gearmotors. Also solder the 1×2 female header into the VCC and GND on the front-right side of the 3pi—this header will be used to power one of your Sharp distance sensors. If you do not have the headers, you can still build a 3pi wall follower; you will need to solder the wires coming from the distance sensors directly to the PCB in the places where the female headers are inserted.
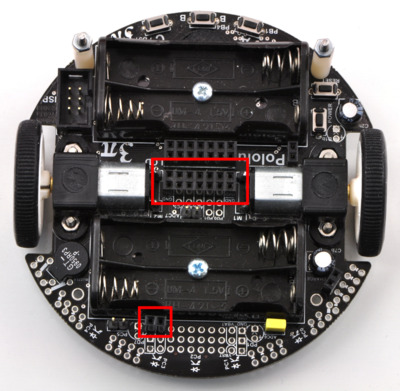 |
3pi with additional female headers soldered in place. |
|---|
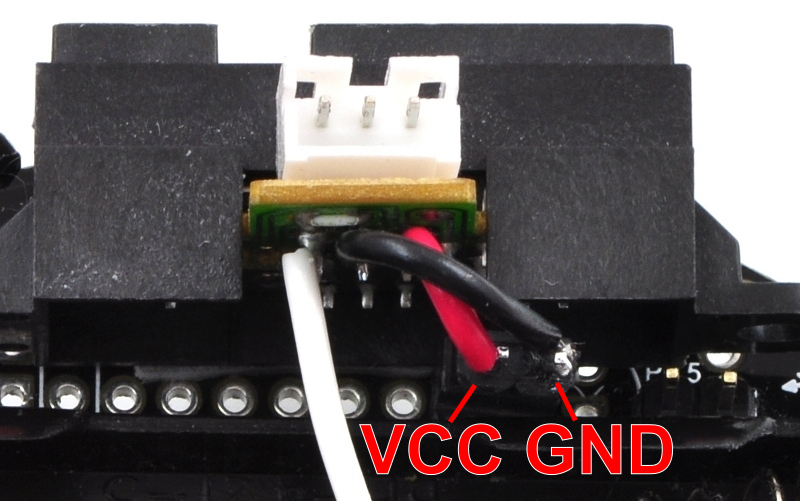
Prepare the two distance sensors by connecting a 3-pin female JST PH-style cables for Sharp distance sensors. If you do not have this cable, you can solder three wires to the three leads as shown in the picture, but the $0.99 cable makes things much easier. Break a 2×7 and a 1×2 male header off of the 2×40 male header. Solder the power and ground wires of one distance sensor to a 1×2 male header that will connect to the 1×2 female header. Solder the other distance sensor’s wires to the 2×7 block as shown in the picture below: the other distance sensor’s power and ground are connected to VCC and GND, and the signal wire of the distance sensors are connected to ADC7 and PC5. The front-left distance sensor’s signal wire should be connected to ADC7 (labeled AD7 on the 3pi silkscreen) and the front distance sensor’s signal wire should be connected to PC5.
|
|
|


Remove the ADC7 and PC5 jumpers and use double sided tape to secure the two distance sensors to the front of the 3pi as shown in the picture below. Mount the distance sensors with a slight upward angle so that they do not see the floor if the robot tips forward.
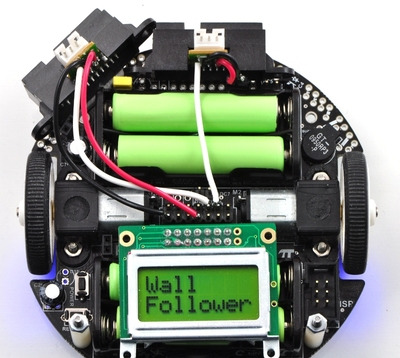 |
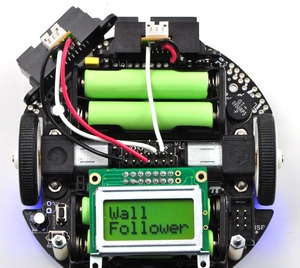
Fully constructed 3pi wall follower. |
|---|
Note: You must be careful if you also want to use the Pololu AVR library’s line sensor routines while your distance sensor is connected to PC5. If you want to use the 3pi line sensors, you should call pololu_3pi_init_disable_emitter_pin as described in Section 19 of the Pololu AVR Library Command Reference to disable the library’s control of PC5. Otherwise, even with the PC5 jumper disconnected, the Pololu AVR library’s line sensor routines will attempt to control the emitters by driving PC5 high for the duration of the sensor read and then driving PC5 low. Alternatively, you can connect your distance sensor to ADC6 instead of PC5.
4. Software
Insert fresh batteries into your 3pi and use an AVR ISP programmer (like our USB AVR programmer) to program your 3pi with the following code. For information on programming your 3pi please visit the programming your 3pi section of the 3pi robot user’s guide.
/*
 * 3pi-wall-follower - demo code for the Pololu 3pi Robot
 *
 * If two Sharp distance sensors ( http://www.pololu.com/catalog/product/136 )
 * are installed, this code will allow a 3pi to explore its environment by
 * following objects it finds on its left side.
 *
 * http://www.pololu.com
 * http://forum.pololu.com
 *
 */

// The 3pi include file must be at the beginning of any program that
// uses the Pololu AVR library and 3pi.
#include <pololu/3pi.h>

// This include file allows data to be stored in program space.  The
// ATmegaxx8 has 16x more flash than RAM, so large
// pieces of static data should be stored in program space.
#include <avr/pgmspace.h>

// Introductory messages.  The "PROGMEM" identifier causes the data to
// go into program space.
const char welcome_line1[] PROGMEM = " Pololu";
const char welcome_line2[] PROGMEM = "3\xf7 Robot";
const char name_line1[] PROGMEM = "Wall";
const char name_line2[] PROGMEM = "Follower";

// A couple of simple tunes, stored in program space.
const char welcome[] PROGMEM = ">g32>>c32";
const char go[]      PROGMEM = "L16 cdegreg4";

// Refresh the LCD display every tenth of a second.
const int display_interval_ms = 100;

#define MS_ELAPSED_IS(n) (get_ms() % n == 0)
#define TIME_TO_DISPLAY (MS_ELAPSED_IS(display_interval_ms))

void initialize()
{
        // Set PC5 as an input with internal pull-up disabled
        DDRC  &= ~(1<< PORTC5);
        PORTC &= ~(1<< PORTC5);

        // Play welcome music and display a message
        print_from_program_space(welcome_line1);
        lcd_goto_xy(0,1);
        print_from_program_space(welcome_line2);
        play_from_program_space(welcome);
        delay_ms(1000);

        clear();
        print_from_program_space(name_line1);
        lcd_goto_xy(0,1);
        print_from_program_space(name_line2);
        delay_ms(1000);

        // Display battery voltage and wait for button press
        while(!button_is_pressed(BUTTON_B))
        {
                clear();
                print_long(read_battery_millivolts());
                print("mV");
                lcd_goto_xy(0,1);
                print("Press B");
                delay_ms(100);
        }

        // Always wait for the button to be released so that 3pi doesn't
        // start moving until your hand is away from it.
        wait_for_button_release(BUTTON_B);
        clear();
        print("Go!");

        // Play music and wait for it to finish before we start driving.
        play_from_program_space(go);
        while(is_playing());
}

void back_up()
{
        if (TIME_TO_DISPLAY)
        {
                clear();
                lcd_goto_xy(0,0);
                print("Backing");
                lcd_goto_xy(0,1);
                print("Up");
        }

        // Back up slightly to the left
        set_motors(-50,-90);
}

void turn_in_place() {
        if (TIME_TO_DISPLAY) {
                clear();
                lcd_goto_xy(0,0);
                print("Front");
                lcd_goto_xy(0,1);
                print("Obstacle");
        }

        // Turn to the right in place
        set_motors(50, -50);
}

int main()
{
        // set up the 3pi
        initialize();

        int last_proximity    = 0;
        const int base_speed  = 200;
        const int set_point   = 100;

        // This is the "main loop" - it will run forever.
        while(1)
        {
                // In case it gets stuck: for 1 second every 15 seconds back up
                if (get_ms() % 15000 > 14000) {
                        back_up();
                        continue;
                }

                // If something is directly in front turn to the right in place
                int front_proximity = analog_read(5);
                if (front_proximity > 200) {
                        turn_in_place();
                        continue;
                }

                int proximity = analog_read(7); // 0 (far away) - 650 (close)
                int proportional = proximity - set_point;
                int derivative = proximity - last_proximity;

                // Proportional-Derivative Control Signal
                int pd = proportional / 3 + derivative * 20;

                int left_set  = base_speed + pd;
                int right_set = base_speed - pd;

                set_motors(left_set, right_set);

                if (TIME_TO_DISPLAY) {
                        clear();
                        lcd_goto_xy(0,0);
                        print_long(proximity);

                        lcd_goto_xy(5,0);
                        print_long(pd);

                        lcd_goto_xy(0,1);
                        print_long(left_set);
                        lcd_goto_xy(4,1);
                        print_long(right_set);
                }

                last_proximity = proximity; // remember last proximity for derivative
        }

        // This part of the code is never reached.  A robot should
        // never reach the end of its program, or unpredictable behavior
        // will result as random code starts getting executed.  If you
        // really want to stop all actions at some point, set your motors
        // to 0,0 and run the following command to loop forever:
        //
        // while(1);
}
5. Suggested Improvements
- The female headers you soldered into your 3pi make it easy to plug in additional sensors. You can use the procedure here to be creative and plug in various analog and digital sensors.
- The GP2Y0A21YK0F distance sensors have a minimum detection range which sometimes allows the wall follower to get caught on obstacles; once it gets too close to something, the sensor no longer detects that obstacle and the 3pi has no idea it’s stuck. By mounting the distance sensors in the back of the 3pi, pointed forward, you can ensure that most obstacles do not enter the sensor’s minimum range. Another way to avoid the minimum range problem is to replace the forward-looking sensor with one that has a smaller minimum range, such as the Pololu carrier with Sharp GP2Y0D810Z0F digital distance sensor 10cm.
- You might consider putting a large (≥10 uF) capacitor between power and ground next to each sensor as recommended by the sensor’s datasheet . The Sharp distance sensors tend to draw current in bursts, which can introduce noise to the system’s power bus, especially if there are multiple Sharp sensors in the system. You could also consider powering the sensors directly from the battery voltage so long as you can be sure the battery voltage is between 4.5 and 5.5 V; the 3pi’s voltage regulator will generally protect the logic voltage from noise the sensors introduce on the battery side.
6. Conclusion
With the addition of two distance sensors and some simple code, the 3pi can be altered to navigate its environment while avoiding obstacles. We encourage you to try to improve upon this project by adding more sensors or even by merely enhancing the code. For example, you can try racing multiple 3pis around the same obstacle course to see whose version of the program works the best.
Please join us on our robotics forum to ask questions, give feedback, or share your 3pi projects. We would love to hear about your experiences implementing this project on your own 3pi, and we would be delighted to see any improvements or alterations you make!
Related products


Home | Forum | Blog | Support | Ordering Information | Lists | Distributors | BIG Order Form | About | Contact
© 2001–2026 Pololu Corporation
