Support »
Orangutan X2 Command Documentation v1.01
View document on multiple pages.
You can also view this document as a printable PDF.
- 1. Overview
- 2. ATmega644 SPI Configuration
- 3. Low-Level SPI Commands
- 3.a. Motor Commands
- 3.a.01. Command 214: Set Motor Mode
- 3.a.02. Command 128: Independent Motor Brake (inB = inA)
- 3.a.03. Command 136: Independent Motor Drive (inB = ~inA)
- 3.a.04. Command 232: Independent Motor Drive with Acceleration (inB = ~inA)
- 3.a.05. Command 144: Joint Motor Operation (inA1 = inB1 = in1; inA2 = inB2 = in2)
- 3.a.06. Command 228: Joint Motor Drive with Acceleration (in2 = ~in1)
- 3.a.07. Command 208: Set Acceleration
- 3.a.08. Command 188: Set Brake Duration
- 3.a.09. Command 212: Set Number of Current Sense Samples in Averages
- 3.a.10. Command 192: Set Current Limit
- 3.a.11. Command 210: Set Motor PWM Frequencies
- 3.a.12. Command 216: Get Average Motor Current
- 3.b. Buzzer Commands
- 3.c. UART Commands
- 3.d. Miscellaneous Commands
- 4. Attention and SPI Pins
- 5. ATmega168's EEPROM Addresses
1. Overview
Note: As of October 25, 2010, all Orangutan X2 versions are shipping with programmable ATmega1284P microcontrollers instead of the ATmega644P included on older units, and the auxiliary microcontroller is now an ATmega328P instead of an ATmega168. The ATmega1284P has 128 KB of program memory, 16 KB of RAM, and 4 KB of EEPROM, and it offers an additional 16-bit timer (TIMER3). If you have a new Orangutan X2, treat all “mega644” references in this document as “mega1284” references.
The Orangutan X2 motor drivers, buzzer, and USB-to-serial interface are controlled by the auxiliary ATmega168 microcontroller, which is connected to the ATmega644 user controller via the Serial Peripheral Interface (SPI), a synchronous serial protocol for which the mega644 has a dedicated hardware module. Once the SPI module is configured correctly, the mega644 can invoke mega168 functions by sending command packets consisting of one command byte followed by zero or more data bytes. Command bytes always have an MSB of one while data bytes always have an MSB of zero.
This document explains in great detail the low-level SPI commands used to communicate with the auxiliary mega168. If you want to get started quickly with your Orangutan X2, you can bypass this detailed documentation and instead use our high-level C wrapper functions (12k zip) of these low-level commands. The file SPI.h contains the function prototypes of the wrappers, along with some convenient #defines; the file SPI.c contains the commented implementations of the wrappers. By including SPI.h in your project, you will be able to get up and running quickly with your Orangutan X2. We encourage you to modify these high-level wrapper functions to fit your specific needs.
Note: Before you can call any of the wrapper functions in SPI.c, you must initialize the mega644’s SPI hardware module by calling SPIInit(). For examples of how to use these wrapper functions in your Orangutan X2 projects, please see the sample AVR Studio project files linked from the various Orangutan X2 pages.
2. ATmega644 SPI Configuration
The mega644 SPI module should be configured as follows:
- SPI enabled
- MSB first
- master mode
- clock polarity 0 (clock line low when idle)
- clock phase 0 (sample on leading ege)
- Maximum frequency: 2.5 MHz (clock/8)
If you have the latest WinAVR installed (version 20070525 at the time this was written), the following C code will set up the SPI module, assuming you have your device set as atmega644. If you are using an older version of WinAVR, you will need to add zeroes to the ends of all of the SPI register/bit names (e.g. change SPCR to SPCR0, SPSR to SPSR0, SPE to SPE0, etc).
#include <avr/io.h>

// global flag used to help us track when an SPI transmission is in progress
unsigned char SPITransmitting;

void SPIInit()
{
    // make the MOSI, SCK, and SS pins outputs
    DDRB |= ( 1 << PB5 ) | ( 1 << PB7 ) | ( 1 << PB4 );

    // make sure the MISO pin is input
    DDRB &= ~( 1 << PB6 );

    // set up the SPI module: SPI enabled, MSB first, master mode,
    //  clock polarity and phase = 0, F_osc/8
    SPCR = ( 1 << SPE ) | ( 1 << MSTR ) | ( 1 << SPR0 );
    SPSR = 1;     // set double SPI speed for F_osc/8

    // the previous settings clear the SPIF bit of SPCR, so we use our global
    //  flag to indicate that this does not mean we are currently transmitting
    SPITransmitting = 0;
}
Most commands require data flow in only one direction: from the mega644 to the mega168. This can be achieved with an SPI transmit command.
void SPITransmit( unsigned char data )
{
    if ( SPITransmitting )                  // if we really are transmitting
        while ( ! ( SPSR & ( 1 << SPIF )))  //  wait for completion of
            ;                               //  previous transmission
    SPDR = data;                            // begin transmission
    SPITransmitting = 1;                    // flag transmission in progress
}
Reading data back from the mega168 is only slightly more complicated since we need to give the mega168 time (~3us) to prepare the data byte we’re requesting. Once it’s ready we then need to transmit an extra byte since every SPI transaction has data flow in both directions. As our byte is being sent to the mega168, the data we’re interested is being sent to us. At the end of the transmission, the value from the mega168 will be in the mega644’s SPI data register, SPDR. We need an extra function to perform our 3 microsecond delay, so we’ll include an example here:
static inline void delay_us(unsigned int microseconds) __attribute__((always_inline));
void delay_us(unsigned int microseconds)
{
    __asm__ volatile (
        "1: push r22"     "\n\t"
        "   ldi  r22, 4"  "\n\t"
        "2: dec  r22"     "\n\t"
        "   brne 2b"      "\n\t"
        "   pop  r22"     "\n\t"
        "   sbiw %0, 1"   "\n\t"
        "   brne 1b"
        : "=w" ( microseconds )
        : "0" ( microseconds )
    );
}


unsigned char SPIReceive( unsigned char data ) // data is often a junk byte (e.g. 0)
{
    if ( SPITransmitting )
        while ( ! ( SPSR & ( 1 << SPIF )))     // wait for completion of
            ;                                  //  previous transmission
    delay_us( 3 );                             // give the mega168 time to prepare
                                               //  return data
    SPDR = data;                               // start bidirectional transfer
    while ( ! ( SPSR & ( 1 << SPIF )))         // wait for completion of
        ;                                      //  transaction
    // reading SPCR and SPDR will clear SPIF, so we will use our global flag
    //  to indicate that this does not mean we are currently transmitting
    SPITransmitting = 0;
    return SPDR;
}
We can now put wrapper functions around these low-level SPI commands to communicate with the mega168. For instance, here is a command for setting motor 1:
void setMotor1( int speed )
{
    // first, we'll prepare our command byte

    unsigned char command;

    if ( speed > 255 )
        speed = 255;
    if ( speed < -255 )
        speed = -255;

    if ( speed >= 0 )
        command = 136;	// motor 1, forward
    else
    {
        command = 138;	// motor 1, reverse
        speed = -speed;
    }

    // the MSB of the speed gets tacked onto the command byte
    command |= ( (unsigned char) speed & 0x80 ) >> 7;

    // now, send the command
    SPITransmit( command );
    SPITransmit( (unsigned char) speed & 0x7F );
}
3. Low-Level SPI Commands
We will now elaborate on the low-level SPI commands.
Some commands produce immediate results (e.g. non-acceleration motor commands, all the read commands, buzzer off) independent of the state of the mega168’s main loop. Others queue up actions to be carried out by the appropriate handler in the mega168’s main loop (e.g. UART transmit, most buzzer commands, acceleration motor commands).
The SPI clock can run at up to 2.5 MHz, which corresponds to SPI byte rate of approximately 312 kHz. The mega168 is designed to be able to accept these bytes as quickly as you are able to send them without losing data or ignoring commands. However there are a few exceptions:
- If you are sending a command that will cause the mega168 to write to its EEPROM, you will be tying up the mega168’s main loop for approximately 3.4 ms per EEPROM write. You should not send another command that will cause an EEPROM write until after the previous write has finished. For example, do not stream “Store Note” commands to the mega168 any faster than one packet per 10.2 ms. You can send a command packet that does not cause an EEPROM write immediately following one that does, but realize that the various handlers in the mega168’s main loop will not get around to that command until after the EEPROM writes are finished. As such, we recommend that, if possible, you have the mega168 perform any necessary EEPROM writes during the initialization phase of your program rather than in the middle of some crucial, time-sensitive phase.
- If you are sending a read command, you must give the mega168 time to load the desired value into its SPI data register before initiating the SPI transmission that will transfer it to the mega644. The recommended protocol is to transmit the byte that will tell the mega168 what value is desired (usually this is just the command byte), wait for the transmission to complete, then wait for an additional 3us before transmitting another byte (usually this will be a junk data byte or a NULL command). As this last byte is transmitted over the SPI to the mega168, the desired value is transmitted over the SPI to the mega644. When transmission of this last byte is complete, the mega644’s SPI data register, SPDR, holds the requested value.
- It doesn’t make sense to stream some commands as quickly as possible to the mega168. For example, you can send PWM updates to the mega168 at 143 kHz, but given that the fastest PWM frequency you can use is ~20 kHz, such an update rate would be pointless.
In general, you rarely need to worry about having to insert delays between the bytes you’re transmitting over the SPI; it is up to you to decide what update rate makes the most sense for your particular application.
Note: “motor 1” corresponds to motor bit 0 and “motor 2” corresponds to motor bit 1.
3.a. Motor Commands
3.a.01. Command 214: Set Motor Mode
Effect: This setting determines whether the X2 is running in independent motor mode (i.e. controlling two PWM-driven motors independently) or in joint motor mode (wired to control only one motor using both drivers operating in unison). Independent-motor commands are not accepted when running in joint motor mode and joint-motor commands are not accepted when running in independent motor mode. Setting the mode to joint operation will synchronize the timers for the two PWMs and set them both based on the settings for motor 1. In general, joint-motor mode uses motor 1 settings only. The X2 defaults to independent motor mode (motor mode bit = 0) after each hardware reset, so this command really only needs to be sent at the beginning of your program if you wish to run in joint motor mode (motor mode bit = 1). This setting cannot be stored in EEPROM and hence to operate in joint mode the mega644 must always send this command after a hardware reset.
If you want to run your X2 in joint motor mode, you should connect one terminal of your motor to the two M1 outputs and the other terminal of your motor to the two M2 outputs.
It is important to note that current sensing is not possible in joint motor mode. The Set Current Limits command (192—Section 3.a.10) will have no effect in joint motor mode and the Get Average Motor Current command (216—Section 3.a.12) will not return anything meaningful.
Values sent: motor mode (1 bit)
command byte = 214 | motor mode bit
3.a.02. Command 128: Independent Motor Brake (inB = inA)
Effect: Causes the specified motor to immediately brake high (inA bit = 1) or low (inA bit = 0) with the desired PWM
Values sent: motor (1 bit), inA (1 bit), PWM (8 bits)
command byte = 128 | (motor bit << 2) | (inA bit << 1) | MSB of PWM
data byte = 7 lower bits of PWM byte
3.a.03. Command 136: Independent Motor Drive (inB = ~inA)
Effect: Causes the specified motor to immediately drive forward (inA bit = 0) or reverse (inA bit = 1) with the desired PWM
Values sent: motor (1 bit), inA (1 bit), PWM (8 bits)
command byte = 136 | (motor bit << 2) | (inA bit << 1) | MSB of PWM
data byte = 7 lower bits of PWM byte
3.a.04. Command 232: Independent Motor Drive with Acceleration (inB = ~inA)
Effect: Causes the specified motor to transition from its current direction and PWM to the desired direction PWM at a rate determined by its corresponding acceleration setting. If the desired motor direction (forward for inA = 0 and reverse for inA = 1) is the same as the current direction and the desired PWM is less than the current PWM, the PWM will be set directly to the desired value during the next PWM-update phase of the mega168 main loop (sometime in the next 10ms). In short, this command will not produce artifical deceleration to slow a motor. The only time the acceleration comes into play is when the PWM is increasing in a specific direction. If this command results in a change of direction, the motor is first stopped by braking low at 100% duty cycle for a duration that can be set using command 188 (Section 3.a.08). The PWM is then linearly incremented from zero to the desired PWM in the desired direction based on the acceleration setting, which can be set using command 208 (Section 3.a.07). Acceleration updates to the PWM are performed 100 times per second if possible. It is important to note that acceleration timing is done using the motor 1 PWM timer, so decreasing motor 1’s PWM frequency below 100Hz will decrease the acceleration update rate.
Values sent: motor (1 bit), inA (1 bit), PWM (8 bits)
command byte = 232 | (motor bit << 2) | (inA bit << 1) | MSB of PWM
data byte = 7 lower bits of PWM byte
3.a.05. Command 144: Joint Motor Operation (inA1 = inB1 = in1; inA2 = inB2 = in2)
Effect: Use dual motor drivers together as a single, more powerful motor driver. The settings of in1 and in2 determine if the effect is brake low, forward, or reverse at thedesired PWM. This command sets motor to the specified state immediately. It is not possible to brake high in joint motor mode. It is also not possible to take advantage of current-sensing while in joint motor mode. Joint motor control works by PWMing the low output side while holding the other side constantly high. Here is how it performs the following actions:
- Joint brake (in1 = in2): both H-bridges alternate between high impedance and driving low at the same synchronized duty cycle.
- Joint “forward” (in1 = 0, in2 = 1): H-bridge 1 alternates between high impedance and driving low while H-bridge 2 drives high.
- Joint “reverse” (in1 = 1, in2 = 0): H-bridge 2 alternates between high impedance and driving low while H-bridge 1 drives high.
The red/green LEDs on the daughter motor-driver board will not function in joint motor mode, nor will current-sensing. To run your X2 in joint motor mode, you should connect one side of your motor to the two M1 outputs and the other side of your motor to the two M2 outputs.
Values sent: in1 (1 bit), in2 (1 bit), PWM (8 bits)
command byte = 144 | (in1 bit << 2) | (in2 bit << 1) | MSB of PWM
data byte = 7 lower bits of PWM byte
3.a.06. Command 228: Joint Motor Drive with Acceleration (in2 = ~in1)
Effect: See “Independent Motor Drive with Acceleration” (Section 3.a.04) command. Joint Motor Drive uses the dual motor drivers together as a single, more powerful motor driver. When operating in joint motor mode, settings for operation are determined by “motor 1” (motor bit = 0) settings while “motor 2” settings are ignored.
Values sent: in1 (1 bit), PWM (8 bits)
command byte = 228 + (in1 bit << 1) + MSB of PWM
data byte = 7 lower bits of PWM byte
3.a.07. Command 208: Set Acceleration
Effect: Sets for the specified motor the acceleration used by the motor acceleration commands 228 (Section 3.a.06) and 232 (Section 3.a.04). While accelerating, the net effect is that the PWM is incremented by the acceleration value every 100 ms. In reality, the updates will usually be increments of the one tenth the acceleration value applied every 10 ms. The acceleration value for each motor is specified by a seven-bit number and will change the duty cycle twice as quickly in seven-bit PWM mode as in eight-bit PWM mode. An acceleration value of zero is treated as infinite acceleration and will simply set the PWM equal to the target PWM when the motor-handling portion of the mega168’s main loop is executed sometime in the next 10ms.
This command does not save the acceleration values to EEPROM, however they can be saved by issuing separate EEPROM-write commands (240—Section 3.d.02) that store the values at the appropriate addresses (9 for motor 1, 10 for motor 2). It is possible to safely store 8-bit values at these location if you need even higher accelerations than 127.
Values sent: motor acceleration (7 bits), motor (1 bit)
command byte = 208 | motor bit
data byte = 7-bit acceleration (MSB always zero)
3.a.08. Command 188: Set Brake Duration
Effect: Sets the duration the specified motor spends braking low at 100% duty cycle when issued an acceleration command (228—Section 3.a.06 or 232—Section 3.a.04) that results in a change of direction. The brake duration value is in tens of milliseconds, so a value of 1 will result in a brake duration of 10 ms and a value of 127 will result in a brake duration of 1.27 seconds. A brake duration value of 0 causes the motor to switch direction with no braking in between. Brake duration is a seven-bit value.
This command does not save the brake duration value to EEPROM, however it can be saved by issuing a separate EEPROM-write command (240—Section 3.d.02) that stores the value at the appropriate address (11 for motor 1, 12 for motor 2). It is possible to safely store 8-bit values at these location if you need longer brake durations than 1.27 seconds.
Note: this command is bugged in firmware version 1.00 and has no effect, but it has been fixed in version 1.01.
Values sent: motor (1 bit), brake duration (7 bits)
command byte = 188 | (motor bit << 1)
data byte = 7-bit brake duration (MSB always zero)
3.a.09. Command 212: Set Number of Current Sense Samples in Averages
Effect: This setting determines how many current sense samples will be in each motor’s current average. These averages are what the Get Currents command (216—Section 3.a.12)) returns. Each motor’s current average is a running average that is updated every other ADC conversion. The ADC can perform conversions at approximately 10 kHz, which means each motor’s current average is updated at approximately 5 kHz. The previous X samples are stored in memory, and the average returned is the average of those X most recent samples. This setting determines the value of X. The values are sent as three-bit, base-two exponents, meaning that the largest sample size allowed per average is 27 (128) while the smallest is 20 (1).
It is important to note that current sensing is not possible in joint motor mode. As such, this command has no effect when running in joint motor mode. It is also important to note that current sensing is only possible when using a motor driver daughter board that has VNH2SP30s (the VNH3SP30 does not provide current sense feedback).
This command does not save this setting to EEPROM, however it can be saved by issuing separate EEPROM-write commands (240—Section 3.d.02) that store the values at the appropriate addresses (3 for motor 1, 4 for motor 2). The values stored in EEPROM should be the actual number of samples to average, not the exponents. For example, if you are sending an exponent of 5 for motor 1 to the mega168 via this command, you should send a value of 25 (32) to be stored in byte 3 of the mega168’s EEPROM. The value you store must be a power of two.
Values sent: motor 1 current sense samples exponent (3 bits), motor 2 current sense samples exponent (3 bits)
command byte = 212
data byte = (motor 2 current sense samples exponent << 3) | motor 1 current sense samples exponent
3.a.10. Command 192: Set Current Limit
Effect: Sets the current limit for the specified motor and the current control constant P (proportional component of PID). The current limit is provided as an 8-bit value that is continuously compared to the corresponding motor current average measured using the ADC. The control constant P is a 7-bit value that determines how the motor behaves in the vicinity of the current limit. Additionally, P affects what the motor does in response to a motor fault. If P is zero, the motor will shut down if it experiences a fault. Otherwise the motor will attempt to recover from the fault by toggling the control lines. The following pseudocode details how the current limit is handled:
if current limit == 0:
    no current limit, take no actions based on motor current average

else if P == 0:
    shut down motor if motor current average > current limit
    (or if a motor fault occurs)

else:
    adjust pwm every 10 ms according to the formula:
        internal pwm word += min( acceleration, P * ( current limit – current ))
        actual pwm = min( target pwm, ( internal pwm word + 5 ) / 10 )
The pwm is internally tracked with two-byte precision rather than one to provide added resolution. When using a non-zero current limit and P, the effect is that that pwm is decreased each update if the average current exceeds the current limit. If the average current is below the current limit and the pwm is below the target pwm, the pwm will be increased each update either based on our acceleration setting or based on a value proportional to the difference between the average current and the current limit, whichever increment is smaller. Acceleration and P combine to influence how the pwm will change each motor update cycle.
It is important to note that current sensing is not possible in joint motor mode. As such, this command has no effect when running in joint motor mode. It is also important to note that current sensing is only possible when using a motor driver daughter board that has VNH2SP30s (the VNH3SP30 does not provide current sense feedback).
This command does not save this setting to EEPROM, however it can be saved by issuing separate EEPROM-write commands (240—Section 3.d.02) that store the values at the appropriate addresses (5 for motor 1 current limit, 6 for motor 1 P, 7 for motor 2 current limit, and 8 for motor 2 P). P must be stored as a 7-bit value (i.e. P must be <= 127).
Note: this command is bugged in firmware version 1.00, however it has been fixed in version 1.01.
Values sent: current limit (8 bits), control constant P (7 bits), motor (1 bit)
command byte = 192 | (motor << 1) | current limit MSB
data byte 1 = 7 lower bits of current limit
data byte 2 = 7-bit control constant P (MSB always zero)
3.a.11. Command 210: Set Motor PWM Frequencies
Effect: Sets the resolutions and clock prescalers of the two motor PWMs, which in turn allows customization of the PWM frequencies. The PWMs can have either seven- or eight-bit resolution, and the allowed clock prescalers are 8, 64, 256, and 1024. This means the eight possible PWM frequencies are 19.5 kHz, 9.77 kHz, 2.44 kHz, 1.22 kHz, 610 Hz, 305 Hz, 153 Hz, and 76.3 Hz. A seven-bit resolution coupled with a prescaler of 8 will result in the only frequency in this group that generally exceeds what can be detected by the human ear ( 19.5 kHz); the daughter motor-driver boards with VNH2SP30s will function at this frequency, but those with VNH3SP30s will not. Because of this, the default frequency is 9.77kHz. Lower frequencies can be used to decrease switching losses, however the motor 1 PWM frequency is used for acceleration timing, so decreasing it below 1 kHz can slightly reduce the frequency at which acceleration updates are performed (at the lowest frequency, acceleration updates will occur every 13 ms instead of every 10 ms).The frequencies can be different for each motor so long as the X2 isn’t being run in joint motor mode. In joint motor mode, both PWMs are set to based on the motor 1 PWM frequency settings.
This command does not save this setting to EEPROM, however it can be saved by issuing separate EEPROM-write commands (240—Section 3.d.02) that store the values at the appropriate addresses (1 for motor 1, 2 for motor 2). The EEPROM byte saved for a given motor should be set as follows: bit 2 high = 8-bit pwm resolution, bit 2 low = 7-bit pwm resolution; bits 0 & 1 represent the PWM’s clock prescaler setting as detailed below.
The prescaler setting is encoded by a two-bit enumeration: 0 = prescaler 8, 1 = prescaler 64, 2 = prescaler 256, and 3 = prescaler 1024. The resolution setting is a one-bit value: 0 = 7-bit PWM, 1 = 8-bit PWM.
The resulting PWM frequency can be calculated as 20MHz / prescaler / 2bit-resolution. The following PWM frequencies (along with their three-bit encondings) can hence be achieved:
- 19.5 kHz (000) => 7-bit resolution, prescaler 8
- 9.77 kHz (100) => 8-bit resolution, prescaler 8
- 2.44 kHz (001) => 7-bit resolution, prescaler 64
- 1.22 kHz (101) => 8-bit resolution, prescaler 64
- 610 Hz (010) => 7-bit resolution, prescaler 256
- 305 Hz (110) => 8-bit resolution, prescaler 256
- 153 Hz (011) => 7-bit resolution, prescaler 1024
- 76.3 Hz (111) => 8-bit resolution, prescaler 1024
Values sent: motor 1 PWM resolution (1 bit), motor 1 PWM prescaler (2 bits), motor 2 PWM resolution (1 bit), motor 2 PWM prescaler (2 bits)
command byte = 210
data byte = (motor 2 PWM resolution bit << 5) | (motor 2 PWM prescaler << 3) | (motor 1 PWM resolution bit << 2) | motor 1 PWM prescaler
3.a.12. Command 216: Get Average Motor Current
Effect: This command will cause the mega168 to load the eight most significant bits of the running ADC average for the specified motor into its SPDR (SPI data register). Once loaded, sending another byte over the SPI will load the value into the mega644’s SPDR. This second byte can be the NULL command (255—Section 3.d.06) or merely a junk data byte (any byte so long as the MSB is zero). It is recommended you do not begin transmission of this second byte until 3 us after the transmission of the command byte has completed. This is to make sure the mega168 has time to load the SPDR.
Values sent: motor (1 bit)
command byte = 216 | motor bit
3.b. Buzzer Commands
3.b.1. Command 152: Play Note
Effect: Plays the desired note immediately, where note is an 8-bit encoding of the frequencies of the equal-tempered scale centered around A4 = 440 Hz. Note 0xFF is defined to be a “silent note,” which merely silences the buzzer for a desired period of time. Notes that produce frequencies less than 40 Hz or greater than 10 kHz are not allowed and will result in the closest note that is allowed. Duration is a 16-bit value specified in ms. In C, the notes can be enumerated as follows:
#define C( x )        (  0 + x*12 )
#define C_SHARP( x )  (  1 + x*12 )
#define D_FLAT( x )   (  1 + x*12 )
#define D( x )        (  2 + x*12 )
#define D_SHARP( x )  (  3 + x*12 )
#define E_FLAT( x )   (  3 + x*12 )
#define E( x )        (  4 + x*12 )
#define F( x )        (  5 + x*12 )
#define F_SHARP( x )  (  6 + x*12 )
#define G_FLAT( x )   (  6 + x*12 )
#define G( x )        (  7 + x*12 )
#define G_SHARP( x )  (  8 + x*12 )
#define A_FLAT( x )   (  8 + x*12 )
#define A( x )        (  9 + x*12 )
#define A_SHARP( x )  ( 10 + x*12 )
#define B_FLAT( x )   ( 10 + x*12 )
#define B( x )        ( 11 + x*12 )

#define SILENT_NOTE   0xFF
The parameter x represents the octave of the note. Typically, x will have a value of 4 – 6. The frequency of a note can be obtained using the formula:
- freq(note) = 440 Hz * 2 ((note – 57) / 12)
If the buzzer is currently playing when this command is received, this command will take precedence and overwrite the current buzzer action. For example, if a melody was playing, the note specified by this command will interrupt the melody and after the note is through the melody will not continue. As such, if you wish to stream a sequence of notes to the mega168 using this command, you must time the issuance of the commands on the mega644 so that each note doesn’t just overwrite the previous. This command will not queue up the notes if called repeatedly.
It is important to note that there is a restriction on the duration of any notes whose frequencies are greater than 1 kHz. The product of the duration (in ms) and the frequency (in kHz) must be no greater than 0xFFFF (65,535). If you attempt to play a frequency of 10 kHz, for example, the maximum duration you can specify is 6553 ms. If you specify a longer duration there will be an integer overflow and the resulting duration of the note will not be what you specified. If you wish to play a 10 kHz frequency for longer than 6.5 seconds, you can accomplish this by stringing together multiple play-note commands.
Bonus feature: If you don’t need it for sound, the buzzer can be used as an extra timer. You can send a command to play a silent note (0xFF) for a specified duration. After that duration has elapsed, the mega168’s status byte will reflect that the buzzer is now finished and the attention line will be set. A silent note disconnects the buzzer so that it makes no sound, however it runs the buzzer PWM at a frequency of 1 kHz and is accurate to the nearest 2 milliseconds.
Values sent: note (8 bits), duration (16 bits)
command byte = 152 | (MSB data byte 3 << 2) | (MSB data byte 2 << 1) | MSB data byte 1
data byte 1 = 7 lower bits of note byte
data byte 2 = most significant byte of duration word (minus the MSB, which is in the command byte)
data byte 3 = least significant byte of duration word (minus the MSB, which is in the command byte)
3.b.2. Command 160: Play Frequency
Effect: Plays the desired frequency immediately. Allowed frequencies are those greater than 40 Hz and less than 10 kHz. The frequency is a 15-bit value specified in Hz. Duration a 16-bit value specified in ms.
If the buzzer is currently playing when this command is received, this command will take precedence and overwrite the current buzzer action. For example, if a melody was playing, the note specified by this command will interrupt the melody and after the note is through the melody will not continue. As such, if you wish to stream a sequence of notes to the mega168 using this command, you must time the issuance of the commands on the mega644 so that each note doesn’t just overwrite the previous. This command will not queue up the notes if called repeatedly.
It is important to note that there is a restriction on the duration of any notes whose frequencies are greater than 1 kHz. The product of the duration (in ms) and the frequency (in kHz) must be no greater than 0xFFFF (65,535). If you attempt to play a frequency of 10 kHz, for example, the maximum duration you can specify is 6553 ms. If you specify a longer duration there will be an integer overflow and the resulting duration of the note will not be what you specified. If you wish to play a 10 kHz frequency for longer than 6.5 seconds, you can accomplish this by stringing together multiple play-frequency commands.
Values sent: frequency (15 bits), duration (16 bits)
command byte = 160 | (MSB data byte 4 << 2) | (MSB data byte 3 << 1) | MSB data byte 2
data byte 1 = most significant byte of frequency word (MSB always 0)
data byte 2 = least significant byte of frequency word (missing MSB)
data byte 3 = most significant byte of duration word (missing MSB)
data byte 4 = least significant byte of duration word (missing MSB)
3.b.3. Command 176: Play Melody
Effect: Plays the desired melody stored in EEPROM. It is possible to store up to 8 melodies using the Store Note (168—Section 3.b.4) and End Melody (224—Section 3.b.5) commands. If the melody doesn’t exist you will either get no response or will possibly hear some garbage melody, depending on the state of the mega168’s EEPROM. One way to get a garbage melody would be to store eight melodies (0 – 7), perform a hardware reset, and then store two different melodies (0 and 1). The pointers for melodies 2 through 7 were not updated by the most recent store commands, however the notes in EEPROM have changed and have potentially overwritten a portion of the old melodies 2 – 7). Attempting to play melody 2 could result in some unexpected sequence of notes. One way to avoid this situation is to issue an “Erase Melodies” command (186—Section 3.b.6) before storing a new set of melodies, however this is purely optional.
Values sent: melody (3 bits)
command byte = 176 | melody
3.b.4. Command 168: Store Note
Effect: This command is used to store a sequence of notes in the mega168’s EEPROM that can then be played as a melody. Each stored note consists of an 8-bit note-frequency enumeration byte and a 16-bit millisecond-duration word. For details on note enumeration, see the Play Note command (152—Section 3.b.1). Specifically, this command adds the three bytes of note data to the end of the melody currently under construction, storing it in EEPROM. After a hardware reset, the melody currently under construction is set to melody 0. It is possible to store up to 8 melodies and up to 159 total notes. The notes can be distributed among the eight melodies in any way. The “current melody” counter is incremented by the End Melody command (224—Section 3.b.5).
Storing melodies can be rather slow given that each EEPROM write takes ~3.4 ms and storing a note requires three EEPROM writes. Typically, the code to store melodies will be executed once at the beginning of a program and then removed from that program. It is crucial that you give enough time between successive issuances of these commands for EEPROM to be written. If you simply stream these commands to the mega168, notes will be lost. A safe delay between issuances would be 15 ms. At a minimum the delay should be 10.2 ms. Alternatively, you can ensure EEPROM is ready for the next store-note command by polling with the “Check If EEPROM Busy” command (254—Section 3.d.04), which returns zero if it’s ok to read from/write to EEPROM.
Values sent: note (8 bits), duration (16 bits)
command byte = 168 | (MSB data byte 3 << 2) | (MSB data byte 2 << 1) | MSB data byte 1
data byte 1 = 7 lower bits of note byte
data byte 2 = most significant byte of duration word (missing MSB)
data byte 3 = least significant byte of duration word (missing MSB)
3.b.5. Command 224: End Melody
Effect: Terminates the melody currently under construction by advancing the next melody’s pointer to point to the location in EEPROM that would be the first note of the next melody. The “current melody” counter is then incremented so the next Store Note command (168—Section 3.b.4) will store the first note of the next melody. It is possible to store up to 8 melodies. The End Melody command performs two EEPROM writes and hence it is recommended you allow it at least 6.8 ms before transmitting a command that will cause the mega168 to perform an EEPROM write.
Values sent: none
Command byte = 224
3.b.6. Command 186: Erase Melodies
Effect: Resets the melody pointers to a state that represents zero stored melodies. It is not necessary to call this function before storing a new set of melodies, but it can prevent you from having unwanted “garbage” melodies left in EEPROM. One way to get a garbage melody would be to store eight melodies (0 – 7), perform a hardware reset, and then store two melodies (0 and 1). The pointers for melodies 2 through 7 were not updated by the most recent store commands, however the notes in EEPROM have changed. Attempting to play melody 2 could result in some unexpected sequence of notes. This command will cause the mega168 to perform nine EEPROM writes, so it is recommended you give it at least 30.6 ms before issuing another command that will cause the mega168 to perform an EEPROM write.
Values sent: none
command byte = 186
3.b.7. Command 226: Set Volume
Effect: Sets the buzzer volume by affecting the duty cycle of the PWM sent to the buzzer. The formula used is duty cycle = TOP >> (16 – volume), where 0 <= volume <= 15. A max volume of 15 produces a 50% duty cycle. A minimum volume of 0 produces a 0% duty cycle (however even at a duty cycle of 0% the buzzer pwm will go high for one timer count every period, thereby introducing some switching noise to your system).
This value can be saved to byte 17 of EEPROM using command 240 (Section 3.d.02) so that it will persist after a hardware reset. When storing in EEPROM, you must ensure the value is within the volume’s allowed range of 0 – 15.
Values sent: volume (4 bits)
command byte = 226
data byte = 4-bit volume (bits 4 – 6 are ignored)
3.b.8. Command 187: Set Note Gap
Effect: Sets the duration in milliseconds of the silent pause inserted after each note/frequency played by the buzzer. If the note gap is set to zero there is no pause. Additionally, no matter what the value of note gap, no pause is added to the end of a silent note. As such, silent notes can still be used for timing purposes if so desired. Note gap is a 7-bit value that allows for pauses of 0 – 127 ms. A note gap allows you to distinctly hear each note in a stream of the same repeated note. For single non-silent notes, the buzzer is not flagged as finished in the status byte until after the trailing note-gap period has elapsed.
This value can be saved to byte 19 of EEPROM using command 240 (Section 3.d.02) so that it will persist after a hardware reset. It is possible to safely store an 8-bit value at this location if you need a longer note gap.
command byte = 187
data byte = 7-bit note gap
3.b.9. Command 225: Buzzer Off
Effect: Immediately silences the buzzer. This will terminate any note/frequency or melody that is being played and immediately set the buzzer-finished flag in the mega168’s status byte (which will in turn set the attention line). The buzzer will remain silent until the next play note/frequency/melody call is sent.
Values sent: none
command byte = 225
3.c. UART Commands
3.c.01. Command 200: Set Serial Parameters
Effect: Specifies the settings that govern the mega168’s serial port. This command will set the baud (by giving the three lowest bits of UBRRH, the eight-bit UBRRL, and 2x speed bit), the parity (disabled, even, or odd), and the number of stop bits in a packet (one or two). The character size of a packet will always be 8 bits. Parity is a two-bit enumeration as follows: 0 = no parity, 1 = reserved, 2 = even parity, 3 = odd parity. If the 2x-speed bit is set, the baud rate as set by UBRR is doubled. If the stop-bits bit is cleared, one stop bit will be used; if it is set, two stop bits will be used. UBRR relates to baud as follows:
in normal mode:
baud = ( 20 MHz / 16 ) / ( UBRR + 1 ) = 1.25 MHz / ( UBRR + 1 ), so
UBRR = ( 1.25 MHz / baud ) – 1
in double-speed mode:
baud = ( 20 MHz / 8 ) / ( UBRR + 1 ) = 2.5 MHz / ( UBRR + 1 ), so
UBRR = ( 2.5 MHz / baud ) – 1
Note: If you are using firmware version 1.00, you must give the mega168 time to set its serial parameters to the desired values before issuing a serial-transmit command. We recommend you wait at least 50 us after sending a Set Serial Parameters command before attempting to use the UART. No such delay is needed if you are running version 1.01 or later.
In addition to the serial setting parameters described above, there is a flag that can put the mega168 into permanent program mode, which means that incoming packets over the UART are treated as an attempt to program the mega644. When set, all other serial parameters sent along with this command are ignored as the UART is now reserved solely for programming. If put into permanent program mode, the mega644 can be programmed without requiring the reset button be held until the yellow LED lights. Using permanent program mode therefore can be more convenient for you if you’re doing a lot of incremental software development for the mega644, but the tradeoff is that you cannot use the serial port for any other purpose (such as debugging, logging values, etc).
In permanent program mode, the mega168 and mega644 will run normally until the mega168 receives a command over the UART that it is to enter programming ISP mode. At this point the mega168 becomes the SPI master and the mega644 is held reset. When the mega168 receives the UART command to leave programming ISP mode at the completion of the ISP action, it will reset itself and the two microcontrollers will once again run normally.
If the save-to-EEPROM bit is one, these serial settings will persist after a hardware reset. Three EEPROM bytes are used to encode these settings (one byte for UBRRH, one byte for UBRRL, and one byte for the rest). The EEPROM encoding differs from the SPI encoding:
	EEPROM byte 13: (permanent program mode bit << 6) |
	                (2-bit parity << 4) |
	                (stop-bits bit << 3) |
	                (2x-speed bit << 1)
	EEPROM byte 14: UBRRH
	EEPROM byte 15: UBRRL
If you want to store the permanent program mode setting so that you will still be in that mode after a hardware reset, you can accomplish this by writing 0x40 to EEPROM byte 13. Warning: the parameters that are stored in EEPROM can be written thousands of times, but not infinitely many. An automated setup that rewrites a parameter over and over could potentially burn out the memory in a few minutes.
Values sent: baud (11 bits — UBRRH and UBRRL), 2x speed (1 bit), parity (2 bits), one or two stop bits (1 bit), permanent program mode (1 bit), save to EEPROM (1 bit)
command byte = 200 | (2-bit parity << 1) | save to EEPROM bit
data byte 1 = (permanent program mode bit << 6) | (stop-bits bit << 5) | (2x-speed bit << 4) | (UBRRH << 1) | MSB of UBRRL
data byte 2 = seven lowest bits of UBRRL
If you want to enable permanent programming mode, you only need to send:
command byte = 200
data byte 1 = 64
data byte 2 = 0
3.c.02. Command 219: Read UART Byte
Effect: If there is a byte in the UART read buffer, this command will remove it from the buffer and load it into the mega168’s SPDR (SPI data register). Sending a second byte over the SPI once the value is loaded (either the NULL command or some junk data byte) will transfer the UART byte to to the 644’s SPDR. It is recommended you do not begin transmission of this second byte until 3 us after the transmission of the command byte has completed. This is to make sure the mega168 has time to load the SPDR.
The UART read buffer is a 32-byte circular buffer that is automatically populated by the mega168 as data comes in over the UART. It is important you verify the read buffer actually has data before initiating a read as reading from an empty buffer will simply return junk. When the read buffer contains a certain amount of bytes, the mega168 status byte has its STATUS_UART_READ_READY bit set and the attention line is set. The number of bytes it takes to trigger this status change defaults to one and can be set by the Set Read Ready Size command (227—Section 3.c.06). The number of unread bytes in the read buffer can be obtained at any time by sending the Get Number of Bytes in Read Buffer command (223—Section 3.c.05).
If a read error occurs when the mega168 is attempting to read a packet over the UART, the mega168’s status byte has its STATUS_UART_ERROR bit set and the attention line is set. The UART error byte is set to reflect the nature of the read error: read buffer overrun, frame error, data overrun, or parity error. A read buffer overrun occurs if a byte comes in over the UART when the 32-byte read buffer is full. The other errors are generated automatically by the UART and obtained from the UART control and status register UCSR0A. The UART error byte can be read by sending the Get UART Error command (252—Section 3.c.07).
Values sent: none
command byte = 219
3.c.03. Command 220: Send UART Byte
Effect: This command sends a byte to the mega168 so it can be transmitted by the mega168 over the UART. The mega168 puts the received byte into a 32-byte circular UART send buffer. It then transmits the bytes in the send buffer in the order they were received over the UART (and removes them from the buffer) as the mega168 executes the UART-handling portion of its main loop. When the send buffer is full, the mega168’s status byte has its STATUS_UART_SEND_FULL bit set and the attention line is set to indicate that the mega644 should not transmit any more UART bytes until there is more room in the send buffer. The amount of free space in the send buffer can be obtained at any time by sending the Get Send Free Space in Send Buffer command (222—Section 3.c.04).
If you attempt to send a byte while the send buffer is full, you will cause a send buffer overrun error, which will be reflected in the UART error byte. The UART error byte can be read by sending the Get UART Error command (252—Section 3.c.07). The mega168’s status byte will have its STATUS_UART_ERROR bit set and the attention line is set to reflect the presence of this UART error.
Values sent: UART byte (8 bits)
command byte = 220 | MSB of send byte
data byte = seven lowest bits of send byte
3.c.04. Command 222: Get Free Space in Send Buffer
Effect: This command loads into the mega168’s SPDR (SPI data register) the number of unoccupied bytes in the UART send buffer. Sending a second byte (either the NULL command or a junk data byte) over the SPI once the value is loaded will transfer it to the mega644’s SPDR. It is recommended you do not begin transmission of this second byte until 3 us after the transmission of the command byte has completed. This is to make sure the mega168 has time to load the SPDR. If the buffer is empty this command will return 32. If the buffer is full this call will return 0.
Values sent: none
command byte = 222
3.c.05. Command 223: Get Number of Bytes in Read Buffer
Effect: This command loads into the mega168’s SPDR (SPI data register) the number of occupied bytes in the UART read buffer. Sending a second byte (either the NULL command or a junk data byte) over the SPI once the value is loaded will transfer it to the mega644’s SPDR. It is recommended you do not begin transmission of this second byte until 3 us after the transmission of the command byte has completed. This is to make sure the mega168 has time to load the SPDR. If the buffer is full this call will return 32. If the buffer is empty this call will return 0.
Values sent: none
command byte = 223
3.c.06. Command 227: Set Read Ready Size
Effect: This command specifies the size in bytes the read buffer must reach before the mega168’s status byte alerts the mega644 that the buffer is ready to be read. The value transmitted is a five-bit number representing read-ready size - 1. That is to say, if the value transmitted to the mega168 is 0, read-ready size will be 1 and the read-ready status flag will be set after every received byte. If the value transmitted is 31, read-ready size will be 32 and the read-ready status flag will be set only when the read buffer is full. The default value for this setting is one (set the read-ready flag after every received byte).
This value can be saved to byte 16 of EEPROM using command 240 (Section 3.d.02) so that it will persist after a hardware reset. When storing in EEPROM, you must ensure the value is within the allowed range of 1 – 32. The value saved should be read-ready size, not read-ready size - 1.
Values sent: read-ready size – 1 (5 bits)
command byte = 227
data byte = read-ready size – 1
3.c.07. Command 252: Get UART Error
Effect: This command loads into the mega168’s SPDR (SPI data register) the UART error byte, which reflects any UART errors that have occured. Sending a second byte (either the NULL command or a junk data byte) over the SPI once the value is loaded will transfer it to the mega644’s SPDR. It is recommended you do not begin transmission of this second byte until 3 us after the transmission of the command byte has completed. This is to make sure the mega168 has time to load the SPDR. As errors occur, bits in the error byte are set and remain set until the error byte is read. Reading the UART error byte will clear it. Every time a bit in the error byte is set, the mega168’s status byte has its STATUS_UART_ERROR bit set and the attention line is set. The UART error bits are as follows:
- bit 0: UART_SEND_BUFF_OVERRUN — the mega644 sent a byte to the mega168 while the send buffer was full
- bit 1: UART_READ_BUFF_OVERRUN — the mega168 received a byte over the UART while its read buffer was full
- bit 2: UART_FRAME_ERROR — an incorrect stop bit (zero) was detected in the next readable frame (from UCSR0A)
- bit 3: UART_DATA_OVERRUN — data was lost due to a receiver buffer full condition (from UCSR0A)
- bit 4: UART_PARITY_ERROR — the next frame in the receive buffer had a parity error when received (from UCSR0A)
- bit 5: UART_READ_BUFF_UNDERRUN — the mega644 requested a byte from an empty read buffer; the result of such a read would just be a junk byte (Note: this error bit does not exist in firmware version 1.00)
- bits 6 & 7 are not used
Values sent: none
command byte = 252
3.d. Miscellaneous Commands
3.d.01. Command 218: Get Status
Effect: This command loads into the mega168 SPDR (SPI data register) the mega168’s status byte. Sending a second byte (either the NULL command or a junk data byte) over the SPI once the value is loaded will transfer it to the mega644’s SPDR. It is recommended you do not begin transmission of this second byte until 3 us after the transmission of the command byte has completed. This is to make sure the mega168 has time to load the SPDR. The status byte contains important information that the mega644 should know about the mega168’s status. The mega168 sets the attention line whenever it sets any bits in the status byte. Sending this command will clear the attention line and the latched bits of the mega168’s status byte. The bits of the status byte are enumerated as follows:
- bit 0: STATUS_UART_ERROR — a UART error has occured, read the UART error byte for further details. This bit is latched and will remain set until the status byte is read.
- bit 1: STATUS_UART_READ_READY — the read buffer is ready to be read according to the read-ready bytes setting. This bit reflects the real-time state of the read buffer and is not cleared by reading the status byte.
- bit 2: STATUS_UART_SEND_FULL — the send buffer contains 32 bytes and does not have room for any more. This bit reflects the real-time state of the send buffer and is not cleared by reading the status byte.
- bit 3: STATUS_BUZZER_FINISHED — the buzzer has finished playing and is now silent. This bit reflects the real-time state of the buzzer and is not cleared by reading the status byte.
- bit 4: STATUS_M1_FAULT — a fault has occurred with motor 1. This bit is latched and will remain set until the status byte is read.
- bit 5: STATUS_M1_CURRENT_HIGH — the average motor 1 current has met or exceeded the specified current limit. This bit will never be set if the specified current limit is zero (i.e. no current limit). This bit is latched and will remain set until the status byte is read.
- bit 6: STATUS_M2_FAULT — a fault has occurred with motor 2. This bit is latched and will remain set until the status byte is read.
- bit 7: STATUS_M2_CURRENT_HIGH — the average motor 2 current has met or exceeded the specified current limit. This bit will never be set if the specified current limit is zero (i.e. no current limit). This bit is latched and will remain set until the status byte is read.
Values sent: none
command byte = 218
3.d.02. Command 240: Write to EEPROM
Effect: This command writes a byte to the specified address of the mega168’s EEPROM. The EEPROM is addressed by a 9-bit value (512 bytes of memory). Using this command can potentially be dangerous as it’s possible to overwrite saved mega168 settings. You should be very careful when writing to any EEPROM address that’s 23 or less. Addresses 24 – 32 are used to hold pointers to melodies, so these may be changed freely so long as you’re not using the EEPROM to store melodies. Melody notes are stored sequentially in three-byte blocks starting at EEPROM address 33. If you wish to store both melodies and custom data in the mega168’s EEPROM, we suggest you start storing your data at the end of the EEPROM as the melodies are stored from the front.
If EEPROM is already being written, it is not possible to perform the write. When processing the command byte, the SPI interrupt routine checks to see if it’s currently possible to write to the EEPROM. It will load the value of the EECR’s EEPE bit (programming enable bit of the EEPROM control register) into bit zero of SPDR. It is recommended you do not begin transmission of the first data byte until 3 us after the transmission of the command byte has completed. This is to make sure the mega168 has time to load the SPDR. If SPDR is zero after transmission of this first data byte, it is possible to perform the write, otherwise the write will not be allowed. The second data byte should be sent regardless of this returned value, however.
This command should be used to save settings so that they persist after a hardware reset. This command can also be used to restore settings to their factory defaults by clearing EEPROM byte zero.
Warning: An EEPROM memory address can be written thousands of times, but not infinitely many. An automated setup that writes to an EEPROM memory address over and over could potentially burn out that memory address in a few minutes.
Values sent: EEPROM address (9 bits), write data (8 bits)
command byte = 240 | (MSB of write data byte << 2) | (bit 7 of write address << 1) | bit 8 of write address
data byte 1 = seven lowest bits of write address (bits 6 – 0)
data byte 2 = seven lowest bits of write data
3.d.03. Command 248: Read from EEPROM
Effect: This command will read a byte from the specified address of the mega168’s EEPROM and return it to the mega644 using the SPDR. The EEPROM is addressed by a 9-bit value (512 bytes of memory). When processing the command byte, the SPI interrupt routine will check to see if it’s currently possible to read from the EEPROM. It will load the value of the EECR’s EEPE bit (programming enable bit of the EEPROM control register) into bit zero of SPDR. It is recommended you do not begin transmission of the data byte until 3 us after the transmission of the command byte has completed. This is to make sure the mega168 has time to load the SPDR. If SPDR is zero after transmission of this data byte, it is possible to perform the read, otherwise the read will not be allowed (the only time a read is not allowed while a write is in progress) . After the transmission of the data byte completes, it is recommended you wait another 3 us and then send a junk data byte or the NULL command. Upon completion of this transmission SPDR will contain the byte stored at the specified EEPROM address, assuming the read was allowed.
This command should be used to obtain the current mega168 settings if you need to figure out what they are.
Values sent: EEPROM address (9 bits)
command byte = 248 | (bit 7 of read address << 1) | bit 8 of read address
data byte = seven lowest bits of read address (bits 6 – 0)
3.d.04. Command 254: Check If EEPROM Is Busy
Effect: This command will tell you if it’s possible to read from or write to the mega168’s EEPROM. Sending a second byte (either the NULL command or a junk data byte) over the SPI once the return value is loaded will transfer it to the mega644’s SPDR. It is recommended you do not begin transmission of this second byte until 3 us after the transmission of the command byte has completed. This is to make sure the mega168 has time to load the SPDR. If SPDR is zero, EEPROM is readable and writable. Otherwise, reading and writing are not presently allowed. You may wish to send this command before attempting to read from or write to the mega168’s EEPROM, though both the read and write commands also return success/failure indicators.
Note: if you are running firmware version 1.00, you should ensure EEPROM remains readable/writable for some short duration (e.g. 300 us) before attempting a read or write. There is no need to do this if you are running firmware version 1.01 or later.
Values sent: none
command byte = 254
3.d.05. Command 253: Get Firmware version (version = major byte . minor byte)
Effect: Returns the two bytes that specify the version of the code running on the mega168. The sequence for obtaining this data is as follows:
- send the command byte, wait for transmission to complete
- wait for 3 us (so the mega168 has time to set the SPDR)
- send any data byte, wait for transmission
- read SPDR to obtain the major version byte
- wait for 3 us (so the mega168 has time to set the SPDR)
- send a junk data byte or the NULL command, wait for transmission
- read SPDR to obtain the minor version byte
Values sent: none
command byte = 253
data byte = any seven-bit value
3.d.06. Command 255: NULL Command
Effect: No action is taken
Values sent: none
command byte = 255
4. Attention and SPI Pins
 |
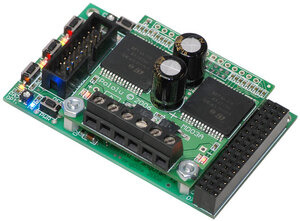
Orangutan X2 SPI and attention pins |
|---|
4.a. ATmega168's Attention Line
Whenever a bit gets set in the mega168’s status byte, the mega168 sets its attention line. Whenever a Get Status command (218—Section 3.d.01) is issued, the mega168 clears the attention line. In the Orangutan X2’s default configuration, the attention line is not connected to the mega644 and hence any status changes must be detected via polling the status byte with Get Status commands. If desired, you can connect the attention line to one of the mega644’s IO pins. Whenever this pin goes high, you know to send a Get Status command. Connecting the attention line to the mega644 gives you a simpler polling method, and it also gives you the option to trigger an interrupt every time a status bit is set. You can access the attention line via the through-hole labelled ATT on the back of the main board. It is located near the center of the board. The attention line is a purely optional feature.
4.b. ATmega168's Slave Select
The Slave Select (SS) line can be used to increase the robustness of the SPI communication between the master mega644 and slave mega168. It can also be used to allow the mega644 to control additional slave microcontrollers beyond the mega168. When initiating SPI communication, the SPI master should pull low the Slave Select pin of the slave for which the communication is intended (while ensuring that the Slave Select pins of all other slaves are pulled high). After each data packet, the master can synchronize the slave by pulling high the Slave Select line.
In the Orangutan X2, the mega168’s Slave Select is externally pulled low. As such, the mega644 does not need to pull the mega168’s Slave Select low in order to be able to communicate with it. This makes the Slave Select line an optional feature.
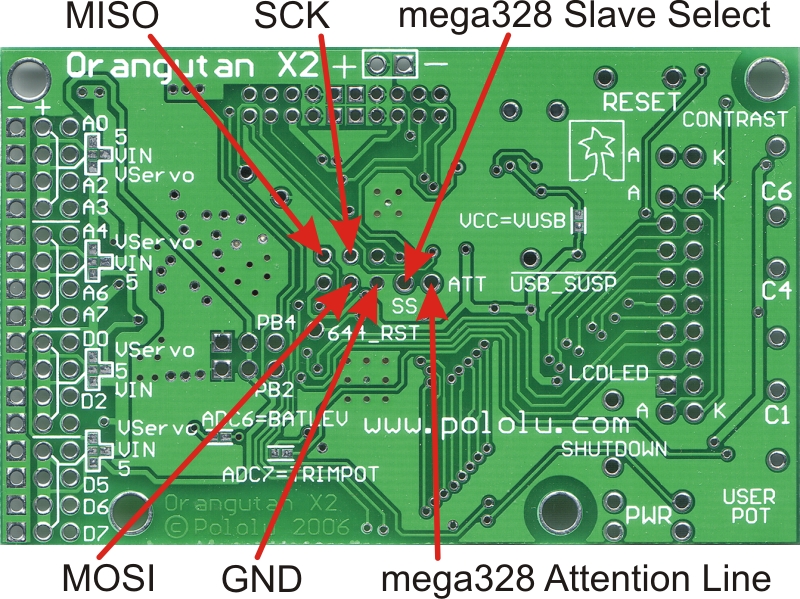
In the Orangutan X2’s default configuration, the mega168’s Slave Select is not connected to the mega644. You can connect it by soldering a wire from one of the mega644’s IO lines to the through-hole labelled SS on the back of the main board. It is located near the center of the board next to the attention line through-hole. The set of six (2×3) holes next to the Slave Select hole contain the SPI MISO (Master In, Slave Out), MOSI (Master Out, Slave In), and SCK (SPI Clock) lines. If you want to connect any additional slave devices, you will need to use these lines. Please see the Orangutan X2 schematic (63k pdf) for more details (when looking at the back of the board, pin 1 of schematic item JP2 is the upper-left hole with the octagonal solder mask — it is labeled MISO in the picture below).
|
Orangutan X2 SPI and attention pins |
|---|
5. ATmega168's EEPROM Addresses
This section details the mega168 settings that can be saved to EEPROM, the format of those settings, and the addresses to which they should be written. When writing to EEPROM, remember that an EEPROM memory address can be written thousands of times, but not infinitely many. An automated setup that writes to an EEPROM memory address over and over could potentially burn out that memory address in a few minutes. Take great care when performing an EEPROM write from within a loop.
0: ADDR_INIT_CHECK — clear this byte and then reset the mega168 to restore it to factory default settings.
1: ADDR_M1_PWM_FREQUENCY — frequency + resolution of motor 1 PWM. Bits 7 – 3 are unused. Bit 2: set = 8-bit resolution, cleared = 7-bit resolution. Bits 1 & 0 enumerate the PWM clock’s prescaler value: 0 = prescaler 8, 1 = prescaler 64, 2 = prescaler 256, 3 = prescaler 1024. The frequency is calculated as 20 MHz / prescaler / 2bit-resolution and can be: 19.5 kHz, 9.77 kHz, 2.44 kHz, 1.22 kHz, 610 Hz, 305 Hz, 153 Hz, and 76.3 Hz. The default value for this byte is 4, which corresponds do a frequency of 9.77 kHz.
2: ADDR_M2_PWM_FREQUENCY — frequency + resolution of motor 2 PWM. Default value is 4.
3: ADDR_M1_CURRENT_SENSE — number of M1 ADC samples to average. The mega168 retains this many of the most recent ADC samples and keeps a running average of these values. This parameter must be a power of two and cannot exceed 128. Default value is 128.
4: ADDR_M2_CURRENT_SENSE — number of M2 ADC samples to average. This must be a power of two and cannot exceed 128. Default value is 128.
5: ADDR_M1_CURRENT_LIMIT — motor 1 current limit (0 = no limit). Default value is 0.
6: ADDR_M1_CL_P_CONST — motor 1 proportional current control constant P (7-bit value). If for a given motor the current exceeds the current limit (and the limit is not zero), one of the following will happen: (1) if P is zero, the motor will be shut off, or (2) if P is not zero, the pwm for that motor is adjusted according to PWM = PWM – P * (current – current limit). A P of zero will also cause the motor to shut off if it experiences a motor fault (otherwise the motor will attempt to recover from a fault). Default value is 5. This parameter must not be greater than 127.
7: ADDR_M2_CURRENT_LIMIT — motor 2 current limit (0 = no limit).
8: ADDR_M2_CL_P_CONST — motor 2 proportional current control constant P (7-bit value). Default value is 5. This parameter must not be greater than 127.
9: ADDR_M1_ACCELERATION — motor 1 acceleration; 0 = instantaneous (7-bit value). If a motor is accelerating, a tenth of this value will be added to it’s PWM every 10 ms (or, effectively, the PWM will increase by this much every 100 ms). Default value is 25.
10: ADDR_M2_ACCELERATION — motor 2 acceleration; 0 = instantaneous (7-bit value). Default value is 25.
11: ADDR_M1_BRAKE_DURATION — time (in 10 ms) motor 1 spends braking at full duty cycle on change of motor direction when issued an acceleration command (7-bit value). Default value is 10 (i.e. brake for 100 ms).
12: ADDR_M2_BRAKE_DURATION — time (in 10 ms) motor 2 spends braking at full duty cycle on change of motor direction when issued an acceleration command (7-bit value). Default value is 10.
13: ADDR_SERIAL_SETTINGS —
- bit 7: unused
- bit 6: normal UART functionality if cleared, enables permanent program mode (and overrides all other serial settings) if set
- bits 5&4: parity (0 = no parity, 1 = reserved, 2 = even parity, 3 = odd parity)
- bit 3: use one stop bit if cleared, two if set
- bit 2: unused
- bit 1: run at normal speed if cleared, at double speed if set
- bit 0: unused
Default value is 0 (normal UART functionality, no parity, one stop bit, normal speed). Character size is always 8-bit and cannot be set to anything else.
14: ADDR_SERIAL_UBRRH — UBRRH register (determines baud). Default value 0. UBRRH is a 3-bit value that combines with the 8-bit UBRRL to create an 11-bit UBRR value.
in normal mode:
baud = ( 20 MHz / 16 ) / ( UBRR + 1 ) = 1.25 MHz / ( UBRR + 1 ), so
UBRR = ( 1.25 MHz / baud ) – 1
in double-speed mode:
baud = ( 20 MHz / 8 ) / ( UBRR + 1 ) = 2.5 MHz / ( UBRR + 1 ), so
UBRR = ( 2.5 MHz / baud ) – 1
15: ADDR_SERIAL_UBRRL — UBRRL register (determines baud). Default value 10 (UBRR = 10 results in 115.2k baud with -1.4% error).
16: ADDR_SERIAL_READ_READY — the number of bytes the UART read buffer has when the mega168 sets the read-ready status flag. The parameter must be in the range of 1 – 32. If you set it to 32 you won’t get a read-ready flag until the read buffer is full. If you set it to 1, you will get a read-ready flag every time the mega168 receives a byte over the UART. Default value is 1.
17: ADDR_BUZZER_VOLUME — buzzer volume (must be a 4-bit value). The buzzer pwm duty cycle is set by generating a compare match at TOP >> (16 – volume). Therefore a volume of 15 results in a 50% duty cycle and a volume of 5 results in a .05% duty cycle. The volume control is somewhat crude, but it still lets you make the buzzer quieter if so desired. Volume must be in the range of 0 – 15. Default value is 12.
18: ADDR_STARTUP_MELODY — this parameter determines the melody that plays on startup/reset: 0 – 7 = melody of that number, 8 = silence (make no sound on startup), else chirp. Default value is 255 (chirp).
19: ADDR_NOTE_GAP — default duration in ms of silent pause inserted after each note (7-bit value). Default value is 5.
20: ADDR_SCK_DURATION — programmer SPI SCK setting (0 is fastest). This determines how quickly you can upload a hex file from the mega168 to the mega644 while programming. This parameter can be changed setting the ISP frequency in Main tab of AVR Studio’s AVRISP dialog window. Default value is 0.
21: ADDR_ISP_STATE — mega168 ISP state (in progmode or not). This is used internally by the mega168 to determine if the mega644 has potentially corrupted flash. If the ISP state ever disagrees with what the mega168 thinks it should be, the mega168 concludes something bad has happened during programming, such as a loss of power, and will not allow the mega644 to run. Instead it will alternately flash the red and yellow LEDs below the reset button until the mega644 is reprogrammed. You should never write to this EEPROM address.
22: ADDR_ISP_SW_MINOR — AVRISP software version major byte. Default value is 0x0A.
23: ADDR_ISP_SW_MAJOR — AVRISP software version minor byte. Default version is 0x02.
At the time of the X2’s release, the current AVR Studio AVRISP version is 2.0A. These bytes represent the version AVRISP version number the mega168 will transmit to AVR Studio when you attempt to program the mega644. If the two version don’t match, you will have to first cancel out of an “upgrade your firmware?” dialog box every time you try to program your mega644 (you cannot upgrade your programming firmware in this way, so this dialog is nothing more than an annoyance). As such, you might have a better programming experience if you set these version values to match the AVRISP version used by the AVR Studio you’re running.
24: ADDR_MELODY_START_PTR_MSBS — the mega168’s EEPROM is can be addressed by 9-bit values (512 bytes); this byte stores the ninth bits of the melody pointers according to the formula: bit i = bit 9 of melody i+1. Bit 9 of “melody 8” is really bit 9 of ADDR_MELODY7_END_PTR (melody 7 termination pointer).
25: ADDR_MELODY1_START_PTR — address of low byte of pointer to melody 1 start.
26: ADDR_MELODY2_START_PTR — address of low byte of pointer to melody 2 start.
27: ADDR_MELODY3_START_PTR — address of low byte of pointer to melody 3 start.
28: ADDR_MELODY4_START_PTR — address of low byte of pointer to melody 4 start.
29: ADDR_MELODY5_START_PTR — address of low byte of pointer to melody 5 start.
30: ADDR_MELODY6_START_PTR — address of low byte of pointer to melody 6 start.
31: ADDR_MELODY7_START_PTR — address of low byte of pointer to melody 7 start.
32: ADDR_MELODY7_END_PTR — address of low byte of pointer to the end of melody 7.
33: ADDR_MELODY0_START — address of 1st note of melody 0.
There is room in EEPROM for 159 notes. Notes are stored sequentially in three-byte blocks starting at EEPROM address 33.
Related products


Home | Forum | Blog | Support | Ordering Information | Lists | Distributors | BIG Order Form | About | Contact
© 2001–2026 Pololu Corporation
