Support » Pololu Orangutan USB Programmer User’s Guide » 8. Updating Your Programmer's Firmware »
8.b. Uploading the New Firmware
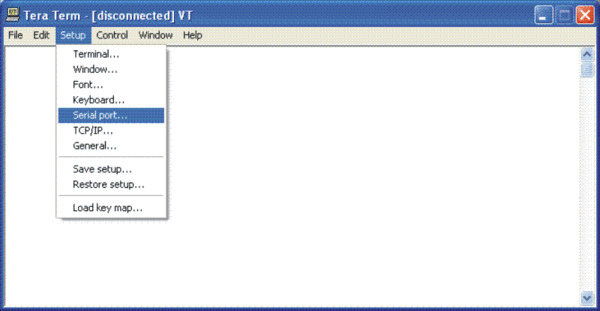
1. Run Tera Term Pro v2.3
You will be greeted by a “TeraTerm: New connection” dialog box. Click cancel, then go to the “Setup” menu and select “Serial port…”.
 |
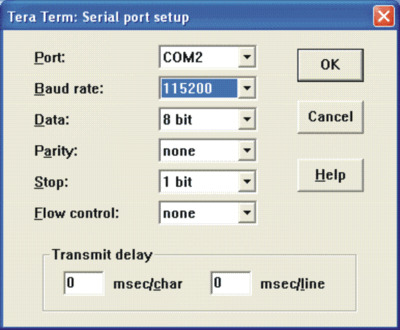
Configure the settings as shown below, substituting your own COM port. The baud rate should be 115200 with 8-bit data, no parity, one stop bit, and no flow control. You do not need any transmit delays. The only settings you should have to change from their default values are the port and the baud rate. Do not click OK yet.
 |
2. Enter the programmer’s firmware update mode
When you connect your programmer to your computer via the USB cable, you should see both the red and green status LEDs light for approximately five seconds. During this time, the programmer is waiting for the proper input sequence that will put it into firmware update mode. The procedure for entering firmware update mode is as follows:
- Bring up the Tera Term serial port setup dialog as described in part 1 above, but do not connect yet.
- Plug your programmer into your computer via the USB cable and wait for the green USB status LED to light. It usually takes around 0.5 s for the USB connection to be established.
- Once the green USB status LED is lit and while both red and green programmer status LEDs are still lit, click OK in the Tera Term serial port setup dialog to establish a connection and type fwbootload. This string must be in all lowercase. With every successfully entered letter, the 5-second timer resets, so the biggest difficulty is typing that first “f” before the first 5-second period expires and the two status LEDs turn off.
As you type the string, you will see the uppercase version of the letters you type echoed back, so as you type “fwbootload”, you will see “FWBOOTLOAD”. If you enter a letter incorrectly, a “?” will be echoed back to you and both status LEDs will turn off immediately. If this happens you will need to disconnect from Tera Term, unplug your programmer, and repeat the process again.
If you enter the string successfully, you will see the bootloader version number echoed back to you (probably “1.2”). Note that this bootloader version number is not the same as the the programmer’s firmware version number. This version number is the version of the small piece of code (called a “bootloader”) that is reprogramming the programmer’s flash. - At this point you can type x to exit firmware upgrade mode or s to load the new firmware. If you type s, there will be a brief delay as the current firmware is erased, after which you will see S echoed back. Now the programmer is waiting for you to upload a binary data file containing the new firmware. This data file should have a .pgm extension.
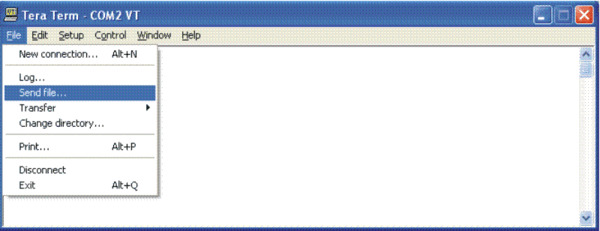
3. Loading the new firmware
From the “File” menu, select “Send file….”
 |
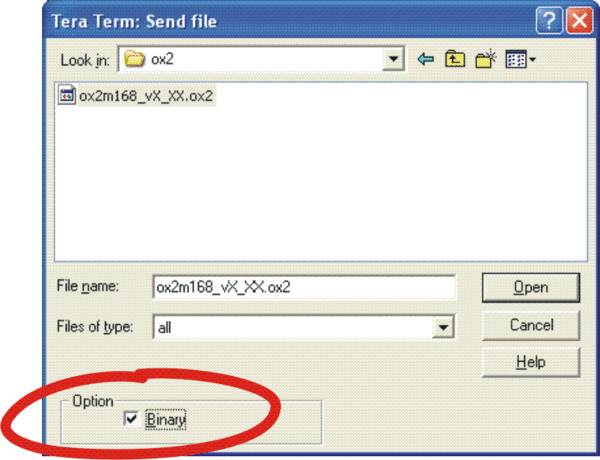
Navigate to the directory that has the .pgm file you wish to upload and select the file. Before you click “Open,” make sure you have checked the binary checkbox option in the lower left part of the window. If you fail to check this box, the upload will fail.
 |
When you click “Open”, you should see periods streaming across your terminal window . Each period represents the successful transmission of a packet. You should also see the red status LED below the reset button flickering as the firmware update progresses. When the upload is complete, the programmer will transmit *SUCCESS to indicate success. If there is a problem, the programmer will transmit either STARTERR or CHKSUMERR, most likely followed by a stream of *'s and a few c's. The most likely cause for such a problem would be the failure to transmit the firmware upgrade file as a binary file. If repeating the steps in this section again do not lead to a successful firmware update, please see Section 2 for information on how to contact us for support.
Related products


Home | Forum | Blog | Support | Ordering Information | Lists | Distributors | BIG Order Form | About | Contact
© 2001–2026 Pololu Corporation
