Support » Pololu Maestro Servo Controller User’s Guide » 4. Using the Maestro Control Center »
4.d. Entering a Script
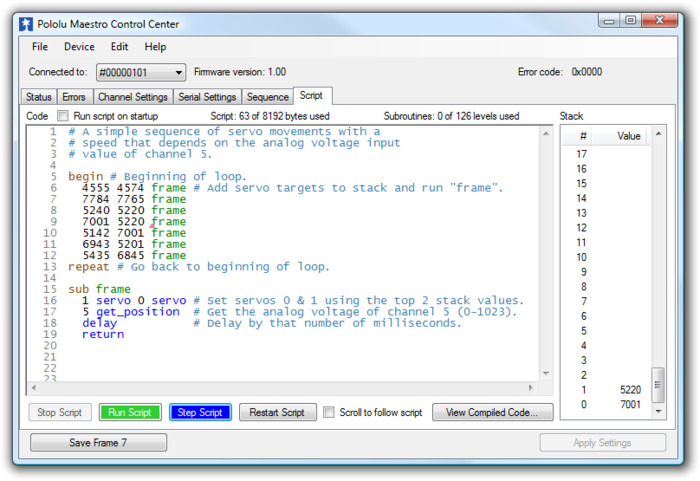 |
The Script tab in the Maestro Control Center. |
|---|
The Script tab is where you enter a script to be loaded into the Maestro. For details on the Maestro scripting language, see Section 6. Once you have entered a script and clicked the “Apply Settings” button to load the script on to the device, there are a number of options available for testing and debugging your script on the Script tab.
Running and stepping through a script
To start a script running, click the green button labeled “Run Script”. Your script will be processed by the Maestro, one instruction at a time, until a QUIT instruction is reached or an error occurs. In many cases it will be useful to use a loop of some kind to cause a script to run forever. While the script is running, the red “Stop Script” button will be available, and the small pink triangle will jump around your source code, showing you the instruction that is currently being executed. If the script places data on the stack, it will be visible on the right side of the tab, and nested subroutine calls are counted in a label at the top of the tab.
To examine the operation of a script in more detail, click the blue button labeled “Step Script”. This button causes the script to execute a single instruction, then stop and wait for another command. By stepping through the script a single instruction at a time, you can check that each part of your program does exactly what you expect it to do.
Setting the script to be run on startup
By default, the script only runs when you click the “Run Script” button. However, for many applications, you will want the script to run automatically, so that the Maestro can be used without a permanent USB connection. Check the “Run script on startup” option to cause the Maestro to automatically run the script whenever it is powered up. You will still be able to use the controls on the Script tab for debugging or to stop the running script.
Examining the compiled code
Click the “View Compiled Code” button to see the actual bytes that are created by each line of your script. This is available mostly as a tool for developers; if you are interested in the details of the bytecode used on the Maestro (for example, if you want to write your own compiler), please contact us. At the end of the compiled code is a listing of all of the subroutines, including their numbers in decimal and hex notation. These numbers can be used with serial commands to enter the subroutines under external control.
Related products


Home | Forum | Blog | Support | Ordering Information | Lists | Distributors | BIG Order Form | About | Contact
© 2001–2026 Pololu Corporation
