Support » Pololu Orangutan SVP User’s Guide » 5. Getting Started »
5.a. Installing Windows Drivers
If you use Windows XP, you will need to have either Service Pack 3 or Hotfix KB918365 installed before installing the drivers for the Orangutan SVP. Some users who installed the hotfix have reported problems using the programmer which were solved by upgrading to Service Pack 3, so we recommend Service Pack 3 over the hotfix.
Before you connect your Pololu Orangutan SVP robot controller to a computer running Microsoft Windows, you must install its drivers:
- Download and install the Pololu AVR Development Bundle (~6MB exe). This includes the drivers for the Orangutan SVP, along with the Pololu AVR C/C++ Library and the drivers for the Pololu USB AVR Programmer. If you are not sure which of these components you need, it is OK to install all of them. If you only need to install the drivers for the Orangutan SVP, you can download those separately: Orangutan SVP Windows Drivers (53k exe).
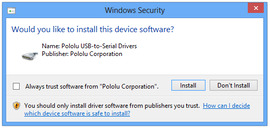
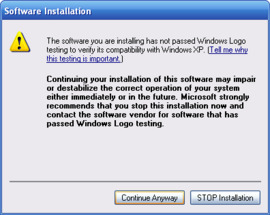
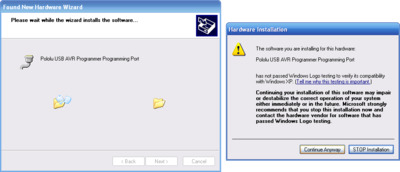
- During the installation, Windows will ask you if you want to install the drivers. Click “Install” (Windows 7, 8, and Vista) or “Continue Anyway” (Windows XP).
|
|
Windows 10, Windows 8, Windows 7, and Windows Vista users: After the installation is complete, your computer should automatically install the necessary drivers when you connect an Orangutan SVP, in which case no further action from you is required.
Windows XP users: After the installation is complete, follow steps 3-7 for each new Orangutan SVP you connect to your computer.
- Connect the device to your computer’s USB port. The Orangutan SVP shows up as three devices in one so your XP computer will detect all three of those new devices and display the “Found New Hardware Wizard” three times. Each time the “Found New Hardware Wizard” pops up, follow steps 4-7.
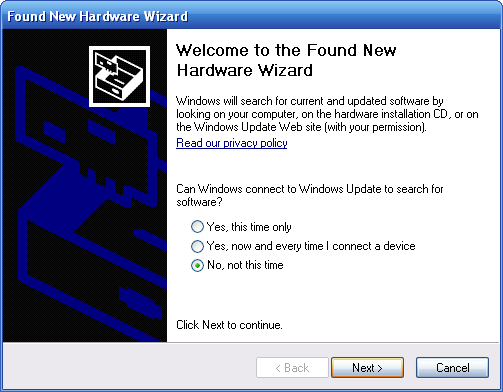
- When the “Found New Hardware Wizard” is displayed, select “No, not this time” and click “Next”.
 |
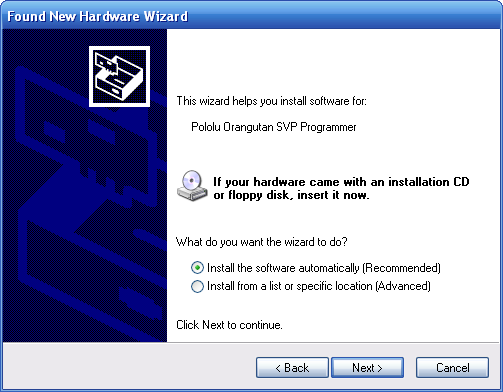
- On the second screen of the “Found New Hardware Wizard”, select “Install the software automatically” and click “Next”.
 |
- Windows XP will warn you again that the driver has not been tested by Microsoft and recommend that you stop the installation. Click “Continue Anyway”.
 |
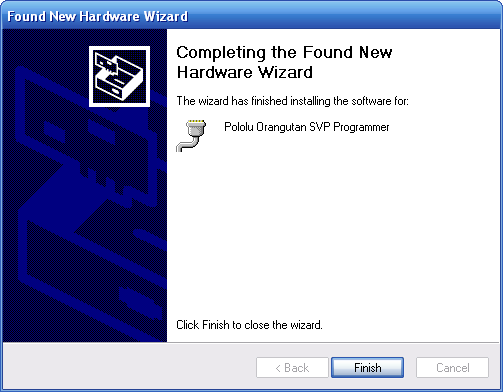
- When you have finished the “Found New Hardware Wizard”, click “Finish”. After that, another wizard will pop up. You will see a total of three wizards when plugging in the Orangutan SVP. Follow steps 4-7 for each wizard.
 |
If you use Windows XP and experience problems installing the drivers, the cause of your problems might be a bug in older versions of Microsoft’s usb-to-serial driver usbser.sys. Versions of this driver prior to version 5.1.2600.2930 will not work with the Orangutan SVP. You can check what version of this driver you have by looking in the “Details” tab of the “Properties” window for C:\Windows\System32\drivers\usbser.sys. To get the fixed version of the driver, you will need to either install Service Pack 3 or Hotfix KB918365. Some users who installed the hotfix have reported problems using the programmer which were solved by upgrading to Service Pack 3, so we recommend Service Pack 3 over the hotfix.
After installing the drivers, if you go to your computer’s Device Manager and expand the “Ports (COM & LPT)” list, you should see three COM ports: Pololu Orangutan SVP Programmer (Section 5.c), Pololu Orangutan SVP USB Communication Port (Section 8), and the Pololu Orangutan SVP TTL Serial Port (Section 9). In parentheses after these names, you will see the name of the port (e.g. “COM5” or “COM6”).
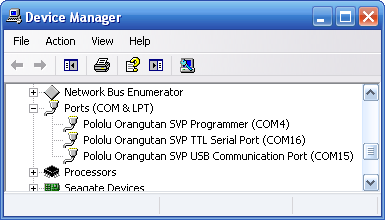 |
Windows XP device manager showing the Pololu Orangutan SVP. |
|---|
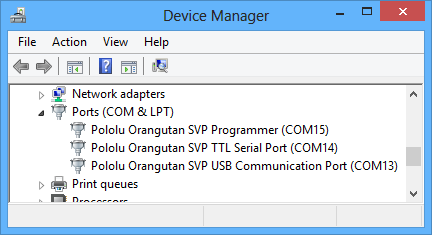 |
Windows 8 device manager showing the Pololu Orangutan SVP. |
|---|
The COM ports in the Device Manager might actually be named “USB Serial Device” instead of having a descriptive name as shown in the screenshots above. This can happen if you are using Windows 10 or later and you plugged the Orangutan SVP into your computer before installing our drivers for it. In that case, Windows will set up your programmer using usbser.inf, a driver from Microsoft that ships with Windows 10 and later, and it will display “USB Serial Device” as the name for each port. The ports will be usable, but it will be hard to distinguish the ports from each other because of the generic name shown in the Device Manager. We recommend fixing the names in the Device Manager by right-clicking on each “USB Serial Device” entry, selecting “Update Driver Software…”, and then selecting “Search automatically for updated driver software”. Windows should find the drivers you already installed, which contain the correct name for the port.
Some software will not allow connection to higher COM port numbers. In particular, AVR Studio and early versions of Atmel Studio can only connect to COM1 through COM9. If you need to change the COM port number assigned to one of the COM ports, you can do so using the Device Manager. Bring up the properties dialog for the COM port and click the “Advanced…” button in the “Port Settings” tab. From this dialog you can change the COM port assigned to your device.
