Support »
Programming Orangutans and the 3pi Robot from AVR Studio 4
View document on multiple pages.
- 1. Overview
- 2. Installing Prerequisites
- 3. Compiling an example program
- 4. Using the Pololu AVR Library for your own projects
1. Overview
This tutorial will help you get started programming the AVR microcontroller on an Orangutan robot controller or 3pi robot under Windows using Atmel’s older AVR Studio 4 IDE. This guide is mainly designed for people who want to use the Pololu USB AVR Programmer and the Pololu AVR C/C++ Library but could still be useful to other people.
AVR Studio 4 is old and no longer supported by Atmel. We recommend using the new Microchip Studio and following the tutorial in the Pololu AVR Programming Quick Start Guide.
2. Installing Prerequisites
To program AVRs from Windows using AVR Studio 4, several pieces of software are needed:
- WinAVR: WinAVR is a free, open-source suite of development tools for the AVR family of microcontrollers, including the GNU C/C++ compiler for AVRs (avr-gcc).
- AVR Studio 4.18: AVR Studio 4.18 is a free integrated development environment (IDE) for programming AVRs offered by Atmel. AVR Studio 4.18 works with the WinAVR avr-gcc compiler and contains built-in support for AVR ISP programming. We do not recommend the newer version 4.19 because it does not automatically detect and use WinAVR.
- Pololu AVR C/C++ Library: This library provides functions for interacting with all of the Orangutan’s integrated hardware, including the auxiliary processor, and many demo programs that show how to use these functions. The library should be installed using the executable installer after installing WinAVR.
You will also need to install the USB drivers for your programmer or board:
- Pololu USB AVR Programmer drivers and software
- CP2102 drivers for the Orangutan X2
- Orangutan SVP drivers
AVR Studio 4 only supports connecting to COM1 through COM9, so be sure to look in your Device Manager and change the COM port number of your device if necessary.
3. Compiling an example program
A very simple demo program for Pololu’s Orangutan robot controllers or 3pi robot is available in the folder examples\atmegaXXX\simple-test, where atmegaXXX is the model of the microcontroller on your board. The examples folder can be found in the directory where you installed the Pololu AVR C/C++ Library, which is C:\libpololu-avr\ by default.
Note: If you are using a new Orangutan X2 with an ATmega1284P user microcontroller, you should use the examples in examples\atmega1284p_x2; if you are using the Orangutan SVP-1284, you should use the examples in examples\atmega1284p.
Double-click on the file test.aps, and the project should open automatically in AVR Studio 4, showing a C file that uses a few basic commands from the Pololu AVR Library:
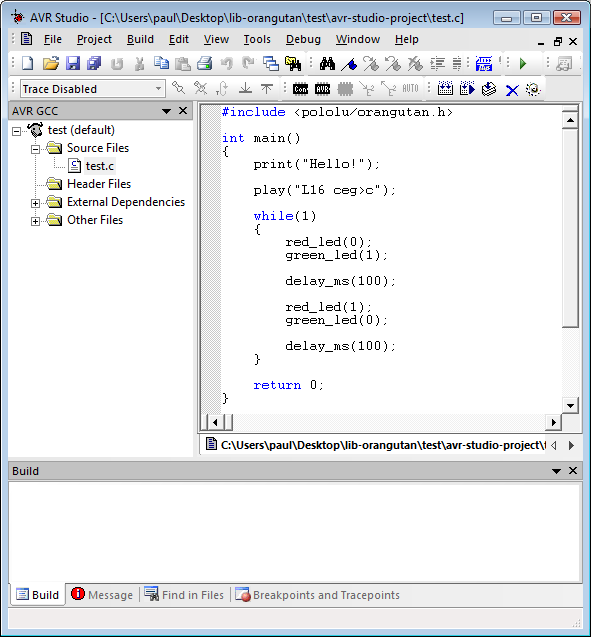 |
AVR Studio 4 showing the sample program. |
|---|
To compile this program, select Build > Build or press F7. Look for warnings and errors (indicated by yellow and red dots) in the output displayed below. If the program compiles successfully, the message “Build succeeded with 0 Warnings…” will appear at the end of the output, and a file test.hex will have been created in the simple-test\default folder.
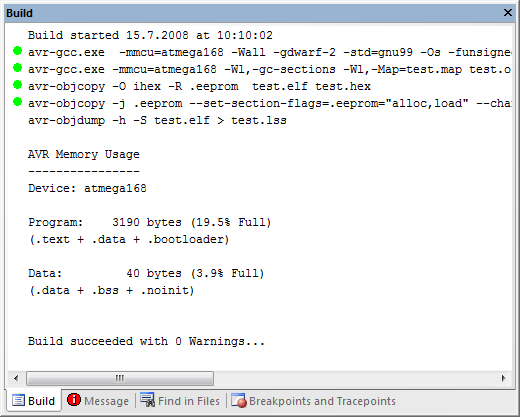 |
AVR Studio 4 build window, compiling the example project. |
|---|
Connect your programmer to your computer and your Orangutan board or 3pi robot, and turn on the target’s power. If you are using the Pololu USB AVR Programmer, the yellow LED should be blinking, indicating that it detects the target’s power. If you are using the Orangutan SVP, make sure the blue power LED is on.
Select Tools > Program AVR > Connect to connect to the programmer. Select “STK500” as the platform and select the COM port of your programmer, as indicated in the Device Manager. When you click the “Connect” button, the STK500 programming window should appear.
Select the Main tab. In the dropdown box that lists AVR models, select the type of AVR on your device. For an Orangutan or 3pi robot, this will either be ATmega48, ATmega168, ATmega328P, ATmega324PA, ATmega644P, or ATmega1284P.
Select the Program tab. Click “…” in the Flash section and select file test.hex that was compiled earlier. Note that you have to first navigate to your project directory. Now click “Program” in the Flash section, and the test code should be loaded onto your Orangutan or 3pi.
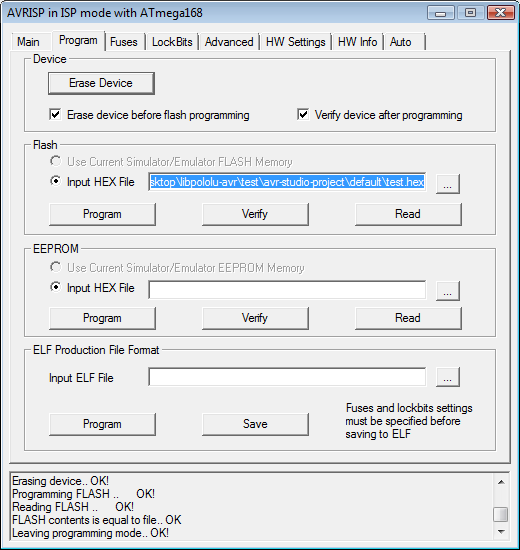 |
Programming the Orangutan from AVR Studio. |
|---|
If your controller was successfully programmed and you not using a Baby Orangutan, you should hear a short tune, see the message “Hello!” on the LCD (if one is present and the contrast is set correctly), and the LEDs on the board should blink. If you are using a Baby Orangutan B, you will just see the red user LED blink.
4. Using the Pololu AVR Library for your own projects
The recommended way to get started with AVR Studio 4 is to start with one of our example projects in the library and modify it to suit your needs. If instead you want to create your own new AVR Studio 4 project that uses the library, then you will need to configure your project correctly. For details about how to configure your project, see the Using the Pololu AVR Library for your own projects section of the Pololu AVR C/C++ Library User’s Guide.
Related products


Home | Forum | Blog | Support | Ordering Information | Lists | Distributors | BIG Order Form | About | Contact
© 2001–2026 Pololu Corporation
