Support »
Pololu Orangutan SV-xx8 and LV-xx8 User’s Guide

View document on multiple pages.
You can also view this document as a printable PDF.
- 1. Overview
- 2. Contacting Pololu
- 3. Schematic Diagrams
- 4. Module Pinouts, Component Identification, and Usage Notes
- 5. Getting Started
- 6. AVR Pin Assignment Table Sorted by Function
- 7. AVR Pin Assignment Table Sorted by Pin
- 8. Motor Driver Truth Table
- 9. Related Resources
1. Overview
|
|


The Orangutan SV-168, SV-328, and LV-168 robot controllers are complete control solutions for small robots. These units all have the same form-factor and nearly identical peripheral hardware with matching pin assignments. This makes the versions interchangeable in most situations, and typically allows the same code to run on any controller.
Note: This guide refers to these controllers as “Orangutans” unless a distinction needs to be made between the versions.
The Orangutan SV-168 and LV-168 are based on Atmel’s ATmega168 AVR microcontroller, which runs at 20 MHz and features 16 Kbytes of flash program memory, 1024 bytes of SRAM, and 512 bytes of EEPROM. The Orangutan SV-328 is based on the ATmega328P, which runs at 20 MHz and features twice the memory of the mega168: 32 Kbytes of flash program memory, 2048 Kbytes of SRAM, and 1024 bytes of EEPROM. The mega328 is essentially a drop-in replacement of the mega168.
Because the user has direct access to the microcontroller, any development software for Atmel’s AVR microcontrollers, including Atmel’s free AVR Studio and the WinAVR GCC C/C++ compiler, is compatible with the Orangutan. An in-circuit programmer, such as our USB AVR programmer, is required for programming the Orangutan. We provide an extensive set of software libraries that make it easy to interface with all of the integrated hardware. These libraries come with a number of sample programs that demonstrate how to use the various components on the Orangutan. These robot controllers are also compatible with the popular Arduino development platform.
Common Orangutan Features
- overall unit dimensions: 2.15" x 1.9"
- 2 bidirectional motor ports
- programmable 20 MHz Atmel ATmega168 AVR microcontroller (16 KB flash, 1 KB SRAM, 512 bytes EEPROM) or ATmega328 (32 KB flash, 2 KB SRAM, 1 KB EEPROM)
- 8 general-purpose I/O lines, 6 of which can be used as analog input channels
- 2 additional analog input channels (ADC6 & ADC7) can be accessed on the board
- removable 8-character x 2-line LCD
- buzzer tied to one of the mega168’s hardware PWMs
- 3 user pushbutton switches
- 2 user LEDs
- user potentiometer optionally jumpered to ADC7
Features Specific to the Orangutan LV-168
- An integrated step-up regulator allows for 2 – 5 V input voltage, making the LV-168 ideal for powering low-voltage, high-current motors and 5V peripheral electronics from 2 – 4 NiMH cells.
- The discrete, low-voltage H-bridge can supply a continuous 2 A per motor channel (5 A maximum).
- A temperature sensor optionally connected to ADC6 gives limited feedback about board temperature.
Features Specific to the Orangutan SV-168 and SV-328
- An integrated 5V switching regulator can provide up to 3 A from an input voltage of 6 – 13.5 V, allowing you to power servos and other high-power peripherals for which the battery voltage would be too high.
- The TB6612FNG dual motor driver can supply a continuous 1 A per motor channel (3 A maximum) and supports ultrasonic PWM frequencies (up to 80 kHz).
- Battery voltage self-monitoring is optionally connected to ADC6 through a voltage divider.
2. Contacting Pololu
You can check the Orangutan SV-328 robot controller page and Orangutan LV-168 robot controller page for additional information, including pictures, example code, and application notes. You can also find a libraries for interacting with the on-board hardware and an assortment of sample code in the Pololu AVR Library.
We would be delighted to hear from you about any of your projects and about your experience with the Orangutan Robot controllers. You can contact us directly or post on our forum. Tell us what we did well, what we could improve, what you would like to see in the future, or anything else you would like to say!
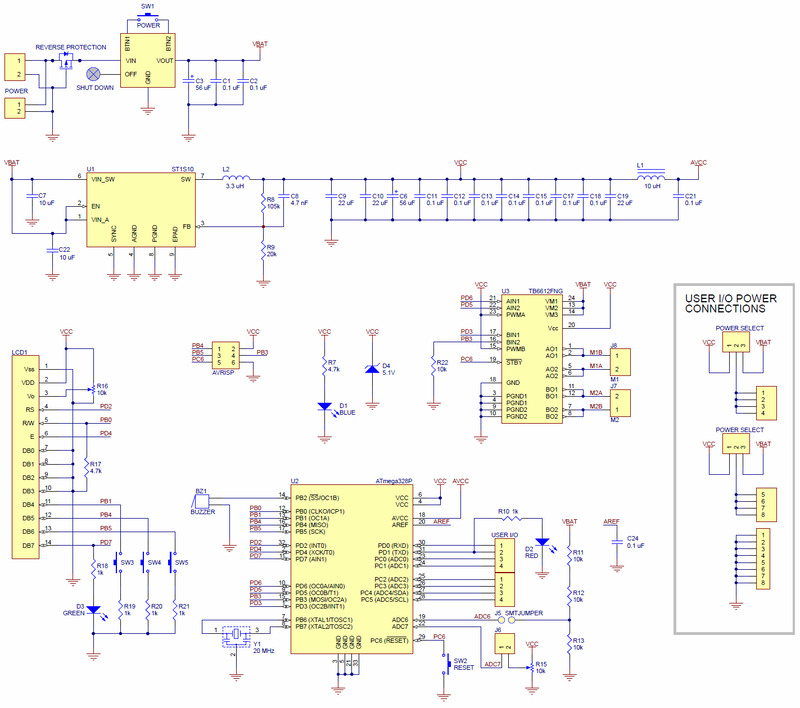
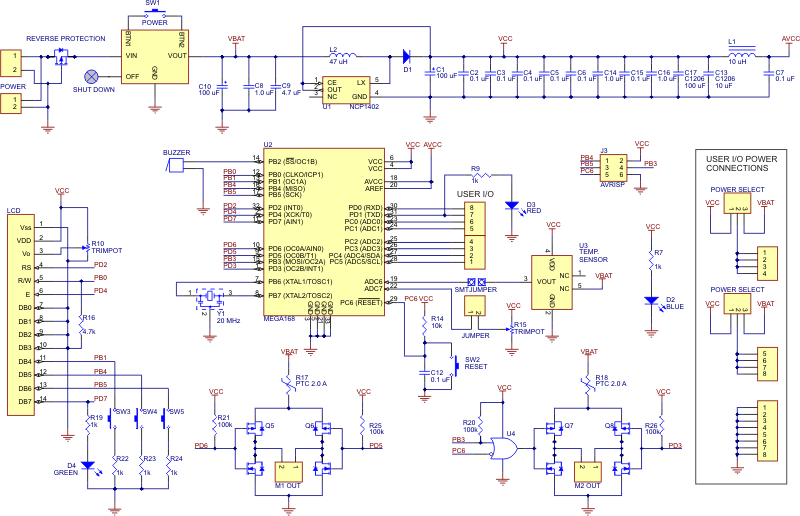
3. Schematic Diagrams
|
||
Download a PDF version (413k pdf) |
|
||
Download a PDF version (39k pdf) |
4. Module Pinouts, Component Identification, and Usage Notes
Components
|
|
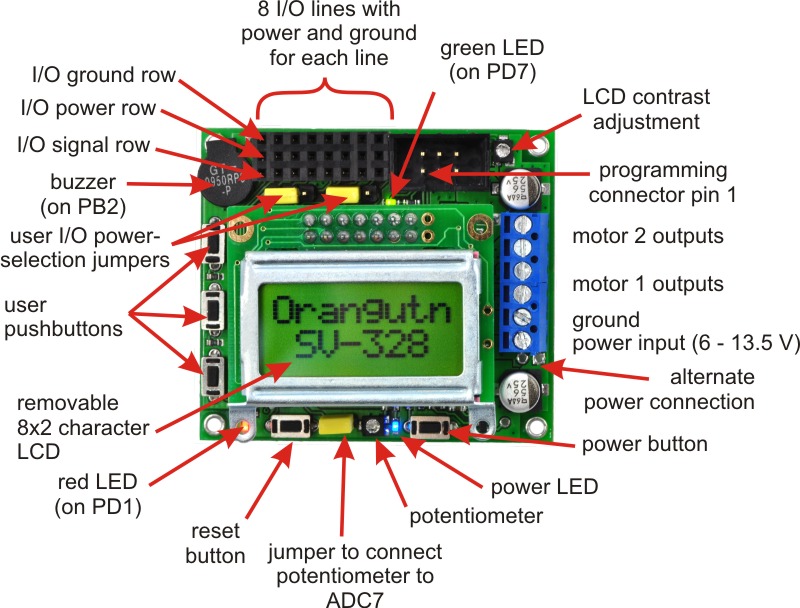

The Orangutan contains a programmable ATmega168 or ATmega328P AVR microcontroller, a dual motor driver for direct control of two DC motors, an 8×2 character LCD, a buzzer, three user pushbuttons, two user LEDs, and a 10k user trimmer potentiometer. These and the rest of the main features of the Orangutan modules are labeled in the pictures above. Most of the connections points are also indicated on the silkscreen on the back side of the PCB, as shown below. The overall unit dimensions are 2.15" x 1.9", and four 0.086" mounting holes, suitable for #2 screws, are located 0.1" from the corners of the board (the top-left mounting hole is usually obscured by the buzzer).
|
|


Orangutan SV-xx8 Power & Motor Connections
The power and motor connections are on the right side of the unit. The Orangutan SV-xx8’s input voltage should be 6 – 13.5 V, from which the on-board regulator generates the 5 V that is used to power the logic. In its factory configuration, analog input ADC6 is connected through a jumper to a third of the battery voltage so that you can monitor the state of your batteries.
The Orangutan SV-xx8’s TB6612FNG motor driver can deliver a continuous 1 A per motor channel, and can briefly deliver up to 3 A per motor channel. If you aren’t taking extra steps to keep the motor driver cool, such as using a heat sink, exceeding this continuous current rating for too long will cause the motor driver to heat up and trigger its built-in thermal shutdown.
Orangutan LV-168 Power & Motor Connections
Just like the Orangutan SV-xx8, the power and motor connections are on the right side of the unit. The Orangutan LV-168 is designed to operate off of three NiMH cells, which corresponds to a voltage range of about 2.5 – 4.5 V. However, the unit can operate from two or four NiMH cells with some limitations. At lower voltages, the effectiveness of the motor drivers (H-bridges) is reduced, and the 5 V step-up regulator’s available output current decreases. Beyond 5 V, the step-up regulator ceases operation and the input voltage shows up on the Vcc line; the components on the board can operate to 5.5 V, but some sensors you use might have a 5.25 V limit.
The Orangutan LV-168’s motor drivers can briefly deliver up to 5 A each, but each motor driver is protected by a 2 A resettable fuse that is triggered by excessive temperature. If the motors draw much more than 2 A for more than a few seconds, the voltage to the motors will be reduced, but normal operation will resume once the board has cooled down. In its factory configuration, an on-board temperature sensor is connected through a jumper to ADC6 for some (limited) feedback about the board temperature.
User I/O & Power Outputs
The eight user I/O lines can be accessed via the 8×3 0.100" female header along the upper edge of the board, as shown below. Each line has associated power and ground connections for easy connections to sensors: the exterior (top) pin is ground, the middle pin is power, and the interior(bottom) pin is signal and connects directly to an AVR I/O line.
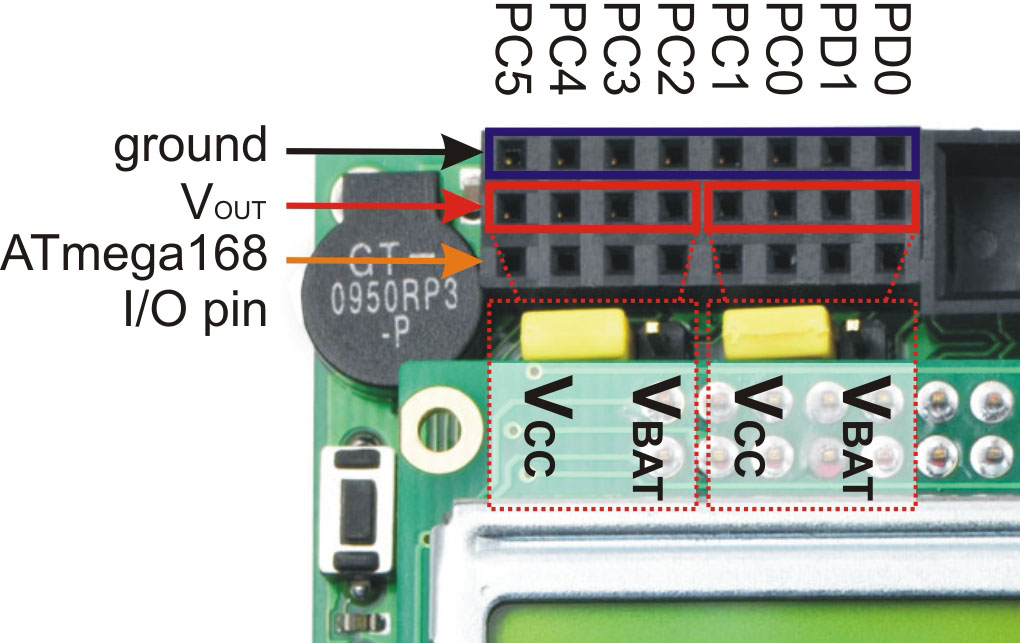 |
Orangutan SV-xx8 and LV-168 user I/O header. |
|---|
The power row is divided into two banks of four pins, and each bank can either connect directly to the battery voltage or to the 5 V generated on the board; this connection is determined by the bank’s associated power selection jumper. On the Orangutan LV-168, the total current available to the 5 V line is approximately 150 mA, but the exact amount depends on your input voltage. On the Orangutan SV-xx8, the total current available to the 5 V line is 3 A, meaning you can power servos and other high-power peripherals directly from your regulated voltage. Please note that you should use something more robust than the supplied power-selection shorting blocks if you plan on pulling much more than an amp from a single bank.
From left to right, the signal connections along the bottom row are: PC5, PC4, PC3, PC2, PC1, PC0, PD1, and PD0. Pins PC0 – PC5 can be used as either digital I/Os or analog inputs. Pins PD0 and PD1 are digital I/Os that connect to the ATmega168’s UART hardware, which means you can use them as logic-level (TTL) serial receive and transmit lines, respectively. Two additional dedicated analog inputs (ADC6 and ADC7) are connected by default to hardware on the board, but their jumpers can be removed to provide user access to these inputs. ADC7 is connected to the user trimmer potentiometer by the shorting block next to the reset button; the left pin of the shorting block header is tied directly to ADC7. ADC6 is connected to the LV-168’s temperature sensor and the SV-xx8’s battery voltage monitoring circuit via a surface-mount jumper on the bottom side of the PCB. You can use a soldering iron to break this short, and you can make your own connection to ADC6 using the right of the two shorting pads.
Motors
The motor drivers are controlled by the AVRs hardware PWM outputs on eight-bit timers 0 and 2, which lets you achieve variable motor speeds using hardware rather than processor-intensive software PWMs on the motor control lines. The two Timer0 PWM outputs connect to both of motor 1’s direction inputs and the two Timer2 PWM outputs connect to both of motor 2’s direction inputs. Note that one of the motor control pins (PB3) is also used during programming as a SPI line (MOSI), which this means that you cannot use SPI on the Orangutan without unintentionally driving one of the motors. Programming the Orangutan does not drive the motors because the motor driver circuitry is disabled while the board is reset.
LCD
The Orangutan is supplied with a removable 8×2 character LCD that uses the common HD44780 parallel interface (109k pdf); a larger display can be connected instead with an appropriate cable. The ATmegaxx8 has four I/O lines connected to LCD data lines DB4 – DB7 (i.e. is configured to use the LCD in 4-bit mode) and three I/O lines connected to the three LCD control lines RS, R/W, and E. Please see the schematic for more information. Please note that the LCD data lines are also shared by the user pushbuttons, the green user LED, and the programming connector.
Pushbuttons
The Orangutan has five total pushbuttons: a power on/off button located on the right side of the bottom edge of the board, a reset button located on the left side of the bottom edge of the board, and three user pushbuttons along the left edge of the board. Please note that the power button turns off power to the entire board, and the reset button connects directly to the ATmegaxx8’s reset pin. The user buttons, from top to bottom, are on pins PB5, PB4, and PB1. Pressing one of these user pushbuttons pulls the associated I/O pin to ground through a 1kΩ resistor, so to use the buttons you should configure them as inputs with their internal pull-up resistors enabled. Note that pushbuttons physically bounce when pressed, so make sure you take this phenomenon into account when writing your button-handling code. Additionally, since the LCD and pushbuttons share I/O lines, the LCD lines must be in high-impedance mode (i.e. both the AVR and the LCD should not be trying to write to the lines) for you to be able to read the pushbuttons.
Note: The user pushbuttons lines are shared by the programming connector, so you should not press the user pushbuttons while your Orangutan is being programmed.
Buzzer
The buzzer is on pin PB2, which can be used as a normal digital I/O or configured as a hardware PWM output driven by the ATmegaxx8’s 16-bit Timer1. If you alternate between driving the buzzer pin high and low at a given frequency, the buzzer will produce sound at that frequency. By taking advantage of the hardware PWM output on the buzzer pin, you can have the buzzer playing in the background while the rest of your program executes. Please see the buzzer section of the Pololu AVR library for more information.
LEDs
The Orangutan comes with a blue power LED (located next to the power button) and two user LEDs: one red and one green. The red user LED is located next to the reset button and is on the user I/O line PD1; it will light if you set PD1 as a high output. The green user LED is located between the user I/O header and the LCD and is connected to pin PD7; it will light if you set PD7 as a high output. Note that PD7 is also used as an LCD data line, so you will see the green LED flicker when you update the LCD.
Programming Connector
The Orangutan has a 6-pin programming connector on the upper right side; the robot controller is designed for an AVR ISP in-system programmer from Atmel or a compatible programmer, such as the Pololu Orangutan USB programmer. Pin 1 is the pin most toward the inside of the board.
5. Getting Started
The Orangutan requires power be applied across the + and GND pins along the right edge of the board. The device is protected by a MOSFET against accidental reverse-battery connection. When the Orangutan is powered, you can press the power button, which is located on the right side of the bottom edge of the board, to turn the Orangutan on and off. When the Orangutan is on, the blue LED next to the power button is lit.
For the Orangutan SV-xx8, the supply voltage should be 6 – 13.5 V, so a 5- to 9-cell NiCd or NiMH battery pack is a good choice. This Orangutan can work with a 10-cell NiCd or NiMH battery pack or a 12V lead-acid battery, but you should be aware that such a power source might exceed the controller’s maximum voltage rating if the batteries are freshly charged.
For the Orangutan LV-168, the supply voltage should be 2 – 5 V, so a 3-cell NiCd or NiMH battery pack is a good choice, though the unit can operate from two or four NiMH cells with some limitations. At lower voltages, the effectiveness of the motor drivers is reduced, and the 5 V step-up regulator’s available output current decreases. Beyond 5 V, the step-up regulator ceases operation and the input voltage shows up on the Vcc line; the components on the board can operate to 5.5 V, but some sensors you use might have a 5.25 V limit.
5.a. Using the Demo Program
The Demo Program
The Orangutan ships with a demo/test program pre-loaded. This demonstrates most of its features and allows you to test that it is working correctly. When you first turn on your Orangutan, you will hear a beep and see the words “Pololu xV-xx8”, then “Demo Program” appear, indicating that you are running the demo program. If you hear a beep but do not see any text on the LCD, you may need to adjust the contrast potentiometer in the upper-right corner of the board. When the program has started successfully, press the B button (the middle button, marked PB4 on the underside of the board) to proceed to the main menu. Press C (the top button, marked PB5) or A (the bottom button, marked PB1) to scroll forward or backward through the menu, and press B to make a selection or to exit one of the demos. There are seven demos accessible from the menu:
- Battery (SV-xx8 only): This demo displays the battery voltage in millivolts. Desoldering the SMT jumper marked ADC6=VBAT/3 will separate the battery voltage measurement circuit from the analog input, causing the number displayed to drop to some low value. Note that this demo only exists on the SV-xx8 version of the program.
- Temp (LV-168 only): This demo displays the board temperature in degrees Fahrenheit (button C) or Celcius (button A). If you touch the board near the center you should see the temperature rise. Desoldering the SMT jumper marked ADC6=TEMP will separate the temperature sensor output from the analog input, causing the number displayed to drop to some low value. Note that this demo only exists on the LV-168 version of the program.
- LEDs: Blinks the red and green user LEDs on the underside of the board. If you have soldered in the optional user LEDs, they will also blink.
- Trimpot: Displays the position of the user trimmer potentiometer, which is located on the underside of the board, as a number between 0 and 1023. While displaying the value, this demo also blinks the LEDs and plays a note whose frequency is a function of the current reading. It is easiest to turn the trimpot using a 2mm flat-head screwdriver.
- Motors: Hold down A or C to run motor 1 or 2, respectively, or hold down both buttons to run both motors simultaneously. The motors will gradually ramp up to speed; in your own programs, you can switch them on much more suddenly. Tap A or C to switch the corresponding motor to reverse (the button letter becomes lowercase if pressing it will drive the corresponding motor in reverse).
- Music: Plays an adaptation of J. S. Bach’s Fugue in D Minor for microcontroller and piezo, while scrolling a text display. This demonstrates the ability of the Orangutan to play music in the background.
- Timer: A simple stopwatch. Press C to start or stop the stopwatch and A to reset. The stopwatch continues to count while you are exploring the other demos.
The source code for the demo program is included with the Pololu AVR C/C++ Library. After downloading and unpacking the library zip file, the demo program can be found in the appropriate examples\atmegaxx8\xV-xx8_demo_program.
The “Secret” Test Program
The demo program contains a simpler test program that can be triggered if you hold one of the user pushbuttons while resetting or turning on the controller. We use this program to test each Orangutan before it ships. When this test program first begins running, the LCD will display a startup screen followed shortly by an interpretation of the voltage on pin ADC6. On the Orangutan SV-xx8, this figure represents the current battery voltage in millivolts; on the Orangutan LV-168, this figure represents the output of the temperature sensor in degrees Fahrenheit (if you touch the board near the center you should see the temperature rise). From this point on, you can use the three user pushbuttons to navigate through the three demo modes:
A Button: Motor Demo
Pushing the bottom user pushbutton (labeled PB1 on the back of the Orangutan PCB) will take you to the motor demo, which alternates between driving motors 1 and 2 forward and reverse. First, the Orangutan gradually ramps motor 1 from stationary to full-speed forward, to full-speed reverse, and back to stationary; motor 2 is stationary during this entire phase. Next, the Orangutan repeats this process with motor 2 while motor 1 remains stationary. The two motors alternate periods of activity like this for the duration of the demo. While motor 1 is active, the red LED is lit, and while motor 2 is active the red LED is off. While the currently active motor is moving forward, the green LED is lit, and while the currently active motor is moving in reverse, the green LED is off. The LCD gives you feed back about which motor is moving in which direction: “F” = forward, “R” = reverse, and “-” = inactive.
B Button: User I/O Demo
Pushing the middle user pushbutton (labeled PB4 on the back of the Orangutan PCB) will take you to the user I/O demo, which makes use of the eight user I/O pins and the trimmer potentiometer. At any given time, one pin is being driven low while the rest are weakly pulled high. At the same time, the LCD displays the input values on the eight user I/O pins. If you short a pin to ground, you will see the corresponding bit on the LCD go to zero. Pin PD1 will always read as low because it is being pulled down through the red user LED. The pin that is driven low will repeatedly cycle from left to right and back again, “bouncing” back and forth from PC5 to PD0 to PC5. The period of this cycle is determined by the position of the user potentiometer. You can connect an LED between an I/O lines and power (make sure you use a current-limiting resistor!), and the LED will light each time the pin it’s connected to is driven low.
Note: do not short a pin to power or else you could damage the ATmega168 microcontroller when it tries to drive that pin low; only short it to one of the ground pins along the top edge of the board, or use an LED in series with a resistor to connect to power.
C Button: Melody Demo
Pushing the top user pushbutton (labeled PB5 on the back of the Orangutan PCB) will take you to the melody demo, in which the Orangutan plays a fugue on the buzzer while using high-frequency software PWM to alternately fade the red and green user LEDs in and out. The demo program uses the Pololu AVR library to play the melody directly from program memory (i.e. flash), thereby conserving RAM, and it uses timer interrupts to play the melody notes at the proper times, so program execution is not blocked as the melody plays.
5.b. Programming Your Orangutan
To program the Orangutan, you will need a computer and an external AVR ISP programmer such as the Pololu USB AVR Programmer.
Please see the Pololu AVR Programming Quick Start Guide for tutorials on how to get started programming the Orangutan in Windows, Linux, and Mac OS X. That guide also covers the Pololu AVR C/C++ Library and the Pololu USB AVR Programmer.
6. AVR Pin Assignment Table Sorted by Function
| Function | megaxx8 Pin |
|---|---|
| digital I/Os (x8) | PD0, PD1, PC0 – PC5 |
| analog inputs (x8) | PC0 – PC5, ADC6, ADC7 |
| motor 1 control (A and B) | PD5 and PD6 |
| motor 2 control (A and B) | PD3 and PB3 |
| red user LED | PD1 |
| green user LED | PD7 |
| user pushbuttons (x3) | PB1, PB4, and PB5 |
| buzzer | PB2 |
| LCD control (RS, R/W, E) | PD2, PB0, and PD4 |
| LCD data (4-bit: DB4 – DB7) | PB1, PB4, PB5, and PD7 |
| user trimmer potentiometer | ADC7 (through shorting block) |
| temperature sensor (LV-168 only) battery voltage monitor (SV-xx8 only) | ADC6 (through SMT jumper) |
| ICSP programming lines (x3) | PB3, PB4, PB5 |
| reset pushbutton | PC6 |
| UART (RX and TX) | PD0 and PD1 |
| I2C/TWI (SDA and SCL) | PC4 and PC5 |
| SPI | inaccessable to user |
7. AVR Pin Assignment Table Sorted by Pin
| Port | Pin | Orangutan Function | Notes/Alternate Functions |
|---|---|---|---|
B |
PB0 | LCD control line R/W | Timer1 input capture (ICP1) divided system clock output (CLK0) |
| PB1 | LCD data line DB4 | user pushbutton (pressing pulls pin low) Timer1 PWM output A (OC1A) | |
| PB2 | buzzer | Timer1 PWM output B (OC1B) | |
| PB3 | M2 control line | Timer2 PWM output A (OC2A) ISP programming line | |
| PB4 | LCD data line DB5 | user pushbutton (pressing pulls pin low) Caution: also an ISP programming line | |
| PB5 | LCD data line DB6 | user pushbutton (pressing pulls pin low) Caution: also an ISP programming line | |
| PB6 | 20 MHz resonator input | not accessable to the user | |
| PB7 | 20 MHz resonator input | not accessable to the user | |
C |
PC0 | analog input and digital I/O | ADC input channel 0 (ADC0) |
| PC1 | analog input and digital I/O | ADC input channel 1 (ADC1) | |
| PC2 | analog input and digital I/O | ADC input channel 2 (ADC2) | |
| PC3 | analog input and digital I/O | ADC input channel 3 (ADC3) | |
| PC4 | analog input and digital I/O | ADC input channel 4 (ADC4) I2C/TWI input/output data line (SDA) | |
| PC5 | analog input and digital I/O | ADC input channel 5 (ADC5) I2C/TWI clock line (SCL) | |
| PC6 | RESET pin | reset button (pressing resets MCU) digital I/O disabled by default | |
D |
PD0 | digital I/O | USART input pin (RXD) |
| PD1 | digital I/O | connected to red user LED (high turns LED on) USART output pin (TXD) | |
| PD2 | LCD control line RS | external interrupt 0 (INT0) | |
| PD3 | M2 control line | Timer2 PWM output B (OC2B) | |
| PD4 | LCD control line E | USART external clock input/output (XCK) Timer0 external counter (T0) | |
| PD5 | M1 control line | Timer0 PWM output B (OC0B) | |
| PD6 | M1 control line | Timer0 PWM output A (OC0A) | |
| PD7 | LCD data line DB7 | connected to green user LED (high turns LED on) | |
ADC6 | dedicated analog input | SMT-jumpered to temperature sensor (LV-168 only) SMT-jumpered to battery voltage monitor (SV-xx8 only) ADC input channel 6 (ADC6) | |
ADC7 | dedicated analog input | connected to user trimmer potentiometerADC input channel 7 | |
8. Motor Driver Truth Table
| input | Orangutan LV-168 output | Orangutan SV-xx8 output | |||||
|---|---|---|---|---|---|---|---|
| PD5, PD3 | PD6, PB3 | M1A, M2A | M1B, M2B | motor effect | M1A, M2A | M1B, M2B | motor effect |
H | H | L | L |
brake low | L | L | brake low |
L | H | L | H | "forward"* |
L | H | "forward"* |
H | L | H | L | "reverse"* |
H | L | "reverse"* |
L | L | H | H | brake high |
OFF (high-impedance) | coast | |
* Note that the concept of “forward” is arbitrary as simply flipping the motor leads results in rotation in the opposite direction.
Please note that we advise against using the fourth state in the above truth table (both motor inputs low). For the Orangutan LV-168, this state results in “brake high”, which is functionally equivalent to “brake low” but less safe (it’s easier to accidentally short power to ground while braking high). For the Orangutan SV-xx8, this state results in coasting; there is no danger involved in using this coast state, but alternating between drive and brake produces a more linear relationship between motor RPM and PWM duty cycle than does alternating between drive and coast. As such, we suggest achieving variable speed by PWMing between drive and brake when using the Orangutan SV-xx8.
Motor 1 is controlled by pins PD5 and PD6 (i.e. OC0B and OC0A), and motor 2 is controlled by PD3 and PB3 (i.e. OC2B and OC2A). These pins are connected to the ATmegaxx8’s four eight-bit hardware PWM outputs (PD5=OC0B, PD6=OC0A, PD3=OC2B, and PB3=OC2A), which allows you to achieve variable motor speeds through hardware timers rather than software. This frees the CPU to perform other tasks while motor speed is automatically maintained by the AVR timer hardware.
If you choose to write your own motor control code (instead of using the Pololu AVR library), the suggested procedure for using hardware PWM outputs to control the motors is as follows:
- Make the four motor control pins outputs and drive them high; this drives all four motor outputs low.
- Configure Timer0 and Timer2 to use a prescaler of 8, which results in a PWM frequency of 20 MHz/8/256 = 9.8 kHz, which is the upper limit for the Orangutan LV-168; you can configure the timers for a higher-frequency PWM (up to 80 kHz) if you are using the Orangutan SV-xx8. Set these timers for inverted PWM mode output on both OCxA and OCxB, meaning that these PWM pins are set on timer compare match and cleared on timer overflow. This results in negative PWM pulses with duty cycles determined by registers OCR0A, OCR0B, OCR2A, and OCR2B.
- You can command motor 1 to drive “forward” at a speed ranging from 0 – 255 by setting OCR0B = speed and holding fixed OCR0A = 0. You can command motor 1 to drive “reverse” at a speed ranging from 0 – 255 by setting OCR0A = speed and OCR0B = 0. During the period where the two input pins have opposite values, the motor drives at full speed. During the period where the two inputs have the same value (high), the motor brakes. Cycling between drive and brake and high frequency results in variable motor speed that changes as a function of PWM duty cycle. Analogous results can be obtained for motor 2 using OCR2A and OCR2B. (Note that the concept of “forward” is arbitrary as simply flipping the motor leads results in rotation in the opposite direction.)
Using these PWM settings, OCR0B = 255 is equivalent to holding PD5 low while OCR0A = 0 is equivalent to holding PD6 high. As you can see from the truth table above, in this state M1B connects to your battery’s positive terminal and M1A connects to ground. Decreasing OCR0B to something less than 255 decreases the percentage of time PD5 is low, causing M1B to alternate between VIN and GND (and hence causing motor 1 to alternate between drive and brake). Similarly, OCR2B = 255 is equivalent to holding PD3 low while OCR2A = 0 is equivalent to holding PB3 high. In this state, M2B connects to your battery’s positive terminal and M2A connects to ground.
9. Related Resources
The following list of resources might come in handy:
- ATmega168 documentation: ATmega168 datasheet and additional documentation
- ATmega328P documentation: ATmega328P datasheet and additional documentation
- Pololu AVR Programming Quick Start Guide: tutorials on how to get started programming in Windows, Linux, and Mac OS X.
- Pololu AVR Library Command Reference: detailed information about every function in the library.
- Pololu AVR Library User’s Guide: instructions on installing and using the library, as well as sample programs.
- Programming Orangutans from the Arduino Environment: a guide to programming the Orangutan using the Arduino IDE in place of Atmel Studio.
- Microchip Studio for AVR and SAM Devices: free integrated development environment (IDE) from Atmel that uses WinAVR as its compiler
- AVR Libc Home Page
- Tutorial: AVR Programming on the Mac
- WinAVR: free, open source C/C++ compiler for AVRs
Please see the resources tab of your Orangutan’s product page for even more resources, including sample AVR Studio projects.
Finally, we would like to hear your comments and questions over at the Orangutan Group on the Pololu Robotics Forum!
Related products


Home | Forum | Blog | Support | Ordering Information | Wish Lists | Distributors | BIG Order Form | About | Contact
© 2001–2024 Pololu Corporation
