Support » Pololu Orangutan USB Programmer User’s Guide » 5. Getting Started Using Windows »
5.b. AVR Studio 4 in More Detail
This section provides a brief overview of the other tabs in the AVRISP dialog. It is rare that you will want to use anything other than the Program tab, but it is useful to know what the other tabs let you do for the rare occasions when you will need them.
- Main: setting your ISP frequency
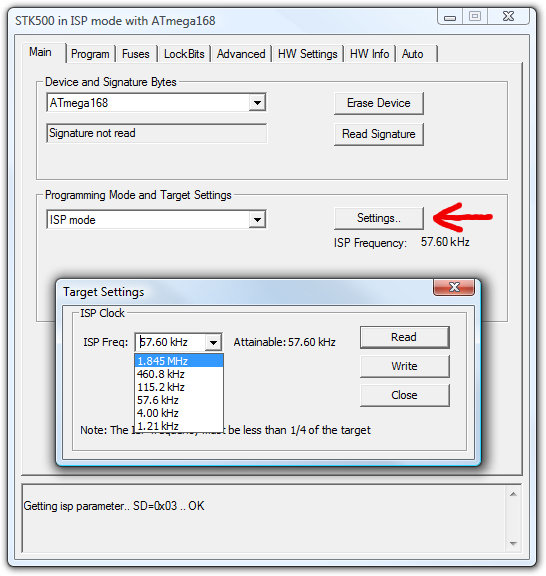
AVR Studio’s interface for setting the ISP frequency.
The Programming Mode and Target Settings section lets you set the frequency of the clock used when programming the target device. This frequency must be less than a quarter of your target’s clock. It is important to note that the frequencies in the ISP Freq list are not correct when you are using the Orangutan USB programmer. Here is how the listed frequencies relate to the actual frequencies:
Listed Frequency Actual Frequency Allowed Target Frequency 1.845 MHz 2.5 MHz > 10 MHz 460.8 kHz 1.25 MHz > 5 MHz 115.2 kHz 625 kHz > 2.5 MHz 57.6 kHz 156 kHz > 625 kHz 4.00 kHz 3.91 kHz > 16 kHz 1.21 kHz* 610 Hz* > 2.5 kHz* * This ISP frequency is so low that AVR Studio times out when it tries to program flash or EEPROM, but it can be used to program fuses and lock bits.
You should be able to program any device running at 1 MHz or higher using the listed 57.6 kHz setting, which is the Orangutan USB programmer’s default ISP frequency. An 8 MHz device (e.g. the Orangutan) can be safely programmed using the 460.8 kHz setting and a 20 MHz device (e.g. the Orangutan SV-xx8, Orangutan LV-168, Baby Orangutan, and 3pi robot) can be safely programmed using the fastest 1.845 MHz setting. The two lowest frequencies exist as a safety net in case you accidentally set the clock of your target device to something under 1 MHz. The 1.21 kHz setting is too slow to actually program your target device (AVR Studio will time out waiting for a response from your Orangutan), but it will still let you set the fuses. Be aware that if you attempt to program flash or EEPROM using the 4.00 kHz setting, it might take somewhere on the order of five to ten minutes depending on the size of your program, so you should only use this ISP frequency as a last resort.
- Fuses (proceed with caution!)
Clicking on the Fuses tab will cause the programmer to read the fuse settings of the target device. If your programmer is not connected to your Orangutan when you select this tab, you will get an error message. Fuses allow you to configure certain aspects of your microcontroller such as boot flash size, brown-out detection level, and the clock off of which it should run (e.g. external crystal, internal oscillator). To learn more about the fuses and what they do, please see the ATmega48/88/168/328P datasheet.Note: You can permanently disable your Orangutan by setting the fuses incorrectly. Only advanced users who know precisely what they are doing should change these fuse settings!
- Lock Bits
Clicking on the Lock Bits tab will cause the programmer to read the lock bits settings of the target device. If your programmer is not connected to your Orangutan when you select this tab, you will get an error message. The lock bits allow you to secure your microcontroller by preventing further flash writing or reading. The lock bits can be reset to a fully unlocked state by performing a chip erase (i.e. by clicking the Erase Device button in the Program tab). Lock bits are usually only important if you wish to release a product to other people without giving them access to the program it is running, or if you wish to make it slightly more difficult to overwrite a programmed chip. - Advanced
You should not need to worry about Oscillator Calibration. - HW Info
This tab will tell you the hardware and software versions of your Orangutan USB programmer. Section 5.c explains how you can configure your programmer to change these version numbers so they will match what your AVR Studio is expecting. - Auto
This tab lets you automatically perform a scripted set of programming actions. If you are going to be configuring many devices the same way, it might be convenient for you to do this using the Auto tab features.
Related products


Home | Forum | Blog | Support | Ordering Information | Lists | Distributors | BIG Order Form | About | Contact
© 2001–2026 Pololu Corporation
