Support » Sample Project: Wixel USB Joystick »
4. Loading and configuring the Joystick App
Once your input device has been properly wired to the Wixel, you can proceed to load the Joystick App onto the Wixel and configure it to represent the device’s functions correctly.
Step 1: If necessary, install drivers and software for the Wixel.
See Section 3 of the Wixel user’s guide for instructions to install the Wixel Configuration Utility and any necessary drivers on your computer.
Step 2: Download the Joystick App.
The Joystick App can be downloaded from Section 9.g of the Wixel User’s Guide, and you can read detailed information about the app there.
Step 3: Open the Joystick App in the Wixel Configuration Utility.
Do not write the app to the Wixel yet. (Section 4 of the Wixel user’s guide explains how to use the Wixel Configuration Utility.)
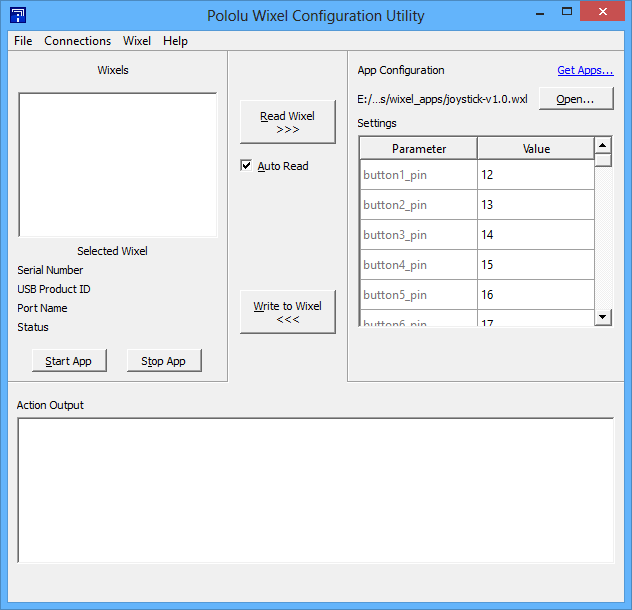 |
The Joystick App opened in the Wixel Configuration Utility. |
|---|
Step 4: Configure the app parameters.
If you wired your device the same way we did in Section 3, you might not need to change any parameters from their default values at all. In case you do need to change some, though, here is a list of the parameters and what they do:
- The buttonB_pin parameters determine which digital input pin on the Wixel corresponds with each logical joystick button. For example, if you want a button connected to pin 1_5 to be Button 3, you should set button3_pin to 15.
- The buttonB_invert parameters determine whether a logic high or logic low voltage indicates a button press for each pin. If you connected your buttons according to the diagram in Section 3, you should set these parameters to 1 to specify that the inputs are inverted (a logic low indicates a button press), since each pin will be connected to ground when the button is pressed and pulled high when the button is released.
- The axis_channel parameters determine which analog input represents each joystick axis. For example, if you want a potentiometer connected on P0_2 (ADC channel 2) to measure Y-axis rotation, you should set Y_channel to 2.
- The axis_invert parameters determine whether to flip the reported position for each axis with respect to the voltage on the corresponding analog input. If you find that an axis of your joystick is reversed, you can toggle the inversion parameter for that axis to correct it.
- The PM_N_pull_enable parameters determine whether the internal pull-up or pull-down resistor on the corresponding pin, and the portM_pull_type parameters determine whether each port is pulled up or down. (The pull-ups/pull-downs can be enabled or disabled for each individual pin, but every pin on the same port must be pulled in the same direction.) To match the diagram in Section 3, you should set the pull_enable parameter to 1 for each pin that has a button connected, and you should set the pull_type parameters to 1 to pull the pins up. Make sure the pull_enable parameter is set to 0 for pins being used as analog inputs so that the pull-ups do not influence the analog readings.)
The app documentation also describes the parameters in detail.
Step 5: Connect the Wixel to your computer and write the app to it.
Once you have successfully written the Joystick App to the Wixel, it should show up to your computer as a Human Interface Device. In addition to appearing as a joystick, the Wixel will also show up as a keyboard and a mouse, but the Joystick App does not use those interfaces.
If you are using Windows, you should see a new entry called “HID-compliant game controller” in your Device Manager in the “Human Interface Devices” section. On Linux, you should see a new device node with a name like /dev/input/js0 that represents the joystick.
Step 6: Test the joystick.
To test the joystick functions on Windows, you can use the Game Controllers applet in the Control Panel, where you should see a “Wixel Joystick” entry. Selecting this entry and clicking the Properties button will display a dialog that shows the state of the joystick’s axes and buttons. On Linux, you can try using the programs jstest or jstest-gtk.
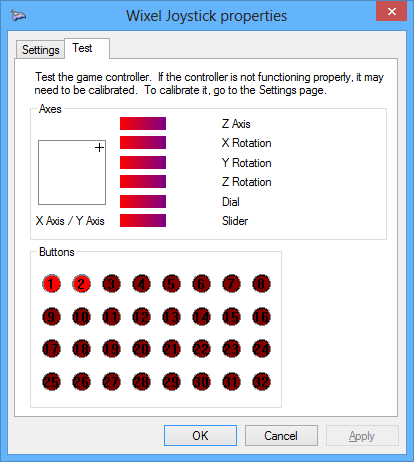 |
The converted Tandy joystick being tested with its properties dialog in Windows. The stick has been moved forward and right, and both buttons are being pressed. |
|---|
If your input device is being read by your computer and behaving correctly, congratulations! You can now finish reassembling it and start using it.
 |
This converted Tandy Deluxe Joystick is now usable as a USB Human Interface Device. |
|---|
Changing parameters and reloading the app
If your device is not behaving the way you expect, you probably need to adjust the app parameters. To do this, you need to manually put the Wixel into bootloader mode, since the Wixel Configuration Utility does not detect Wixels with USB HID interfaces.
- Connect P2_2 to 3V3 on the Wixel using a wire. The Joystick App monitors the voltage on P2_2 and starts the bootloader if it goes high. The Wixel should now appear in the Wixel Configuration Utility.
- Select the Wixel in the configuration utility. If the “Auto Read” checkbox is checked, the Wixel’s current settings will be retrieved and displayed in the configuration utility; otherwise, you can click the “Read Wixel” button to do this.
- Check the parameter values and make any necessary changes.
- Write the app to the Wixel and test it again.
Related products


Home | Forum | Blog | Support | Ordering Information | Lists | Distributors | BIG Order Form | About | Contact
© 2001–2026 Pololu Corporation
