Pololu Blog »
Pololu Blog (Page 18)
Welcome to the Pololu Blog, where we provide updates about what we and our customers are doing and thinking about. This blog used to be Pololu president Jan Malášek’s Engage Your Brain blog; you can view just those posts here.
Popular tags: community projects new products raspberry pi arduino more…
New linear actuators and Jrk settings files
We’ve expanded our line of Glideforce Light-Duty Linear Actuators to now include options with a 10:1 gear ratio. As you might know if you are a long time customer, we’ve carried our light-duty actuators in 20:1 and 5:1 gear ratios for many years. The 20:1 actuators have nice load capabilities, but they’re kind of slow. The 5:1 actuators are speedy, but they can’t push around the larger loads that the 20:1 actuators can. These new 10:1 actuators fall in the middle, offering a great blend of force and speed.
We carry these new actuators in stroke lengths ranging from 2–12 inches and in versions with and without feedback, bringing our total line of light-duty actuators to 28 options.
| Actuator Type |
Max Dynamic Load |
No-Load Speed @ 12 V |
Max-Load Speed @ 12 V |
Current Draw @ 12 V |
Nominal Stroke Length |
With Feedback |
Without Feedback |
|---|---|---|---|---|---|---|---|
| Light-Duty (LD) 5:1 |
15 kgf [34 lbs] |
4.4 cm/s [1.7″/s] |
3.6 cm/s [1.4″/s] |
1.2 A – 3.2 A |
4″ | LACT4P-12V-05 | LACT4-12V-05 |
| 12″ | LACT12P-12V-05 | LACT12-12V-05 | |||||
| Light-Duty (LD) 10:1 |
25 kgf [55 lbs] |
2.8 cm/s [1.1″/s] |
2.3 cm/s [0.9″/s] |
1.2 A – 3.2 A |
2″ | LACT2P-12V-10 | LACT2-12V-10 |
| 4″ | LACT4P-12V-10 | LACT4-12V-10 | |||||
| 6″ | LACT6P-12V-10 | LACT6-12V-10 | |||||
| 8″ | LACT8P-12V-10 | LACT8-12V-10 | |||||
| 10″ | LACT10P-12V-10 | LACT10-12V-10 | |||||
| 12″ | LACT12P-12V-10 | LACT12-12V-10 | |||||
| Light-Duty (LD) 20:1 |
50 kgf [110 lbs] |
1.5 cm/s [0.57″/s] |
1.2 cm/s [0.48″/s] |
1.2 A – 3.2 A |
2″ | LACT2P-12V-20 | LACT2-12V-20 |
| 4″ | LACT4P-12V-20 | LACT4-12V-20 | |||||
| 6″ | LACT6P-12V-20 | LACT6-12V-20 | |||||
| 8″ | LACT8P-12V-20 | LACT8-12V-20 | |||||
| 10″ | LACT10P-12V-20 | LACT10-12V-20 | |||||
| 12″ | LACT12P-12V-20 | LACT12-12V-20 | |||||
For actuators with feedback, a built-in potentiometer is linked to the shaft position allowing for precise control of the actuator’s extension. Our line of Jrk G2 Motor Controllers with Feedback are a great solution for use with any of our linear actuators with feedback, and our most affordable option, the Jrk G2 21v3, is a great choice for use with our light-duty actuators specifically.
In separate but related news, we’ve also either created or updated Jrk settings files for all our linear actuators with feedback for use with our Jrk G2s:
- Light-duty actuators with the 5:1 gear ratio: Jrk 21v3 settings file for use with LACTxP-12V-5 (2k txt)
- Light-duty actuators with 10:1 or 20:1 gear ratios: Jrk 21v3 settings file for use with LACTxP-12V-10 or LACTxP-12V-20 (2k txt)
- Medium-duty actuators: Jrk 24v13 settings for MD linear actuators (2k txt)
- Industrial-duty actuators: Jrk 24v21 settings for ID linear actuators (2k txt)
These settings files can be opened in the Jrk configuration utility and then uploaded to your Jrk G2 motor controller. Please make sure to follow the detailed instructions on your actuator’s product page.
So what does one of these settings files do for you? The Jrks use a PID control loop to control the position of a motor based on feedback from that motor. PID stands for proportional, integral, and derivative, and for a control loop to work well, the PID coefficients must be tuned for the specific system they are being used in. The Jrk uses the coefficients for those terms along with the along with the difference between the motor’s actual position and its target position to calculate what the power to the motor should be. The details of this calculation are discussed in the Jrk’s user’s guide. Tuning the PID coefficients so your motor goes where you want it to can sometimes be difficult. The Jrk settings files provide a set of parameters that should work well for most uses of the linear actuators. Some systems might require more fine tuning, but even in those cases, the files should provide a good starting point.
I created these files by first starting with the default settings for the Jrk motor controller. I left the settings on the Motor, Errors, and Advanced tabs of the Jrk configuration utility on their defaults (with the exception of one of the files for the light-duty actuators having the motor direction reversed). On the input tab, I also left the input mode in Serial so you can control the linear actuator directly from the software. On the feedback tab, I set the feedback mode to analog voltage so the Jrk can read the potentiometer wiper of the linear actuator. To get the feedback values, I connected an actuator to the Jrk and ran the feedback setup wizard. (You might need to rerun this wizard for the specific actuator you have connected to your Jrk. The instructions on the actuators’ product pages go into more detail about this.)
Once all that was done, I configured the PID settings and worked out the PID coefficients by testing each type of actuator with the Jrks. We wanted to provide files that worked generally well across all the stroke length options for each type of actuator, so a lot of actuators were tested to come up with coefficients that worked well for all of them.
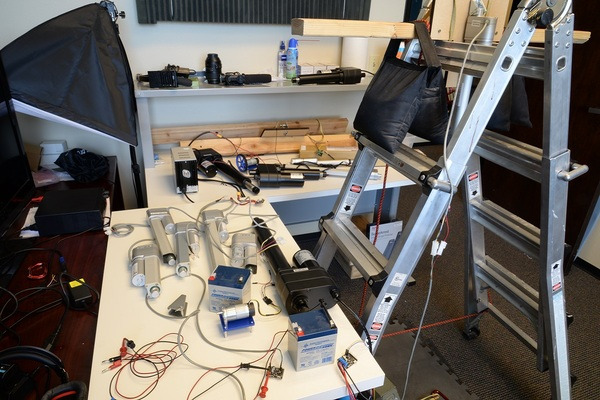 |
Many of the actuators used for creating Jrk settings files (can you find all 12?). |
|---|
I set the proportional and derivative terms first, selecting terms that allowed the actuators to move at their highest speeds but not overshoot their target position. In general, you can get fairly good control over the actuator just using the proportional and derivative terms. In fact, if you are just testing your motor without a load, it might seem like you don’t need an integral term at all. However, there are situations where the control system can get stuck without moving all the way to its target. The controller will continue to apply power to get the actuator to the set position, but it won’t be enough to actually move the actuator. This can be fixed using the integral term of the PID loop. The error will add up over time and eventually get big enough to get things moving again. I was able to test this with the light-duty actuators using the setup below:
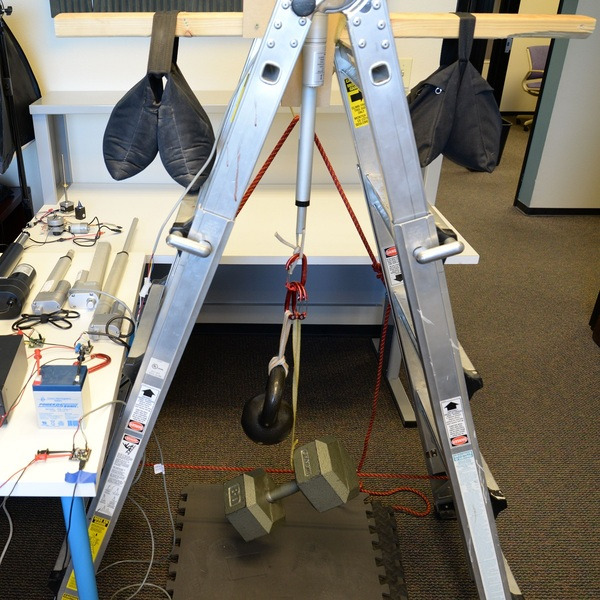 |
Testing Jrk settings with a load. |
|---|
That’s one of our 20:1 light-duty actuators lifting 105 lbs (5 lbs less than its max dynamic load rating). Once I had a large enough load on the actuator, I could see that without an integral term set, the actuator would stall just short of its target position, continuing to apply power but not getting anywhere. Once the integral term was added, the Jrk was able to move it that last little bit to the target.
Unfortunately, I wasn’t able to perform the same test with our medium- and heavy-duty actuators; my makeshift testing rig couldn’t support a load high enough to produce the steady state error issue. However, I did add a little bit of an integral term to the files for those actuators anyway, making sure that doing so didn’t have an obvious negative effect on their performance.
If you want to learn some more about PID control, I found this video and its follow up from Brian Douglas’s channel on YouTube a helpful starting point.
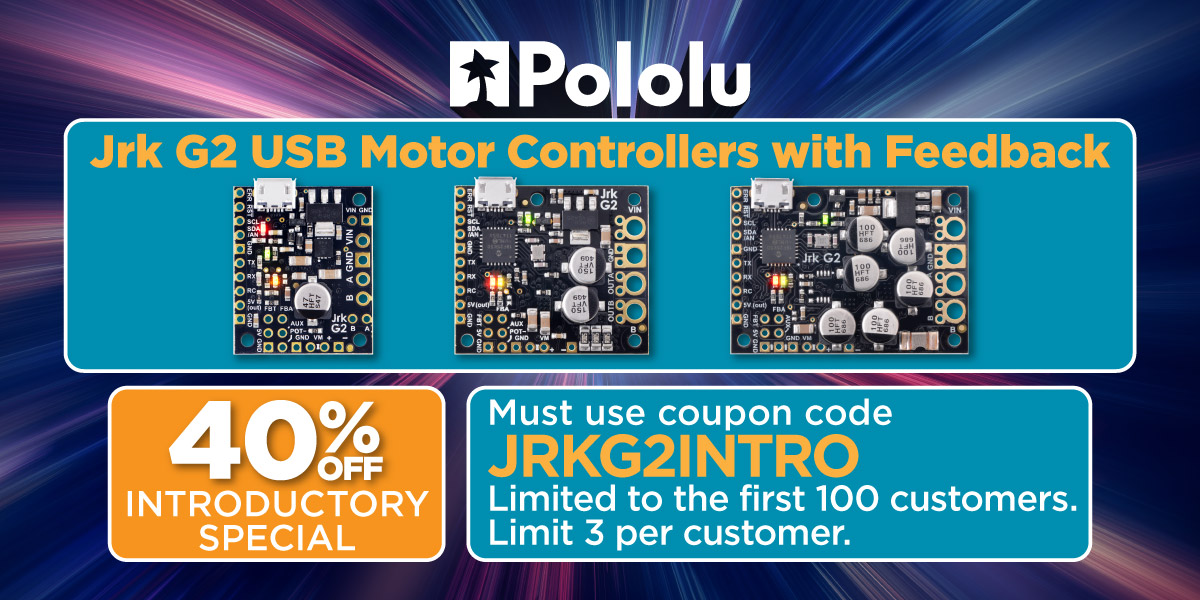
One last note: the intro coupon for our Jrk G2 controllers still has some uses left. Add coupon code JRKG2INTRO to your cart and get up to three Jrk G2 motor controllers for 40% off!
PyTic - Python interface for Pololu Tic Stepper Motor Controllers
Customer Daniel Castelli of the Allen Institute has released a Python package for interfacing with our Tic Stepper Motor Controllers. Currently, he only supports 64-bit Windows, but the source code is available and should be straightforward to extend to other operating systems. Here is example code using PyTic to control a stepper motor:
import pytic
from time import sleep

# - Initialization -------------------------------------------

tic = pytic.PyTic()

# Connect to first available Tic Device serial number over USB
serial_nums = tic.list_connected_device_serial_numbers()
tic.connect_to_serial_number(serial_nums[0])

# Load configuration file and apply settings
tic.settings.load_config('path\\to\\config.yml')
tic.settings.apply()

# - Motion Command Sequence ----------------------------------

# Zero current motor position
tic.halt_and_set_position(0)

# Energize Motor
tic.energize()
tic.exit_safe_start()

# Move to listed positions
positions = [1000, 2000, 3000, 0]
for p in positions:
  tic.set_target_position(p)
  while tic.variables.current_position != tic.variables.target_position:
    sleep(0.1)

# De-energize motor and get error status
tic.enter_safe_start()
tic.deenergize()
print(tic.variables.error_status)
The code and documentation for this package are available on GitHub.
New product: high-density QTR reflectance sensor arrays
|
|
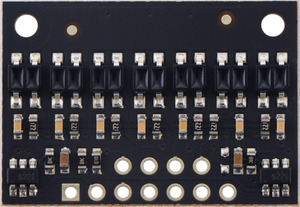
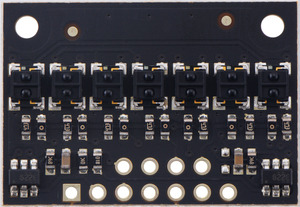
I am excited to announce the first of a new line of reflectance sensor arrays that feature a high-density 4-mm pitch and dimmable IR emitter brightness control. In addition to versions with our familiar IR emitter/phototransistor pair modules without lenses, which we will keep calling “QTR,” we have versions with a higher-performance sensor with lenses on the IR emitter and phototransistor, which we are calling “QTRX.” These higher-performance sensors allow similar performance at a much lower IR LED current, which can really start adding up at higher channel counts. (High-brightness, “QTRXL” versions of these boards are coming soon, too.)
These new sensor arrays also feature LED brightness control that is independent of the supply voltage (which can be 2.9 V to 5.5 V) and separate controls for the odd-numbered LEDs and the even-numbered LEDs, which gives you extra options for detecting light reflected at various angles. As with our older QTR sensors, we are offering these in “A” versions with analog voltage outputs and “RC” versions that can be read with a digital I/O line on a microcontroller by first setting the line high and then releasing it and timing how long it takes for the voltage to get pulled to the logic low threshold:
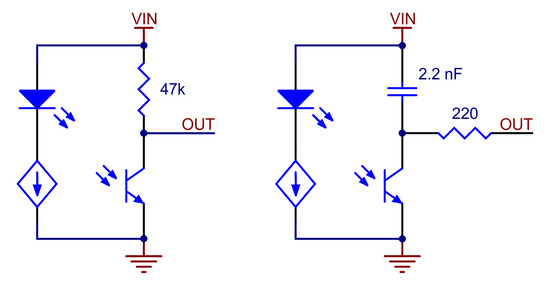 |
Schematic diagrams of individual QTR sensor channels for A version (left) and RC version (right). This applies only to the newer QTRs with dimmable emitters. |
|---|
This announcement therefore covers four total new products:
- QTR-HD-07RC Reflectance Sensor Array
- QTR-HD-07A Reflectance Sensor Array
- QTRX-HD-07RC Reflectance Sensor Array
- QTRX-HD-07A Reflectance Sensor Array
As with all our new products this year, we are offering a special introductory promotion, and this one is for half off up to three of each sensor type, limited to the first 100 customers using coupon code QTRHD07INTRO.
New product: Raspberry Pi 3 Model B+
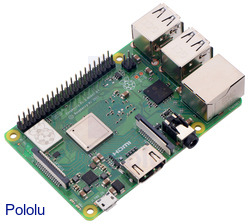
We are now carrying the Raspberry Pi 3 Model B+. The Raspberry Pi is a popular credit card-sized computer that can run ARM Linux distributions. The Raspberry Pi 3 Model B+ has many performance improvements over the Pi 3 Model B including a faster CPU clock speed (1.4 GHz vs 1.2 GHz), increased Ethernet throughput, and dual-band WiFi. It also supports Power over Ethernet with a Power over Ethernet HAT. Continued…
New Product: Jrk G2 21v3 USB Motor Controller with Feedback
Our Jrk G2 family is growing! Today we released the Jrk G2 21v3 USB Motor Controller with Feedback, which you can think of as the baby version of the new Jrk G2 motor controllers we released a few months ago or the updated version of our original Jrk 21v3. I already wrote about the history of the Jrk motor controllers in the blog post announcing the Jrk G2 motor controllers, so for today’s announcement I just want to quickly go over how small this motor controller is and how much we packed into it.
First off, this latest controller is small! Here it is next to the original Jrk 21v3:
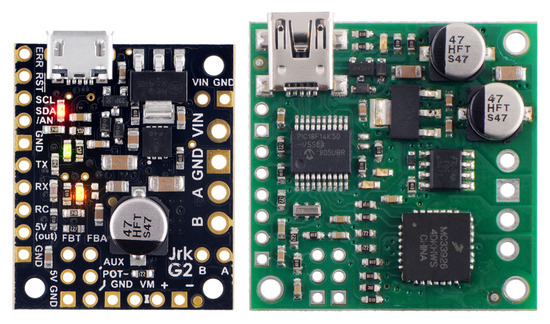 |
Comparison of the newer Jrk G2 21v3 (black PCB) with the original Jrk 21v3 (green PCB). |
|---|
We managed to reduce the size by more than a third, which is quite an achievement given that connectors and mounting holes already took up a pretty good portion of the board area, and we did not want to reduce those. If you looked closely at that picture above, you probably noticed that the motor driver and microcontroller are not visible on the G2, and that’s because they’re now on the back side. Here is that back side, with a quarter for scale:
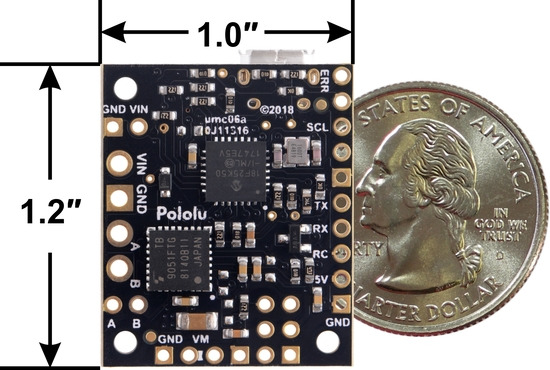 |
Jrk G2 21v3 USB Motor Controller with Feedback, bottom view with dimensions. |
|---|
Because the Jrk G2 21v3 is based on the same foundation as our bigger controllers, you get all the same convenient configurability over USB using our software utility that is available for Windows, macOS, and Linux (if you are interested, you can read more details in this post about the Jrk G2 software).
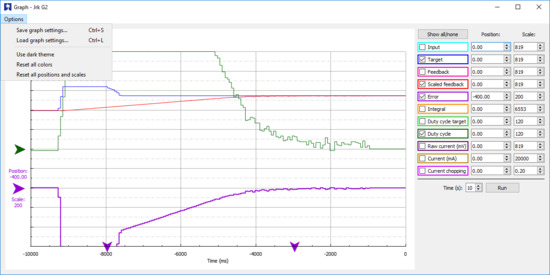 |
The graph window in the Jrk G2 Configuration Utility (version 1.2.0). |
|---|
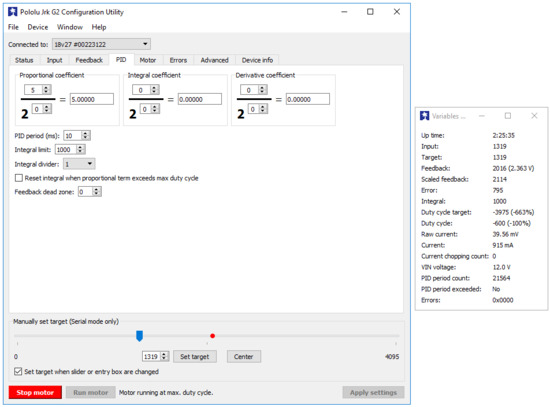 |
The main window and the variables window in the Jrk G2 Configuration Utility (version 1.2.0). |
|---|
You also get all the great features and interfaces of the Jrk G2 family:
- Easy open-loop or closed-loop control of one brushed DC motor
- A variety of control interfaces:
- USB for direct connection to a computer
- TTL serial operating at 5 V for use with a microcontroller
- I²C for use with a microcontroller
- RC hobby servo pulses for use in an RC system
- Analog voltage for use with a potentiometer or analog joystick
- Feedback options:
- Analog voltage (0 V to 5 V), for making a closed-loop servo system
- Frequency, for closed-loop speed control using pulse counting (for higher-frequency feedback) or pulse timing (for lower-frequency feedback)
- None, for open-loop speed control
- Note: the Jrk does not support using quadrature encoders for position control
- Ultrasonic 20 kHz PWM for quieter operation (can be configured to use 5 kHz instead)
- Simple configuration and calibration over USB with free configuration software utility (for Windows, Linux, and macOS)
- Configurable parameters include:
- PID period and PID coefficients (feedback tuning parameters)
- Maximum current
- Maximum duty cycle
- Maximum acceleration and deceleration
- Error response
- Input calibration (learning) for analog and RC control
- Optional CRC error detection eliminates communication errors caused by noise or software faults
- Reversed-power protection
- Field-upgradeable firmware
- Optional feedback potentiometer disconnect detection
Here is a quick comparison of the different Jrk versions, including the original ones that we do not recommend for new designs:
 Jrk 21v3 |
 Jrk 12v12 |
 Jrk G2 21v3 |
 Jrk G2 18v19 |
 Jrk G2 24v13 |
 Jrk G2 18v27 |
 Jrk G2 24v21 |
|
|---|---|---|---|---|---|---|---|
| Recommended max operating voltage: |
28 V(1) | 16 V | 28 V(1) | 24 V(2) | 34 V(3) | 24 V(2) | 34 V(3) |
| Max nominal battery voltage: |
24 V | 12 V | 24 V | 18 V | 28 V | 18 V | 28 V |
| Max continuous current (no additional cooling): |
2.5 A* | 12 A | 2.6 A | 19 A | 13 A | 27 A | 21 A |
| TTL serial, USB, Analog, RC control: |
 |
 |
 |
 |
 |
 |
 |
| I²C control: |  |
 |
 |
 |
 |
||
| Hardware current limiting: |  |
 |
 |
 |
|||
| Dimensions: | 1.35″ × 1.35″ | 1.85″ × 1.35″ | 1.0″ × 1.2″ | 1.4″ × 1.2″ | 1.7″ × 1.2″ | ||
| Price: | $69.95 | $199.95 | $59.95 | $99.95 | $99.95 | $159.95 | $149.95 |
| 1 Transient operation (< 500 ms) up to 40 V. 2 30 V absolute max. 3 40 V absolute max. * Reduced from “3 A” based on newer, more stringent tests. The value now is directly comparable to the rating for the newer G2 21v3. |
|||||||
No new product announcement this year would be complete without our introductory special: be among the first 100 customers to use coupon code JRKG2INTRO and get up to three Jrk G2 motor controllers for 40% off. This coupon is good for the whole family, so you can use it for the 21v3 version we released today or for the larger units released earlier this year.
New Product: Dual TB9051FTG Motor Driver for Raspberry Pi
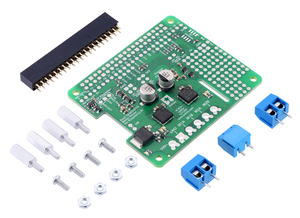
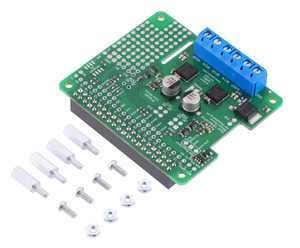
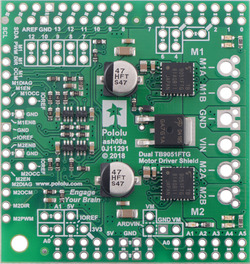
I am excited to share the second Pololu product for which I routed the PCB, the Dual TB9051FTG Motor Driver for Raspberry Pi. This board complements the TB9051FTG Single Brushed DC Motor Driver Carrier and the recently announced Dual TB9051FTG Motor Driver Shield for Arduino by making it easy to control two motors with a Raspberry Pi (Model B+ or newer).
The TB9051FTG can deliver a few amps across a wide operating voltage (4.5 to 28 V), which makes this expansion board ideal for controlling two small or medium size motors in your Raspberry Pi project. You can optionally connect a voltage regulator, like a D24V10F5 or D24V22F5 step down regulator, to power the Raspberry Pi with your motor power supply. The board also provides a prototyping area to help you construct clean custom circuits without the need for additional prototyping PCBs beyond the footprint of your Raspberry Pi.
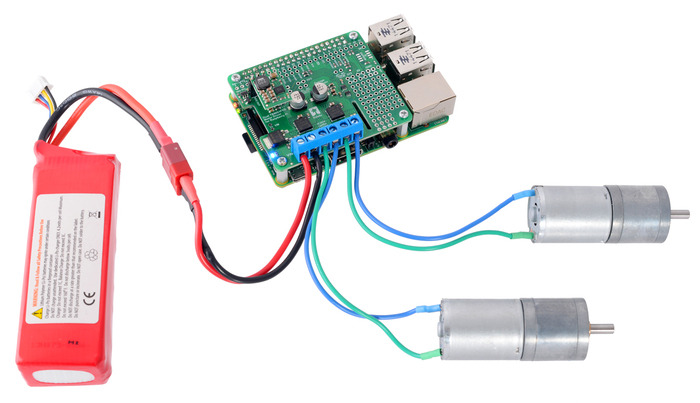 |
The Dual TB9051FTG Motor Driver for Raspberry Pi is available in two versions:
- a partial kit, with connectors included but not soldered in
- fully assembled, with the female header and terminal blocks soldered to the board
The board adheres to the Raspberry Pi HAT (Hardware Attached on Top) mechanical specification, although it does not conform to the full HAT specifications due to the lack of an ID EEPROM. (A footprint for adding your own EEPROM is available for applications where one would be useful.)
|
|
With the addition of this product, we now have eight Raspberry Pi motor driver expansion boards for you to choose from. To control more powerful motors, we offer various high-power motor drivers for Raspberry Pi. If you don’t need all the power provided by the TB9051FTG, consider our small and inexpensive DRV8835 Dual Motor Driver for Raspberry Pi or the dual MAX14870 motor driver expansion board (the first board I routed).
|
|
We have an introductory discount to go with this new product announcement. The first 100 customers to use coupon code RPITB9051INTRO can get up to two units for just $10.95 each. Note that this introductory offer applies only to the units without connectors soldered in. The introductory coupons for the single TB9051FTG carrier, the dual TB9051FTG Arduino shield, and some other products introduced this year are still available; you can see all the coupons available on our specials page.
New Product: Dual TB9051FTG Motor Driver Shield for Arduino
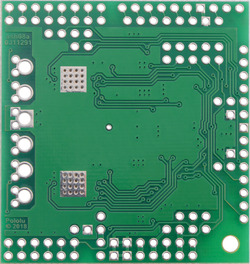
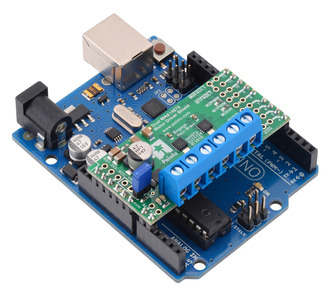
I am happy to announce the Dual TB9051FTG Motor Driver Shield for Arduino. It gives you two of our favorite integrated motor driver (you can read more about why I like it in my TB9051FTG carrier blog post) in the convenient Arduino shield form factor. You can also think of it as a lower-cost, slightly higher-performance version of our popular Dual MC33926 Motor Driver Shield for Arduino.
With a 4.5 V to 28 V operating range and the ability to deliver up to a few amps per motor, the TB9051FTG is great for a huge range of small hobby and toy motors that you might have available in your parts box or classroom.
|
|
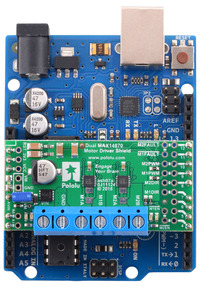
For those who don’t need all the power that the TB9051FTG can support, we also have the smaller (and lower cost) Dual MAX14870 Motor Driver Shield for Arduino.
|
|
As usual, we have an introductory discount to go with this new product announcement. Be among the first 100 customers to use coupon code TB9051SHIELD (click to add the coupon code to your cart) and get up to three units for just $9.97 each. The introductory coupon for the single TB9051FTG carrier is still available, along with some discounts for other products we have introduced this year; you can see all the coupons that are not used up yet on our specials page.
Modified Han Solo toy blaster controls LED displays of Star Wars characters
 |
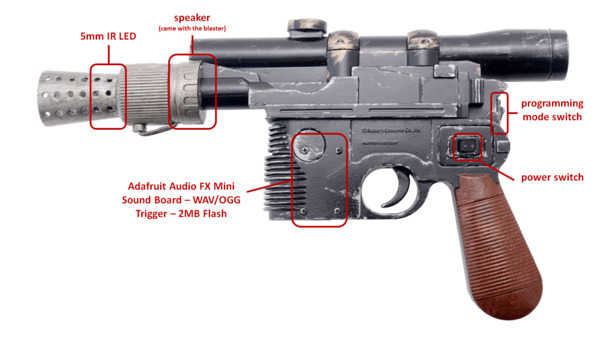
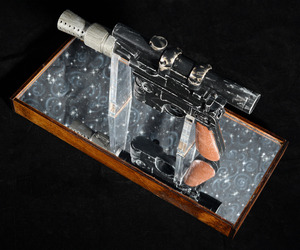
A while ago, I made a wedding gift for some friends, both of whom are avid Star Wars fans. The gift was basically a multi-piece decorative set that consisted of a modified toy Han Solo blaster, a stand to hold the blaster, and three edge-lit LED displays: one each of Boba Fett, Darth Vader, and Jar Jar Binks. I painted over the toy blaster to make it look more like it came straight out of the movies and added electronics so that it could interact with the displays (and the couple’s TV!).
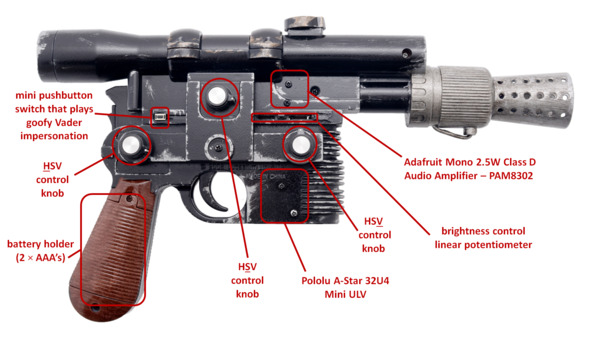
The blaster uses IR TV remote codes to do several things: it can shoot the LED displays (and they’ll respond by blinking and playing audio recordings unique to each character), change the color and brightness of each display, and it can act as a limited TV remote by turning on or off the TV. At the heart of the blaster lies an A-Star 32U4 Mini ULV, which monitors the state of a switch, a couple of buttons, and a few potentiometers in order to decide which actions to carry out. The ULV version of the A* Mini is especially convenient for this setup because the toy blaster was originally powered by two AAA batteries, which produce too low of a voltage for a 5V microcontroller. The ULV’s built-in switching step-up voltage regulator allows it to operate directly off of the batteries and power the other components, unlike typical Arduinos that need at least 7V.
|
|
The blaster has two modes: one for shooting the displays and turning on/off the TV and another for adjusting color and brightness of the displays. Which mode the blaster is in is determined by the state of the programming mode switch, which is accessible with a flick of the thumb. While powered on, the A* continually checks to see if the programming mode switch is enabled. If it is disabled, the blaster will respond to trigger presses. When the trigger is depressed, the A* does two things: it sends a pulse train to a 5mm IR LED and drives an input pin low on an Adafruit Audio FX Mini sound board, which then outputs sound to a speaker through a 2.5W audio amplifier, producing DL-44 blaster firing noises. The blaster and displays use the IRremote Arduino library for sending and receiving the pulses. For these blaster shots, the blaster emits the IR TV remote code that corresponds to the generic power-on/power-off code for an LG TV. This same code is decoded by the Star Wars displays as a “hit” and the characters react to being shot. You can watch videos of those reactions in the YouTube playlist below (the playlist also includes the displays’ bonus Easter egg content, which is only accessible by sending certain button presses from the LG TV remote!). The sound level is a little low, so you might need to increase your volume to hear what the characters are saying:
If the programming mode switch is enabled, the blaster repeatedly emits a set of IR TV remote codes that contain information on what color and how bright the displays should be. Color is adjusted in the HSV color space using the blaster’s three rotary potentiometers (one each for hue, saturation, and value). There is also a linear potentiometer that can be used to set overall brightness (this effect combines with the change in brightness from adjusting the value potentiometer). So long as a display’s IR receiver can detect the IR signal sent by the blaster, the LED information can be decoded and the LED arrays can be updated.
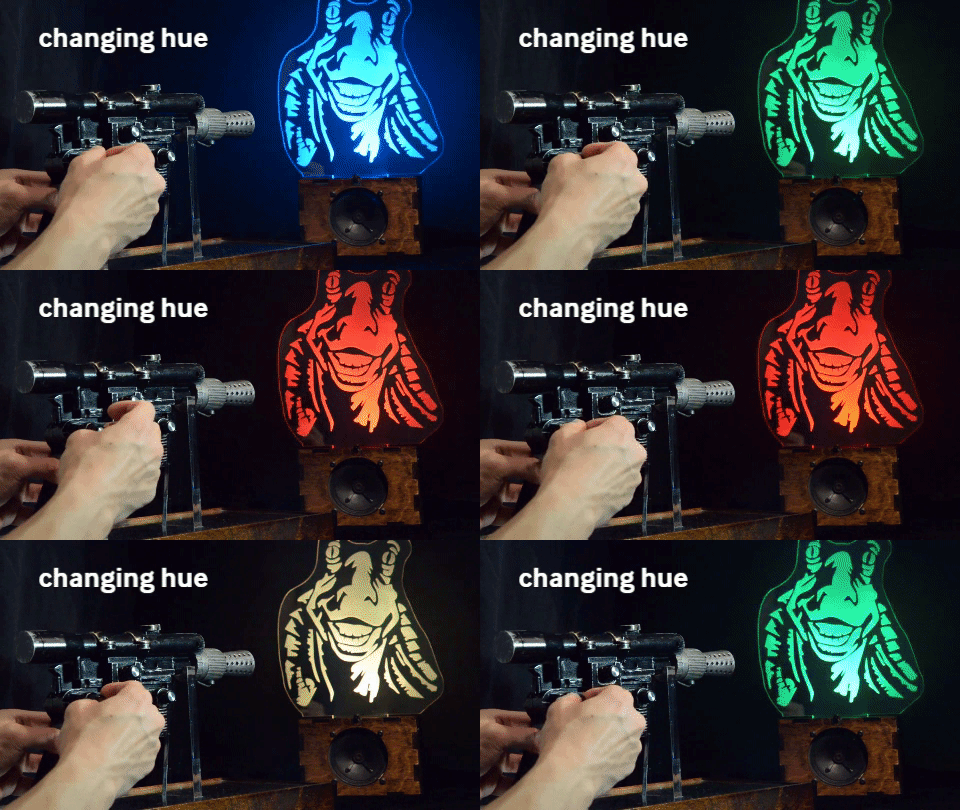 |
Each display features a ~12″ tall profile of the head or upper body of a Star Wars character. The profiles are laser-etched onto a 1/2″ thick clear acrylic piece, which also has holes at its base. The holes allow the piece to be fastened to a recessed channel at the top of the display box. A short segment of an APA102C LED strip lines the bottom of the recessed channel and faces upward into the acrylic profile, which allows its light to disperse across the laser-etched surfaces. The display box has the same sound board and amplifier as the blaster, but uses a more powerful 1W speaker. An A-Star 32U4 Prime controls everything and power is supplied via a 9V 3A wall power adapter.
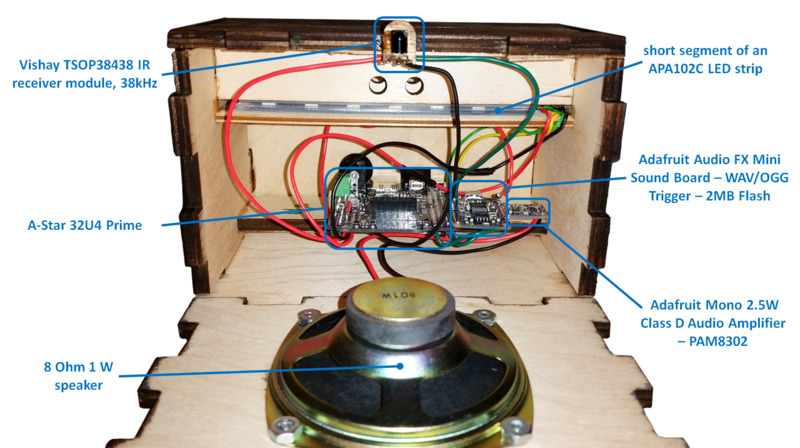 |
Compared to the rest of the system, the design of the blaster stand is pretty straightforward: it is just several pieces of 1/4″ plywood arranged into a frame that houses two channels. Those two channels have mounting holes which allow two clear acrylic pieces, which conform to the shape of the blaster, to be fixed to the frame. A lip along the inside of the frame makes it easy to mount the silver mirrored acrylic piece. The bottom of the mount features a personal well-wish from me to the couple. The message is written on the inside of the Alliance Starbird, which is cut from gold mirrored acrylic. The stand also houses some scrap metal parts (a bunch of prototype Zumo blades) to give it some weight. Four adhesive rubber feet, one for each corner of the stand, help make sure the stand doesn’t slide around easily and scrape the gold Starbird piece.
|
|
I owe a part of the inspiration of this gift to my coworker, Kevin, since in some ways I was basically trying to one-up his Harry Potter-themed wedding gift, which was given to another coworker, Brandon, for his wedding. Kevin also ended up helping me make some good decisions and generate some clean-looking CorelDraw files for the display cutouts/rastering. So, thanks, Kevin! You the real MVP.
For more pics, gifs, and a build log, check out this Imgur album! Also, you can find 2D (.DXF and .CDR) and 3D (.STL, .STEP, and .SLDPRT) CAD files for the laser cut parts on my Thingiverse page!
 |
Independence Day Sale
In celebration of Independence Day (July 4th), we are discounting selected products by up to 25% and offering an upgrade to the next best price break for everything else in our store. Please note that we will be closed Wednesday, so orders placed after 2 PM Pacific Time on Tuesday, July 3 will be shipped on Thursday, July 5.
For more information, including all the discount coupon codes, see the sale page.
 |
Happy 4th of July!
New product: 80×10mm wheels with multi-hub inserts for 3mm and 4mm shafts
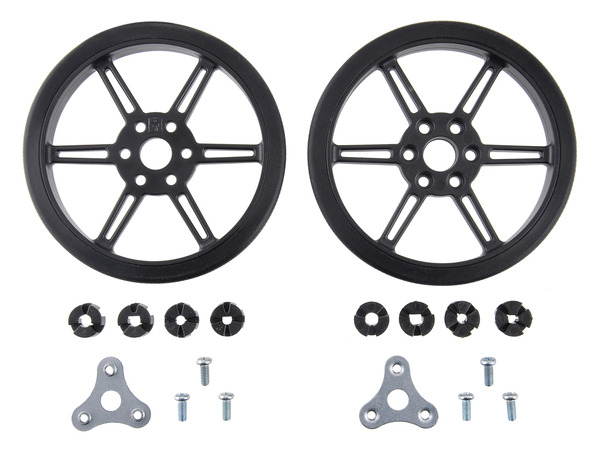
I have some exciting new wheels to tell you about (available as an 80×10mm black pair and an 80×10mm white pair). With a few small exceptions, all of the wheels we have made so far were for press fits (more properly called interference fit) onto 3mm D shafts such as those on our micro metal gearmotors. The press fit is simple and convenient for smaller motors and wheels, but there is an inherent trade-off between how hard you have to push to get the wheel on the shaft and how well the wheel stays on the shaft. As we contemplated designing some new wheels for our growing lines of 20D gearmotors and 25D gearmotors with 4mm output shafts (and higher power), I wanted something better. Our wheels already worked with our machined hubs with set screws, like this:
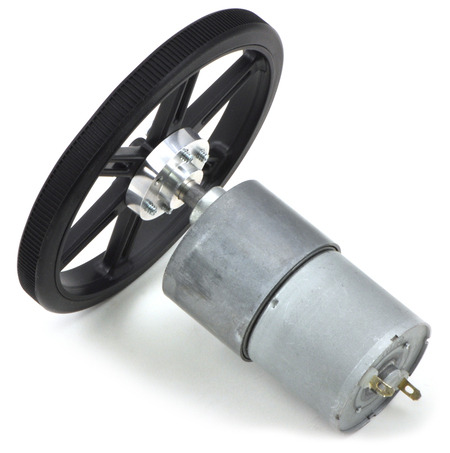 |
But the machined hubs are expensive, more expensive than the rest of the wheel. There’s also the much more minor issue of the machined hub option only allowing for the wheel to be placed at the very end of the shaft unless you drilled out the plastic wheel to have a hole larger than the shaft. I wanted to have an all-plastic, injection moldable solution that involved multiple parts that would somehow clamp the wheel onto an axle, kind of like a chuck on a drill.
My initial idea was to have just two parts: the outer wheel and an inner, interchangeable collet that would get wedged between the wheel and axle. But our mechanical engineers were not able to come up with a single part that could both compress onto the shaft and attach rigidly to the outer wheel. Because the parts are so small, the resolution of our 3D printer limited the effectiveness of prototypes, so we worked with scaled-up models. This picture shows one earlier model next to the final production parts for scale:
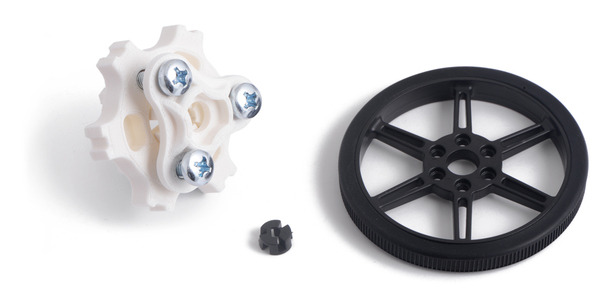 |
The other side of that model shows what we were thinking about for holding nuts in place on the back side of the wheel:
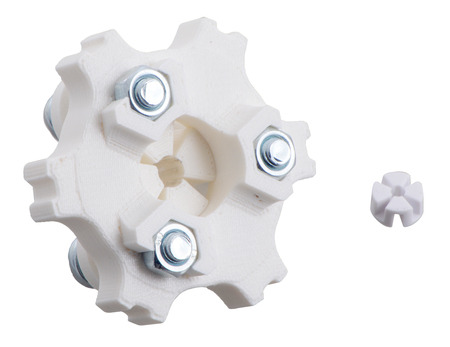 |
At that point, we were at a three-component design, plus the three screws and nuts, which was turning out to be difficult to assemble onto a shaft, even if it worked. The screw heads needed to be accessible from the outside of the wheel so they could be tightened, and that left the nuts near the motor where they were difficult to access, and trying to make the wheel hold the nuts required the wheel to be toward the motor and the collet piece on the outside, which was less aesthetically appealing.
So, in the end, we gave up on my all-plastic goal and designed a single stamped plate with threaded holes that clamps the wheel onto the collet insert. It definitely makes the assembly much easier, as you can see from this expanded view:
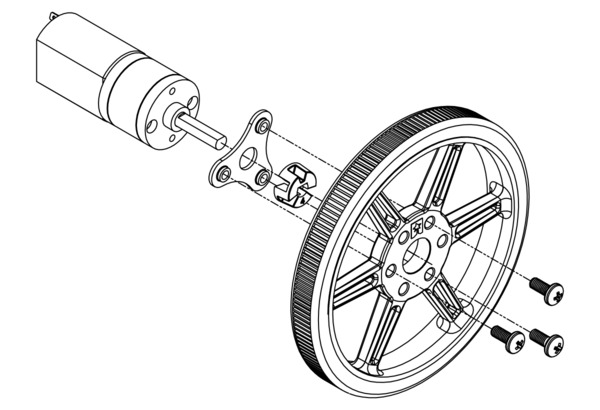 |
Having a design that seems like it might work on a 3D printed mock-up is still quite different from getting it working on the final, injection-molded parts. The clamping action of the collet inserts might have given us a little more margin for error than our usual press-fit wheels, but on those, a wrong fit is relatively straightforward to adjust: start with the fit a little on the loose side, and if it’s too loose, make the pin (and hole) smaller until it’s tight enough. With the new wheels, there were many more things that could go wrong, including alignment (wobbling). There was also the unknown of how much torque the hubs would take.
In the end, I think we arrived at a nice performance point. The wheels cannot take as much torque as if they were screwed on to the machined hub with set screw, but they can do much more than just the press fit hubs while putting less strain on the motor output shafts during installation. It’s possible to assemble the wheels with a little wobble, but if it’s a concern in your application, you can fiddle with how you tighten the three screws to get it as lined up as you like.
We started with our 80×10mm wheels, and made inserts that work with 3mm and 4mm shafts, both round and D-shaped:
 |
Since the concept seems to be working, we will be working on different wheel sizes and inserts for larger shafts later this year.
As with all our new product introductions this year, we are having an introductory special. Be among the first 100 customers to use coupon code MULTIHUBINTRO (click to add the coupon code to your cart) and get 33% off on up to three sets.

