Support »
Pololu AVR Programming Quick Start Guide

View document on multiple pages.
You can also view this document as a printable PDF.
- 1. Overview
- 2. Before Programming
- 3. Programming in Windows with Microchip Studio
- 4. Programming in Linux
- 5. Getting Started on macOS
1. Overview
This guide is a collection of tutorials on how to get started programming the AVR microcontroller on an Orangutan robot controller or 3pi robot under Windows, Linux, or Mac OS X. This guide is mainly designed for people who want to use the Pololu USB AVR Programmer and the Pololu AVR C/C++ Library.
- If you want to use a different programmer, this guide will still be useful to you but some of the steps will not apply to you.
- If you want to program an AVR that is not on an Orangutan or 3pi robot, this guide will still be useful to you, but please note that the Pololu AVR C/C++ Library only works on certain AVRs in the ATmega family.
- If you want to program an AVR that is not on an Orangutan or 3pi robot, and are not interested in the Pololu AVR C/C++ Library, we recommend reading the tutorials in the Pololu USB AVR Programmer User’s Guide instead of this guide.
- This guide does not cover the Arduino IDE; there is a separate guide for Programming Orangutans and the 3pi robot from the Arduino Environment.
- This guide does not cover the older AVR Studio 4 IDE; there is a separate guide for Programming Orangutans and the 3pi robot from AVR Studio 4.
2. Before Programming
Connect Power
Before programming your AVR, you will need to connect power. Please see the user’s guide of your particular device for information on how to choose a suitable power supply and what pins to connect it to. If your device has a power button, you will need to press it to turn on power to the AVR.
Note: If you have purchased rechargeable batteries for your device, you should fully charge them before you first use them. You should never attempt to program your device if its batteries are drained or uncharged. Losing power during programming could permanently disable your AVR.
Try the preloaded demo program
The 3pi robot, Orangutan SVP, Orangutan SV-xx8, and Orangutan LV-xx8 all come with preloaded demo programs that demonstrate various features. Before programming, we recommend using these demo programs to familiarize yourself with some of your device’s features and also to make sure that the device is working.
3. Programming in Windows with Microchip Studio
To program AVRs in Windows, we recommend using Microchip Studio for AVR and SAM Devices, an integrated development environment (IDE) from Microchip.
Note: The Orangutan X2 does not work with the built-in AVR ISP programming software in Microchip Studio. These instructions will show you how to use Microchip Studio to compile the .hex file and then load it onto the X2 using AVRDUDE, which is included in WinAVR.
3.1. Installing Prerequisites
As a first step for programming AVRs in Windows, we recommend downloading and installing an appropriate version of Microchip Studio, an integrated development environment (IDE) from Microchip.
If you are using Windows 7 or later, we recommend Microchip Studio 7.0 because it is the latest version supported by the installers for the Pololu AVR C/C++ Library.
If you are using Windows Vista, we recommend Atmel Studio 6.2 (available here) because Microchip Studio 7.0 does not support Windows Vista.
After Microchip Studio is installed and working, download and install the Pololu AVR Development Bundle (~11MB exe). The Pololu AVR Development Bundle contains these components:
- The Pololu AVR C/C++ Library, which provides functions for interacting with the hardware on your Orangutan or 3pi robot.
- Pololu USB AVR Programmer drivers and software.
- Orangutan SVP drivers.
When you run the Pololu AVR Development Bundle installer, it will ask you which components to install. If you are not sure which ones you will need, it is OK to install them all.
The installer for the Pololu AVR C/C++ Library will ask you which AVR toolchains you want the library to be installed into:
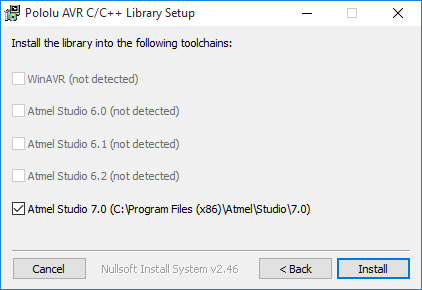 |
The second screen of the Pololu AVR C/C++ Library installer for Windows. |
|---|
If the checkbox for your version of Atmel Studio or Microchip Studio version is grayed out, then the installer was unable to find that IDE and you should try reinstalling or repairing it. You should leave the checkbox checked so that the library can install its files into your AVR toolchain.
Note that Microchip Studio 7.0 shows up as Atmel Studio 7.0 in this installer. If you want to use Microchip Studio 7.0, make sure that the Atmel Studio 7.0 checkbox is checked.
During the installation, Windows will ask you if you want to install the drivers. Click “Install”.
If you have an Orangutan X2, you will also need to install our CP2102 drivers.
3.2. Setting up your programmer
This section does not apply to the Orangutan X2.
Now that you have installed the drivers, it is time to plug the Pololu USB AVR Programmer or Orangutan SVP into your computer’s USB port, make sure the drivers are working, and configure Microchip Studio to use the programmer. For brevity, we will just say “programmer” in this section to refer to either the Pololu USB AVR Programmer or the Orangutan SVP’s auxiliary processor, which serves as a programmer.
If you use Windows Vista, Windows 7, or a later version of Windows, your computer should automatically set up the necessary drivers when you connect a programmer.
If you use Windows XP, you will need to follow these steps whenever you plug in a new programmer:
- Connect the programmer to your computer’s USB port. The programmer is actually three devices in one so your XP computer will detect all three of those new devices and display the “Found New Hardware Wizard” three times. Each time the “Found New Hardware Wizard” pops up, follow steps 2–5.
- When the “Found New Hardware Wizard” is displayed, select “No, not this time” and click “Next”.
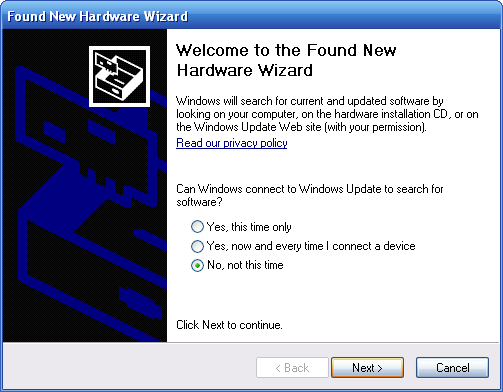 |
- On the second screen of the “Found New Hardware Wizard”, select “Install the software automatically” and click “Next”.
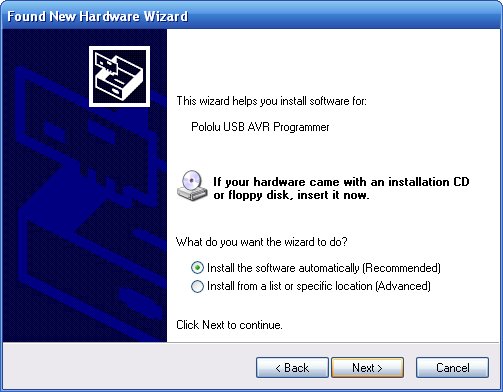 |
- Windows XP will warn you again that the driver has not been tested by Microsoft and recommend that you stop the installation. Click “Continue Anyway”.
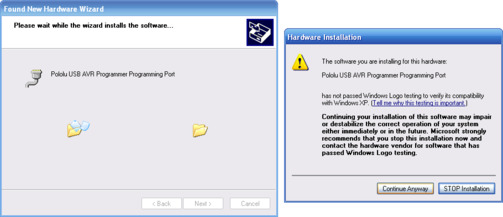 |
- When you have finished the “Found New Hardware Wizard”, click “Finish”. After that, another wizard will pop up. You will see a total of three wizards when plugging in the programmer. Follow steps 4-7 for each wizard.
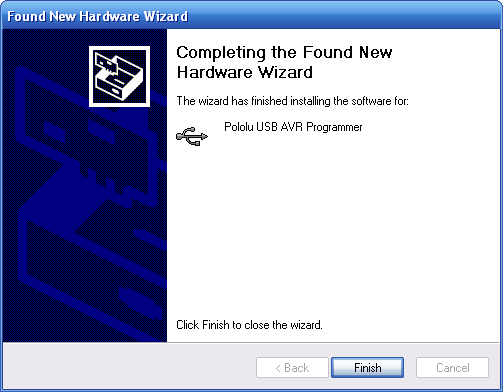 |
If you use Windows XP and experience problems installing the serial port drivers, please make sure you have upgraded to Service Pack 3.
After installing the drivers, please go to your computer’s Device Manager and expand the “Ports (COM & LPT)” list. If you are using the Pololu USB AVR Programmer, you should see two COM ports: “Pololu USB AVR Programmer Programming Port” and “Pololu USB AVR Programmer TTL Serial Port”. If you are using the Orangutan SVP, you should see three COM ports: “Pololu Orangutan SVP Programmer”, “Pololu Orangutan SVP USB Communication Port”, and “Pololu Orangutan SVP TTL Serial Port”. In parentheses after these names, you will see the name of the port (e.g. “COM3” or “COM4”).
Additionally, if you are using the Pololu USB AVR Programmer, there should be a “Pololu USB Devices” list with an entry for the programmer.
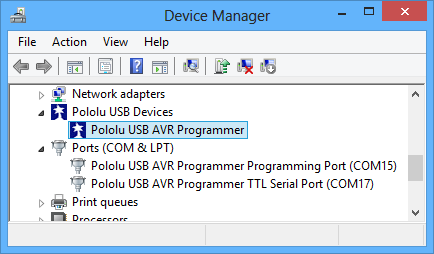 |
Windows 8 device manager showing the Pololu USB AVR Programmer |
|---|
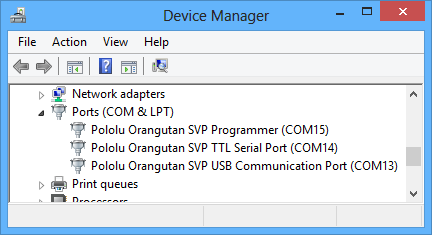 |
Windows 8 device manager showing the Pololu Orangutan SVP. |
|---|
The COM ports in the Device Manager might actually be named “USB Serial Device” instead of having a descriptive name as shown in the screenshots above. This can happen if you are using Windows 10 or later and you plugged the programmer into your computer before installing our drivers for it. In that case, Windows will set up your programmer using usbser.inf, a driver from Microsoft that ships with Windows 10 and later, and it will display “USB Serial Device” as the name for each port. The ports will be usable, but it will be hard to distinguish the ports from each other because of the generic name shown in the Device Manager. We recommend fixing the names in the Device Manager by right-clicking on each “USB Serial Device” entry, selecting “Update Driver Software…”, and then selecting “Search automatically for updated driver software”. Windows should find the drivers you already installed, which contain the correct name for the port.
Next, you will need to configure Microchip Studio to use the programmer. Open Microchip Studio, make sure your programmer is connected to your computer via USB, and then select Add target… from the Tools menu. For the tool, select “STK500”. For the serial port, select the COM port that has been assigned to the programmer’s programming port. Finally, click Apply.
 |
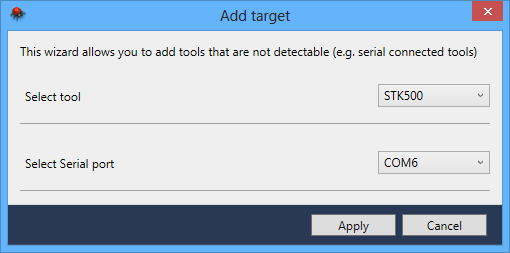 |
3.3. Compiling an Example Program
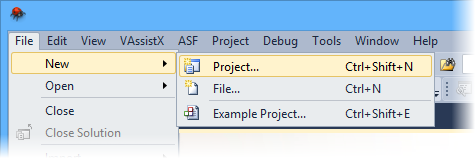
The next step is to compile an example program in Microchip Studio and load it onto your Orangutan or 3pi robot. Open Microchip Studio and create a new project by selecting New > Project… in the File menu.
 |
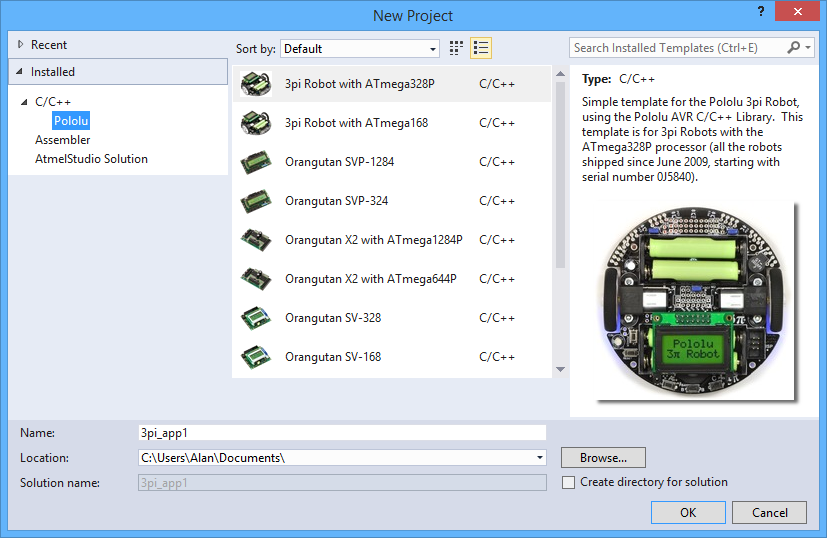
In the New Project dialog, select Installed to see the installed templates. Expand the C/C++ category and select Pololu to see a list of templates that were installed by the Pololu AVR C/C++ Library’s installer. If there is no Pololu category, make sure that you have installed the Pololu AVR C/C++ Library and try restarting Microchip Studio. Select the template that corresponds to your device. Be careful to select the right one; if you’re not sure what model of AVR microcontroller your device has then you can find out by checking your invoice, checking your Pololu order history, or by reading the writing on the AVR itself.
- All 3pi robots shipped from Pololu since June 2009, starting with serial number 0J5840, have an ATmega328P.
- All Orangutan X2s shipped from Pololu since October 25, 2010 have an ATmega1284P.
Also, we recommend unchecking the Create directory for solution checkbox to make your directory structure a little simpler.
 |
After you click OK, Microchip Studio will create a new project from the template and open it:
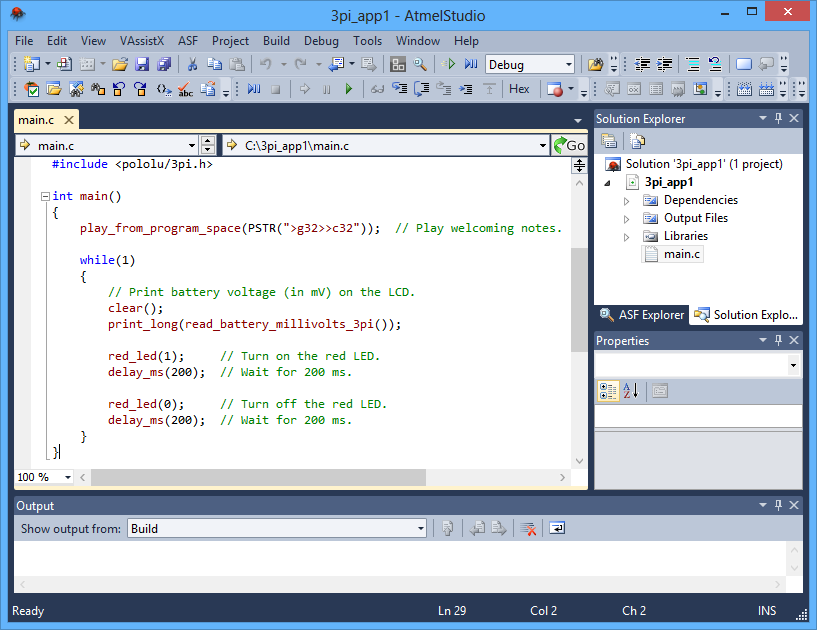 |
The project will contain some simple example code that demonstrates basic features of the board, such as blinking an LED, playing some notes on the buzzer, and displaying numbers on the LCD. The functions being called are defined in the Pololu AVR C/C++ Library. You can find more information about them in the Pololu AVR C/C++ Library User’s Guide and read their source code by looking in the directory where you installed the library.
You can build/compile the project by selecting Build > Build Solution or by pressing F7. If you get an error at this point, and you haven’t modified the example program or project configuration at all, then it is likely that the Pololu AVR C/C++ Library was not installed correctly and you should try installing it again. If the build is successful, then the build output shown in the “Output” tab at the bottom should end like this:
...
Build succeeded.
========== Build: 1 succeeded or up-to-date, 0 failed, 0 skipped ==========
If that is what your output looks like, then you have successfully compiled your project into a HEX file, which can be found in the project directory. It is now time to program that HEX file onto your AVR using the Pololu USB AVR Programmer or the built-in programmer on the Orangutan SVP or Orangutan X2.
Before programming, make sure your device is powered and that your programmer is connected to your computer via USB. If you are using the Pololu USB AVR Programmer, you will need to connect the programmer to the device using the included 6-pin ISP cable. If you are programming a device such as the Baby Orangutan B that does not have a shrouded male header that enforces the correct cable orientation, then be careful to line up the pin 1 indication arrow on the cable with the arrow on the device.
Orangutan X2 users: The AVR programming software in Microchip Studio is not compatible with the Orangutan X2 so we recommend using AVRDUDE as described in Section 3.4 instead of attempting to follow the instructions below.
To program, simply go to Microchip Studio and press the F5 key. Alternatively you can program by selecting either Continue or Start Without Debugging from the Debug menu.
If programming fails: If you get an error message after attempting to program, then click View > Available Microchip Tools to open the “Available Tools” window. Make sure that there is one and only one STK500 in the list and make sure that the COM port number matches the COM port number of your programmer’s programming port, which is displayed in the Device Manager. If you are using the Pololu USB AVR Programmer, then please see the Troubleshooting section of the programmer’s user’s guide. If you are using an Orangutan SVP, then make sure you have firmware version 1.03 or later (see the Upgrading Firmware section of the user’s guide). If you are using an Orangutan X2, see the note above.
If the programming was successful, you should be able to see the program running on your device. The red user LED on the device should be blinking. If your device has a buzzer, it should play a note whenever the device starts up. If your device has an LCD, it should display a number on the LCD, but you might have to adjust the contrast potentiometer to see it.
If you want to access advanced features of the programmer, or want an interface that gives more feedback when the programming is successful, you can use the Device Programming dialog box of Microchip Studio.
Tip: If you use multiple programmers, but never connect more than one at a time to your computer, you might want to configure them all to be on the same COM port so that programming with the F5 key in Microchip Studio will always work. You can change the COM port number assigned to a device by going to the Device Manager, double clicking on the COM port, and then clicking the “Advanced…” button in the “Port Settings” tab.
3.4. Programming with AVRDUDE
After you have compiled a HEX file, you can load it onto your AVR using Microchip Studio as described in Section 3.3 or by using a separate command-line utility named AVRDUDE. This utility is free and included in the WinAVR package.
First you need to locate the HEX file. If you compiled it using Microchip Studio, it should have the extension “.hex” and be in your Microchip Studio project folder, in a subfolder named Debug or Release. Open a Command Prompt and navigate to that folder. Then to program your AVR, you would type something similar to this:
avrdude -p m328p -P COM6 -c avrispv2 -U flash:w:test.hex
- The argument following the -p is the part number of the AVR. For an Orangutan or 3pi Robot, the part number should be m328p, m1284p, m324p, m644p, m168, or m48.
- The argument following the -P is the port name. You can determine your device’s programming port name by looking in the “Ports (COM & LPT)” list of the Device Manager.
- The argument following the -c is the programmer protocol and should be avrispv2.
- The -U option is used for writing, reading, or verifying flash, EEPROM, fuses, or lock bits. In this example we are using -U to write test.hex to flash.
Please see the AVRDUDE documentation for more detailed information.
Note for Orangutan SVP and X2 users: AVRDUDE has incorrect chip erase delay settings for the ATmega324P, ATmega644P, ATmega1284P. This means that when you try to program, the erase operation will take longer than AVRDUDE expects and AVRDUDE will interpret this as an error. The workaround is to find the AVRDUDE configuration file, avrdude.conf, and increase the chip erase delay for the m324p/m644p/m1284p to 55000. The file is located in C:\WinAVR-20100110\bin by default in Windows.
4. Programming in Linux
4.1. Setting up your programmer in Linux
No driver installation is necessary to use the Pololu USB AVR Programmer or Orangutan SVP in Linux.
When you plug your programmer or Orangutan SVP into a Linux computer, the Linux kernel’s cdc_acm driver should automatically detect it and create two or three serial port devices. Unless you have other devices plugged in that use the same driver, the name of the programming port should be /dev/ttyACM0. You can see what virtual COM ports you have available by typing ls /dev/ttyACM* in a terminal.
4.2. Installing Prerequisites
To program AVRs in Linux, you will need the free avr-gcc compiler, avr-libc, AVRDUDE, and other associated tools. Ubuntu users can get the required software by running:
sudo apt-get install gcc-avr avr-libc avrdude
Users of other Linux distributions should install all relevant AVR-related packages available in their distribution’s package manager.
4.3. Installing the Pololu AVR C/C++ Library in Linux
The Pololu AVR C/C++ Library can be downloaded as a .zip file from the Download Instructions section of the library user’s guide. From the Linux command line, run the command
unzip libpololu-avr-yymmdd.zip
where yymmdd is replaced by the version of the library that you have downloaded. It will unzip to a folder called libpololu-avr.
To install the library, open a Linux command prompt, navigate to the libpololu-avr directory, and type sudo make install. This will copy the library object (.a) and header (.h) files to the appropriate avr subdirectories. To see exactly where they will be copied, you can type make show_prefix.
4.4. Compiling an Example Program in Linux
A simple demo program is supplied in the directory libpololu-avr/examples/atmegaXXX/simple-test/, where atmegaXXX is the processor on your board.
Open a terminal window and navigate to this directory. You should be able to compile the example with the supplied Makefile by typing make at the command prompt. This will produce a file named test.hex which is ready to be flashed to your AVR, and the output to your terminal should look something like this:
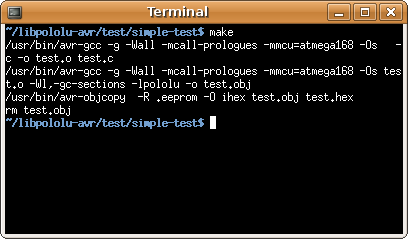 |
Compiling the test program under Linux. |
|---|
If make completed successfully, connect your programmer (or Orangutan SVP) to your computer and your target device, and turn on the target’s power. If you are using the Pololu USB AVR Programmer, the green USB LED should be on, the red LED should be off, and the yellow LED should be blinking, indicating that the programmer is ready. Type make program to load the program onto the Orangutan or 3pi. If your programmer is installed on a port other than /dev/ttyACM0 you will have to edit the Makefile and enter the correct port.
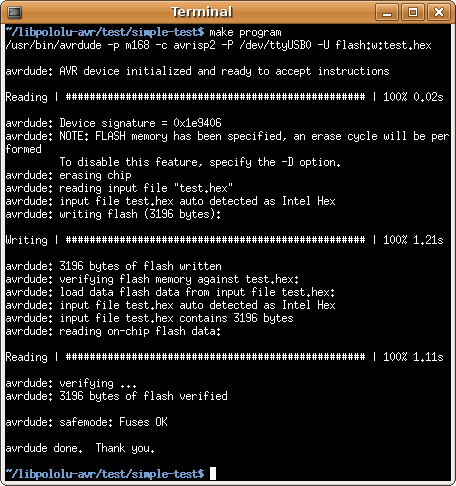 |
Programming the Orangutan with avrdude under Linux. |
|---|
If your controller was successfully programmed and you are not using a Baby Orangutan, you should hear a short tune, see the message “Hello!” on the LCD (if one is present and the contrast is set correctly), and the LEDs on the board should blink. If you are using a Baby Orangutan, you will just see the red user LED blink.
Note for Orangutan SVP and X2 users: AVRDUDE has incorrect chip erase delay settings for the ATmega324P, ATmega644P, ATmega1284P. This means that when you try to program, the erase operation will take longer than AVRDUDE expects and AVRDUDE will interpret this as an error. The workaround is to find the AVRDUDE configuration file, avrdude.conf, and increase the chip erase delay for the m324p/m644p/m1284p to 55000. The file is located in /etc/ in Linux.
5. Getting Started on macOS
5.1. Setting up your programmer for macOS
If you are using the Pololu USB AVR Programmer, you might need to update the firmware of your programmer to get it working with macOS. See the Firmware Support for Mac OS X section of the Pololu USB AVR Programmer User’s Guide for instructions.
Mac OS X compatibility: we have confirmed that the programmer and Orangutan SVP work on Mac OS X 10.7 and we can assist with advanced technical issues, but most of our tech support staff does not use Macs, so basic support for Mac OS X is limited.
To test your setup, plug the programmer or Orangutan SVP into a USB port on your Mac. Click “Cancel” if you see the following dialog:
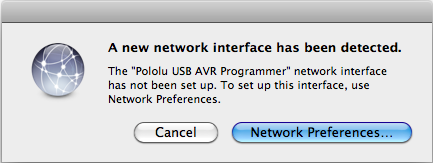 |
In a Terminal window, type ls /dev/tty.usb* and press enter. You should see 1–3 new entries of the form tty.usbmodem<number> (e.g. /dev/tty.usbmodem00022331). These entries represent virtual serial ports created by the programmer or Orangutan SVP.
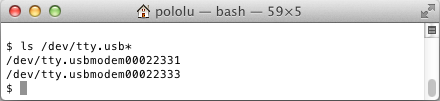 |
The entry with the lowest number is the programming port, and later you will need to pass its name as a parameter to AVRDUDE.
5.2. Installing Prerequisites
To program AVRs in macOS, you will need the free avr-gcc compiler, avr-libc, AVRDUDE, and other associated tools.
To obtain these tools, we recommend first installing Homebrew. Then run the following commands to install AVRDUDE and homebrew-avr:
brew install avrdude
xcode-select --install
brew tap osx-cross/avr
brew install avr-gcc
5.3. Installing the Pololu AVR C/C++ Library in macOS
The Pololu AVR C/C++ Library can be downloaded as a .zip file from the Download Instructions section of the library user’s guide. Use the Mac’s Archive Utility to extract the .zip file to your desktop or any other convenient location. It will unzip to a folder called libpololu-avr.
To install the library, open a Terminal session, navigate to the libpololu-avr directory, and type sudo make install. This will copy the library object (.a) and header (.h) files to appropriate subdirectories of your AVR toolchain. To see exactly where they will be copied, you can type make show_prefix.
5.4. Compiling an example program in macOS
A simple demo program is supplied in the directory libpololu-avr/examples/atmegaXXX/simple-test/, where atmegaXXX is the processor on your board.
Open a terminal window and navigate to this directory. You should be able to compile the example with the supplied Makefile by typing make at the command prompt. This will produce a file named test.hex which is ready to be flashed to your AVR.
Now connect your programmer to your Mac and your Orangutan or 3pi robot, and turn on the device’s power. If you are using the Pololu USB AVR Programmer, the green USB LED should be on and the yellow LED should be blinking, indicating that the programmer is ready.
Open the Makefile in a text editor. You will need to change the PORT variable to refer to your programmer’s programming port, as determined in Section 5.1 (e.g. /dev/tty.usbmodem00022331).
To load the example program onto your device, type make program. Some seconds later, you should see output from AVRDUDE that looks something like this:
avrdude: AVR device initialized and ready to accept instructions

Reading | ################################################## | 100% 0.01s

avrdude: Device signature = 0x1e950f
avrdude: NOTE: FLASH memory has been specified, an erase cycle will be performed
         To disable this feature, specify the -D option.
avrdude: erasing chip
avrdude: reading input file "test.hex"
avrdude: input file test.hex auto detected as Intel Hex
avrdude: writing flash (3392 bytes):

Writing | ################################################## | 100% 0.88s

avrdude: 3392 bytes of flash written
avrdude: verifying flash memory against test.hex:
avrdude: load data flash data from input file test.hex:
avrdude: input file test.hex auto detected as Intel Hex
avrdude: input file test.hex contains 3392 bytes
avrdude: reading on-chip flash data:

Reading | ################################################## | 100% 0.72s

avrdude: verifying ...
avrdude: 3392 bytes of flash verified

avrdude: safemode: Fuses OK

avrdude done.  Thank you.
If your controller was successfully programmed and you are not using a Baby Orangutan, you should hear a short tune, see the message “Hello!” on the LCD (if one is present and the contrast is set correctly), and the LEDs on the board should blink. If you are using a Baby Orangutan, you will just see the red user LED blink.
Related products


Home | Forum | Blog | Support | Ordering Information | Wish Lists | Distributors | BIG Order Form | About | Contact
© 2001–2024 Pololu Corporation
