Support » Pololu TReX Jr User’s Guide »
6. Updating the TReX Jr's Firmware
Current Firmware Version
Our most recently released firmware update for the TReX Jr motor controller is trexjrv1_2.trx (161k trx) (version 1.2). This version fixes a bug that prevented baud rates of 38.4 and 28.8 kbps from working in versions 1.0 and 1.1. All other supported baud rates work properly in firmware versions 1.0 and 1.1, so if your TReX Jr does not have version 1.2 firmware and you do not need communicate serially at 38,400 or 28,800 bps, you do not need to update your firmware to 1.2. Version 1.2 also adds a new configuration parameter that lets you optionally delay the TReX Jr’s serial responses by 1ms so that slower microcontrollers, such as the Basic Stamp, won’t miss the first byte of the TReX Jr’s response. Previously, if you wanted such a delay, you needed to use firmware version 1.1; if you didn’t want this delay, you needed to use firmware version 1.0. Please note that you should upgrade your TReX Configurator (295k zip) to version 090923 or later prior to updating your firmware to version 1.2, and upgrades to future firmware releases will require TReX Configurator version 100608 or later. If you have an older version of the TReX Configurator installed, you should manually uninstall it first using the Add/Remove Programs control panel.
Note that some units are now shipping with version 1.3. This version is functionally identical to version 1.2 but identifies a hardware change on the board that has no impact on performance.
Updating Firmware
To update the firmware, you need to put your TReX Jr into firmware-update mode and then send the new binary firmware file, which you can do using the TReX Configurator program (295k zip) or a terminal program. We recommend you read through the following procedure before performing the update.
- Turn off power to your TReX Jr.
- Put the TReX Jr into Serial Mode by removing the Mode jumper.
- Ground the TTL Serial Out (SO) pin by attaching the Learning-Mode/Firmware-Upgrade jumper.
- Attach the Mix jumper.
- Restore power to the TReX Jr; the status LEDs should alternately flash red and green.
- Remove the Mix jumper; the status LEDs should alternate faster.
- Remove the Learning-Mode/Firmware-Upgrade jumper; the green status LED should now briefly flash every second.
- Reconnect your TReX Jr’s serial cable to establish a connection between your TReX Jr and your computer.
Option 1: using the TReX Configurator program
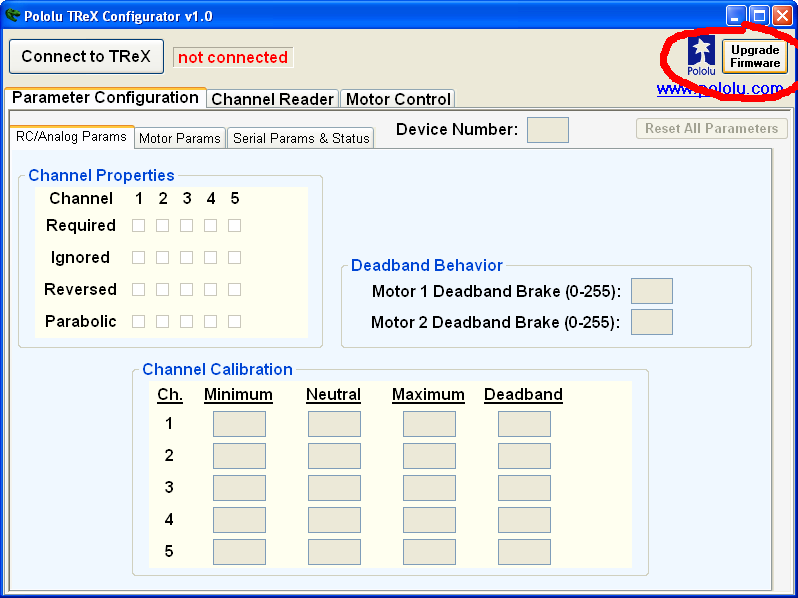
Run the TReX Configurator program and click on the “Upgrade Firmware” button, which is circled in the screen capture below.
 |
This will bring up the Firmware Upgrade dialog, as shown below.
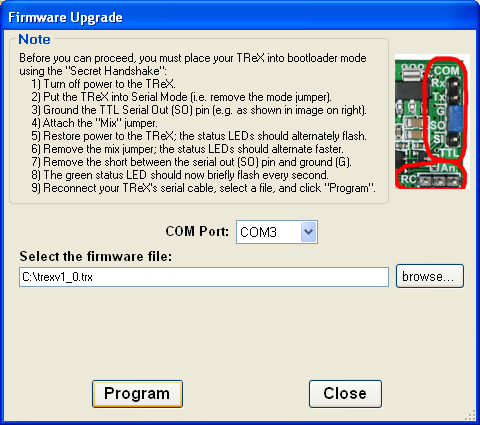 |
Select the COM port your TReX Jr is connected to and enter the firmware update file’s path. Click the Program button to initiate the firmware update. If all goes correctly, you will be prompted to confirm that you want to erase your current firmware and you will then see a progress bar showing you the status of the upload. If no errors occur, you will see a success message when the update is finished.
Option 2: using a terminal program
If you would rather use a terminal program, you will need one that is capable of transferring binary files, such as Tera Term Pro. Connect to the serial port that your TReX Jr is on at 115.2 kbsp with 8-bit characters, no parity, and one stop bit. No flow control is necessary. If you have completed the 8 steps above (so that the green status LED is flashing once per second), you are ready to upload the new firmware file. First, transmit the characters:
‘l’, ‘o’, ‘a’, ‘d’
As you type these lowercase letters, you should see the capital versions echoed back to you, followed by the bootloader identifier: LOADTReXBL1.2:. If you make a mistake, you should receive a ‘?’ and should start typing ‘load’ again from the beginning.
Next, transmit the character ‘s’. This will erase the current firmware. Finally, transfer the firmware update file (.trx) to the TReX Jr as a binary file. If everything works correctly you should see a ‘*’ appear and the TReX Jr’s red status LED will flash five times as it starts up before staying solidly on.
Related products


Home | Forum | Blog | Support | Ordering Information | Wish Lists | Distributors | BIG Order Form | About | Contact
© 2001–2024 Pololu Corporation
