Pololu Blog »
Pololu Blog (Page 41)
Welcome to the Pololu Blog, where we provide updates about what we and our customers are doing and thinking about. This blog used to be Pololu president Jan Malášek’s Engage Your Brain blog; you can view just those posts here.
Popular tags: community projects new products raspberry pi arduino more…
New product: 12V, 2.2A Step-Down Voltage Regulator D24V22F12
 |
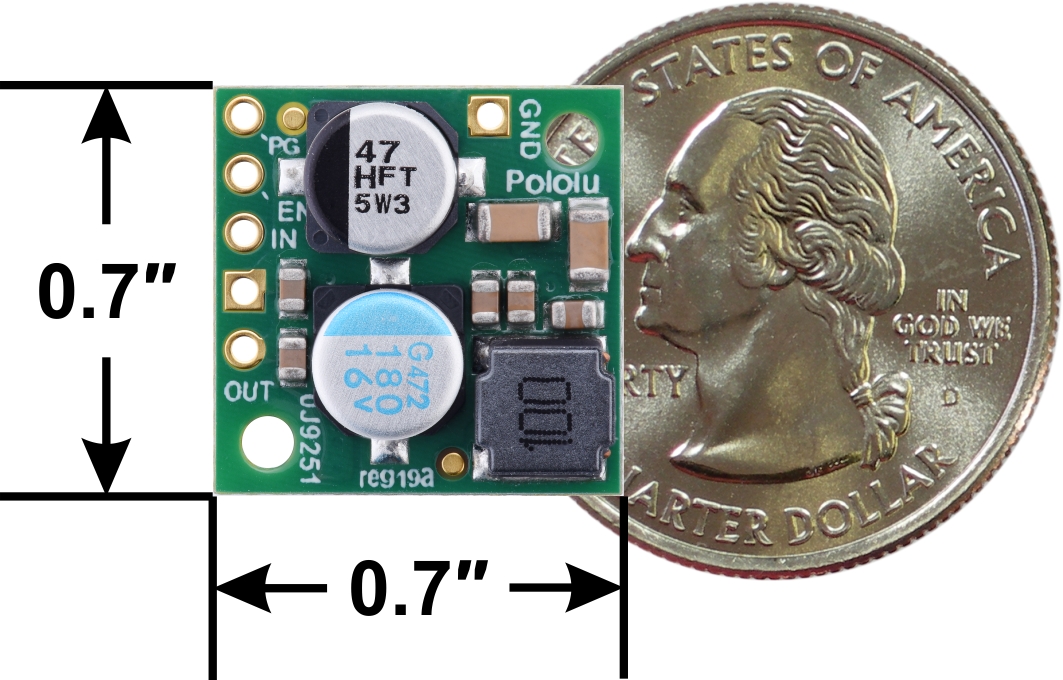
We are pleased to introduce our new 12 V, 2.2 A switching regulator, the inaugural member of the D24V22Fx family of step down voltage regulators. We expect to release other voltage versions next month, but we wanted to get a 12 V version out right away since we did not offer a 12 V buck regulator that could do more than 1 A. The compact regulator works with input voltages up to 36 V and can typically deliver up to a continuous 2.2 A. It offers integrated reverse voltage protection along with over-current and over-temperature shutoff, and a power-good output can be used to determine when the regulator cannot maintain its output voltage.
|
|
|
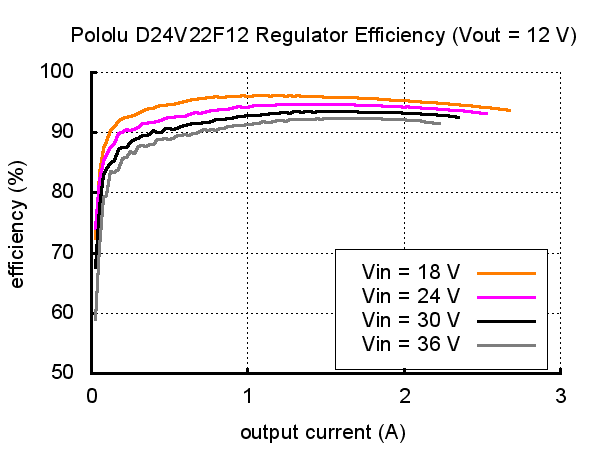
Unlike linear regulators which waste a lot of power and generate a lot of heat in the process, this new regulator is very efficient, which means you can get the most out of your battery life:
 |
Until we release other voltage versions of the D24V22Fx, the closest substitutes are the similar D24V25Fx family of step-down voltage regulators:
These regulators are the same size as the D24V22F12 and they have similar current capabilities and input voltage ranges, but they do not have the same pinout and they are based on a different internal design, so there are fundamental differences in operation.
See the D24V22F12 product page for more information on this new regulator, or visit our voltage regulator category to see all of our regulator options.
Related products

New support for Atmel Studio 7.0 and Windows 10
 |
We now support using the Orangutan Robot Controllers, 3pi robot, and the Pololu USB AVR Programmer with the new Atmel Studio 7.0 and Windows 10.
To make this possible, we updated the Windows installers for the Pololu AVR C/C++ Library to support Atmel Studio 7.0. This means that when you install the library on Windows, it will automatically copy its files into the AVR GCC toolchain inside Atmel Studio 7.0 and install project templates for the supported devices. Adding support for Atmel Studio 7.0 required us to add some code to detect its location and fix two unexpected problems. You can see the changes that were made in the libpololu-avr commit history on GitHub.
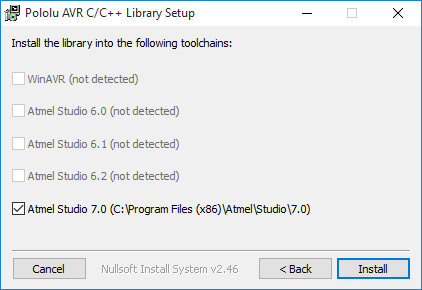 |
The second screen of the Pololu AVR C/C++ Library installer for Windows. |
|---|
We also tested the library installer, Atmel Studio 7, the Pololu USB AVR Programmer, and the Orangutan SVP on Windows 10. Everything worked fine, so we now support using those products on Windows 10.
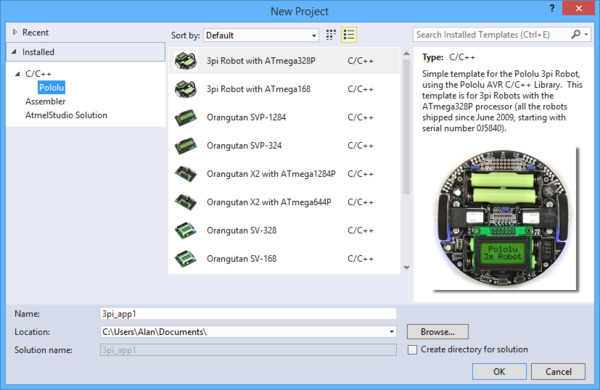
Importing an Arduino sketch in Atmel Studio 7.0
Atmel Studio 7.0 is the latest version of Atmel Studio, an integrated development environment (IDE) for AVRs from Atmel. It has an interesting new feature that allows you to create a new project from an Arduino sketch. The idea is that you could import an Arduino sketch, compile it with Atmel Studio, and then load it onto an Arduino-compatible board using a debugger from Atmel. This would allow you to step through the program one line at a time as it runs on real hardware and see what the program does at each step. It would also allow you to use the advanced code editing features of Atmel Studio. When you import a sketch into Atmel Studio 7.0, the source code of your sketch, along with the Arduino core source code and the code for any libraries you are using, gets copied into the directory for the new project.
However, the new feature only supports a certain small set of boards from Arduino and Adafruit, which means that you would have to select a board similar to your Orangutan, 3pi robot, or A-Star and then adjust the project settings (such as the F_CPU clock speed macro) to make it work. Atmel Studio does not support Arduino bootloaders, so it will not be easy to program an A-Star without getting an external programmer. Our Pololu USB AVR Programmer does not support debugging, so if that is the only programmer you have, then there is relatively little value in using Atmel Studio to program your device instead of just using the Arduino IDE. The feature does not appear to be very polished and still has bugs, which I encountered when I tried to import a sketch that has multiple .h and .cpp files.
If you want to try out the new feature, just open Atmel Studio 7.0, select File > New > Project…, and then select “Create Project from Arduino sketch”, which is a template that can be found in the “C/C++” category.
Related products


New product: VL6180X Time-of-Flight Distance Sensor Carrier
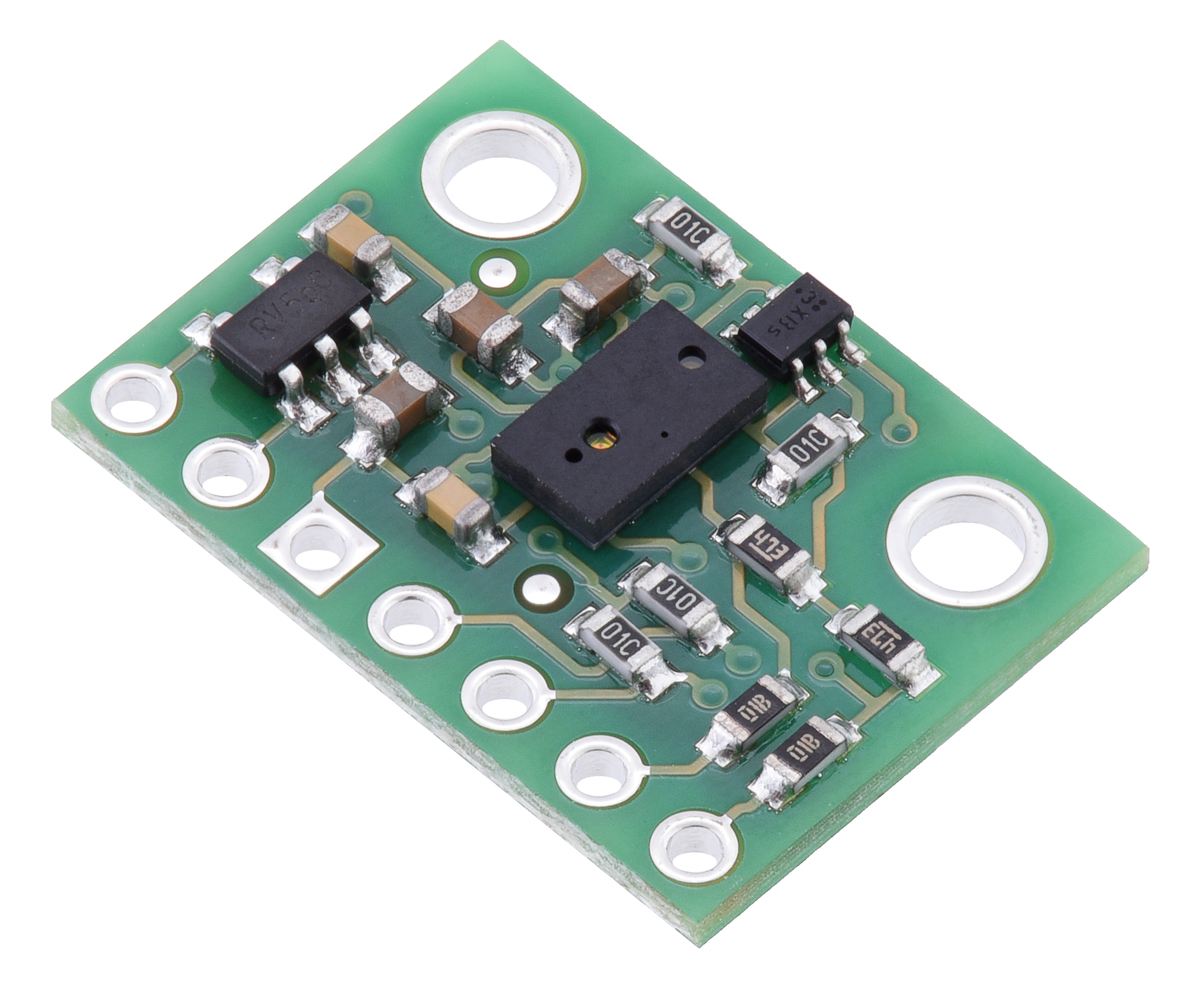 |
There’s another new product coming out of the assembly line here at Pololu: the VL6180X Time-of-Flight Distance Sensor Carrier. The VL6180 from ST Microelectronics distinguishes itself from other optical sensors by using time-of-flight measurements to determine distance: it emits pulses of infrared laser light and precisely times how long they take to reach the nearest object and reflect back to the sensor, which means it is essentially a complete short-range lidar system in a single tiny package.
With this technique, the VL6180X can accurately measure the absolute distance to a target object from 0 cm to at least 10 cm away – sometimes up to 20 cm away, depending on the target and environment – without being affected by what color the target is or how reflective it is.
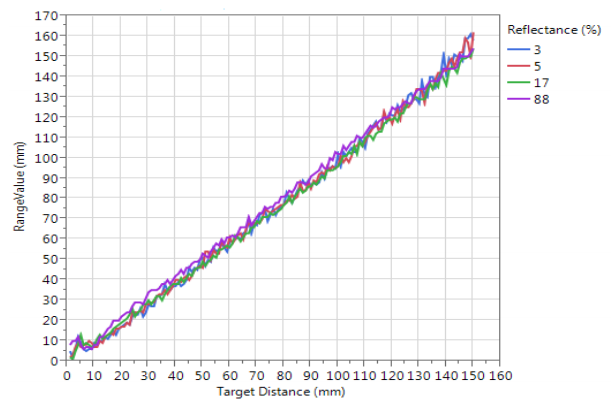 |
VL6180X datasheet graph of typical ranging performance. |
|---|
Distance readings can be obtained through the sensor’s I²C interface (in units of millimeters – no complicated conversions necessary!). The VL6180X also includes an ambient light sensor; this combination of sensing capabilities is useful for applications, including smartphones, for which the VL6180 was designed.
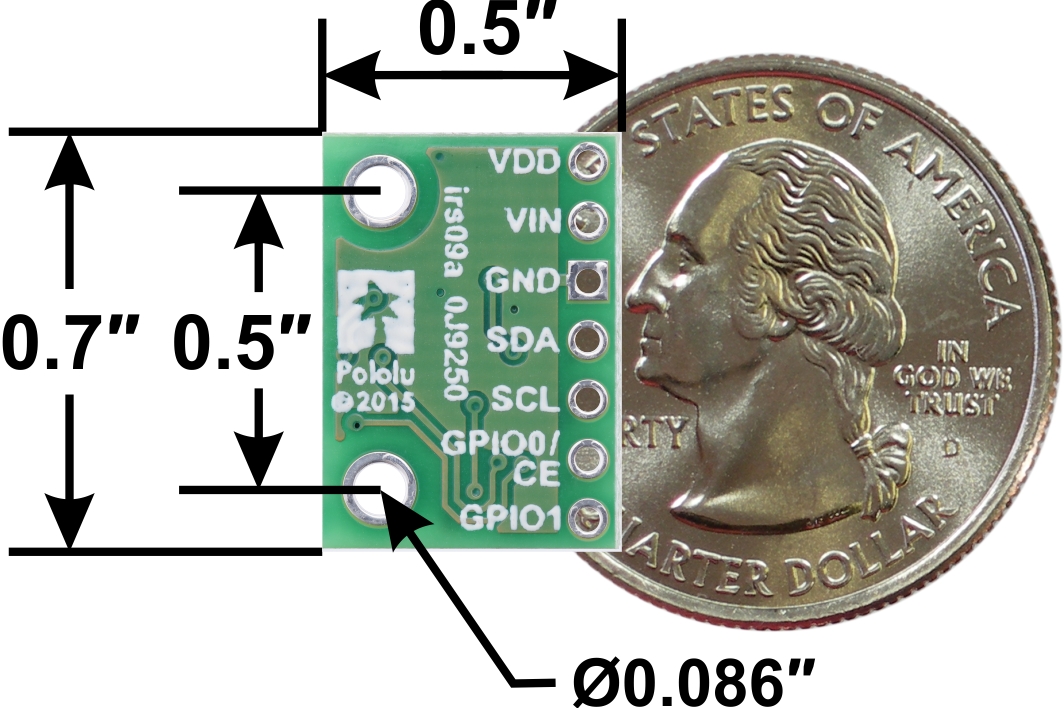 |
The VL6180X IC by itself is a challenge to use because of its small surface-mount package and particular voltage requirements, so our breakout board includes a 2.8 V regulator and level shifters that allow it to be used with 3.3 V and 5 V systems. The carrier board provides a breadboard-friendly pinout and mounting holes while remaining as compact as possible (0.5″ × 0.7″). We’ve also written an Arduino library for the VL6180X that makes it easy to get started with this board.
For more information about the VL6180X carrier, see its product page.

New MOSFET-based power switches
I am excited to announce four new general-purpose MOSFET-based power switches. But why is Pololu making something as seemingly basic as power switches?
Powering your project
One of the most basic requirements for any electronics project is a way to turn the power on and off.
For a typical project assembled on a breadboard, your first approach might naturally be to plug in some breadboard-compatible switch like this:
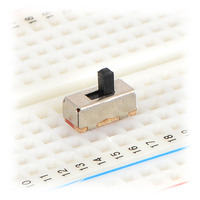 |
This will work okay in many situations, but if you start connecting motors or other high-power components like a Raspberry Pi, you will quickly reach the 300 mA limit of that little switch and melt it or worse. So, assuming that the rest of your project survived, the next step might be to upgrade to a beefier switch:
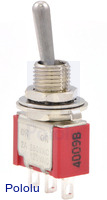 |
I use this one on a lot of projects; it feels really solid and can do 5 A. But it is not breadboard compatible, it is kind of big (more than one inch long), and flipping it takes a lot of force, all of which means more wiring and mounting issues to deal with. And then your project ends up not looking particularly modern – can you imagine a smartphone with one of those sticking out the side? We expect everything these days to be controlled by a tiny pushbutton, with software power features like auto-shutoff. Even my new car does not have the traditional mechanical keyswitch: those are getting rapidly replaced by intelligent software-controlled pushbuttons.
MOSFET-based power switches
With a modern power switch like the one on your phone, the pushbutton itself is only momentary and does not actually conduct the current that powers the device. Typically the button is just an input to a low-power microcontroller that activates MOSFETs as necessary to control power to the rest of the circuit. Programming a microcontroller is a fine approach to power management, but it is a difficult engineering challenge itself. What if you just want a component that does the job for you, like the switches pictured above? That’s where Pololu power switches come in.
|
|
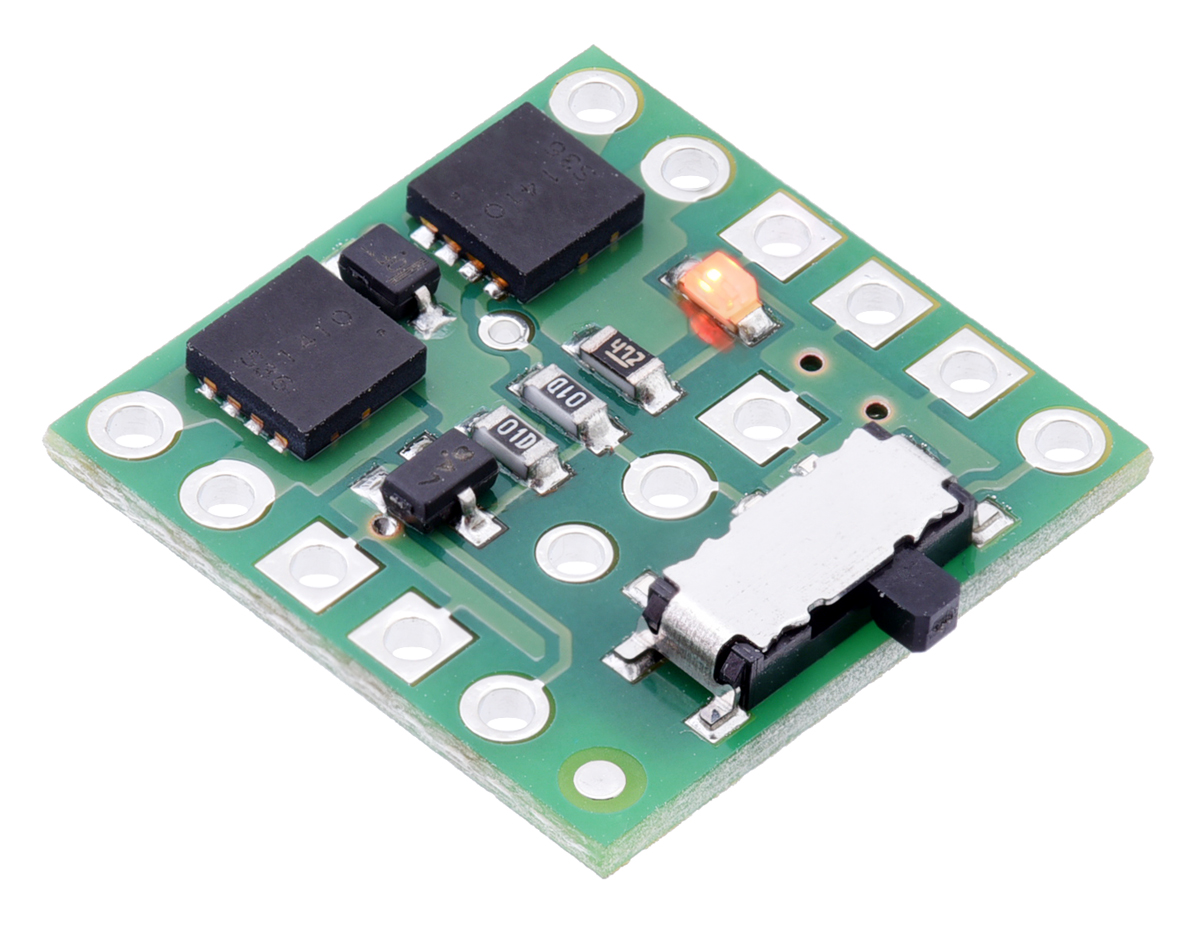
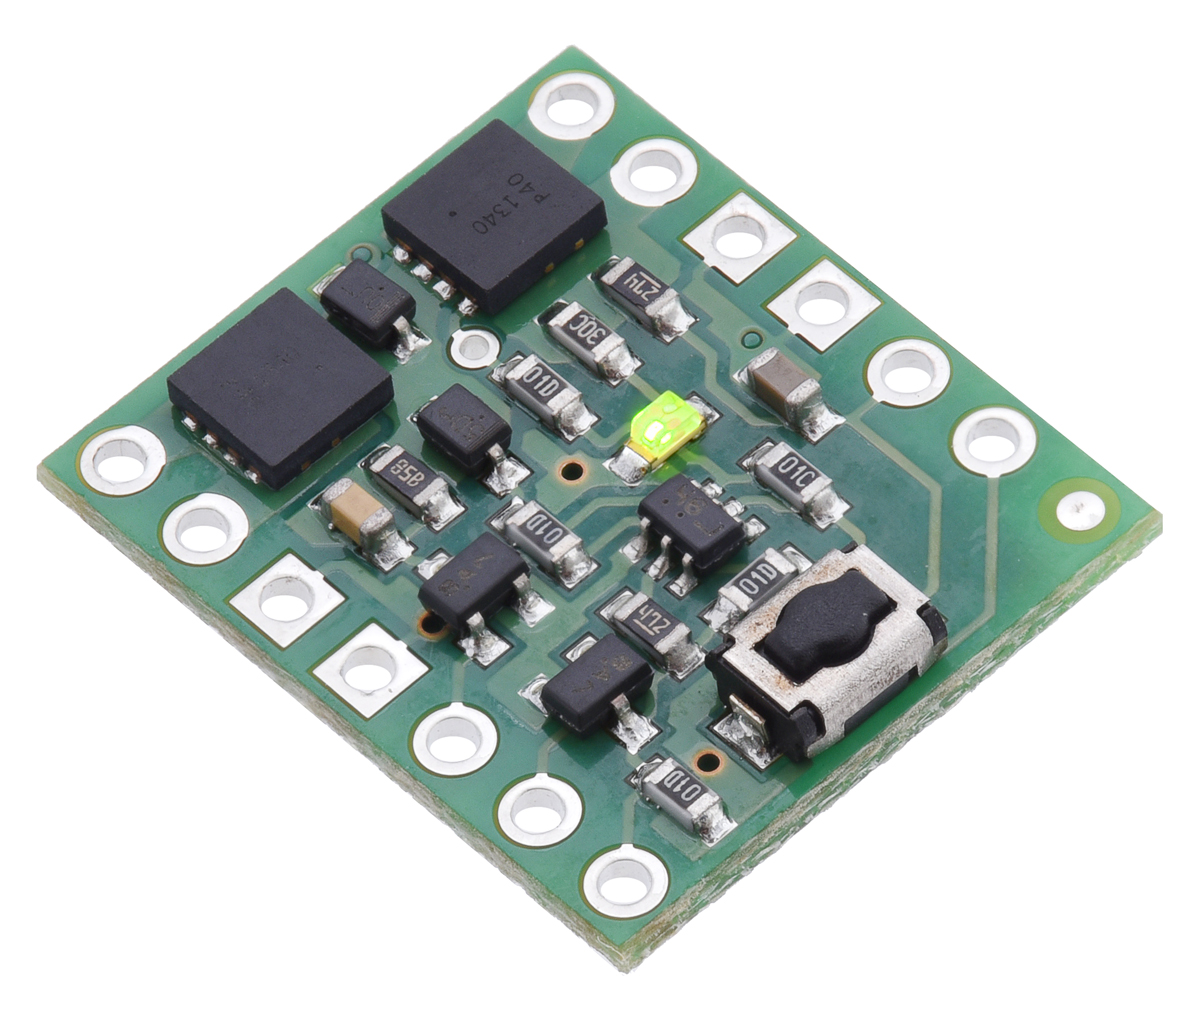
Our power switches do MOSFET-based switching using simple electronic circuits; not having a built-in microcontroller means they are inexpensive and can work over a wide voltage range, for use in a variety of projects. Unlike many soft-power solutions, they are also designed to turn completely off – no current flows in the off state except whatever can leak through the transistors (around 10 nA or less).
We have been selling switches like these for a long time, both as discrete boards and incorporated into other products. As shown in the pictures above, we have two basic implementations:
- A slide switch that directly controls a MOSFET: the board stays permanently off or on depending on the state of the switch. (Used on the Zumo robots and the A-Star 32U4 Robot Controller.)
- A momentary button for push-on/push-off control, using a latching circuit. (Used on several Orangutan robot controllers and the 3pi robot.)
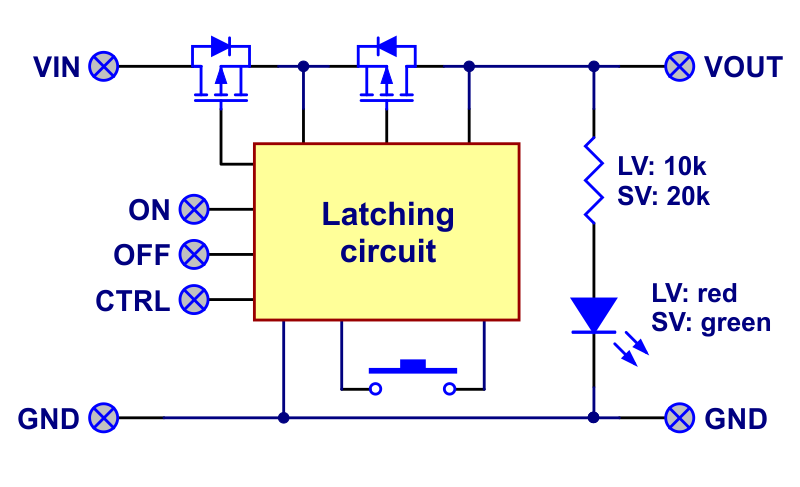 |
Block diagram of the Mini Pushbutton Power Switch with Reverse Voltage Protection. |
|---|
The pushbutton version seems more modern and lends itself better to features like software shutoff, but using it on the 3pi demonstrates one potential disadvantage: if a 3pi crashes into something hard enough to rattle the batteries, the input voltage briefly drops to zero and turns off the switch, stopping the robot. You might consider this a feature, since it prevents further damage to an out-of-control robot. However, when we designed the Zumo, we knew that slamming into things would be standard practice, and a power shutdown in the middle of a sumo match could be disastrous. So our Zumo boards use the slide-switch method of power control.
The new Pololu power switches
Our older pushbutton power switches have long been in need of an upgrade, and now we have two new boards to replace them as well as two entirely new slide-switch versions. The boards have a greatly increased input voltage range: 2.2 V to 20 V on the LV versions or 4.5 V to 40 V on the SV versions, and there are a few other new features:
- An additional MOSFET for reverse voltage protection. This helps protect your project against plugging in batteries or a power supply backwards, making a Pololu power switch a great first stage for your project. Please note that it can’t protect you against shorts that bypass the switch. (Ground connections through a benchtop power supply and a USB cable can cause problems, for example.)
- Control pins that allow your microcontroller to turn the switch on and off. The simpler slide-switch versions just have a single input that turns the switch on, while our pushbutton switches provide inputs for latching the switch either on or off as well as an input (CTRL) that can assert either state.
- Additional connection points so that you can connect your own button or switch (e.g. wire it to the outside of your case) in addition to the pre-installed one.
Note that the form factor is different and the current limits are lower than our older pushbutton power switches, so these are not drop-in replacements.
In summary, don’t be one of those people who has to plug and unplug wires to turn his project on and off. Take a look at the detailed specifications on product pages to select the right switch for your application!
Related products


New product: Pololu Ball Caster with 1″ Plastic Ball and Ball Bearings
|
|
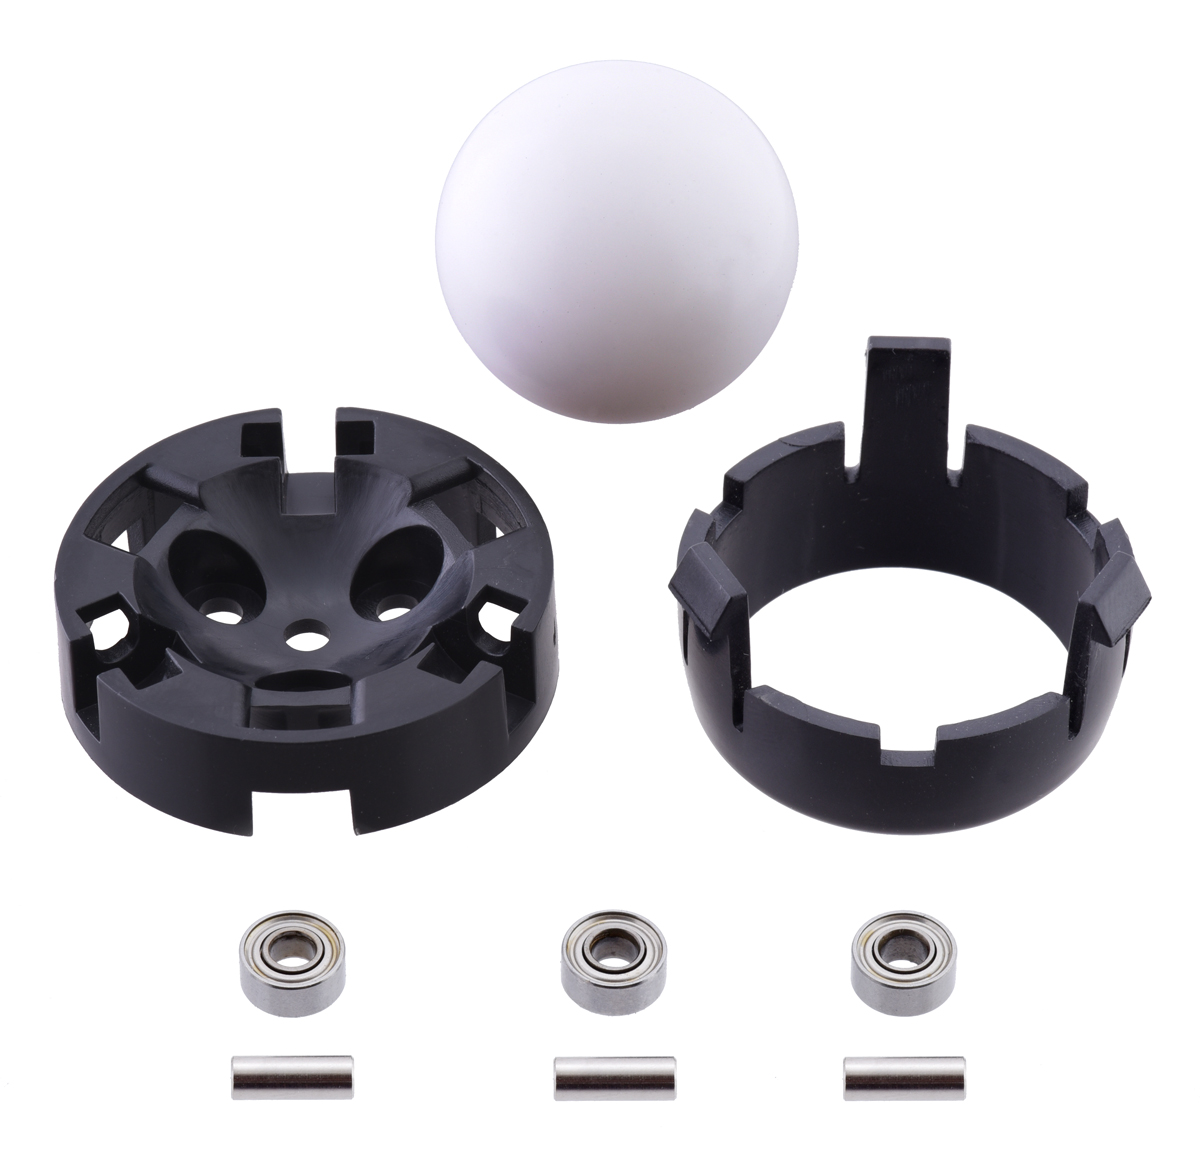
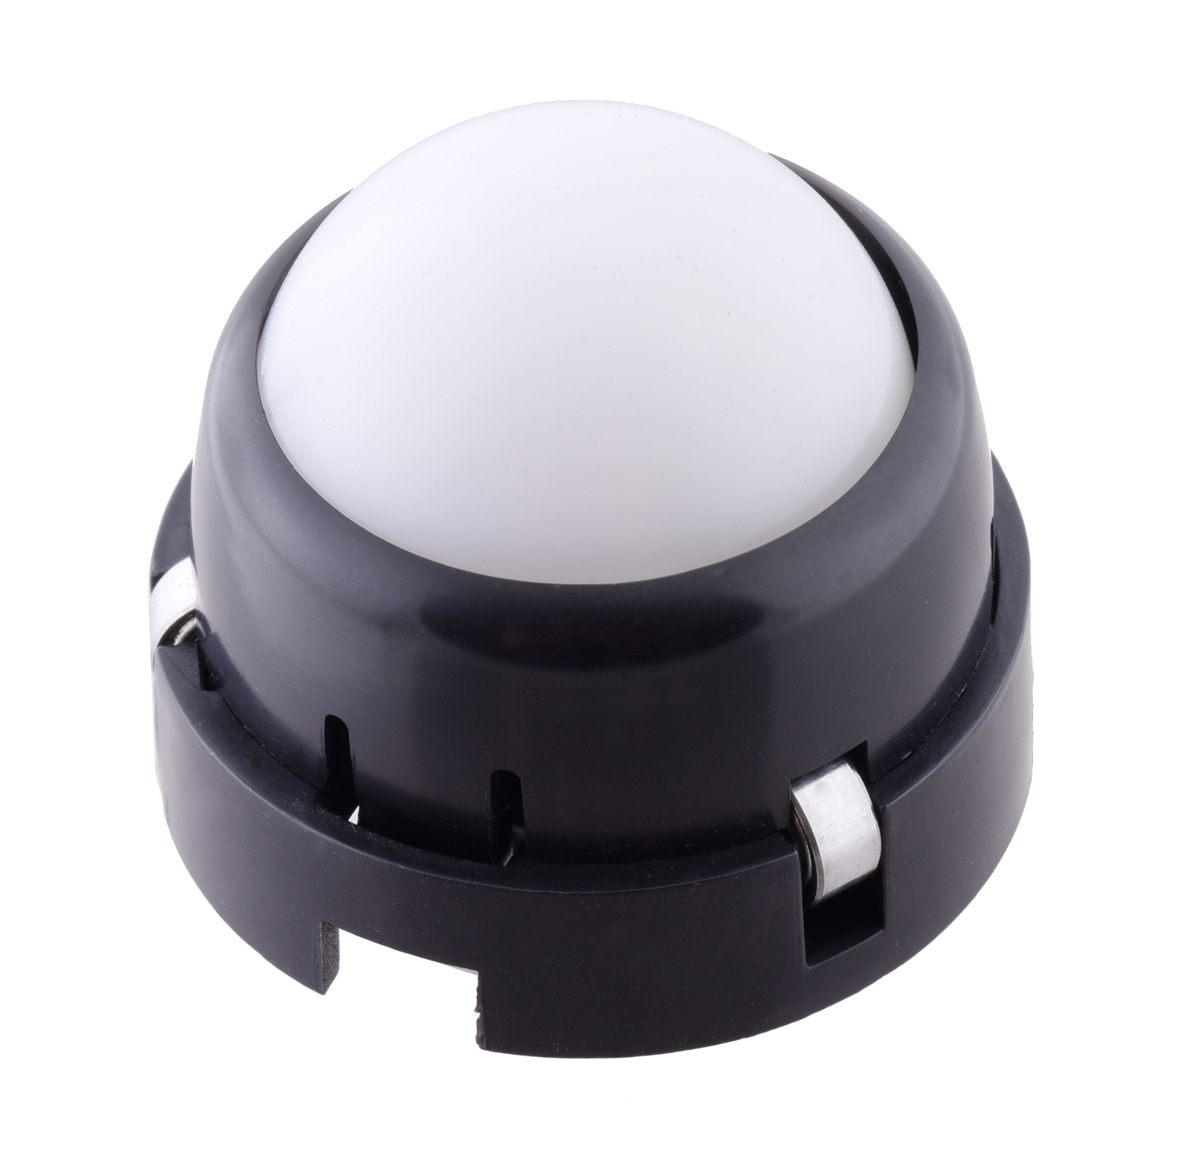
Our ball caster with 1″ plastic ball is now available with ball bearings instead of plastic rollers for even better performance!
Related products


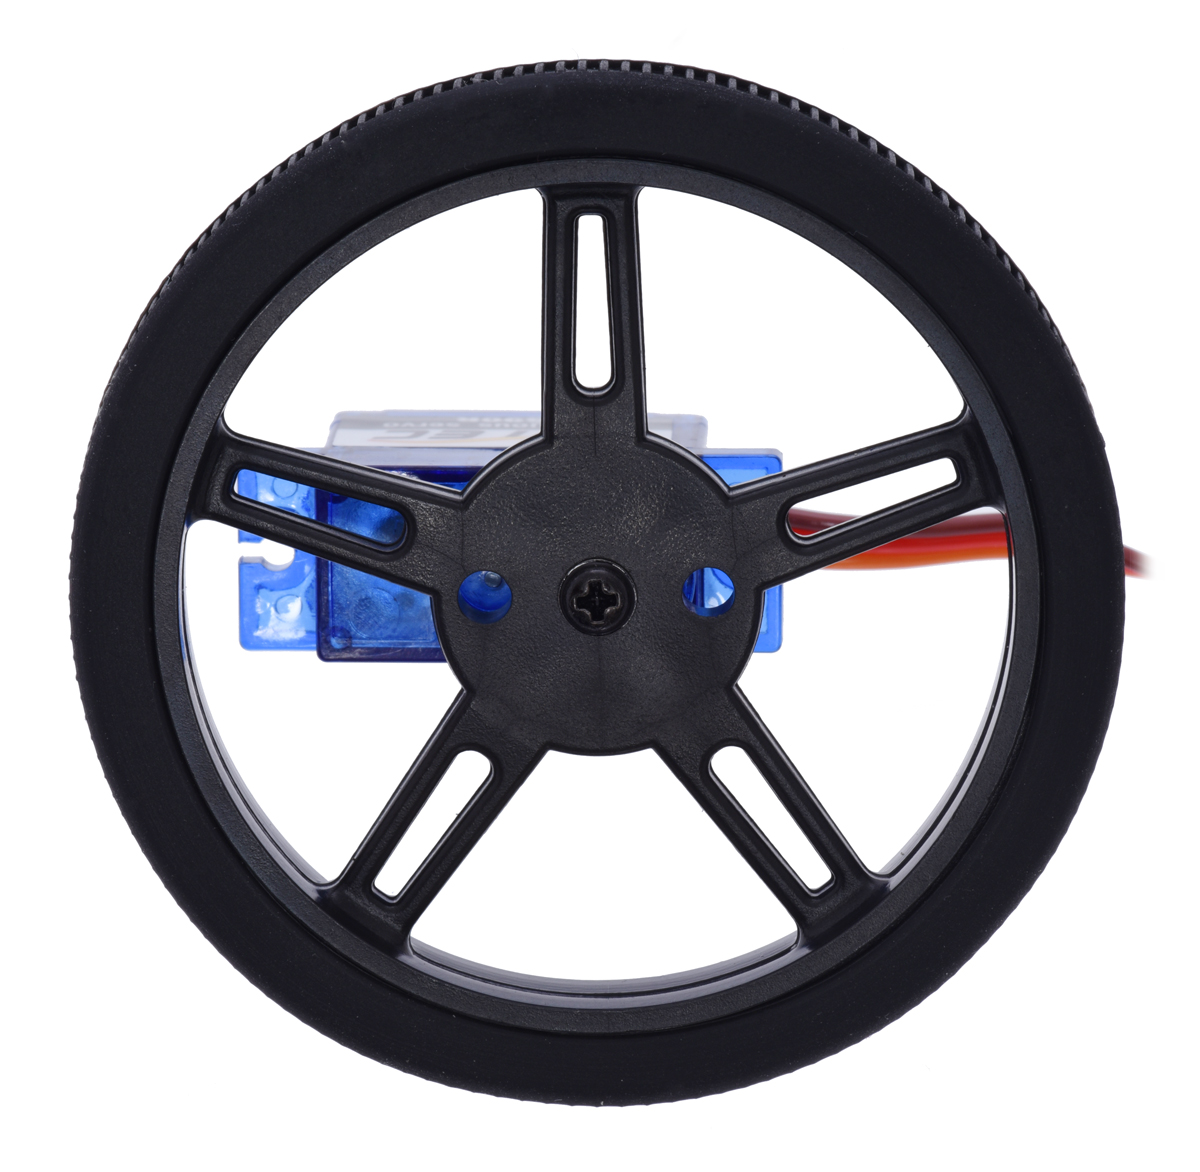
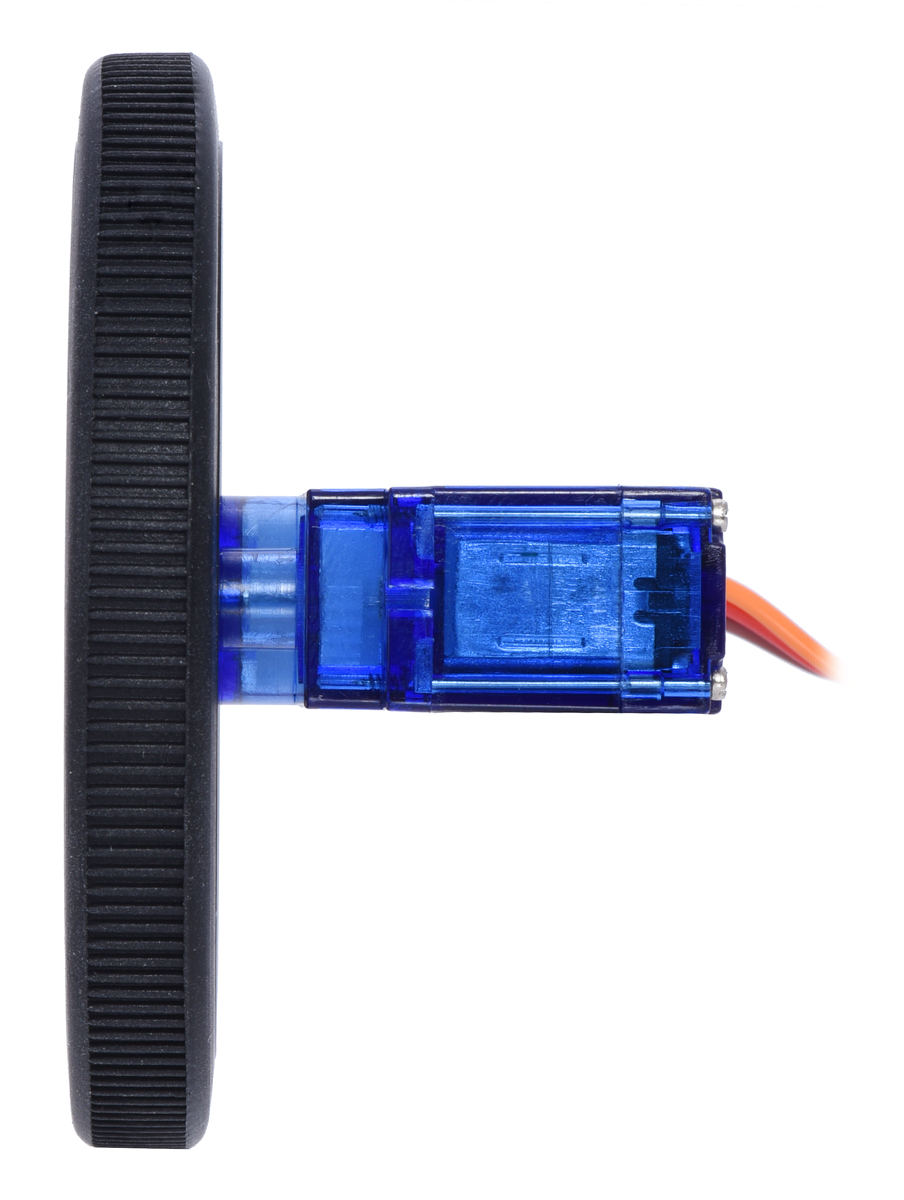
New Pololu 60×8mm wheels for FEETECH FS90R micro servos
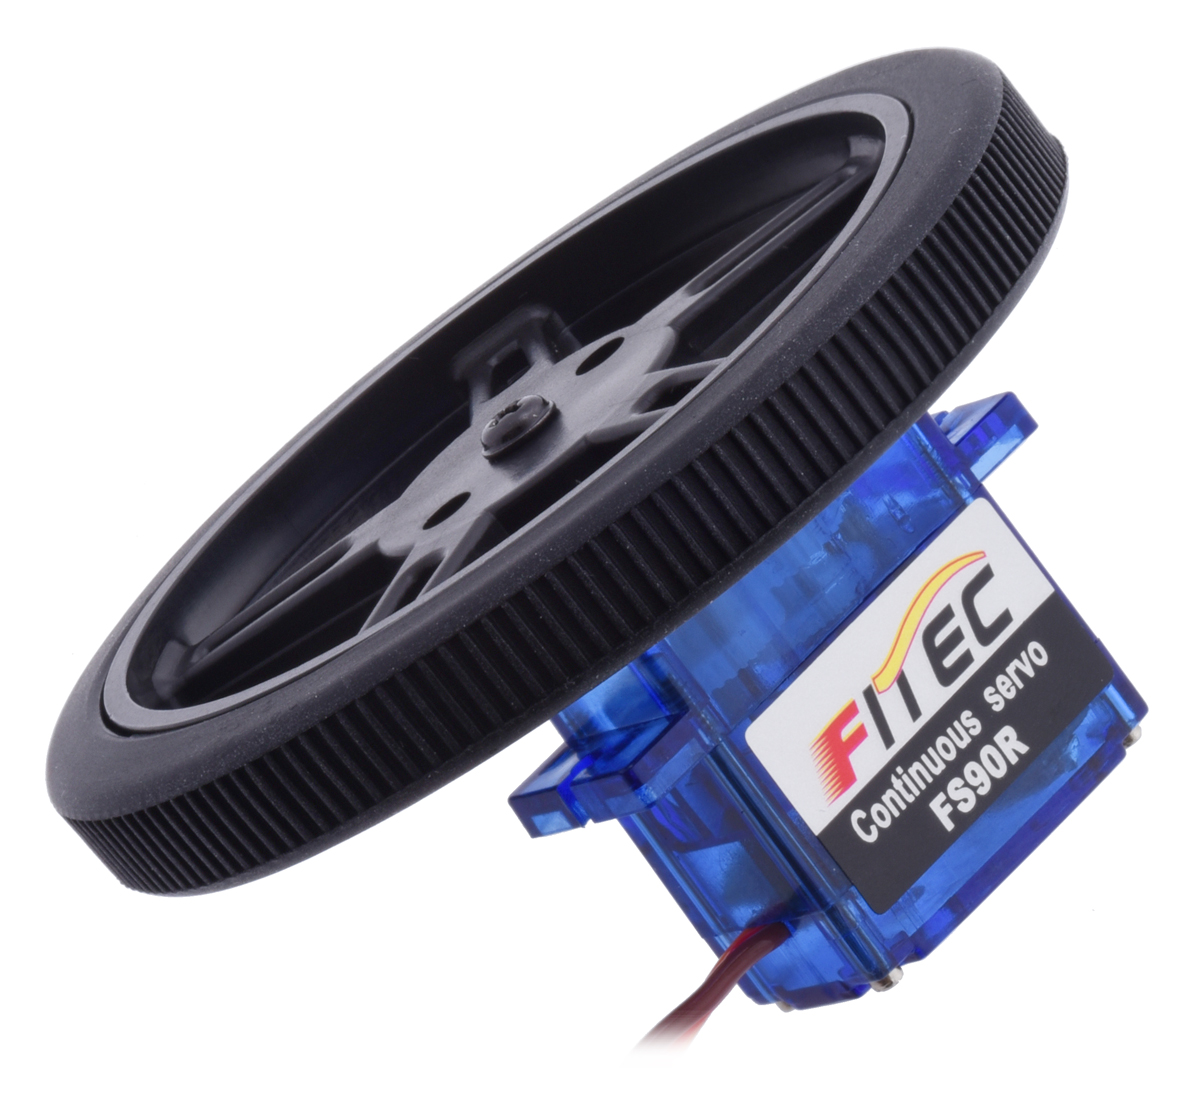 |
Continuous rotation servos like FEETECH’s FS90R are popular actuators for beginner robots because of their low cost and ease of use—since the motor controller is built right into the actuator, it can be controlled directly from a microcontroller or RC receiver. However, to complete the drive system, you need wheels, and that is something that we have not been able to offer for the FS90R until today. I am excited to introduce the new 60×8mm wheels for FS90R micro servos, which should make it much easier to get your FS90R-based miniature robot rolling.
|
|
All that said, we still generally recommend creating custom drive systems out of individual motor drivers, DC motors, and wheels over continuous rotations servos, since that gives you much more control over performance. Continuous rotation servos are more appropriate for projects where cost and simplicity are more important than performance, and with these wheels and the FS90R, this approach is simpler and more affordable than ever.
Related products


Video: LVBots August 2015 mini-sumo competition
LVBots held a mini-sumo competition at Pololu on August 20. The goal of mini-sumo is to make an autonomous robot that pushes the other robot out of a 30″ ring, but this is not BattleBots: the robots cannot be controlled by a human, and they are not supposed to damage one another. Eighteen robots faced off in our head-to-head double elimination tournament. The video above shows some of the more entertaining matches and the full results of the contest.
The robots have become more sophisticated since our previous mini-sumo competition. Our new Zumo 32U4 Robot, which came out in the meantime, improves on the Zumo Robot for Arduino by adding IR sensors and encoders. This allowed some entries to do well just by programming a Zumo 32U4 robot (for example David’s Zumo Red). Also, people generally have gotten better at fabricating and programming their robots. Some people used 3D CAD programs to design 3D-printed and laser-cut chassis.
Kevin’s Roku won the competition, with the consensus being that Kevin won because he did not have enough time to make a gimmicky robot (like his line following hovercraft). His compact design used our new A-Star 32U4 robot controller and Sharp GP2Y0A60SZ 10 to 150 cm analog distance sensors, which kept the wiring minimal and the sight range long. Ben’s robot, The Big Ben, was unchanged since competing in the previous contest, yet it managed to do much better this time around, taking second place (though Brian was operating the robot in Ben’s absence, so he might want to claim some of the credit). Paul’s reigning champion, Paul Sumo 2, took third place despite also remaining unchanged since the last competition.
 |
Update: Here are posts about some of the robots in the contest:
- Grant’s mini sumo robot: Rattata
- Patrick’s mini sumo robot: Covert Ops
- Kevin’s mini-sumo robot: Roku
- Brandon’s mini sumo robot: Black Mamba
Are you in the Las Vegas area? Check out the LVBots Meetup page to get involved.
Related products


Pololu Labor Day weekend sale

We are having a big Labor Day sale throughout the weekend, with 15% discounts on over 700 products when you use the coupon code LABORDAY15. Note that we will be closed on Monday, so orders placed after 2 PM Pacific Time on Friday, September 4 will be shipped on Tuesday, September 8.
For more information, including all of the sale items, see the sale page.
Raspberry Pi Solar Tracker
Jay Doscher posted on his blog at Polyideas.com about his 2-axis solar tracker designed to provide the optimal amount of power output with a portable setup. In the build, Jay uses a Raspberry Pi A+ topped with our Dual MC33926 Motor Driver for Raspberry Pi to control the motion of the system, which is accomplished using a Concentric 4″ linear actuator with feedback. In lieu of a GPS unit, the tracker uses hard-coded longitude and latitude coordinates with Pysolar, an open-source Python library, to calculate the sun’s predicted position. The system keeps the solar panel pointed at the calculated position with the help of a Razor IMU from SparkFun. The video above is time lapse footage of a mechanical test of the system that shows the unit tracking the sun (although it is indoors).
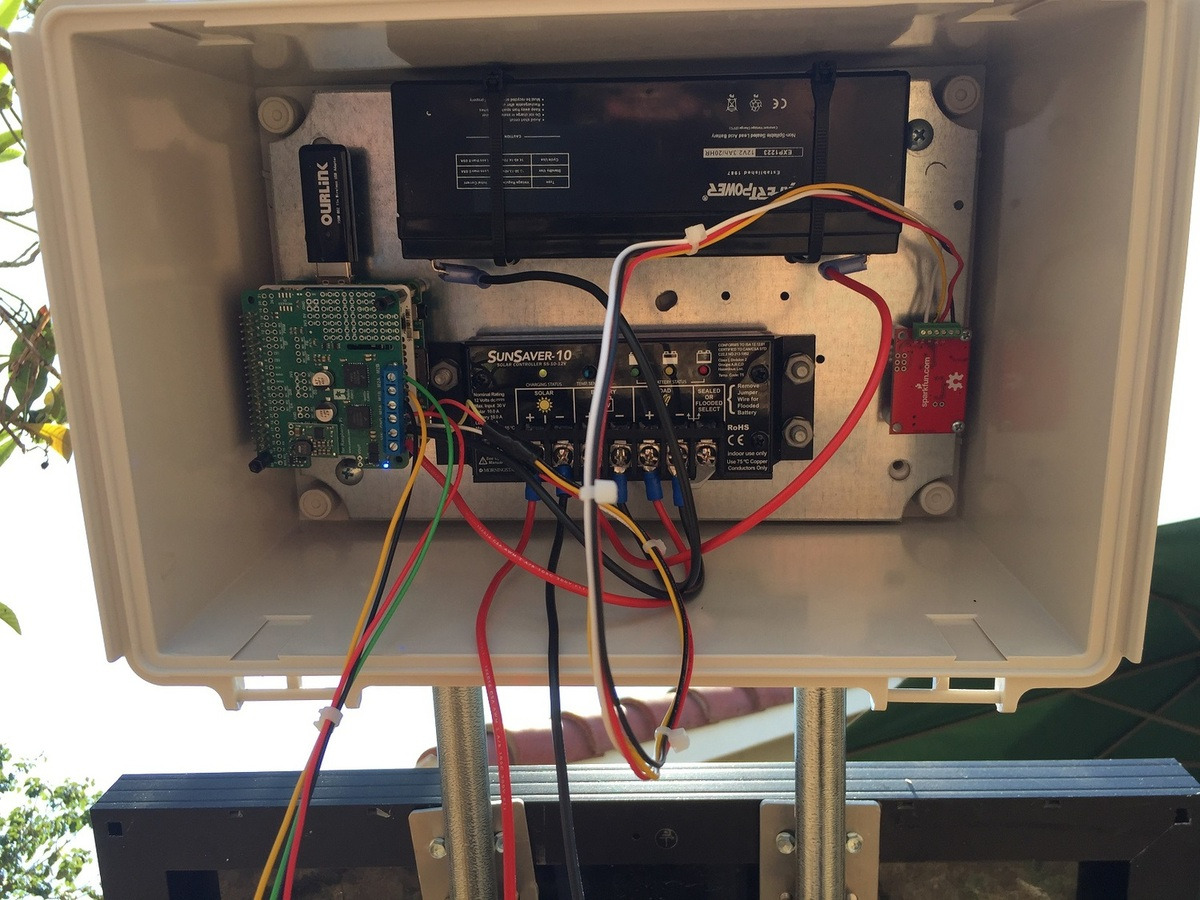 |
In the picture above, you can see the Raspberry Pi and dual MC33926 driver board on the left and the IMU on the right. The Dual MC33926 Driver for Raspberry Pi fits on top of the Raspberry Pi mainboard, eliminating a lot of wiring and making it easy to use while also leaving the setup looking clean and organized. Additionally, the Dual MC33926 Driver for Raspberry Pi provides a set of three through-holes where an appropriate voltage regulator can be conveniently connected, allowing the motor supply to also power the Raspberry Pi. You can see one of our D24V10F5 switching step-down regulators mounted on top of the dual MC33926 driver board to serve this purpose in the picture above as well.
 |
This project was also a 2015 Hackaday Prize entry and made it to the quarterfinals!
For more information about this project, see Jay’s blog post, which has additional photos and details including a parts list and links to his code.
Related products


Zippy: an Arduino Nano-based balancing robot
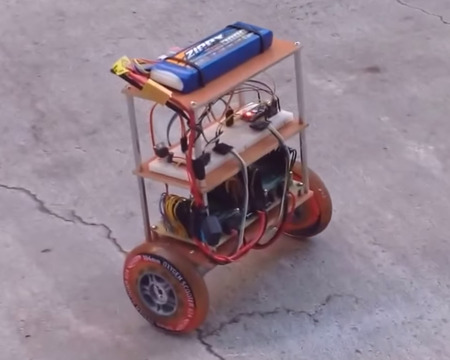 |
Zippy is an RC balancing robot created by Larry McGovern. It uses an Arduino Nano to read pulses from an RC receiver and accelerometer and gyroscope data from an MPU6050. After processing that information, the Nano commands two ST motor driver development boards, which each control a 30:1 37D mm gearmotor with encoder. The whole system is powered by a 3S LiPo (brand: Zippy, of course!). You can watch Zippy scoot around on pavement below:
In the video description, Larry mentions that he modeled Zippy after the Balanduino robot, but we would like to highlight one noticeable difference: he used his own pair of wheels, which are mated to the output shaft of his gearmotors with our 6mm scooter wheel adapters! I had a major role in designing these, so on a personal note, it is especially exciting to see someone get a good use out of them. (It also looks like our stamped aluminum L brackets are used to mount the motors.)
Related products


Home | Forum | Blog | Support | Ordering Information | Wish Lists | Distributors | BIG Order Form | About | Contact
© 2001–2024 Pololu Corporation


